For this solution created by 2 steps:
-
Create a link list in SharePoint Site and call Script Editor to generate the list View using SharePoint COM Script/Jquery.
-
Create a App solutions (SharePoint-Hosted) that creates a custom Link List and integrate a View with the created SharePoint COM Script/Jquery
-
Create a Client Web Part (Host Web) to List the View using the Script List using REST

Expected Result:

First Step:
Create the Script using Jquery(Accordion)/COM to call List Data in SharePoint Site
Add Custom View using Jquery and SharePoint Site
For this example have selected the “Accordion” Jquery plug-in example to apply in the SharePoint 2013 enviroment, this example will be use to display List data and automatic sort order using Drag and Drop.

Access to your SharePoint Site and add a “Links App”, include the following column “OrderLink” as Numeric and default value ‘0’.
The Second step will be add a Script Editor in the Home Page and include the script to create our new View.

Increase the Textbox in Script Editor
One question people make about the Script Editor and how small it is, well this script is normally use from external references for example:“Embeded Youtube Videos” or references to embed Office Documents.
If you want to increase height because you are adding a very extensive script can recomend to include in the Snippet a style for the class “.ms-rte-embeddialog-textarea” and increase the height, for this example was increase to 500px.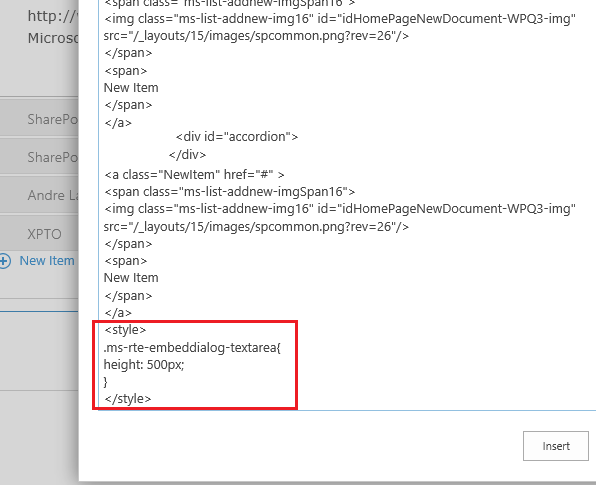
PS:This is a example, my recomendation is to use a minify Javascript file and make a reference to him.
Include the Jquery reference files
To work with the “Accordion” Plug-in, some references needs to be made, for this case i added some JS in the SiteAssets Library, but for the support file change to the existing UI page.
Define the Look and Feel of the HTML that will be generated dynamically by JS and changed by the Accordion Plug-in.


Define the Method where will be call that changes the look and feel as “Accordion”.
The Property “ListID=’ListitemID’” will be very important when a item is deleted, the Jquery will delete the DIV Tag and will not be needed a refresh of the Page.
For this example have 2 Methods:
-
Users will be able to expand and collapse items.
-
User will be able to reorder the items if they have permissions

There are some variables that can be changed in order to response other List name, filter Column or row Limit.

You can download the file with all the Script in the following link.
PS: this code was made in 15 minutes and was not optimized.
After the inclusion of the code you should be able to add new items, edit, delete and reorder the position of the items in a more flexible way and the the final result should be something like this:
There is also the possibility to include the JS script code in the View to change the Out of the Box Look and Feel to our new View (needs to be made some changes, that will be shown in the app Solution).
Reoder of the Listitem
After you drag and drop the columns in the new View the OrderLink will be update with the new Order like is shown in the following image. Step 2:
Step 2:Create a SharePoint App to create new View with Jquery
The second part of this example is the creating of a SharePoint app call “Custom Links”, using “SharePoint-Host” as support to our application.
This app will create a link in the Main site call “Custom Links” where will redirect to our custom Support Application.

The first thing that we should do is to open and create our App for SharePoint 2013.
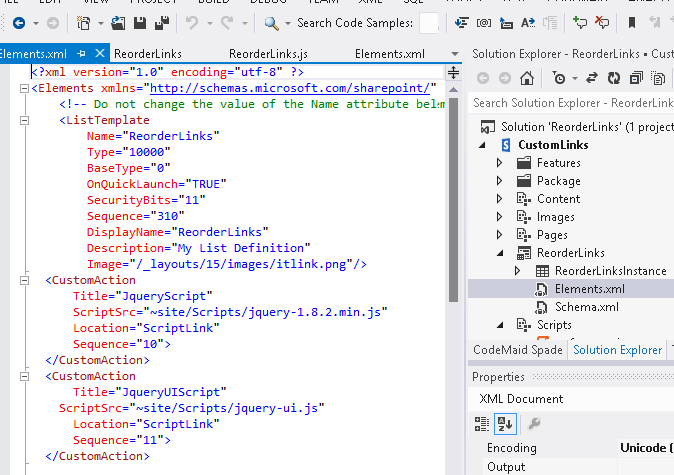
This Solution will include the following Main Files:
-
Pages
-
WPReorder Web Part
-
WPReorder.ASPX
-
-
SharePoint List
-
ListTemplate: 10000
-
Custom Action:ScriptLink :jquery-1.8.2.min.js
-
Custom Action:ScriptLink :jquery-ui.js
-
-
Images
-
Scripts
-
(OOB Visual Studio Files)
-
Jquery* (Files)
-
ReorderLinks.js
-
WPReorder.js
-
-
AppManifest.xml

After the Project is created, Visual Studio 2012 will add some default files and pages that can be use to create our App.
For this example the AppManifest.xml was changed to change the Starting Page to our custom View
The second action will be create the Custom List call “ReorderLinks”.

After the Support files are created, you will be able to make some changes in the List definition and proportieslike adding fields.
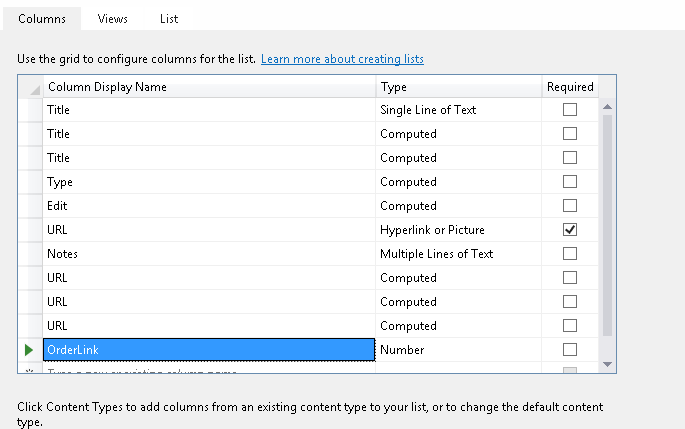
One option the graphical option dont have is the definition of the Default Value for the Fields, for this example “OrderLink, for that you will need to change the Schema.xml file and include the following XML “0”.
Another option of the Visual Studio 2012 List Management is the definition of the Views and the fields to be Displayed.
Here is very useful to define which one should be the Default.
For this example was created 2 Views:
-
All Items
-
Reorder

One thing that should be done after the creation of the Views, it’s the option on how the View will be Display, for example you are able to use Javascript file to add your custom View “like the example bellow” or to use the .XSL to customize the Look and Feel of the View.
For this example i have define don’t want to use the OOB “main.xsl” but a custom JS file call “ReoderLinks”.
Another thing that was included in the Schema of the List was the inclusion of the Jquery support files to be accessible in the “SharePoint-Host” Site.

After the definition of the List, Views and support Files, we can start to create the code that will change the View “Reorder” Look and Feel.
SharePoint 2013 has new class that can be use to override the existing style and use the Context to access some List Content.
You can find a example in the following Microsoft Article.
This example is creating the HTML tags to include a custom CSS and create the new Look and Feel and include the Jquery plug-in “Accordion” in the New View.

Change Look and Feel of Custom View
The method to make the change is the Method CustomItem(ctx). This Method brings the Object ctx associated with the properties of the List, if you need to know some of the properties you can use “Chrome > Sources>Reoder.aspx”, this page gives a look of the ctx(List) properties.


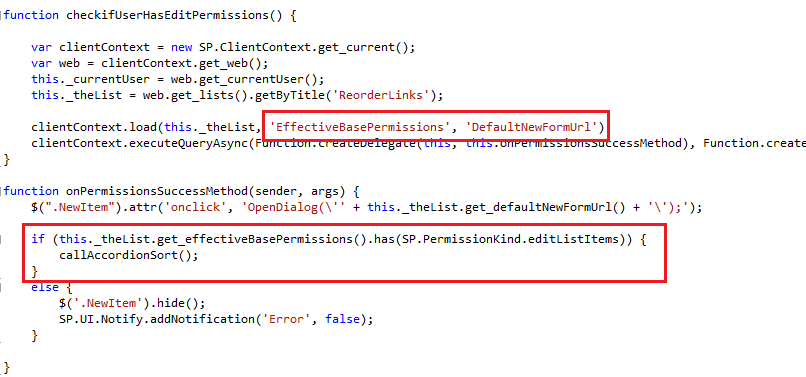
Validate Permissions
This code will validate if the user has permission to edit the List content and more functionalities like add/Edit/Delete/reordering of the List.
Reordering of the Items
The next code will update the reordering of the List, with a new Method and my recomendation will be to use “SP.SOD.executeFunc” to ensure the SharePoint Client Object files are included in the Page.


By Default the Values are 0 after the Reordering using drag and drop will have a different ordering.

Delete of Item
For the Delete Action was made a Jquery function to delete DIV Tag of the ListItemID.
Change the View
Since we are working over a List we are able to select the Ribbon option associated with the List and change the View to a different View.

Create a Client Web Part
This Client Web Part will support to display the content of the “Reoder Link” from the “SharePoint-Host” to the Production “SharePoint Site” using a Iframe.
This Web Part will have the “Accordion” look and Feel but will not have administration actions, because it’s made in a Iframe.
The fist thing made in Visual Studio was to include a Client Web Part Feature.
This feature will create a ASPX page, with some OOB HTMl Tag and references.
for this example was included a new File “WPReoder.js” where will be the Script do display the content and the DIV Tag associated with the accordion. 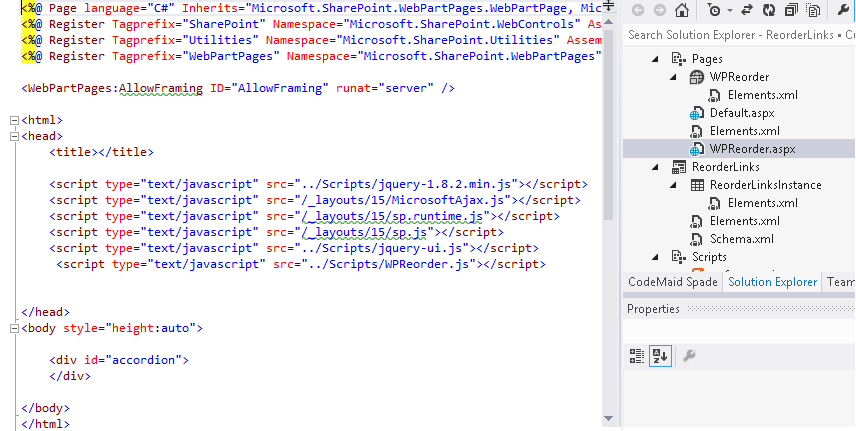
For the Client Web Part example was made some change in the Way to call the Data from the Jquery Call using REST Url.

Using fiddler you can use to make calls to REST Url and validate the content of the JSON and properties Data that returns.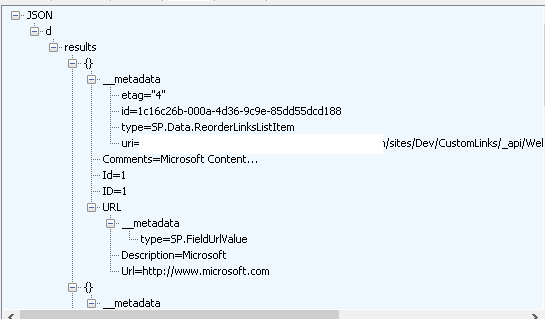
For the output was created a Object Data where all Items are listed and generate the necessary tags.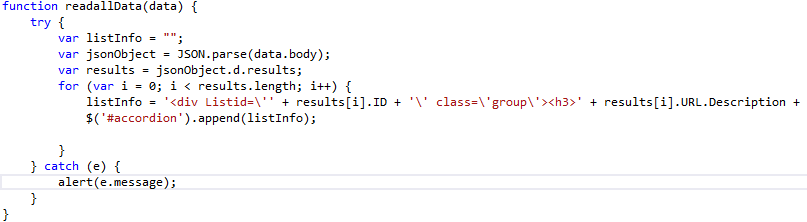
After our SharePoint App is deployed, you will be able to add the App Part in your Production SharePoint Page as a “App part” call Reoder Links.
After you add the Web Part will make the call to “ReoderLinks” List using Cross-Domain code and display the data in the Production SharePoint Site.
The solution can be acessible in the following link.
There are a lot of things talk in the article that needs to be aware when you are using SharePoint Apps but didn’t have time to explain.
