Category Archives: WSP

How to: Create a provider-hosted app for SharePoint to access SAP data via SAP Gateway for Microsoft

You can create an app for SharePoint that reads and writes SAP data, and optionally reads and writes SharePoint data, by using SAP Gateway for Microsoft and the Azure AD Authentication Library for .NET. This article provides the procedures for how you can design the app for SharePoint to get authorized access to SAP.

hero-for-hire_basic-layout_600sap_integration_en_round[1]


The following are prerequisites to the procedures in this article:

sap_integration_en_round[2]

Code sample: SharePoint 2013: Using the SAP Gateway to Microsoft in an app for SharePoint

OAuth 2.0 in Azure AD enables applications to access multiple resources hosted by Microsoft Azure and SAP Gateway for Microsoft is one of them. With OAuth 2.0, applications, in addition to users, are security principals. Application principals require authentication and authorization to protected resources in addition to (and sometimes instead of) users. The process involves an OAuth “flow” in which the application, which can be an app for SharePoint, obtains an access token (and refresh token) that is accepted by all of the Microsoft Azure-hosted services and applications that are configured to use Azure AD as an OAuth 2.0 authorization server. The process is very similar to the way that the remote components of a provider-hosted app for SharePoint gets authorization to SharePoint as described in Creating apps for SharePoint that use low-trust authorization and its child articles. However, the ACS authorization system uses Microsoft Azure Access Control Service (ACS) as the trusted token issuer rather than Azure AD.

Tip Tip
If your app for SharePoint accesses SharePoint in addition to accessing SAP Gateway for Microsoft, then it will need to use both systems: Azure AD to get an access token to SAP Gateway for Microsoft and the ACS authorization system to get an access token to SharePoint. The tokens from the two sources are not interchangeable. For more information, see Optionally, add SharePoint access to the ASP.NET application.

For a detailed description and diagram of the OAuth flow used by OAuth 2.0 in Azure AD, see Authorization Code Grant Flow. (For a similar description, and a diagram, of the flow for accessing SharePoint, see See the steps in the Context Token flow.)

Create the Visual Studio solution

  1. Create an App for SharePoint project in Visual Studio with the following steps. (The continuing example in this article assumes you are using C#; but you can start an app for SharePoint project in the Visual Basic section of the new project templates as well.)
    1. In the New app for SharePoint wizard, name the project and click OK. For the continuing example, use SAP2SharePoint.
    2. Specify the domain URL of your Office 365 Developer Site (including a final forward slash) as the debugging site; for example, https://<O365_domain&gt;.sharepoint.com/. Specify Provider-hosted as the app type. Click Next.
    3. Choose a project type. For the continuing example, choose ASP.NET Web Forms Application. (You can also make ASP.NET MVC applications that access SAP Gateway for Microsoft.) Click Next.
    4. Choose Azure ACS as the authentication system. (Your app for SharePoint will use this system if it accesses SharePoint. It does not use this system when it accesses SAP Gateway for Microsoft.) Click Finish.
  2. After the project is created, you are prompted to login to the Office 365 account. Use the credentials of an account administrator; for example Bob@<O365_domain>.onmicrosoft.com.
  3. There are two projects in the Visual Studio solution; the app for SharePoint proper project and an ASP.NET web forms project. Add the Active Directory Authentication Library (ADAL) package to the ASP.NET project with these steps:
    1. Right-click the References folder in the ASP.NET project (named SAP2SharePointWeb in the continuing example) and select Manage NuGet Packages.
    2. In the dialog that opens, select Online on the left. Enter Microsoft.IdentityModel.Clients.ActiveDirectory in the search box.
    3. When the ADAL library appears in the search results, click the Install button beside it, and accept the license when prompted.
  4. Add the Json.net package to the ASP.NET project with these steps:
    1. Enter Json.net in the search box. If this produces too many hits, try searching on Newtonsoft.json.
    2. When Json.net appears in the search results, click the Install button beside it.
  5. Click Close.

Register your web application with Azure AD

  1. Login into the Azure Management portal with your Azure administrator account.
    Note Note
    For security purposes, we recommend against using an administrator account when developing apps.
  2. Choose Active Directory on the left side.
  3. Click on your directory.
  4. Choose APPLICATIONS (on the top navigation bar).
  5. Choose Add on the toolbar at the bottom of the screen.
  6. On the dialog that opens, choose Add an application my organization is developing.
  7. On the ADD APPLICATION dialog, give the application a name. For the continuing example, use ContosoAutomobileCollection.
  8. Choose Web Application And/Or Web API as the application type, and then click the right arrow button.
  9. On the second page of the dialog, use the SSL debugging URL from the ASP.NET project in the Visual Studio solution as the SIGN-ON URL. You can find the URL using the following steps. (You need to register the app initially with the debugging URL so that you can run the Visual Studio debugger (F5). When your app is ready for staging, you will re-register it with its staging Azure Web Site URL. Modify the app and stage it to Azure and Office 365.)
    1. Highlight the ASP.NET project in Solution Explorer.
    2. In the Properties window, copy the value of the SSL URL property. An example is https://localhost:44300/.
    3. Paste it into the SIGN-ON URL on the ADD APPLICATION dialog.
  10. For the APP ID URI, give the application a unique URI, such as the application name appended to the end of the SSL URL; for example https://localhost:44300/ContosoAutomobileCollection.
  11. Click the checkmark button. The Azure dashboard for the application opens with a success message.
  12. Choose CONFIGURE on the top of the page.
  13. Scroll to the CLIENT ID and make a copy of it. You will need it for a later procedure.
  14. In the keys section, create a key. It won’t appear initially. Click SAVE at the bottom of the page and the key will be visible. Make a copy of it. You will need it for a later procedure.
  15. Scroll to permissions to other applications and select your SAP Gateway for Microsoft service application.
  16. Open the Delegated Permissions drop down list and enable the boxes for the permissions to the SAP Gateway for Microsoft service that your app for SharePoint will need.
  17. Click SAVE at the bottom of the screen.

Configure the application to communicate with Azure AD

  1. In Visual Studio, open the web.config file in the ASP.NET project.
  2. In the <appSettings> section, the Office Developer Tools for Visual Studio have added elements for the ClientID and ClientSecret of the app for SharePoint. (These are used in the Azure ACS authorization system if the ASP.NET application accesses SharePoint. You can ignore them for the continuing example, but do not delete them. They are required in provider-hosted apps for SharePoint even if the app is not accessing SharePoint data. Their values will change each time you press F5 in Visual Studio.) Add the following two elements to the section. These are used by the application to authenticate to Azure AD. (Remember that applications, as well as users, are security principals in OAuth-based authentication and authorization systems.)
    <add key="ida:ClientID" value="" />
    <add key="ida:ClientKey" value="" />
    
  3. Insert the client ID that you saved from your Azure AD directory in the earlier procedure as the value of the ida:ClientID key. Leave the casing and punctuation exactly as you copied it and be careful not to include a space character at the beginning or end of the value. For the ida:ClientKey key use the key that you saved from the directory. Again, be careful not to introduce any space characters or change the value in any way. The <appSettings> section should now look something like the following. (The ClientId value may have a GUID or an empty string.)
    <appSettings>
      <add key="ClientId" value="" />
      <add key="ClientSecret" value="LypZu2yVajlHfPLRn5J2hBrwCk5aBOHxE4PtKCjIQkk=" />
      <add key="ida:ClientID" value="4da99afe-08b5-4bce-bc66-5356482ec2df" />
      <add key="ida:ClientKey" value="URwh/oiPay/b5jJWYHgkVdoE/x7gq3zZdtcl/cG14ss=" />
    </appSettings>
    
    NoteNote
    Your application is known to Azure AD by the “localhost” URL you used to register it. The client ID and client key are associated with that identity. When you are ready to stage your application to an Azure Web Site, you will re-register it with a new URL.
  4. Still in the appSettings section, add an Authority key and set its value to the Office 365 domain (some_domain.onmicrosoft.com) of your organizational account. In the continuing example, the organizational account is Bob@<O365_domain>.onmicrosoft.com, so the authority is <O365_domain>.onmicrosoft.com.
    <add key="Authority" value="<O365_domain>.onmicrosoft.com" />
    
  5. Still in the appSettings section, add an AppRedirectUrl key and set its value to the page that the user’s browser should be redirected to after the ASP.NET app has obtained an authorization code from Azure AD. Usually, this is the same page that the user was on when the call to Azure AD was made. In the continuing example, use the SSL URL value with “/Pages/Default.aspx” appended to it as shown below. (This is another value that you will change for staging.)
    Copy
    <add key="AppRedirectUrl" value="https://localhost:44322/Pages/Default.aspx" />
    
  6. Still in the appSettings section, add a ResourceUrl key and set its value to the APP ID URI of SAP Gateway for Microsoft (not the APP ID URI of your ASP.NET application). Obtain this value from the SAP Gateway for Microsoft administrator. The following is an example.
    <add key="ResourceUrl" value="http://<SAP_gateway_domain>.cloudapp.net/" />
    

    The <appSettings> section should now look something like this:

    <appSettings>
      <add key="ClientId" value="06af1059-8916-4851-a271-2705e8cf53c6" />
      <add key="ClientSecret" value="LypZu2yVajlHfPLRn5J2hBrwCk5aBOHxE4PtKCjIQkk=" />
      <add key="ida:ClientID" value="4da99afe-08b5-4bce-bc66-5356482ec2df" />
      <add key="ida:ClientKey" value="URwh/oiPay/b5jJWYHgkVdoE/x7gq3zZdtcl/cG14ss=" />
      <add key="Authority" value="<O365_domain>.onmicrosoft.com" />
      <add key="AppRedirectUrl" value="https://localhost:44322/Pages/Default.aspx" />
      <add key="ResourceUrl" value="http://<SAP_gateway_domain>.cloudapp.net/" />
    </appSettings>
    
  7. Save and close the web.config file.
    Tip Tip
    Do not leave the web.config file open when you run the Visual Studio debugger (F5). The Office Developer Tools for Visual Studio change the ClientId value (not the ida:ClientID) every time you press F5. This requires you to respond to a prompt to reload the web.config file, if it is open, before debugging can execute.

Add a helper class to authenticate to Azure AD

  1. Right-click the ASP.NET project and use the Visual Studio item adding process to add a new class file to the project named AADAuthHelper.cs.
  2. Add the following using statements to the file.
    using Microsoft.IdentityModel.Clients.ActiveDirectory;
    using System.Configuration;
    using System.Web.UI;
    
    
  3. Change the access keyword from public to internal and add the static keyword to the class declaration.
    internal static class AADAuthHelper
    
  4. Add the following fields to the class. These fields store information that your ASP.NET application uses to get access tokens from AAD.
    private static readonly string _authority = ConfigurationManager.AppSettings["Authority"];
    private static readonly string _appRedirectUrl = ConfigurationManager.AppSettings["AppRedirectUrl"];
    private static readonly string _resourceUrl = ConfigurationManager.AppSettings["ResourceUrl"];     
            
    private static readonly ClientCredential _clientCredential = new ClientCredential(
                               ConfigurationManager.AppSettings["ida:ClientID"],
                               ConfigurationManager.AppSettings["ida:ClientKey"]);
    
    private static readonly AuthenticationContext _authenticationContext = 
                new AuthenticationContext("https://login.windows.net/common/" + 
                                          ConfigurationManager.AppSettings["Authority"]);
    
  5. Add the following property to the class. This property holds the URL to the Azure AD login screen.
    private static string AuthorizeUrl
    {
        get
        {
            return string.Format("https://login.windows.net/{0}/oauth2/authorize?response_type=code&redirect_uri={1}&client_id={2}&state={3}",
                _authority,
                _appRedirectUrl,
                _clientCredential.OwnerId,
                Guid.NewGuid().ToString());
        }
    }
    
    
  6. Add the following properties to the class. These cache the access and refresh tokens and check their validity.
    public static Tuple<string, DateTimeOffset> AccessToken
    {
        get {
    return HttpContext.Current.Session["AccessTokenWithExpireTime-" + _resourceUrl] 
           as Tuple<string, DateTimeOffset>;
        }
    
        set { HttpContext.Current.Session["AccessTokenWithExpireTime-" + _resourceUrl] = value; }
    }
    
    private static bool IsAccessTokenValid
    {
       get 
       { 
           return AccessToken != null &&
           !string.IsNullOrEmpty(AccessToken.Item1) &&
           AccessToken.Item2 > DateTimeOffset.UtcNow;
       }
    }
    
    private static string RefreshToken
    {
        get { return HttpContext.Current.Session["RefreshToken" + _resourceUrl] as string; }
        set { HttpContext.Current.Session["RefreshToken-" + _resourceUrl] = value; }
    }
    
    private static bool IsRefreshTokenValid
    {
        get { return !string.IsNullOrEmpty(RefreshToken); }
    }
    
    
  7. Add the following methods to the class. These are used to check the validity of the authorization code and to obtain an access token from Azure AD by using either an authentication code or a refresh token.
    private static bool IsAuthorizationCodeNotNull(string authCode)
    {
        return !string.IsNullOrEmpty(authCode);
    }
    
    private static Tuple<Tuple<string,DateTimeOffset>,string> AcquireTokensUsingAuthCode(string authCode)
    {
        var authResult = _authenticationContext.AcquireTokenByAuthorizationCode(
                    authCode,
                    new Uri(_appRedirectUrl),
                    _clientCredential,
                    _resourceUrl);
    
        return new Tuple<Tuple<string, DateTimeOffset>, string>(
                    new Tuple<string, DateTimeOffset>(authResult.AccessToken, authResult.ExpiresOn), 
                    authResult.RefreshToken);
    }
    
    private static Tuple<string, DateTimeOffset> RenewAccessTokenUsingRefreshToken()
    {
        var authResult = _authenticationContext.AcquireTokenByRefreshToken(
                             RefreshToken,
                             _clientCredential.OwnerId,
                             _clientCredential,
                             _resourceUrl);
    
        return new Tuple<string, DateTimeOffset>(authResult.AccessToken, authResult.ExpiresOn);
    }
    
    
  8. Add the following method to the class. It is called from the ASP.NET code behind to obtain a valid access token before a call is made to get SAP data via SAP Gateway for Microsoft.
    internal static void EnsureValidAccessToken(Page page)
    {
        if (IsAccessTokenValid) 
        {
            return;
        }
        else if (IsRefreshTokenValid) 
        {
            AccessToken = RenewAccessTokenUsingRefreshToken();
            return;
        }
        else if (IsAuthorizationCodeNotNull(page.Request.QueryString["code"]))
        {
            Tuple<Tuple<string, DateTimeOffset>, string> tokens = null;
            try
            {
                tokens = AcquireTokensUsingAuthCode(page.Request.QueryString["code"]);
            }
            catch 
            {
                page.Response.Redirect(AuthorizeUrl);
            }
            AccessToken = tokens.Item1;
            RefreshToken = tokens.Item2;
            return;
        }
        else
        {
            page.Response.Redirect(AuthorizeUrl);
        }
    }
    
Tip Tip
The AADAuthHelper class has only minimal error handling. For a robust, production quality app for SharePoint, add more error handling as described in this MSDN node: Error Handling in OAuth 2.0.

Create data model classes

  1. Create one or more classes to model the data that your app gets from SAP. In the continuing example, there is just one data model class. Right-click the ASP.NET project and use the Visual Studio item adding process to add a new class file to the project named Automobile.cs.
  2. Add the following code to the body of the class:
    public string Price;
    public string Brand;
    public string Model;
    public int Year;
    public string Engine;
    public int MaxPower;
    public string BodyStyle;
    public string Transmission;
    

Add code behind to get data from SAP via the SAP Gateway for Microsoft

  1. Open the Default.aspx.cs file and add the following using statements.
    using System.Net;
    using Newtonsoft.Json.Linq;
    
  2. Add a const declaration to the Default class whose value is the base URL of the SAP OData endpoint that the app will be accessing. The following is an example:
    private const string SAP_ODATA_URL = @"https://<SAP_gateway_domain>.cloudapp.net:8081/perf/sap/opu/odata/sap/ZCAR_POC_SRV/";
    
  3. The Office Developer Tools for Visual Studio have added a Page_PreInit method and a Page_Load method. Comment out the code inside the Page_Load method and comment out the whole Page_Init method. This code is not used in this sample. (If your app for SharePoint is going to access SharePoint, then you restore this code. See Optionally, add SharePoint access to the ASP.NET application.)
  4. Add the following line to the top of the Page_Load method. This will ease the process of debugging because your ASP.NET application is communicating with SAP Gateway for Microsoft using SSL (HTTPS); but your “localhost:port” server is not configured to trust the certificate of SAP Gateway for Microsoft. Without this line of code, you would get an invalid certificate warning before Default.aspx will open. Some browsers allow you to click past this error, but some will not let you open Default.aspx at all.
    ServicePointManager.ServerCertificateValidationCallback = (s, cert, chain, errors) => true;
    
    Important noteImportant
    Delete this line when you are ready to deploy the ASP.NET application to staging. See Modify the app and stage it to Azure and Office 365.
  5. Add the following code to the Page_Load method. The string you pass to the GetSAPData method is an OData query.
    if (!IsPostBack)
    {
        GetSAPData("DataCollection?$top=3");
    }
    
    
  6. Add the following method to the Default class. This method first ensures that the cache for the access token has a valid access token in it that has been obtained from Azure AD. It then creates an HTTP GET Request that includes the access token and sends it to the SAP OData endpoint. The result is returned as a JSON object that is converted to a .NET List object. Three properties of the items are used in an array that is bound to the DataListView.
    private void GetSAPData(string oDataQuery)
    {
        AADAuthHelper.EnsureValidAccessToken(this);
    
        using (WebClient client = new WebClient())
        {
            client.Headers[HttpRequestHeader.Accept] = "application/json";
            client.Headers[HttpRequestHeader.Authorization] = "Bearer " + AADAuthHelper.AccessToken.Item1;
            var jsonString = client.DownloadString(SAP_ODATA_URL + oDataQuery);
            var jsonValue = JObject.Parse(jsonString)["d"]["results"];
            var dataCol = jsonValue.ToObject<List<Automobile>>();
    
            var dataList = dataCol.Select((item) => {
                return item.Brand + " " + item.Model + " " + item.Price;
                }).ToArray();
    
            DataListView.DataSource = dataList;
            DataListView.DataBind();
        }
    }


Create the user interface

  1. Open the Default.aspx file and add the following markup to the form of the page:
    <div>
      <h3>Data from SAP via SAP Gateway for Microsoft</h3>
    
      <asp:ListView runat="server" ID="DataListView">
        <ItemTemplate>
          <tr runat="server">
            <td runat="server">
              <asp:Label ID="DataLabel" runat="server"
                Text="<%# Container.DataItem.ToString()%>" /><br />
            </td>
          </tr>
        </ItemTemplate>
      </asp:ListView>
    </div>
    
  2. Optionally, give the web page the “look ‘n’ feel” of a SharePoint page with the SharePoint Chrome Control and the host SharePoint website’s style sheet.

Test the app with F5 in Visual Studio

  1. Press F5 in Visual Studio.
  2. The first time that you use F5, you may be prompted to login to the Developer Site that you are using. Use the site administrator credentials. In the continuing example, it is Bob@<O365_domain>.onmicrosoft.com.
  3. The first time that you use F5, you are prompted to grant permissions to the app. Click Trust It.
  4. After a brief delay while the access token is being obtained, the Default.aspx page opens. Verify that the SAP data appears.

Optionally, add SharePoint access to the ASP.NET application


Of course, your app for SharePoint doesn’t have to expose only SAP data in a web page launched from SharePoint. It can also create, read, update, and delete (CRUD) SharePoint data. Your code behind can do this using either the SharePoint client object model (CSOM) or the REST APIs of SharePoint. The CSOM is deployed as a pair of assemblies that the Office Developer Tools for Visual Studio automatically included in the ASP.NET project and set to Copy Local in Visual Studio so that they are included in the ASP.NET application package. For information about using CSOM, start with How to: Complete basic operations using SharePoint 2013 client library code. For information about using the REST APIs, start with Understanding and Using the SharePoint 2013 REST Interface.Regardless, of whether you use CSOM or the REST APIs to access SharePoint, your ASP.NET application must get an access token to SharePoint, just as it does to SAP Gateway for Microsoft. See Understand authentication and authorization to SAP Gateway for Microsoft and SharePoint above. The procedure below provides some basic guidance about how to do this, but we recommend that you first read the following articles:

  1. Open the Default.aspx.cs file and uncomment the Page_PreInit method. Also uncomment the code that the Office Developer Tools for Visual Studio added to the Page_Load method.
  2. If your app for SharePoint is going to access SharePoint data, then you have to cache the SharePoint context token that is POSTed to the Default.aspx page when the app is launched in SharePoint. This is to ensure that the SharePoint context token is not lost when the browser is redirected following the Azure AD authentication. (You have several options for how to cache this context. See OAuth tokens.) The Office Developer Tools for Visual Studio add a SharePointContext.cs file to the ASP.NET project that does most of the work. To use the session cache, you simply add the following code inside the “if (!IsPostBack)” block before the code that calls out to SAP Gateway for Microsoft:
    if (HttpContext.Current.Session["SharePointContext"] == null) 
    {
         HttpContext.Current.Session["SharePointContext"]
            = SharePointContextProvider.Current.GetSharePointContext(Context);
    }
    
  3. The SharePointContext.cs file makes calls to another file that the Office Developer Tools for Visual Studio added to the project: TokenHelper.cs. This file provides most of the code needed to obtain and use access tokens for SharePoint. However, it does not provide any code for renewing an expired access token or an expired refresh token. Nor does it contain any token caching code. For a production quality app for SharePoint, you need to add such code. The caching logic in the preceding step is an example. Your code should also cache the access token and reuse it until it expires. When the access token is expired, your code should use the refresh token to get a new access token. We recommend that you read OAuth tokens.
  4. Add the data calls to SharePoint using either CSOM or REST. The following example is a modification of CSOM code that Office Developer Tools for Visual Studio adds to the Page_Load method. In this example, the code has been moved to a separate method and it begins by retrieving the cached context token.
    Copy
    private void GetSharePointTitle()
    {
        var spContext = HttpContext.Current.Session["SharePointContext"] as SharePointContext;
        using (var clientContext = spContext.CreateUserClientContextForSPHost())
        {
            clientContext.Load(clientContext.Web, web => web.Title);
            clientContext.ExecuteQuery();
            SharePointTitle.Text = "SharePoint web site title is: " + clientContext.Web.Title;
        }
    }
    
  5. Add UI elements to render the SharePoint data. The following shows the HTML control that is referenced in the preceding method:
    <h3>SharePoint title</h3><asp:Label ID="SharePointTitle" runat="server"></asp:Label><br />
    
Note Note
While you are debugging the app for SharePoint, the Office Developer Tools for Visual Studio re-register it with Azure ACS each time you press F5 in Visual Studio. When you stage the app for SharePoint, you have to give it a long-term registration. See the section Modify the app and stage it to Azure and Office 365.

Modify the app and stage it to Azure and Office 365


When you have finished debugging the app for SharePoint using F5 in Visual Studio, you need to deploy the ASP.NET application to an actual Azure Web Site.

Create the Azure Web Site

  1. In the Microsoft Azure portal, open WEB SITES on the left navigation bar.
  2. Click NEW at the bottom of the page and on the NEW dialog select WEB SITE | QUICK CREATE.
  3. Enter a domain name and click CREATE WEB SITE. Make a copy of the new site’s URL. It will have the form my_domain.azurewebsites.net.

Modify the code and markup in the application

  1. In Visual Studio, remove the line ServicePointManager.ServerCertificateValidationCallback = (s, cert, chain, errors) => true; from the Default.aspx.cs file.
  2. Open the web.config file of the ASP.NET project and change the domain part of the value of the AppRedirectUrl key in the appSettings section to the domain of the Azure Web Site. For example, change <add key=”AppRedirectUrl” value=”https://localhost:44322/Pages/Default.aspx&#8221; /> to <add key=”AppRedirectUrl” value=”https://my_domain.azurewebsites.net/Pages/Default.aspx&#8221; />.
  3. Right-click the AppManifest.xml file in the app for SharePoint project and select View Code.
  4. In the StartPage value, replace the string ~remoteAppUrl with the full domain of the Azure Web Site including the protocol; for example https://my_domain.azurewebsites.net. The entire StartPage value should now be: https://my_domain.azurewebsites.net/Pages/Default.aspx. (Usually, the StartPage value is exactly the same as the value of the AppRedirectUrl key in the web.config file.)

Modify the AAD registration and register the app with ACS

  1. Login into Azure Management portal with your Azure administrator account.
  2. Choose Active Directory on the left side.
  3. Click on your directory.
  4. Choose APPLICATIONS (on the top navigation bar).
  5. Open the application you created. In the continuing example, it is ContosoAutomobileCollection.
  6. For each of the following values, change the “localhost:port” part of the value to the domain of your new Azure Web Site:
    • SIGN-ON URL
    • APP ID URI
    • REPLY URL

    For example, if the APP ID URI is https://localhost:44304/ContosoAutomobileCollection, change it to https://<my_domain&gt;.azurewebsites.net/ContosoAutomobileCollection.

  7. Click SAVE at the bottom of the screen.
  8. Register the app with Azure ACS. This must be done even if the app does not access SharePoint and will not use tokens from ACS, because the same process also registers the app with the App Management Service of the Office 365 subscription, which is a requirement. You perform the registration on the AppRegNew.aspx page of any SharePoint website in the Office 365 subscription. For details, see Guidelines for registering apps for SharePoint 2013. As part of this process you will obtain a new client ID and client secret. Insert these values in the web.config for the ClientId (not ida:ClientID) and ClientSecret keys.
    Caution note Caution
    If for any reason you press F5 after making this change, the Office Developer Tools for Visual Studio will overwrite one or both of these values. For that reason, you should keep a record of the values obtained with AppRegNew.aspx and always verify that the values in the web.config are correct just before you publish the ASP.NET application.

Publish the ASP.NET application to Azure and install the app to SharePoint

  1. There are several ways to publish an ASP.NET application to an Azure Web Site. For more information, see How to Deploy an Azure Web Site.
  2. In Visual Studio, right-click the SharePoint app project and select Package. On the Publish your app page that opens, click Package the app. File explorer opens to the folder with the app package.
  3. Login to Office 365 as a global administrator, and navigate to the organization app catalog site collection. (If there isn’t one, create it. See Use the App Catalog to make custom business apps available for your SharePoint Online environment.)
  4. Upload the app package to the app catalog.
  5. Navigate to the Site Contents page of any website in the subscription and click add an app.
  6. On the Your Apps page, scroll to the Apps you can add section and click the icon for your app.
  7. After the app has installed, click it’s icon on the Site Contents page to launch the app.

For more information about installing apps for SharePoint, see Deploying and installing apps for SharePoint: methods and options.

Deploying the app to production


When you have finished all testing you can deploy the app in production. This may require some changes.

  1. If the production domain of the ASP.NET application is different from the staging domain, you will have to change AppRedirectUrl value in the web.config and the StartPage value in the AppManifest.xml file, and repackage the app for SharePoint. See the procedure Modify the code and markup in the application above.
  2. The change in domain also requires that you edit the apps registration with AAD. See the procedure Modify the AAD registration and register the app with ACS above.
  3. The change in domain also requires that you re-register the app with ACS (and the subscription’s App Management Service) as described in the same procedure. (There is no way to edit an app’s registration with ACS.) However, it is not necessary to generate a new client ID or client secret on the AppRegNew.aspx page. You can copy the original values from the ClientId (not ida:ClientID) and ClientSecret keys of the web.config into the AppRegNew form. If you do generate new ones, be sure to copy the new values to the keys in web.config.

Microsoft Site Templates Upgraded and are now available


One of the main goals of the application templates is to provide a demonstration of the application building power in SharePoint and as a potential starting point for larger, more robust applications. While these templates are fully functional and usable out-of-the-box, I’ll be happy to reply on your comments and supporting you as needed.


note: those templates were collected from several resources and no source code for them.

All templates are compatible with SharePoint Server 2010 and Foundation Server 2010.

Case Management

The Case Management application template helps case managers track the status and tasks required to complete their work. When a case is created, standard tasks and documents are created which are modified based on the work each case manager has completed.

Clinical Trial Initiation and Management

For those who work in Academic Medical Centers, the Clinical Trial Initiation and Management application template helps teams manage the process of tracking clinical trial protocols, objective setting, subject selection and budget activities.

Employee Activities Site
employee activities
The Employee Activities Site application template helps departments, such as HR and Marketing, manage the creation and attendance of events for employees.

Employee Training Scheduling and Materials

The Employee Training Scheduling and Materials application template helps Instructors add new courses and organize course materials. Employees use the site to schedule attendance at a course, track courses they’ve attended and to provide feedback.

Employee Training 01

Employee Training

Employee Training 03

Absence Request and Vacation Schedule Management

The Absence Request and Vacation Schedule Management application template helps provider departments manage requests for out of office days and provides dashboards showing which users are signed up for a set of responsibilities

Event Planning

The Event Planning application template helps teams organize events efficiently through the use online registration, schedules, communication and feedback.

Discussion Database

The Discussion Database application template provides a location where team members can create and reply to discussion topics.

Team Work Site

The Team Work Site application template provides a place where clinical and business teams, can upload background documents, track scheduled calendar events and submit action items that result from team meetings.

Document Library and Review

The Document Library and Review application template helps people to manage the review cycle common to processes like publication, knowledge management and project plan development.

Knowledgebase

The Knowledgebase application template helps teams manage the information that is resident within their organization. The template enables team members to upload/create documents using Web-based tools and tag them with relevant identifying information.

Policies and Procedures Solution Accelerator

The Policies and Procedures Solution Accelerator assists healthcare organizations create, maintain, publish and easily access policy and procedure information. It also provides the ability to upload documents, maintain a version history and manage tasks.

Board of Directors

The Board of Directors application template provides a single location for an external group of members to store and locate common documents such as quarterly reviews, shareholder meeting notes and annual strategy documents.

Business Performance Reporting

The Business Performance Reporting application template helps health organization managers track the satisfaction of internal customers/patients through a combination of surveys and discussions.

Request for Proposal

The Request for Proposal application template helps manage the process of creating and releasing an initial RFP, collecting submissions of proposals and formally accepting the selected proposal from amongst those submitted.

Compliance Process Support Site

The Compliance Process Support Site application template helps both teams and executive sponsors to manage compliance implementation endeavors, such as HIPAA.

Expense Reimbursement and Approval

The Expense Reimbursement and Approval application template helps manage elements of the expense approval process, including creation and approval. Users can monitor the status of their reimbursement request through a filtered view listing.

Scorecards Solution Accelerator

The Scorecards solution accelerator acts as a template for configuring a management dashboard to track organizational metrics. It contains four example dashboards ranging from a primary care practice to a healthcare organization’s CEO dashboard.

Call Center
call center
The Call Center application template helps departments manage the process of handling customer service requests. The application template helps teams manage service requests from issue identification to cause analysis and resolution.

Help Desk
help desk
The Help Desk application template helps departments manage the process of handling service requests. Team members use the application template to identify a service request, manage identification of the root cause and track solution status.

Physical Asset Tracking and Management

The Physical Asset Tracking and Management application template helps departments, such as Facilities, BioMedical, Surgery, etc. manage requests and the tracking of physical assets.

Inventory Tracking
inventory
The Inventory Tracking application template helps organizations track elements associated with inventory, including creation of inventory. Users are notified when each part reaches the reorder quantity and helps manage customer and supplier information.

Cafeteria Menu Management

The Cafeteria Menu Management application template helps hospital Food & Nutrition staff easily communicate daily menu choices to hospital staff and visitors. It allows staff to develop/schedule menus and provide related nutritional information.

Budgeting and Tracking Multiple Projects

The Budgeting and Tracking Multiple Projects application template helps project teams track and budget multiple, interrelated sets of activities. Management tools such as assignment of new tasks, Gantt Charts and common status designators.

Change Request Management
change request management
The Change Request Management application template helps users track risks associated with a design change. Team members can submit a change request, notifying stakeholders of the risks involved with the change.

IT Team Workspace

The IT Team Workspace application template helps teams manage the development, deployment and support of software projects. It also includes help desk functionality, allowing team members to guide service requests from initiation to resolution.

Project Tracking Workspace

The Project Tracking Workspace application template helps small team projects manage project information in a single location. The application template provides a place where a team can list and view project issues and tasks.


HTML5 SharePoint Pic Web Part Released and Available !!

This is a Sandbox web part control to display a matrix of image thumbnails.

For a build a Metro IDE or a Picture Gallery to show products, news, or a social team that integrates with pictures, etc. All this, from any SharePoint picture library.

Supports : SharePoint 2010 & 2013 On-Premise Web Part,  SharePoint Online Web Part

FEATURES OF THE WEB PART** ver. 1.0


**PREVIEW EXAMPLE OF THE CONTROL**


1

How to: Customize the SharePoint HTML Editor Field Control using ECM

You can use the HTML Editor field control to insert HTML content into a publishing page. Page templates that include a Publishing HTML column type also include the HTML Editor field control.

This editor has special capabilities, such as customized styles, editing constraints, reusable content support, a spelling checker, and use of asset pickers to select documents and images to insert into a page’s content. This topic describes how to modify some features and attributes of the HTML Editor field control.

Image

If the content type of a page layout supports the Page Content column, you can add a Rich HTML field control to your page layout by using markup such as the following.

<PublishingWebControls:RichHtmlField id="ArticleAbstract" FieldName="ArticleAbstract" 
          AllowExternalUrls="false" 
          AllowFonts="true" 
          AllowReusableContent="false" 
          AllowHeadings="false"
          AllowHyperlinks="false"
          AllowImages="false"
          AllowLists="false"
          AllowTables="false"
          AllowTextMarkup="false" 
          AllowHTMLSourceEditing="false"
          DisalbeBasicFormattingButtons="false"
          runat="server"/>

In the example above, RichHTMLField is the name of the field control that provides the richer HTML editing experience. Attributes such as AllowFonts and AllowTables specify restrictions on the field.

The HTML field control allows font tags, but the control does not allow URLs that are external to the current site collection, reusable content stored in a centralized list, standard HTML heading tags, hyperlinks, images, numbered or bulleted lists, tables, or text markup.

Table 1. HTML editor field control properties
Attribute Description
AllowExternalUrls Only URLs internal to the current site collection are allowed to be referenced in a link or an image.
AllowFonts Content may contain Font tags.
AllowHtmlSourceEditing HTML Editor can be switched into a mode that allows the HTML to be edited directly.
AllowReusableContent Content may contain reusable content fragments stored in a centralized list.
AllowHeadings Content may contain HTML heading tags (H1, H2, and so on).
AllowTextMarkup Content may contain bold, italic, and underlined text.
AllowImages Content may contain images.
AllowLists Content may contain numbered or bulleted lists.
AllowTables Content may contain table-related tags such as <table>, <tr>, and <td>.
AllowHyperlinks Content may contain links to other URLs.
AllowHtmlSourceEditing When set to false, the HTML editor is disabled from switching to HTML source editing mode.
AllowHyperlinks Gets or sets the constraint that allows hyperlinks to be added to the HTML. If this flag is set to false, <A>, <AREA>, and <MAP> tags are removed from the HTML. Default is true. This property also determines whether the editing user interface (UI) enables these operations.
AllowImageFormatting Gets or sets image formatting items. This restriction disables only menus and does not force the content to adhere to this restriction
AllowImagePositioning Gets or sets the position of the image. This restriction disables only menus and does not force the content to adhere to this restriction.
AllowImageStyles Gets or sets whether the Table Styles menu is enabled. This restriction disables only the menu and does not force the content to adhere to this restriction.
AllowInsert Gets or sets whether Insert options are shown. This restriction disables only the menu and does not force the content to adhere to this restriction.
AllowLists Gets or sets the constraint that allows list tags to be added to the HTML. If this flag is set to false, <LI>, <OL>, <UL>, <DD>, <DL>, <DT>, and <MENU> tags are removed from the HTML. Default is true. This also determines whether the editing UI enables these operations.
AllowParagraphFormatting Gets or sets whether paragraph formatting items are enabled. This restriction disables only menus and does not force the content to adhere to this restriction.
AllowStandardFonts Gets or sets whether standard fonts are enabled. This restriction disables only menus and does not force the content to adhere to this restriction.
AllowStyles Gets or sets whether the Style menu is enabled. This restriction disables only the menu and does not force the content to adhere to this restriction.
AllowTables Gets or sets the constraint to allow tables to be added when editing this field.
AllowTableStyles Gets or sets whether the Table Styles menu is enabled. This restriction disables only the menu and does not force the content to adhere to this restriction.
AllowTextMarkup Get or set the constraint to allow text markup to be added when editing this field.
AllowThemeFonts Gets or sets whether theme fonts are enabled. This restriction disables only menus and does not force the content to adhere to this restriction.
Predefined Table Formats

The HTML editor includes a set of predefined table formats, but it can be customized to fit the styling of an individual page. Each table format is a collection of cascading style sheet (CSS) classes for each table tag. You can define styling for the first and last row, odd and even rows, first and last column, and so on.

The HTML Editor dynamically applies certain styles from the referenced style sheets on the page and makes them available to users when formatting a table. For a custom style to be available when formatting a table, the relevant class names must follow the PREFIXTableXXX-NNN format, where:

  • PREFIX is ms-rte by default, but you can override the default by using the control PrefixStyleSheet() property of the RichHTML field control.
  • XXX is the specific table section, such as EvenRow or OddRow.
  • NNN is the name to identify the table styling.

The following example presents a complete set of classes for a table styling format.

.ms-rteTable-1 {border-collapse:collapse;border-top:gray 1.5pt;
    border-left:gray 1.5pt;border-bottom:gray 1.5pt;
    border-right:gray 1.5pt;border-style:solid;}
.ms-rteTableHeaderRow-1 {color:Green;background:yellow;text-align:left}
.ms-rteTableHeaderFirstCol-1 {padding:0in 5.4pt 0in 5.4pt;}
.ms-rteTableHeaderLastCol-1 {padding:0in 5.4pt 0in 5.4pt;}
.ms-rteTableHeaderOddCol-1 {padding:0in 5.4pt 0in 5.4pt;}
.ms-rteTableHeaderEvenCol-1 {padding:0in 5.4pt 0in 5.4pt;}
.ms-rteTableOddRow-1 {color:black;background:#FFFFDD;}
.ms-rteTableEvenRow-1 {color:black;background:#FFB4B4;}
.ms-rteTableFirstCol-1 {padding:0in 5.4pt 0in 5.4pt;}
.ms-rteTableLastCol-1 {padding:0in 5.4pt 0in 5.4pt;}
.ms-rteTableOddCol-1 {padding:0in 5.4pt 0in 5.4pt;}
.ms-rteTableEvenCol-1 {padding:0in 5.4pt 0in 5.4pt;}
.ms-rteTableFooterRow-1 {color:blue;font-style:bold;
    font-weight:bold;background:white;border-top:solid gray 1.0pt;
    border-bottom:solid gray 1.0pt;border-right:solid silver 1.0pt; 
    border-style:solid;}
.ms-rteTableFooterFirstCol-1 {padding:0in 5.4pt 0in 5.4pt;
    border-top:solid gray 1.0pt;text-align:left}
.ms-rteTableFooterLastCol-1 {padding:0in 5.4pt 0in 5.4pt;
    border-top:solid gray 1.0pt;text-align:left}
.ms-rteTableFooterOddCol-1 {padding:0in 5.4pt 0in 5.4pt;
    text-align:left;border-top:solid gray 1.0pt;}
.ms-rteTableFooterEvenCol-1 {padding:0in 5.4pt 0in 5.4pt;
    text-align:left;border-top:solid gray 1.0pt;}

Microsoft SharePoint Server 2010 includes a set of default table styles. However, if the system detects new styles that did not originate in the default .css file, it removes the default set and presents only those newly defined styles in the HTML editor dialog box.

Spelling Checker

In SharePoint Server 2010, the HTML editor includes a spelling checker, which can be customized by developers by using the SpellCheckV4Action Web control and the SpellCheckToolbarButton Web control. The spelling checker action registers client files and data during a spelling check.

It also includes a method to get the console tab and calls the user rights to verify that the current user has rights to perform a spelling check operation on the selected item. The spelling checker action calls the appropriate ECMAScript (JavaScript, JScript) code, and sends information to the client about available spellings and the default language to use for the request.

How To : Use Javascript to enable Listview Folder Navigation

list view webpart is added to page and user navigate to different folders in the list view, there’s no way for users to know current folder hierarchy. So basically breadcrumb for the list view webpart missing. If there would be a way of showing users the exact location in the folder hierarchy the user is current in (as shown in the image below), wouldn’t be that great?


Image 1: Folder Navigation in action

Deploy the FolderNavigation.js File

Download the FolderNavigation.js and then you can deploy the script either in Layouts folder (in case of full trust solutions) or in Master Page gallery (in case of SharePoint Online or full trust). I would recommend to deploy in Master Page Gallery so that even if you move to cloud, it works without modification. If you deploy in Master page gallery, you don’t need to make any changes, but if you deploy in layouts folder, you need to make small changes in the script which is described in section ‘Deploy JS Link file in Layouts folder’.


Option 1: Deploy in Master Page Gallery (Suggested)

If you are dealing with SharePoint Online, you don’t have the option to deploy in Layouts folder. In that case you need to deploy it in Master page gallery. Note, deploying the script in other libraries (like site assets, site library) will not work, you need to deploy in master page gallery. Otherwise you can deploy in Layouts folder as described in next section. To deploy in master page gallery manually, please follow the steps:

  1. Download the JavaScript file attached.
  2. Navigate to Root web => site settings => Master Pages (under group ‘Web Designer Galleries’).
  3. From the ‘New Document’ ribbon try adding ’JavaScript Display Template’ and then upload the FolderNavigation.js file and set properties as shown below:

    Image 2: Upload the JavaScript file in master page gallery

    In the above image, we’ve specified the content type to ‘JavaScript Display Template’, ‘target control type’ to view to use the js file in list view. Also I’ve set target scope to ‘/’ which means all sites and subsites will be applied. If you have a site collection ‘/sites/HR’, then you need to use ‘/Sites/HR’ instead. You can also use List Template ID, if you need.


Option 2: Deploy in Layouts Folder

If you are deploying the FolderNavigation.js file in Layouts folder, you need to make small changes in the downloaded script’s RegisterModuleInti method as shown below:

RegisterModuleInit(FolderNavigation.js, folderNavigation);


In this case the ‘RegisterModuleInit’ first parameter will be the path relative to Layouts folder. If you deploy your file in path ‘/_Layouts/folder1’, the then you need to modify code as shown below:

RegisterModuleInit(Folder1/FolderNavigation.js, folderNavigation);


If you are deploying in other subfolders in Layouts folder, you need to update the path accordingly. What I’ve found till now, you can only deploy in Layouts and Master page gallery. But if you find deploying in other folders works, please share. Basically first paramter in RegisterModuleInti is the file either:

  • Relative to ‘_Layouts’ folder
  • Or Master page gallery in which case the path is started with ‘/_catalogs/masterpage’


Use the FolderNavigation.js in List View WebPart

Once you deploy the JavaScript file in Master page gallery or Layouts folder, you need to use it in List View WebPart. Once you deploy the FolderNavigation.js file, you can start using it in list view webpart. Edit the list view web part properties and then under ‘Miscellaneous’ section put the file url for JS Link as shown below:

Image 3: List View WebPart’s JS Like Propery


Few points to note for this JS Link:

  • if you have deployed the js file in Master Page Gallery, You can use ~site or ~SiteCollection token, which means current site or current site collection respectively. The URL for JS Link then might be ‘~siteCollection/_catalogs/masterpage/FolderNavigatin.js’ or  ‘~site/_catalogs/masterpage/FolderNavigatin.js’. If you deploy the file in Site Collection Master Page gallery only, you need to use ~siteCollection token in subsites so that it uses the JavaScript file from Site Collection.
  • If you have deployed in Layouts folder, you need to use corresponding path in the JS Link properties. For example if you are deploying the file in Layouts folder, then use ‘/_layouts/15/FolderNavigation.js’, if you are deploying in ‘Layouts/Folder1’ then, use ‘/_layouts/15/Folder1/FolderNavigation.js’. Just to inform again, if you deploy in Layouts folder, you need to make small changes in the JavaScript file as described under ‘Option 2: Deploy in Layouts Folder’ section.


JavaScript file Description

In case you are interested to know how the code works, the code snippet is given below:

JavaScript

function replaceQueryStringAndGet(url, key, value) { 
    var re = new RegExp("([?|&])" + key + "=.*?(&|$)""i"); 
    separator = url.indexOf('?') !== -1 ? "&" : "?"; 
    if (url.match(re)) { 
        return url.replace(re, '$1' + key + "=" + value + '$2'); 
    } 
    else { 
        return url + separator + key + "=" + value; 
    } 
} 
 
 
function folderNavigation() { 
    function onPostRender(renderCtx) { 
        if (renderCtx.rootFolder) { 
            var listUrl = decodeURIComponent(renderCtx.listUrlDir); 
            var rootFolder = decodeURIComponent(renderCtx.rootFolder); 
            if (renderCtx.rootFolder == '' || rootFolder.toLowerCase() == listUrl.toLowerCase()) 
                return; 
 
            //get the folder path excluding list url. removing list url will give us path relative to current list url 
            var folderPath = rootFolder.toLowerCase().indexOf(listUrl.toLowerCase()) == 0 ? rootFolder.substr(listUrl.length) : rootFolder; 
            var pathArray = folderPath.split('/'); 
            var navigationItems = new Array(); 
            var currentFolderUrl = listUrl; 
 
            var rootNavItem = 
                { 
                    title: 'Root', 
                    url: replaceQueryStringAndGet(document.location.href, 'RootFolder', listUrl) 
                }; 
            navigationItems.push(rootNavItem); 
 
            for (var index = 0; index < pathArray.length; index++) { 
                if (pathArray[index] == '') 
                    continue; 
                var lastItem = index == pathArray.length - 1; 
                currentFolderUrl += '/' + pathArray[index]; 
                var item = 
                    { 
                        title: pathArray[index], 
                        url: lastItem ? '' : replaceQueryStringAndGet(document.location.href, 'RootFolder'encodeURIComponent(currentFolderUrl)) 
                    }; 
                navigationItems.push(item); 
            } 
            RenderItems(renderCtx, navigationItems); 
        } 
    } 
 
 
    //Add a div and then render navigation items inside span 
    function RenderItems(renderCtx, navigationItems) { 
        if (navigationItems.length == 0return; 
        var folderNavDivId = 'foldernav_' + renderCtx.wpq; 
        var webpartDivId = 'WebPart' + renderCtx.wpq; 
 
 
        //a div is added beneth the header to show folder navigation 
        var folderNavDiv = document.getElementById(folderNavDivId); 
        var webpartDiv = document.getElementById(webpartDivId); 
        if(folderNavDiv!=null){ 
            folderNavDiv.parentNode.removeChild(folderNavDiv); 
            folderNavDiv =null; 
        } 
        if (folderNavDiv == null) { 
            var folderNavDiv = document.createElement('div'); 
            folderNavDiv.setAttribute('id', folderNavDivId) 
            webpartDiv.parentNode.insertBefore(folderNavDiv, webpartDiv); 
            folderNavDiv = document.getElementById(folderNavDivId); 
        } 
 
 
        for (var index = 0; index < navigationItems.length; index++) { 
            if (navigationItems[index].url == ''{ 
                var span = document.createElement('span'); 
                span.innerHTML = navigationItems[index].title; 
                folderNavDiv.appendChild(span); 
            } 
            else { 
                var span = document.createElement('span'); 
                var anchor = document.createElement('a'); 
                anchor.setAttribute('href', navigationItems[index].url); 
                anchor.innerHTML = navigationItems[index].title; 
                span.appendChild(anchor); 
                folderNavDiv.appendChild(span); 
            } 
 
            //add arrow (>) to separate navigation items, except the last one 
            if (index != navigationItems.length - 1{ 
                var span = document.createElement('span'); 
                span.innerHTML = '&nbsp;> '; 
                folderNavDiv.appendChild(span); 
            } 
        } 
    } 
 
 
    function _registerTemplate() { 
        var viewContext = {}; 
 
        viewContext.Templates = {}; 
        viewContext.OnPostRender = onPostRender; 
        SPClientTemplates.TemplateManager.RegisterTemplateOverrides(viewContext); 
    } 
    //delay the execution of the script until clienttempltes.js gets loaded 
    ExecuteOrDelayUntilScriptLoaded(_registerTemplate, 'clienttemplates.js'); 
}; 
 
//RegisterModuleInit ensure folderNavigation() function get executed when Minimum Download Strategy is enabled. 
//if you deploy the FolderNavigation.js file in '_layouts' folder use 'FolderNavigation.js' as first paramter. 
//if you deploy the FolderNavigation.js file in '_layouts/folder/subfolder' folder, use 'folder/subfolder/FolderNavigation.js as first parameter' 
//if you are deploying in master page gallery, use '/_catalogs/masterpage/FolderNavigation.js' as first parameter 
RegisterModuleInit('/_catalogs/masterpage/FolderNavigation.js', folderNavigation); 
 
//this function get executed in case when Minimum Download Strategy not enabled. 
folderNavigation(); 

Let me explain the code briefly:

  • The method ‘replaceQueryStringAndGet’ is used to replace query string parameter with new value. For example if you have url http://abc.com?key=value&name=sohel’  and you would like to replace the query string ‘key’ with value ‘New Value’, you can use the method like

    replaceQueryStringAndGet(http://abc.com?key=value&name=sohel&#8221;,“key”,“New Value”)

  • The function folderNavigation has three methods. Function ‘onPostRender’ is bound to rendering context’s OnPostRender event. The method first checks if the list view’s root folder is not null  and root folder url is not list url (which means user is browsing list’s/library’s root). Then the method split the render context’s folder path and creates navigation items as shown below:

    var item = { title: title, url: lastItem ? : replaceQueryStringAndGet(document.location.href, ‘RootFolder’, encodeURIComponent(rootFolderUrl)) };

    As shown above, in case of last item (which means current folder user browsing), the url is empty as we’ll show a text instead of link for current folder.

  • Function ‘RenderItems’ renders the items in the page. I think this is the place of customisation you might be interested. Having all navigation items passed to this function, you can render your navigation items in your own way. renderContext.wpq is unique webpart id in the page. As shown below with the wpq value of ‘WPQ2’ the webpart is rendered in a div with id ‘WebPartWPQ2’.

    Image 4: List View WebPart in Firebug

    In ‘RenderItems’ function I’ve added a div just before the webpart div ‘WebPartWPQ2’ to put the folder navigation as shown in the image 1.

  • In the method ‘_registerTemplate’, I’ve registered the template and bound the OnPostRender event.
  • The final piece is RegisterModuleInit. In some example you will find the function folderNavigation is executed immediately along with the declaration. However, there’s a problem with Client Side Rendering and Minimal Download Strategy (MDS) working together.
  • To avoid this problem, we need to Register foldernavigation function with RegisterModuleInit to ensure the script get executed in case of MDS-enabled site. The last line ‘folderNavigation()’ will execute normally in case of MDS-disabled site.

Creating Your Own Document Management System With SharePoint and Dynamix

Image

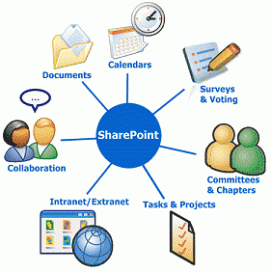
With the R2 release of Dynamics AX 2012, a new feature was quietly snuck into the product that allows you to store document attachments from Dynamics AX within SharePoint rather than within an archive location, or within the database. This opens up a whole slew of possibilities when it comes to document management within SharePoint.

In this example we will show how you can create a document management structure within SharePoint that you can use in conjunction with the Dynamics AX attachments feature, and also we will show a few tweaks that you can make that may make managing your documents within SharePoint just a little easier.

Creating a new Document Management Site

The first step that we are going to work through is the creation of a new Document Management site where we will put all of our Dynamics AX document attachments. We are just creating a site to separate out the documents from other items that you may already have stored within SharePoint.

How to do it…

To create a new Document Management Site in SharePoint, follow these steps:

  1. Open up the SharePoint Workspace that you want to use to house your Document Management site and from the Site Actions menu, select the New Site option.
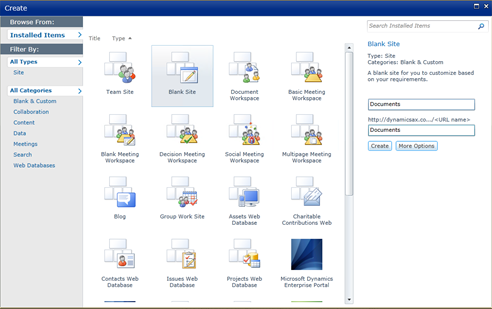
  2. When the Site Templates are displayed, select the Blank Site template. Give your site a name, and also a sub site name (probably the same as your site name). When you are done, click on the Create button for start the site creation process.

How it works…

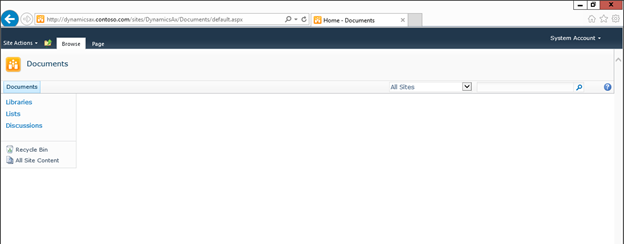
When the site is created, you should be taken to a new blank site which you will be able to use as a document repository.

Creating Document Libraries for the Business Areas

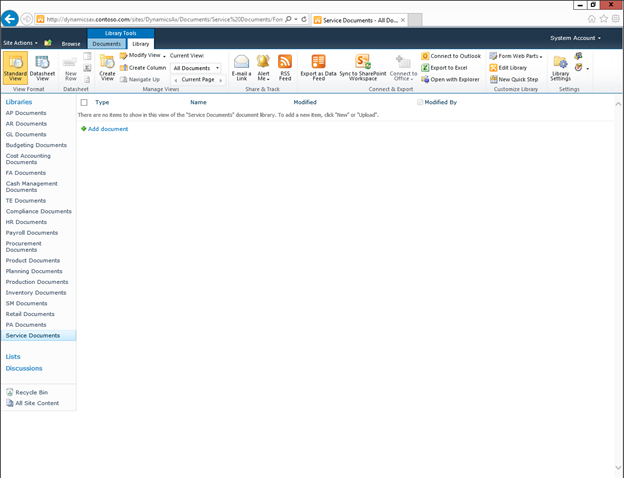
The next step in the process is to create document libraries to store all of your documents away in. You could create one big library, or a number of smaller ones, broken out into groups based on business area or function. In this example we will do the latter because it will give us more flexibility with the indexing of the documents, and also make it easier to find particular documents.

How to do it…

To create document libraries for the business areas, follow these steps:

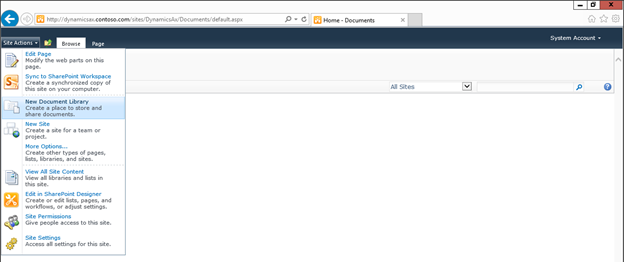
  1. From within your new Document Management site, select the New Document Library option from the Site Actions menu.
  2. When the Document Library Creation dialog box appears, give your library a Name, Description, and also set the Document Template to None. In this example we are creating a library for all of the AP Documents.
    When you are done, click on the Create button to start the document library creation process.

How it works…

After it finishes you should have a new library for you to use. You can repeat the process for all of the other business areas that you want to manage documents for – in our example we just used the standard business areas from the Dynamics AX navigation menu.

Creating Dynamics AX Document Types that Link to the Document Libraries

Once you have created your document libraries, you can connect them to Dynamics AX with the new SharePoint option so that the users are able to attach documents from the client and then store them within SharePoint for everyone to access.

How to do it…

To create a file attachment type that links to SharePoint, follow these steps:

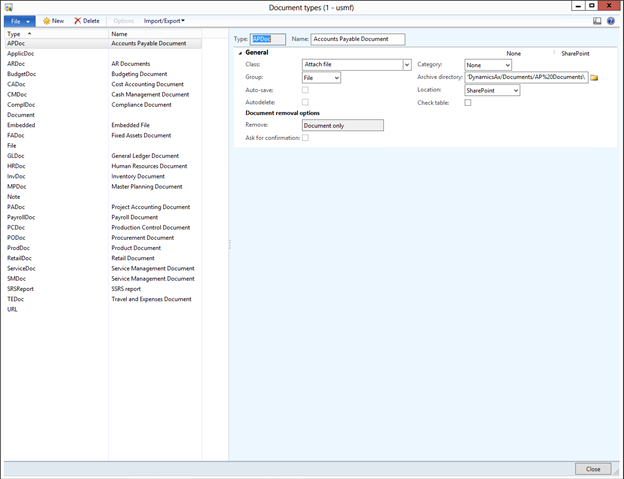
  1. From the Organization administration area page, select the Document types menu item from the Document management folder of the Setup group.
  2. When the Document types maintenance form is displayed, click on the New button in the menu bar to create a new entry.
  3. We will start by creating a link for all of our generic Accounts Payable documents by giving our new Document type a Name and Description. In the Group select File from the dropdown options and select SharePoint for the Location option.
  4. Now return back to your document libraries within SharePoint and copy the URL for the document library.
  5. Paste the URL into the Archive
    directory field.

    Note: Remove all of the extra parameters though so that you are just referencing the base folder location.
    Also, if you click on the folder browser to the right of the Archive directory field you can test the link to SharePoint.

How it works…

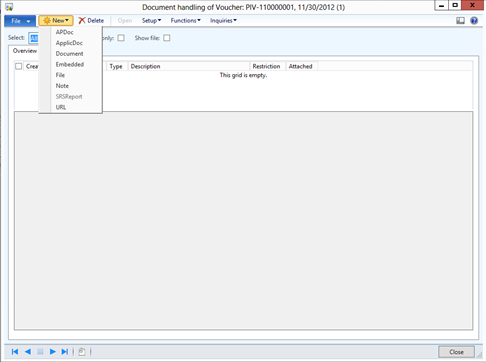
Now, if you attach a document, then you will see the option for your new document type.

It will allow you to attach any file that you have on your desktop.

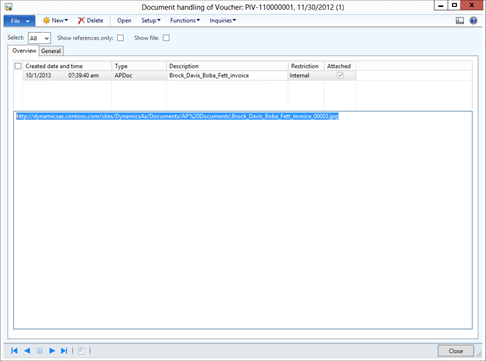
And rather than showing you the thumbnail image, it will show you a reference link to your SharePoint document library.

After attaching the document, if you look within SharePoint, you will see your document is saved away for you.

You can repeat this process for all of your other document libraries that were created in the previous step.

Adding Columns to your Document Libraries for Better Indexing

One of the reasons why you want to start using SharePoint is so that you can take advantage of the indexing functionality to code and classify your documents. Now that you have people storing the documents away, it’s time to add some indexes to you document libraries.

How to do it…

To create new indexes for your document libraries, follow these steps:

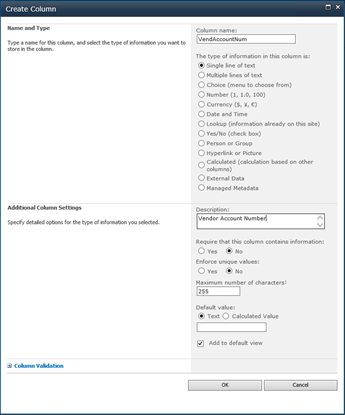
  1. Open up your document libraries within SharePoint and select the Library ribbon bar. Then click on the Create Column button within the Manage Views group.
  2. When the Create Column form opens, set the Column Name to be the field that you want to index, select the type of the column, and also set the columns Description.
  3. Note: Sometimes it’s a good idea not to have spaces in the column name, later on when we add filters, it becomes a litter easier to manage this way.
  4. After you have finished defining the column, click on the OK button to add the column to your library.
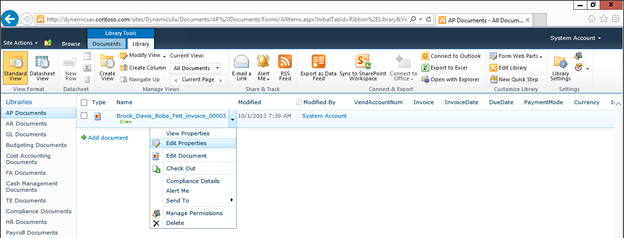
  5. When you return back to your document library, there will be a new column on the form.
  6. Repeat the process for all of the columns that you want to use as index fields for the library.

    Note: All of the columns do not have to be used during the indexing process, so it’s OK to have variations of columns, like InvoiceNum, CreditNoteNum, etc.

How it works…

To edit the columns, select the options menu for the document, and choose the Edit Properties option.

This will allow you to update the fields that Dynamics AX did not populate initially.

Now when you look at the document within SharePoint, you will see the additional metadata that is associated with the document.

Embedding Document Libraries into Dynamics AX Forms

Now that we are able to index documents a little more effectively within SharePoint, we can go the extra step, and link SharePoint to our forms within Dynamics AX so that we are able to access them without even leaving the application. Doing this just requires a little bit of coding, but is well worth the effort.

Getting Started…

You can manipulate the information that is displayed by SharePoint, and also how it is displayed through the URL that you use.

If you filter any of the views, then you will notice that it uses two qualifiers – FilterFieldX
and FilterValueX to restrict the viewed records.

Also, if you add a IsDlg=1 qualifier, then all of the navigation areas are hidden giving you a clean list of filtered documents.

This is the perfect type of view to embed within Dynamics AX.

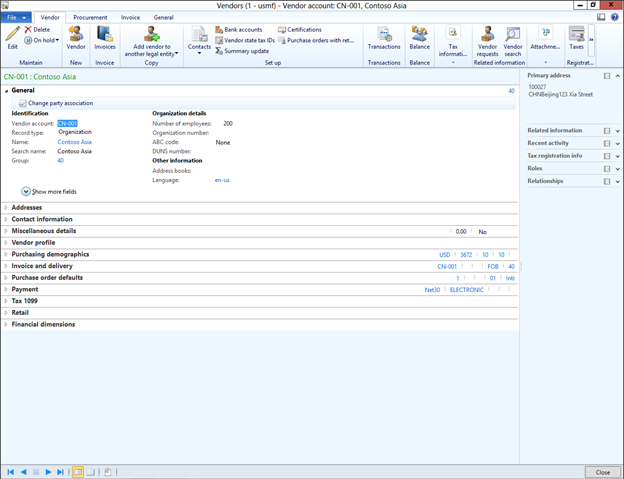
The other half of this step is to choose a form to add your document libraries to. In this case we will update the Vendors form.

How to do it…

To embed your SharePoint document libraries within Dynamics AX forms, follow these steps:

  1. Start the process by opening up AOT, and create a new project for this tweak.
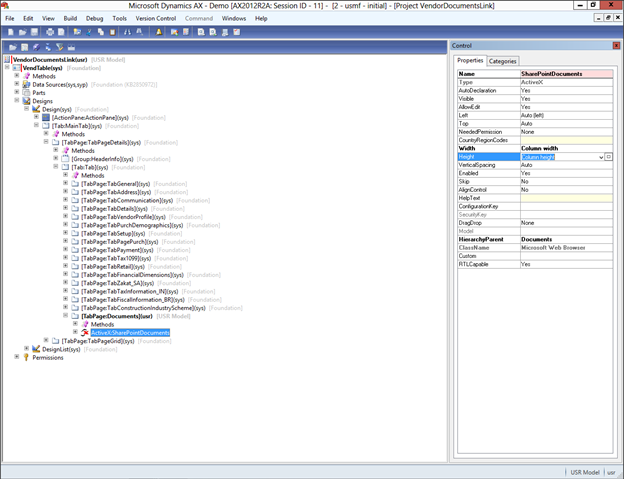
  2. From the Forms area in the AOT, drag over the form that you want to add the documents to – in this case it’s the VendTable form.
  3. Expand out the form within the project, and navigate to the group that you want to add your document library view into.
  4. Right-mouse-click on the parent tab, and select the TabPane option from the New Control sub-menu.
  5. Reorder your tabs (ALT+UpArrow/DownArrow) so that they are in the sequence that you want and then give your new Tab Control a Name and Caption in the Properties section.
  6. Right-mouse-click on the new tab that you added for the document library and select the ActiveX control from the New Control sub menu.
  7. When the list of ActiveX controls are displayed, select the Microsoft Web Browser control, and click the OK button to add it.
  8. Rename your ActiveX control, and set the Width to Column width
    and Height to Column height.
  9. Now we need to have Dynamics AX update the URL that is navigated to when the form is opened. To do this, right-mouse-click on the parent Methods group for the form, and select the activate method from the Override methods submenu.
  10. Update the activate method by building the URL that will define the specific document index that you are wanting to show. You are able to now add conditional filters that pick up the record values, and filter based on the current record – in this case the vendor number.
  11. Once you have finished the update, save the project.

How it works…

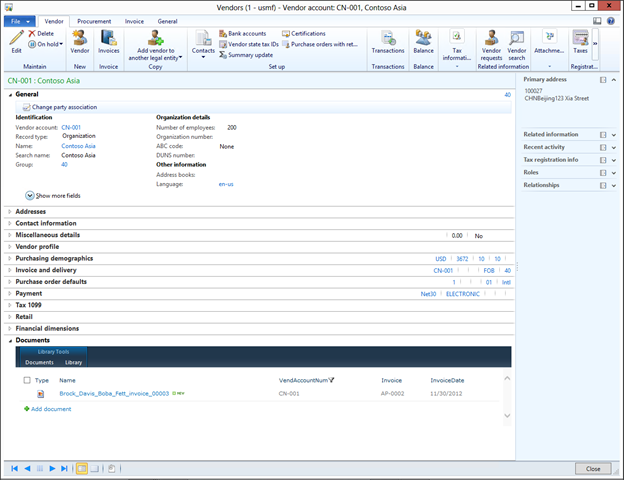
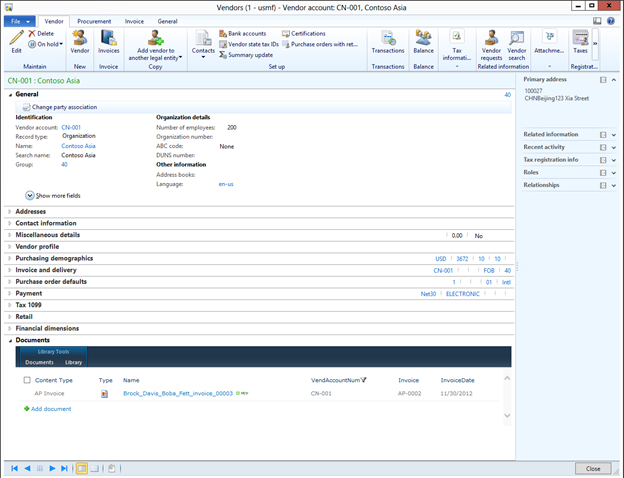
Now when you open up the Vendor form, there will be a Documents tab that shows all of the documents that are associated with the current record.

If you select a record that does not have attached documents, then you will not see anything there.

How cool is that.

Creating Custom Views for the Document Libraries

Now that all of the heavy lifting has been done, you can now start tweaking the SharePoint libraries and the way that the information is displayed. Based on the form that you are in you may want to show only particular information. You can do that by creating new custom views.

How to do it…

To create a custom view for your document libraries, follow these steps:

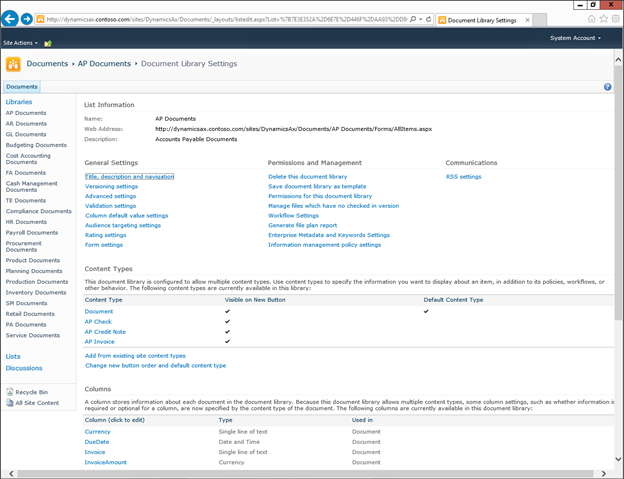
  1. Open up your document libraries within SharePoint and select the Library ribbon bar. Then click on the Library Settings button within the Settings group.
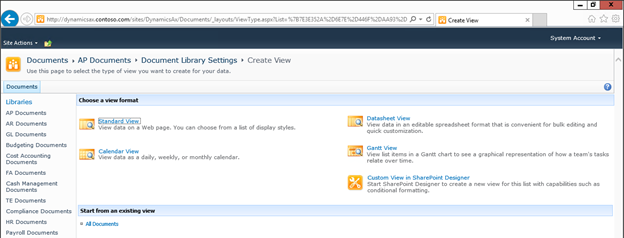
  2. When the document library settings maintenance form is displayed, scroll down to the bottom of the page, and there will be a section for Views that will show you all of the different ways that the form could be displayed. In this case there is only one, but we can fix that by clicking on the Create View link.
  3. Select the Standard View option from the format templates that are displayed.
  4. Assign your new view a Name and select the fields that you want to be displayed in the view.
  5. Once you have made the changes, click on the OK button to save your new view.

How it works…

When you return to the document library you will be able to see the new format of the view.

You can then change the view within the URL of your project to make it the default view for the form.

Now when you see all of the documents within your Dynamics AX form you will see just the information that you need.

Using the SharePoint Designer to Edit Document Libraries

Although you can do everything that we have shown so far within SharePoint, you can also take advantage of the SharePoint Designer application to update your SharePoint document libraries. You don’t even have to search for the install kit, because it is embedded within your SharePoint site, just waiting to be downloaded and installed.

How to do it…

To access the SharePoint Designer to manipulate your SharePoint site, follow these steps:

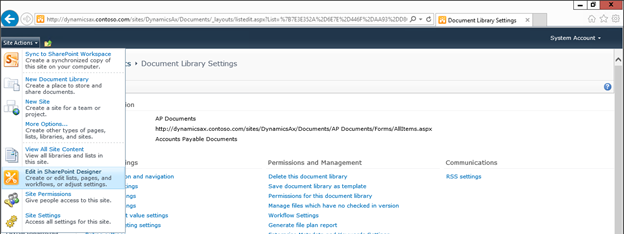
  1. To use the SharePoint Designer to update your SharePoint site, just select the Edit in SharePoint Designer option from the Site Actions menu.

    Note: If you don’t have SharePoint Designer installed then it will ask you to install it, and download the kit directly from your SharePoint installation.

How it works…

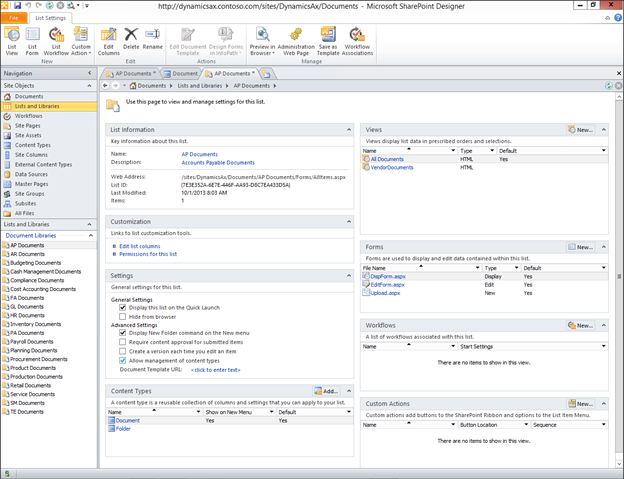
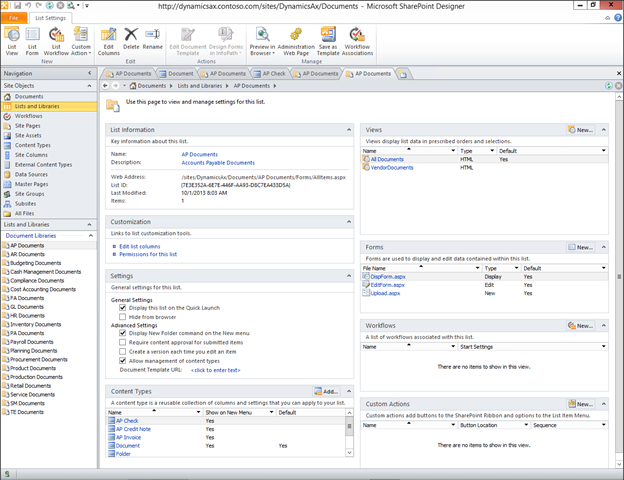
When SharePoint Designer opens up, it will be connected to your current SharePoint site, showing you all of the libraries, etc. that you have been creating.

If you select the Lists and Libraries option from the navigation pad, you will be able to see all of the document libraries that you created in the previous steps.

Drilling into the libraries you will be able to also see all of the views etc. that you configured within SharePoint.

Creating New Content Types to Manage Document Types

When we set up our document libraries we deliberately created them so that all of the documents for a particular area are within the same library. This allows us to save multiple types of documents away within the library like Invoices, Credit Notes, Vendor Certificates etc. The way that we can identify the type of document is through the creation of Content Types.

How to do it…

To create custom Content Types to help make classification easier, follow these steps:

  1. Open up SharePoint Designer (although you can also do this within SharePoint itself) and select the Content Types from the navigation menu and click on the Content type menu button within the New group
    of the Content Types ribbon bar.
  2. When the Content Type creation form is displayed, give your Content Type a Name, and Description, select a parent content type, and also a group that you want to show the Content Type in.

    Note: For the first content type that you create, you may want to create a new Content Type Group so that it isn’t intermingled with all of the other content types.

  3. When you have finished creating your Content Type click on the OK button to add it to SharePoint.
  4. When you return to your SharePoint Designer workspace you will be able to see your new Content Type.
  5. Repeat the process for all of the other types of documents that you want to file away within SharePoint.
  6. Now we need to enable Content Types within our document libraries, and then assign them. To do this, open up your Document Library within SharePoint Designer, and within the Settings group, check the Allow management of content types check box.
  7. Then click on the Add button to the right of the Content Types group to open up the Content Type Picker. Find the new Content Types that you just created, and click on the OK button to assign them to your Document Library.
  8. Now the Content Type will show up as a valid option for the document library.
  9. Repeat the process for all of the other content types that you created.

How it works…

Now when you edit the properties for your documents, there will be a new indexing option for your documents that allows you to define the type of document that you are looking at.

Specifying Document Columns by Content Types to Simplify Indexing

There is an additional benefit that you get from using Content Types within SharePoint, which is the ability to specify what columns are applicable to different Content Types at the time of indexing. For example, you probably don’t want to specify a Invoice Number when indexing a Vendor Insurance Certificate, but would definitely would want to when indexing an Invoice and even a Credit Note.

How to do it…

To modify your Content Types within your Document Libraries to only require certain columns to be indexed, follow these steps:

  1. From within your SharePoint Document Library (or from within SharePoint Designer) click on the Library Settings button within the Settings group of the Library ribbon bar.
  2. Within the Library Settings you will be able to see all of your Content Types that have been assigned. Select any of them to edit their options.
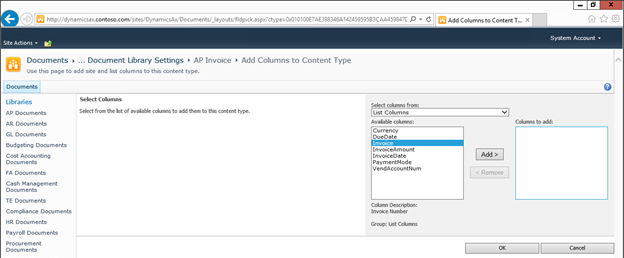
  3. When you first create the Content Types then they will have no columns assigned to them. Click on the Add from existing site or list columns link to assign the valid columns to your Content Type.
  4. When the Add columns to Content Type form is displayed, you will be able to see all of the available columns within the Document Library.
  5. Just select the ones that you want to use for the indexing, and then click the Add button. Once you have selected all the ones that you want to use, click on the OK button to save your changes.

How it works…

Now you will have indexing by Content Type.

Showing the Content Type in the Document View

Now that we are classifying documents by Content Type we might as well show it in the views so that we are able to differentiate different document types.

How to do it…

To add the Content Type field to our Document View, follow these steps:

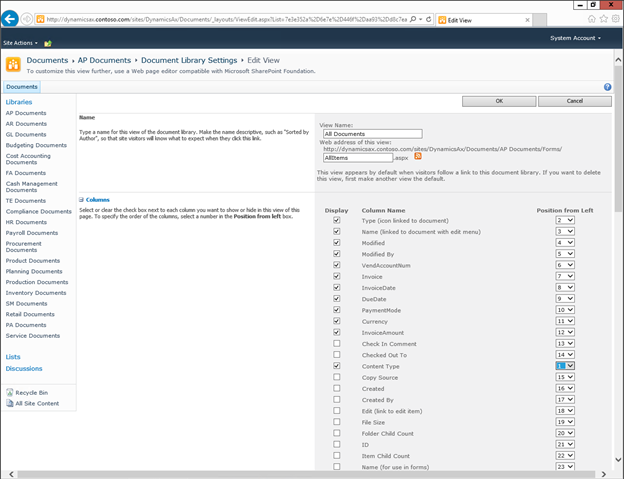
  1. From within your SharePoint Document Library (or from within SharePoint Designer) click on the Modify View button within the Manage Views group of the Library ribbon bar.
  2. Now that the Content Type is enabled on our Document Library, it will show up on the list of valid columns. To add it to our view, just check the Display checkbox, and possibly change the order of the field so that it is first in the table.
  3. When you’re done, click on the OK button to update the view.

How it works…

Now the Content Type is shown in the document library view.

And also will show up when we browse to the documents within Dynamics AX.

How neat is that.

Grouping Records in the Document View by Key Columns

One final tweak that we will show within SharePoint is the ability to group columns within our document library views so that common information is shown together. These groupings can be different by view, and just make it a little easier to find information if we don’t’ initially filter the data.

How to do it…

To group records within your document library view, follow these steps:

  1. From within your SharePoint Document Library (or from within SharePoint Designer) click on the Modify View button within the Manage Views group of the Library ribbon bar.
  2. Scroll down your view definition until you see the Group By configuration options. Here you will be able to change the Group By fields.

How it works…

Now when you look at your documents, they will be classified by key fields.

Summary

In this walkthrough we have shown how you can:

  • Create a simple document management repository within SharePoint
  • Link the document attachments function within Dynamics AX to SharePoint to make the acquisition of the documents easier
  • Index your documents more effectively by defining custom columns
  • Embed SharePoint back into Dynamics AX and also
  • Tweak your views within SharePoint to make it easier to find and view documents

This is really just a starting point, and once you have mastered the basics, you can start investigating:

  • Assigning workflows to documents for approvals and updates
  • Enabling version control for your documents
  • Acquire documents into SharePoint through scanning technologies
  • Link the index column fields to Dynamics AX for validation of key information
  • And much more.

SharePoint is a great document management tool, and can usually handle all of your document indexing needs. Especially now that it is connected with Dynamics AX natively.

Features from SharePoint 2010 Integration with SAP BusinessObjects BI 4.0

ImageOne of the core concepts of Business Connectivity Services (BCS) for SharePoint 2010 are the external content types. They are reusable metadata descriptions of connectivity information and behaviours (stereotyped operations) applied to external data. SharePoint offers developers several ways to create external content types and integrate them into the platform.


The SharePoint Designer 2010, for instance, allows you to create and manage external content types that are stored in supported external systems. Such an external system could be SQL Server, WCF Data Service, or a .NET Assembly Connector.

This article shows you how to create an external content type for SharePoint named Customer based on given SAP customer data. The definition of the content type will be provided as a .NET assembly, and the data are displayed in an external list in SharePoint.

The SAP customer data are retrieved from the function module SD_RFC_CUSTOMER_GET. In general, function modules in a SAP R/3 system are comparable with public and static C# class methods, and can be accessed from outside of SAP via RFC (Remote Function Call). Fortunately, we do not need to program RFC calls manually. We will use the very handy ERPConnect library from Theobald Software. The library includes a LINQ to SAP provider and designer that makes our lives easier.

.NET Assembly Connector for SAP

The first step in providing a custom connector for SAP is to create a SharePoint project with the SharePoint 2010 Developer Tools for Visual Studio 2010. Those tools are part of Visual Studio 2010. We will use the Business Data Connectivity Model project template to create our project:

After defining the Visual Studio solution name and clicking the OK button, the project wizard will ask what kind of SharePoint 2010 solution you want to create. The solution must be deployed as a farm solution, not as a sandboxed solution. Visual Studio is now creating a new SharePoint project with a default BDC model (BdcModel1). You can also create an empty SharePoint project and add a Business Data Connectivity Model project item manually afterwards. This will also generate a new node to the Visual Studio Solution Explorer called BdcModel1. The node contains a couple of project files: The BDC model file (file extension bdcm), and the Entity1.cs and EntityService.cs class files.

Next, we add a LINQ to SAP file to handle the SAP data access logic by selecting the LINQ to ERP item from the Add New Item dialog in Visual Studio. This will add a file called LINQtoERP1.erp to our project. The LINQ to SAP provider is internally called LINQ to ERP. Double click LINQtoERP1.erp to open the designer. Now, drag the Function object from the designer toolbox onto the design surface. This will open the SAP connection dialog since no connection data has been defined so far:

Enter the SAP connection data and your credentials. Click the Test Connection button to test the connectivity. If you could successfully connect to your SAP system, click the OK button to open the function module search dialog. Now search for SD_RFC_CUSTOMER_GET, then select the found item, and click OK to open the RFC Function Module /BAPI dialog:

SP2010SAPToBCS/BCS12.png

The dialog provides you the option to define the method name and parameters you want to use in your SAP context class. The context class is automatically generated by the LINQ to SAP designer including all SAP objects defined. Those objects are either C# (or VB.NET) class methods and/or additional object classes used by the methods.

For our project, we need to select the export parameters KUNNR and NAME1 by clicking the checkboxes in the Pass column. These two parameters become our input parameters in the generated context class method named SD_RFC_CUSTOMER_GET. We also need to return the customer list for the given input selection. Therefore, we select the table parameter CUSTOMER_T on the Tables tab and change the structure name to Customer. Then, click the OK button on the dialog, and the new objects get added to the designer surface.

IMPORTANT: The flag “Create Objects Outside Of Context Class” must be set to TRUE in the property editor of the LINQ designer, otherwise LINQ to SAP generates the Customer class as nested class of the SAP context class. This feature and flag is only available in LINQ to SAP for Visual Studio 2010.

The LINQ designer has also automatically generated a class called Customer within the LINQtoERP1.Designer.cs file. This class will become our BDC model entity or external content type. But first, we need to adjust and rename our BDC model that was created by default from Visual Studio. Currently, the BDC model looks like this:

Rename the BdcModel1 node and file into CustomerModel. Since we already have an entity class (Customer), delete the file Entity1.cs and rename the EntityService.cs file to CustomerService.cs. Next, open the CustomerModel file and rename the designer object Entity1. Then, change the entity identifier name from Identifier1 to KUNNR. You can also use the BDC Explorer for renaming. The final adjustment result should look as follows:

SP2010SAPToBCS/BCS4.png

The last step we need to do in our Visual Studio project is to change the code in the CustomerService class. The BDC model methods ReadItem and ReadList must be implemented using the automatically generated LINQ to SAP code. First of all, take a look at the code:

SP2010SAPToBCS/BCS6.png

As you can see, we basically have just a few lines of code. All of the SAP data access logic is encapsulated within the SAP context class (see the LINQtoERP1.Designer.cs file). The CustomerService class just implements a static constructor to set the ERPConnect license key and to initialize the static variable _sc with the SAP credentials as well as the two BDC model methods.

The ReadItem method, BCS stereotyped operation SpecificFinder, is called by BCS to fetch a specific item defined by the identifier KUNNR. In this case, we just call the SD_RFC_CUSTOMER_GET context method with the passed identifier (variable id) and return the first customer object we get from SAP.

The ReadList method, BCS stereotyped operation Finder, is called by BCS to return all entities. In this case, we just return all customer objects the SD_RFC_CUSTOMER_GET context method returns. The returned result is already of type IEnumerable<Customer>.

The final step is to deploy the SharePoint solution. Right-click on the project node in Visual Studio Solution Explorer and select Deploy. This will install and deploy the SharePoint solution on the server. You can also debug your code by just setting a breakpoint in the CustomerService class and executing the project with F5.

That’s all we have to do!

Now, start the SharePoint Central Administration panel and follow the link “Manage Service Applications”, or navigate directly to the URL http://<SERVERNAME>/_admin/ServiceApplications.aspx. Click on Business Data Connectivity Service to show all the available external content types:

On this page, we find our deployed BDC model including the Customer entity. You can click on the name to retrieve more details about the entity. Right now, there is just one issue open. We need to set permissions!

Mark the checkbox for our entity and click on Set Object Permissions in the Ribbon menu bar. Now, define the permissions for the users you want to allow to access the entity, and click the OK button. In the screen shown above, the user administrator has all the permissions possible.

In the next and final step, we will create an external list based on our entity. To do this, we open SharePoint Designer 2010 and connect us with the SharePoint website.

Click on External Content Types in the Site Objects panel to display all the content types (see above). Double click on the Customer entity to open the details. The SharePoint Designer is reading all the information available by BCS.

In order to create an external list for our entity, click on Create Lists & Form on the Ribbon menu bar (see screenshot below) and enter CustomerList as the name for the external list.

OK, now we are done!

Open the list, and you should get the following result:

The external list shows all the defined fields for our entity, even though our Customer class, automatically generated by the LINQ to SAP, has more than those four fields. This means you can only display a subset of the information for your entity.

Another option is to just select those fields required within the LINQ to SAP designer. With the LINQ designer, you can access not just the SAP function modules. You can integrate other SAP objects, like tables, BW cubes, SAP Query, or IDOCs. A demo version of the ERPConnect library can be downloaded from the Theobald Software homepage.

If you click the associated link of one of the customer numbers in the column KUNNR (see screenshot above), SharePoint will open the details view:

SP2010SAPToBCS/BCS10.png


NEW “Filter My Lists” Web Part now available + FREE Metro UI Master Page when ordering

“Filter My Lists” Web Part

Saves you time with optimal performance

Find what you are looking for with a few clicks, even in cluttered sites and lists with masses of items and documents.

Find exactly what you need and stop wasting your time browsing SharePoint.
Filter the content of multiple lists and libraries in a single   step.

Combine search and metadata filters

In a single panel combine item, document and attachment searches with metadata keyword searches and managed metadata filters.

Select multiple filter values from drop-down lists or alternatively use the keyword search of metadata fields with the help of wildcard characters and logical operators.

Export filtered views to Excel

Export filtered views and data to Excel. A print view enables you to print your results in a clear printable format with a single  click.

Keep views clear and concise

Provides a complete set of filters without cluttering list views and keeps your list views clear, concise and speedy. Enables you to filter SharePoint using columns which aren’t visible in list views.

Refine filters and save them for future use, whether private, to share with others or to use as default filters.

FREE Metro Style UI Master Page


Screen Capture Medium

Modern UI Master Page and Styles for SharePoint 2010.

This will give the Metro/Modern UI styling of SharePoint 2013 to your SharePoint 2010 team sites.

Features include:
– Quick launch styling
– Global navigation and drop-down styling
– Search box styling and layout change
– Web part header styling
– Segoe UI font

All my Web Parts and Apps are now making use of Knockout.JS !! Template also available at very low price!!

After completing the development of my latest Web Part, the “List Search” Web Part I decided to update all my Web Parts and Apps to using Knockout.JS, starting with the “List Search” Web Part.

This topic came up when we I looked at some of my older products that includes generic list and library web parts, that would display few common fields like ID, Title, Description, File Url etc. Prior to this request we solved similar issues with OOB list and library web parts with custom XSLT, by creating Visual Studio web part for branding purposes only, or by using Imtech content query web part( which is XSLT solution by design).

At the end, clients hated XSLT solutions and I hated to create new web part for every new list or library. That’s where Knockout popped. Why don’t we use Knockout for templates instead XSLT.

I’ll assume that whoever reads this article knows about creating a web part for SharePoint, SharePoint module, java script and html and I will not go into details.

Background

A bit about Knockout

From Knockout web site: “Knockout is a JavaScript library that helps you to create rich, responsive display and editor user interfaces with a clean underlying data model. “

From Wikipedia:

Knockout is a standalone JavaScript implementation of the Model-View-ViewModel pattern with templates. The underlying principles are therefore:

  • a clear separation between domain data, view components and data to be displayed
  • the presence of a clearly defined layer of specialized code to manage the relationships between the view components

Knockout includes the following features:

  • Declarative bindings
  • Automatic UI refresh (when the data model’s state changes, the UI updates automatically)
  • Dependency tracking
  • Templating (using a native template engine although other templating engines can be used, such as jquery.tmpl)

So what’s the deal?

First you have your view model:

 var myViewModel = {
     personName: 'Bob',
     personAge: 123
};

Then you have a view:

The name is <span data-bind="text:personName"></span>

At the end just bind your view to model

 ko.applyBindings(myViewModel);

We’ll talk about model later.

Using the code

Proof of concept

I’ve created an html mock of our web part. This is useful, because we can prepare java scripts, css files, models and views in advance and test it without SharePoint and visual studio.

You can download proof of concept as separate download from the link above.

References

There would be only two file references.

One is knockout library itself

<script type='text/javascript' src="http://knockoutjs.com/downloads/knockout-3.0.0.js"></script>

and the other is css file I’ve added to this project

<link href="css/controls.css" rel="stylesheet" type="text/css" />

Model 

I’ve designed model as Item class. Here it is:

// Item class definition
var Item = function (id, title, datecreated,url,description,thumbnail) {
   this.id = id;
   this.title = title;
   this.datecreated = datecreated;
   this.url=url;
   this.description=description;
   this.thumbnail=thumbnail;
}

It’s called item and it has 6 properties:

  1. id – ID of the item
  2. title – Title of the item
  3. datecreated – Creation date of the item
  4. url – Url of the item
  5. description – Description of the item
  6. thumbnail – Thumbnail of the item


View model

Here is the view model

function viewModel1 (){
    var self = this;
    self.items =  [  
     new Item(2, 'News1 title','21.10.2013','javascript:OpenDialog(2);'
               ,'Description News 1','img/pic1.jpg'), 
    new Item(1, 'News 2 title','21.02.2013','javascript:OpenDialog(1);',
               'Description News 2','img/pic2.jpg')
}

View model has property items, which in fact is collection of Item objects. For mocking purposes we’ve added two Item objects in this collection (News 1 and News 2);


View

Here is the view:

<div class="glwp glwp-central" id="k1">
  <div class="glwpLine"></div>
  <h5><img src="PublishingImages/siteIcon.png" 
          width="28" height="28" align="absmiddle" />
      News</h5>
  <div class="glwpLineGrey"></div>
    <ul data-bind="foreach:items">
      <li>
       <div class="glwpDate"><span data-bind="text: datecreated" ></span>
       <img class="glwpImage" data-bind="attr: { src: thumbnail }" />         
       </div>
       <div class="glwpText glwpText-central" >
        <a data-bind="attr: { href: url, title: title }" style="min-height:70px;">
         <span class="glwpTextTTL" data-bind="text:title"></span><br />
         <span data-bind="text: description"></span>
        </a>
       </div>
       <div class="glwpSep"></div>
      </li>
    </ul>
</div>

What we have here:

It’s pretty simple. We haveunordered list bound to our model. One

  • element would be created for every item of our items collection (data-bind=”foreach: items”).


Property binding: 

  •  datecreated">< /span> – This is the simplest data binding. It would write datecreated property of Item object to text of span element (like: <span>11/11/2013</span>)
  • <img class="glwpImage" data-bind="attr: { src: thumbnail }" />. This is a bit more complicated binding. It would take thumbnail property of item object and write it to src attribute of img element.
  • 70px;">. It would take url property and write it as href attribute of the a element, and title property as title attribute.
  • <span class="glwpTextTTL" data-bind="text:title"></span>. Title property would be written as text of span element
  • <span data-bind="text: description"></span>. Description property would be written as text of span element

So anyone with little knowledge of html and css can customize this template anyway (s)he likes, as long as (s)he provides required properties.


Binding

ko.applyBindings(viewModel1,document.getElementById('k1'));

Note second parameter in applyBindings method. It says document.getElementById('k1'). Same id is on the first div in our view (k1″>). This is helpful if you want to have more than one view model in one page. It tells knockout to bind this specific model (viewModel1) to specific template on our page (k1).


What we have from this? We are going to create web part from this code and one of the web part features is that you can put same web part several times on the same page. So it would be possible to put one web part in SharePoint page to display news and one web part to display projects or documents. And they will coexist together.

If you look at the source you will notice that we have 2 view models (viewModel1 and viewModel2) and two templates (k1 and k2), and two bindings of course. One binding is for news (with images and description) and one binding is for files (no images, and no descriptions). Templates are slightly different.

Final result

Here is the final result

SharePoint Part

As I said I will assume that you have some experience with SharePoint development so I will not explain how to create the project and add project items. Project type is standard Visual Studio 2010 SharePoint Empty Project template.

SharePoint part consists of following items:

  • Web part item – KnockoutWp. Standard SharePoint Visual Web part project Item
  • Assets module. SharePoint module project item. We are going to use it for deploying of images and css files (0.png – empty container for images and controls.css – css file for our projects).
  • Layouts mapped folder. We’ll put here editor page for template.

And here is the solution explorer for project:

Assets

We are going to deploy 2 files:

  • 0.png – 1×1 pixel transparent image aka placeholder
  • Controls.css – css file for our template

Both of these items are going to be deployed to Style Library of the SharePoint site collection, so content editors may change it later without need of solution redeployment.

Here is the elements.xml file:

So our assets will end to http://oursitecollectionurl/Style Library/wp folder.

KnockoutWp

This is Visual Studio 2010 Visual Web part.

It is consisted of 4 items:

  • KnockoutWp.cs – web part class
  • KnockoutWpUserControl – User control of our web part
  • KnockoutWp.webpart – web part xml file
  • Elements.xml – manifest file

Properties

Web part has following properties:

  • ListUrl (string, required) – url of the list we are displaying.
  • TitleField (string, optional) – display name of the field that would be displayed as Title. If it’s blank Title field would be used.
  • DateField (string, optional) – display name of the field that would be displayed as date. If it’s blank Created field would be used.
  • DescriptionField (string, optional) – display name of the field that would be displayed as Description. If it’s blank it would be omitted.
  • ImageField (string, optional) – display name of the field that would be displayed as Thumbnail picture. If it’s blank it would be omitted.
  • NoOfItems (int) – how many items from the list would be displayed
  • ItemTemplate (string) – html template of the web part. Defines the look of our web part.
  • WpPosition (enum) – Used for a three column layouts. Web part has styles for three zones: right, central and left. Difference is in width, padding and margin. Everything is set in css so you can accommodate it to your environment.

On picture below you can see mapping between Field properties of web part and list item fields.


EditorPart

I’ve added one more thing to this web part it’s EditorPart class GenericListPartEditorPart. I’m not going into deep with editor parts, but here is quick info. When you create public property for a web part it is automatically displayed in web part edit panel.

And it is great concept when you need simple properties as strings, numbers and short lists. If you want more complicated scenario (as we want here for our web part) it’s not enough.

What I wanted here is template editor. It could be reasonably large so idea was to have a button in web part edit panel that would open large dialog window with editor. User would work with our template, click Apply and change ItemTemplate web part property.

Template editor KnockoutWpUserControl

This is user control created by Visual Studio, when we added Visual web part project item to the project. It consists of markup ascx file and code behind .ascx.cs file. We will put our markup and our c# code here.

Markup

Here is the complete markup:

<script type='text/javascript' src="http://knockoutjs.com/downloads/knockout-3.0.0.js">
</script>
<style type="text/css">  @import url("/Style
Library/wp/controls.css");  </style>  
<div class="glwp glwp-<%=PositionClass %>" id="k<%=WpId %>">
  <div class="glwpLine"></div>      
  <h5><img src="<%=Icon %>" width="28" 
    height="28" align="absmiddle"><%=Title %></h5>
    <div class="glwpLineGrey"></div>      
  <asp:Literal ID="LitLayout" runat="server"></asp:Literal>
</div>  

<script type="text/javascript">    
  function OpenDialog(Url) {
    var options = SP.UI.$create_DialogOptions();        
    options.resizable = 1;        
    options.scroll = 1;        
    options.url = Url;
    SP.UI.ModalDialog.showModalDialog(options);    
}         
// Item class         
  var Item = function (id, title, datecreated,url,description,thumbnail) {            
     this.id = id;            
     this.title = title;
     this.datecreated = datecreated;
     this.url=url;
     this.description=description;
     this.thumbnail=thumbnail;
  }         
 //ViewModel goes here (It's created on server)        
 runat="server" ID="LitItems"></asp:Literal>
 
//Function that opens Template editor. Used only in edit mode of web part       
 function portal_openTemplateEditor(wpid) {       
  var val="";              
  var options = SP.UI.$create_DialogOptions();              
  options.width = 600;             
  options.height = 500;                
  options.url = "/_layouts/KnockoutTemplate/TemplateEditor.aspx?c="+wpid;//"";
  options.dialogReturnValueCallback =
           Function.createDelegate(null,portal_openTemplateEditorClosedCallback);
  SP.UI.ModalDialog.showModalDialog(options);
}
</script>

First Section, of the markup (picture below) has script (knockout, on the remote server) and style references (controls.css in local Document library). Below is html markup that defines the container of the web part (top and bottom borders, width, icon and title). Markup is not the cleanest because I was little lazy and left some public properties in it. Note< %=PositionClass%>, <%=WpId%> and so on.

There are all public properties of the user control and they are used for presentation:

  • PositionClass – depending on WpPosition web part property (right, central or left) adds appropriate css class to markup and that way defines width, padding and margin of web part WpId is guid of the web part. It is used to uniquely identify the web part, because we can put several web parts of the same type and everything would crush without this identificator.
  • Icon – is a url to icon that would be displayed on web part. Web part property Title Icon Image URL is used here (this is OOB property)
  • Title –title text of the web part. Text that was entered in the title area of the web part. Web part property Title is used here (this is OOB property)

Last interesting thing here is Literal control LitLayout. This control would hold our ItemTemplate property (html template of our web part).

Second section, is a java script function that opens list item in a dialog window. It is used when underlying list is not document library.

Third section consists of knockout view model (java script). Item class definition is self-explanatory (defines 6 properties only). The rest of the model is created on the server side so now there is only LitItems Literal control there.

Fourth section is just a java script function that is used when editing web part properties. This function opens template editor in dialog window.

Code

Properties:

  • Properties from web part
    • Icon – url to the icon
    • Title – title of the web part
    • ListUrl – url to the list
    • TitleField – Title field in the list
    • DateField – Date field in the list
    • ImageField – Image field in the list
    • DescriptionField – Description field in the list
    • NoOfItems – number of items to return
    • Position – position of the web part (right, left or central)
    • ItemTemplate – html template of the web part
    • WpId – guid id of the web part ·
  • UC’s properties
    • PositionClass – css class based on position
    • ColumnMap – dictionary that holds internal names of the list item fields.

Methods: File has only one method Page_Load. Code is executing with elevated privileges.

In that method we:

  1. Resolve list by the supplied URL (ListUrl property) SPList annList = annWeb.GetList(ListUrl);
  2. Get internal names of the list columns by their Display names SpHelper.GetFieldsInternals(annWeb, annList.Title, TitleField, DateField, DescriptionField, ImageField, columnMap );
  3. Create CAML Query SpHelper.GetGenericQuery(annList, q, NoOfItems);
  4. Execute it
  5. Iterate over SPListItemCollection (coll) and create required JavaScript
Helper class

SPHelper is helper class and you can find it in Helpers directory.

It has 3 responsibilities:

  1. To retrieve List Columns Internal names based on supplied List Columns display names (WP properties – TitleField – Title field, DateField, ImageField , DescriptionField ) – GetFieldsInternals method
  2. To create Caml query for retrieving list items – GetGenericQuery method
  3. To retrieve values from SharePoint columns based on their types – GetFieldValue method


When should I choose to create a mail app versus an add-in for Outlook?

When should I choose to create a mail app versus an add-in for Outlook?

Rate This
PoorPoorFairFairAverageAverageGoodGoodExcellentExcellent

Some of you may or may not be aware that alongside with the legacy COM-based Office client object models, Office 2013 supports a new apps for Office developer platform. This blog post is intended to help new and existing Office developers understand the main differences between the COM-based object models and the apps for Office platform. In particular, this post focuses on Outlook, suggests why you should consider developing solutions as mail apps, and identifies those exceptional scenarios where add-ins may still be the more appropriate choice.

Contents:

An introduction to the apps for Office platform

Architectural differences between add-in model and apps for Office platform

Main features available to mail apps

Major objects for mail apps

Reasons to create mail apps instead of add-ins for Outlook

Reasons to choose add-ins

Conclusion

Further references

An introduction to the apps for Office platform

The apps for Office platform includes a JavaScript API for Office and a schema for apps for Office manifests. You can use this platform to extend web services and content into the context of rich and web clients of Office. An app for Office is a webpage that is developed using common web technologies, hosted inside an Office client application (such as Outlook) on-premises or in the cloud. Of the three types of apps for Office, the type that Outlook supports is called mail apps. While you use the legacy APIs—the object model, PIA, and MAPI—to automate Outlook at an application level, you can use the JavaScript API for Office in a mail app to interact at an item level with the content and properties of an email message, meeting request, or appointment. You can publish mail apps in the Office Store or in an internal Exchange catalog. End users and administrators can install mail apps for an Exchange 2013 mailbox, and use mail apps in the Outlook rich client as well as Outlook Web App. As a developer, you can choose to make your mail app available for end users on only the desktop, or also on the tablet or smart phone. You can find more information about the apps for Office platform by starting here: Overview of apps for Office.

Architectural differences between add-in model and apps for Office platform

Add-in model

The Office add-in model offers individual object models for most of the Office rich clients. Each object model is intended to automate the corresponding Office client, and allows an add-in to integrate closely with the behavior of that client. The same add-in can integrate with one or multiple Office applications, such as Outlook, Word, and Excel, by calling into each of the Outlook, Word, and Excel object models. Figure 1 describes a few examples of 1:1 relationships between an Office rich client and its object model.

Figure 1. The legacy Office development architecture is composed of individual client object models.


Apps for Office platform

The apps for Office platform includes an apps for Office schema. Using this schema, each app specifies a manifest that describes the permissions it requests, its requirements for its host applications (for example, a mail app requires the host to support the mailbox capability), its support for the default and any extra locales, display details for one or more form factors, and activation rules for a mail app to be available in the app bar.

In addition to the schema, the apps for Office platform includes the JavaScript API for Office. This API spans across all supporting Office clients and allows apps to move toward a single code base. Rather than automating or extending a particular Office client at the application level, the apps for Office platform allows apps to connect to services and extend them into the context of a document, message, or appointment item in a rich or web client. Figure 2 shows Office applications with their rich and web clients sharing a common app platform.

Figure 2. The apps for Office development architecture is composed of a common platform and individual object models.


One main difference of note is that the object models were designed to integrate tightly with the corresponding Office client applications. However, this tight integration has a side effect of requiring an add-in to run in the same process as the rich client. The reliability and performance of an add-in often affects the perceived performance of the rich client. Unlike client add-ins, an app for Office doesn’t integrate as tightly with the host application, does not share the same process as the rich client, and instead runs in its own isolated runtime environment. This environment offers a privacy and permission model that allows users and IT administrators to monitor their ecosystem of apps and enjoy enhanced security.

Main features available to mail apps

Contextual activation: Mail app activation is contextual, based on the app’s activation rules and current circumstances, including the item that is currently displayed in the Reading Pane or inspector. A mail app is activated and becomes available to end users when such circumstances satisfy the activation rules in the app manifest.

Matching known entities or regular expression: A mail app can specify certain entities (such as a phone number or address) or regular expressions in its activation rules. If a match for entities or regular expressions occurs in the item’s subject or body, the mail app can access the match for further processing.

Roaming settings: A mail app can save data that is specific to Outlook and the user’s Exchange mailbox for access in a subsequent Outlook session.

Accessing item properties: A mail app can access built-in properties of the current item, such as the sender, recipients, and subject of a message, or the location, start, end, organizer, and attendees of a meeting request.

Creating item-level custom properties: A mail app can save item-specific data in the user’s Exchange mailbox for access in a subsequent Outlook session.

Accessing user profile: A mail app can access the display name, email address, and time zone in the user’s profile.

Authentication by identity tokens: A mail app can authenticate a user by using a token that identifies the user’s email account on an Exchange Server.

Using Exchange Web Services: A mail app can perform more complex operations or get further data about an item through Exchange Web Services.

Permissions model and governance: Mail apps support a three-tier permissions model. This model provides the basis for privacy and security for end users of mail apps.

Major objects for mail apps

For mail apps, you can look at the JavaScript API for Office object model in three layers:

  1. In the first layer, there are a few objects shared by all three types of apps for Office: Office, Context, and AsyncResult.
  2. The second layer in the API that is applicable and specific to mail apps includes the Mailbox, Item, and UserProfile objects, which support accessing information about the user and the item currently selected in the user’s mailbox.
  3. The third layer describes the data-level support for mail apps:
    1. There are CustomProperties and RoamingSettings that support persisting properties set up by the mail app for the selected item and for the user’s mailbox, respectively.
    2. There are the supported item objects, Appointment and Message, that inherit from Item, and the MeetingRequest object that inherits from Message. These objects represent the types of Outlook items that support mail apps: calendar items of appointments and meetings, and message items such as email messages, meeting requests, responses, and cancellations.
    3. Then there are the item-level properties (such as Appointment.subject) as well as objects and properties that support certain known Entities objects (for example Contact, MeetingSuggestion, PhoneNumber, and TaskSuggestion).

Figure 3 shows the major objects: Mailbox, Item, UserProfile, Appointment, Message, Entities, and their members.

Figure 3. Major objects and their members used by mail apps in the JavaScript API for Office.

Figure 4 shows all of the objects and enumerations in the JavaScript API for Office that pertain to mail apps.

Figure 4. All objects for mail apps in the JavaScript API for Office.

Figure 5 is a thumbnail of a diagram with all the objects and members that mail apps use. Zoom into the diagram at http://go.microsoft.com/fwlink/?LinkId=317271.

Figure 5. All objects and members used by mail apps in the JavaScript API for Office.

The following are common reasons why mail apps are a better choice for developers than add-ins:

  • You can use existing knowledge of and the benefits of web technologies such as HTML, JavaScript, and CSS. For power users and new developers, XML, HTML, and JavaScript require less significant ramp-up time than COM-based APIs such as the Outlook object      model.
  • You can use a simple web deployment model to update your mail app (including the web services that the app uses) on your web server without any complex installation on the Outlook client. In fact, any updates to the mail app, with the exception of the app manifest, do not require any updating on the Office client. You can update the code or user interface of the mail app conveniently just on the web server. This presents a significant advantage over the administrative overhead involved in updating add-ins.
  • You can use a common web development platform for mail apps that can roam across the Outlook rich client and Outlook Web App on the desktop, tablet, and smartphone. On the other hand, add-ins use the object model for the Outlook rich client and, hence, can run on only that rich client on a desktop form factor.
  • You can enjoy rapid turnaround of building and releasing apps via the Office Store.
  • Because of the three-tier permissions model, users and administrators can appreciate better security and privacy in mail apps than add-ins, which have full access to the content of each account in the user’s profile. This, in turn, encourages user consumption of apps.
  • Depending on your scenarios, there are features unique to mail apps that you can take advantage of and that are not supported by add-ins:
    • You can specify a mail app to activate only for certain contexts (for example, Outlook displays the app in the app bar only if the message class of the user-selected appointment is IPM.Appointment.Contoso, or if the body of an email contains a package       tracking number or a customer identifier).
    • You can activate a mail app if the selected message contains some known entities, such as an address, contact, email address, meeting suggestion, or task suggestion.
    • You can take advantage of authentication by identity tokens and of Exchange Web Services.

Reasons to choose add-ins

The following features are unique to add-ins and may make them a more appropriate choice than mail apps in some circumstances:

  • You can use add-ins to extend or automate Outlook at an application-level, because the object model and PIA have extensive integration with Outlook features (such as all Outlook item types, user interface, sessions, and rules). At the item-level, add-ins can interact with an item in read or compose mode. With mail apps, you cannot automate Outlook at the application level, and you can extend Outlook’s functionality in the context of only the read-mode of the supported items (messages and appointments) in the user’s mailbox.
  • You can specify custom business logic for a new item type.
  • You can modify and add custom commands in the ribbon and Backstage view.
  • You can display a custom form page or form region.
  • You can detect events such as sending an item or modifying properties of an item.
  • You can use add-ins on Outlook 2013 and Exchange Server 2013, as well as earlier versions of Outlook and Exchange. On the other hand, mail apps work with Outlook and Exchange starting in Outlook 2013 and Exchange Server 2013, but not earlier versions.

Conclusion

When you are considering creating a solution for Outlook, first verify whether the supported major features and objects of the apps for Office platform meet your needs. Develop your solution as a mail app, if possible, to take advantage of the platform’s support across Outlook clients over the desktop, tablet, and smartphone form factors. Note that there are still some circumstances where add-ins are more appropriate, and you should prioritize the goals of your solution before making a decision.

Further references

Apps for Office and mail apps

Brand NEW “My Latest Documents” SharePoint Web Part and App released and available!!

In each SharePoint Team site where we have multiple document libraries, the requirement is always there to see what the latest changes are. Unfortunately the Microsoft web part allows only seeing the documents changed by myself.

To be able to have a solution for that, where you haven’t to be administrator or owner, I created a definition for a recent document web part. This can be deployed on Office 365, SharePoint 2010 and SharePoint 2007 sites. On SharePoint 2007 and SharePoint 2010 the only use right needed, is to be able to modify the site.

The goal of the web part was:

  • Show the 10 latest changed documents
  • Show a more button that displays additional 40 documents
  • Display the online status of users
  • Display the correct date format of each site
  • Display the name of the folder where the document is stored and a link to the folder.
  • Get documents recursively from all sub sites

Example Image:

The following instructions explain in detail how you can activate it:


Activation SharePoint 2010

  1. Edit your webpage and add a new web part
  2. Select browse and upload a the webpart definition

  3. Click Upload

  4. Now, it’s a bit confusing, but you have to click again add new web part
  5. The upload web part is now available in your web part menu and you can add it.

All this steps have to be done each time when you want to add the web part. To provide it for all site owners add it to the web part gallery.

Activation on Office 365

That means you have to upload it to your web part gallery:

After uploading the web part is available on your site.

You can simple edit the site, and click More Web Parts

Afterwardy you can find it in the Default Web Parts folder.


Contact me NOW at tomas.floyd@outlook.com to order this brand new Web Part and/or App

SharePoint Samurai