Category Archives: SharePoint Online; Office 365;

How To : SAP Integration with .Net 4.0 (SAP Connection Manager) & SharePoint

This is a simple, C# class library project to connect .NET applications with SAP.

ppt_img[1]


This component internally implements SAP .NET Connector 3.0. The SAP .NET Connector is a development environment that enables communication between the Microsoft .NET platform and SAP systems.

This connector supports RFCs and Web services, and allows you to write different applications such as Web form, Windows form, or console applications in the Microsoft Visual Studio .NET.

With the SAP .NET Connector, you can use all common programming languages, such as Visual Basic. NET, C#, or Managed C++.

Features
Using the SAP .NET Connector you can:

Write .NET Windows and Web form applications that have access to SAP business objects (BAPIs).

Develop client applications for the SAP Server.

Write RFC server applications that run in a .NET environment and can be installed starting from the SAP system.

Following are the steps to configure this utility on your project

Download and extract the attached file and place it on your machine. This package contains 3 libraries:

SAPConnectionManager.dll
sapnco.dll
sapnco_utils.dll

Now go to your project and add the reference of all these four libraries. Sapnco.dll and sapnco_utils.dll are inbuilt libraries used by SAP .NET Connector. SAPConnectionManager.dll is the main component which provides the connection between .NET and SAP.

Once the above steps are complete, you need to make certain entries related to SAP server on your configuration file. Here are the sample entries that you have to maintain on your own project. You need to change only the values which are marked in Bold. Rest remains unchanged.

<appSettings>
<add key=”ServerHost” value=”127.0.0.1″/>
<add key=”SystemNumber” value=”00″/>
<add key=”User” value=”sample”/>
<add key=”Password” value=”pass”/>
<add key=”Client” value=”50″/>
<add key=”Language” value=”EN”/>
<add key=”PoolSize” value=”5″/>
<add key=”PeakConnectionsLimit” value=”10″/>
<add key=”IdleTimeout” value=”600″/>
</appSettings>

To test this component, create one windows application. Add the reference of sapnco.dll, sapnco_utils.dll, andSAPConnectionManager.dll on your project.

Paste the below code on your Form lode event

SAPSystemConnect sapCfg = new SAPSystemConnect();
RfcDestinationManager.RegisterDestinationConfiguration(sapCfg);
RfcDestination rfcDest = null;
rfcDest = RfcDestinationManager.GetDestination(“Dev”);

sap_integration_en_round[1]
That’s it. Now you are successfully connected with your SAP Server. Next you need to call SAP business objects (BAPIs) and extract the data and stored it in DataSet or list.

Demo Code available on request!!

How To : Add a Promoted Links Web Part to SharePoint 2013 App Default page

This article helps you to add Promoted links web part to your default app page as the following figure:


To do this follow the following steps:
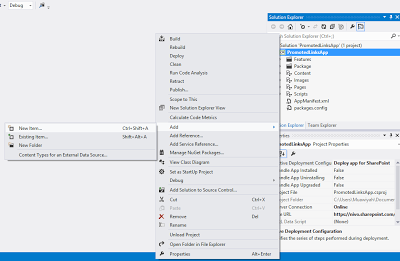
Open the shortcut menu for the project, and then choose Add, New Item
Add Picture Textbox, and two buttons to infopath form


In the Templates pane, choose the List template, and then choose the Add button :

Enter list name and choose the Create a non-customizable list based on an existing list type of option button, and then, in its list, choose Promoted links, and then choose the Finish button

Binding the CAPTCHA image
In Solution Explorer, under the list instance node, open the Elements.xml file.
Add the promoted links items as the following:
<?versionencodingutf-8?>
Elementsxmlnshttp://schemas.microsoft.com/sharepoint/
ListInstanceTitleMyPromotedLinks
OnQuickLaunch
TemplateType
FeatureId192efa95-e50c-475e-87ab-361cede5dd7f
Lists/MyPromotedLinks
DescriptionMy List Instance
FieldTitleTwitter</Field
FieldBackgroundImageLocation/PromotedLinksApp/Images/twitter.png
FieldDescriptionMuawiyah Shannak Twitter
FieldLinkLocationhttps://twitter.com/MuShannak</Field
FieldOrder</Field
</
FieldTitle</Field
FieldBackgroundImageLocation/PromotedLinksApp/Images/blogger.png
FieldDescriptionMuawiyah Shannak Blog
FieldLinkLocationhttp://mushannak.blogspot.com</Field
FieldOrder</Field
</
FieldTitleLinkedin</Field
FieldBackgroundImageLocation/PromotedLinksApp/Images/linkedin.png
FieldDescriptionMuawiyah Shannak Linkedin
FieldLinkLocationhttp://ae.linkedin.com/in/shannak</Field
FieldOrder</Field
</
</
</
<!–ListInstance
</Elements
In Solution Explorer, under the Pages node, open the Default.aspx file. Add following tags inside the PlaceHolderMain Place Holder:
WebPartPagesWebPartZone=”WebPartZone”runat=”server”FrameType=”None”>
WebPartPagesXsltListViewWebPart=”XsltListViewAppPromotedList”
runat=”server”ListUrl=”Lists/MyPromotedLinks”IsIncluded=”True”
NoDefaultStyle=”TRUE”Title=”Images used in switcher”
PageType=”PAGE_NORMALVIEW”Default=”False”
ViewContentTypeId=”0x”>
</WebPartPagesXsltListViewWebPart
</WebPartPagesWebPartZone

Deploy a solution and you will find nice promoted links web part in the app default page!

How To : Use the REST API and AngularJS to Create a Web Part to retrieve List Items

Introduction

This article explains how to get the data from a SharePoint List using Angular JavaScript and the REST API. I used the REST API to talk to SharePoint and get the data from the list.

In this script we just see that we have first created an Angular Controller with the name “spCustomerController”. We have also injected $scope and $http service.

The $http service will fetch the list data from the specific columns of the SharePoint list. $scope is a glue between a Controller and a View. It acts as execution context for Expressions. Angular expressions are code snippets that are usually placed in bindings such as {{ expression }}.

Angular Controller.jpg

Use the following procedure to create a sample.

  1. <h1>WelCome To Angular JS Sharepoint 2013 REST API !!</h1>  
  2.   
  3. <div ng-app=“SharePointAngApp” class=“row”>  
  4.     <div ng-controller=“spCustomerController” class=“span10”>  
  5.         <table class=“table table-condensed table-hover”>  
  6.             <tr>  
  7.                 <th>Title</th>  
  8.                 <th>Employee</th>  
  9.                 <th>Company</th>  
  10.                  
  11.             </tr>  
  12.             <tr ng-repeat=“customer in customers”>  
  13.                 <td>{{customer.Title}}</td>  
  14.                 <td>{{customer.Employee}}</td>  
  15.                 <td>{{customer.Company}}</td>  
  16.                 </tr>  
  17.         </table>  
  18.     </div>  
  19. </div>  


Step 1: Navigate to your SharePoint 2013 site.

Step 2: From this page select the Site Actions | Edit Page.

Edit the page, go to the “Insert” tab in the Ribbon and click the “Web Part” option. In the “Web Parts” picker area, go to the “Media and Content” category, select the “Script Editor” Web Part and press the “Add button”.

Step 3: Once the Web Part is inserted into the page, you will see an “EDIT SNIPPET” link; click it. You can insert the HTML and/or JavaScript as in the following

  1. <style>  
  2. table, td, th {  
  3.     border: 1px solid green;  
  4. }  
  5.   
  6. th {  
  7.     background-color: green;  
  8.     color: white;  
  9. }  
  10. </style>  
  11. <script src=https://ajax.googleapis.com/ajax/libs/angularjs/1.0.1/angular.min.js&#8221;></script>  
  12. <script src=http://code.jquery.com/ui/1.10.3/jquery-ui.min.js&#8221;></script>  
  13.   
  14. <script>  
  15.       
  16.   
  17.     var myAngApp = angular.module(‘SharePointAngApp’, []);  
  18.     myAngApp.controller(‘spCustomerController’, function ($scope, $http) {  
  19.         $http({  
  20.             method: ‘GET’,  
  21.             url: _spPageContextInfo.webAbsoluteUrl + “/_api/web/lists/getByTitle(‘InfoList’)/items?$select=Title,Employee,Company”,  
  22.             headers: { “Accept”: “application/json;odata=verbose” }  
  23.         }).success(function (data, status, headers, config) {  
  24.             $scope.customers = data.d.results;  
  25.         }).error(function (data, status, headers, config) {  
  26.          
  27.         });  
  28.     });  
  29.       
  30. </script>  
  31.   
  32. <h1> Angular JS SharePoint 2013 REST API !!</h1>  
  33.   
  34. <div ng-app=“SharePointAngApp” class=“row”>  
  35.     <div ng-controller=“spCustomerController” class=“span10”>  
  36.         <table class=“table table-condensed table-hover”>  
  37.             <tr>  
  38.                 <th>Title</th>  
  39.                 <th>Employee</th>  
  40.                 <th>Company</th>  
  41.                  
  42.             </tr>  
  43.             <tr ng-repeat=“customer in customers”>  
  44.                 <td>{{customer.Title}}</td>  
  45.                 <td>{{customer.Employee}}</td>  
  46.                 <td>{{customer.Company}}</td>  
  47.                 </tr>  
  48.         </table>  
  49.     </div>  
  50. </div>  


Finally the result show look as below:


Finally result show.jpg