Category Archives: JQuery

How To : Add a Promoted Links Web Part to SharePoint 2013 App Default page

This article helps you to add Promoted links web part to your default app page as the following figure:


To do this follow the following steps:
Open the shortcut menu for the project, and then choose Add, New Item
Add Picture Textbox, and two buttons to infopath form


In the Templates pane, choose the List template, and then choose the Add button :

Enter list name and choose the Create a non-customizable list based on an existing list type of option button, and then, in its list, choose Promoted links, and then choose the Finish button

Binding the CAPTCHA image
In Solution Explorer, under the list instance node, open the Elements.xml file.
Add the promoted links items as the following:
<?versionencodingutf-8?>
Elementsxmlnshttp://schemas.microsoft.com/sharepoint/
ListInstanceTitleMyPromotedLinks
OnQuickLaunch
TemplateType
FeatureId192efa95-e50c-475e-87ab-361cede5dd7f
Lists/MyPromotedLinks
DescriptionMy List Instance
FieldTitleTwitter</Field
FieldBackgroundImageLocation/PromotedLinksApp/Images/twitter.png
FieldDescriptionMuawiyah Shannak Twitter
FieldLinkLocationhttps://twitter.com/MuShannak</Field
FieldOrder</Field
</
FieldTitle</Field
FieldBackgroundImageLocation/PromotedLinksApp/Images/blogger.png
FieldDescriptionMuawiyah Shannak Blog
FieldLinkLocationhttp://mushannak.blogspot.com</Field
FieldOrder</Field
</
FieldTitleLinkedin</Field
FieldBackgroundImageLocation/PromotedLinksApp/Images/linkedin.png
FieldDescriptionMuawiyah Shannak Linkedin
FieldLinkLocationhttp://ae.linkedin.com/in/shannak</Field
FieldOrder</Field
</
</
</
<!–ListInstance
</Elements
In Solution Explorer, under the Pages node, open the Default.aspx file. Add following tags inside the PlaceHolderMain Place Holder:
WebPartPagesWebPartZone=”WebPartZone”runat=”server”FrameType=”None”>
WebPartPagesXsltListViewWebPart=”XsltListViewAppPromotedList”
runat=”server”ListUrl=”Lists/MyPromotedLinks”IsIncluded=”True”
NoDefaultStyle=”TRUE”Title=”Images used in switcher”
PageType=”PAGE_NORMALVIEW”Default=”False”
ViewContentTypeId=”0x”>
</WebPartPagesXsltListViewWebPart
</WebPartPagesWebPartZone

Deploy a solution and you will find nice promoted links web part in the app default page!

Windows 8.1 Updated Reources and Tools

With Windows 8.1 also come lots of updates to the tools and templates that you can use to create Windows Store apps. These updates can help cut down the work in your development and test cycles.


Get the updated tools described below at our Windows 8.1 page.

 w81_intro_2

New or updated in Windows 8.1

General updates

Area Description of update
Support for updating your Windows Store apps to Windows 8.1. Migrate your Windows 8 app to Windows 8.1. This may first require updating your app code for Windows 8.1.
Windows Store app templates We’ve updated all templates for Windows 8.1, and we’ve added a new Hub template too.
Azure Mobile Services and push notification wizards
  • The Services Manager makes it easy to connect your app to Azure Mobile Services or Microsoft Advertising.
  • The push notification wizard makes it easy to set up a Azure Mobile Service to send push notifications to your app.
App bundle support Now you can combine resource packages (like multiple scales, languages, or Microsoft Direct3D feature levels) into a single .appxbundle file for submission to the Windows Store. For your customers, this means that your app is only deployed with the resources they need for their device and locale.
App validation on a remote device The Create App Package Wizard in Microsoft Visual Studio 2013 now makes it easy to validate your app using Windows App Certification Kit 3.0 on a remote device (such as Windows RT PCs).
Create coded UI tests using XAML Write automated functional tests for testing Windows Store apps using XAML and the cross-hair tool.

Note  Touch interactions are now supported for controls.

New Visual Studio theme/ and Visual Design We’ve added a third theme, Blue, to the existing Light and Dark themes. The Blue theme offers a mid-range color scheme reminiscent of Microsoft Visual Studio 2010.

Also, based on user feedback, we’ve enhanced all themes with additional color and clarity in icons, revised icons, more contrast across the development environment , and clearer segmentation of regions within the environment.


Diagnostics

Area Description of update
Mixed-language debugging For Windows Store apps that use JavaScript and C++, the debugger now lets you set breakpoints in either language and provides a call stack with both JavaScript and C++ functions.
Managed app debugging The debugger now displays return values. You can use Edit and Continue in 64-bit managed apps. Exceptions that come from Windows Store apps preserve information about the error, even across language boundaries.
Asynchronous debugging improvements The call-stack window now includes the creation stack if you stop in an asynchronous method.
Native “Just My Code” For native code, the call stack simplifies debugging by displaying only the code that you’ve created.
DOM Explorer
  • The Cascading Style Sheets (CSS) editor supports improved editing, Microsoft IntelliSense, inline style support, shorthand, specificity, and notification of invalid properties.
  • The Computed and Styles panes have been enhanced.
  • The DOM Explorer supports search, editing as HTML, IntelliSense, and undo stacks.
JavaScript Console The console now supports object preview and visualization, new APIs, multiline function support, IntelliSense, evaluation of elements as objects or HTML, and legacy document modes.
JavaScript Memory Profiler
  • Dominators view shows memory allocation retained by each object.
  • The profiler notifies you of potential memory leaks caused by detached or disconnected DOM nodes.
JavaScript UI Responsiveness
  • The Details pane includes hyperlinks to event source locations, plus a chart showing the percentage of time that each child event contributed to the selected event’s overall duration.
  • You can now expand instances of Layout and Style calculation events to display the HTML elements that were affected by the operation.
XAML UI Responsiveness For C#/VB/C++ XAML-based Windows Store apps, the XAML UI Responsiveness tool allows you to diagnose performance issues related to app startup and page navigation, panning and scrolling, and input responsiveness in general.


JavaScript editor

Area Description of update
Completion of enclosing character pairs The editor automatically inserts the closing character when you type a left brace (“{“), parenthesis (“(“), bracket (“[“), single quotation mark (“`”), or (“””). A smart auto-format and indent of your source is also made as it auto-completes.
Editor navigation bar This new UI feature helps you identify and move through the important elements in your source code. New for JavaScript developers, the navigation bar will highlight important functions and objects in your source.
Deprecation notes in IntelliSense. If a Windows API element has been deprecated in Windows 8.1, IntelliSense tooltips identify it as “[deprecated]”.
Go To Definition for namespaces You can right-click a namespace you use in your code (such as WinJS.UI) and then click Go To Definition to be taken to the line where that namespace is defined.
Identifier highlighting Select an identifier (for example, a variable, parameter, or function name) in your source and any uses of that identifier will be highlighted in your source code.


C++ development

Area Description of update
Windows Store app development for Windows 8.1
  • Boxed types in value structs

    You can now define value types by using fields that can be null—for example, IBox<int>^ as opposed to int. This means that the fields can either have a value, or be equal to nullptr.

  • Richer exception information

    C++/CX supports the new Windows error model that enables the capture and propagation of rich exception information across the Application Binary Interface (ABI); this includes call stacks and custom message strings.

  • Object::ToString is now virtual

    You can now override ToString() in user-defined Windows Runtime ref types.

C++11 standard compliance Compiler support for ISO C++11 language features

  • Default template arguments for function templates
  • Delegating constructors
  • Explicit conversion operators
  • Initializer lists and uniform initialization
  • Raw string literals
  • Variadic templates

Updated Standard Template Library (STL) to use the latest C++11 features Improvements to C99 libraries

  • C99 functionality added to
  • Complex math functions in new header, <complex.h>
  • Integer type support in new header, ; includes format string support for “hh”
  • Support for variable-argument scanf forms in . C99 variants of vscanf, strtoll, vwscanf/wcstoll, and isblank/iswblank are implemented.
  • New conversion support for long long and long double in <stdlib.h>
C++ REST SDK Modern C++ implementation of Representational State Transfer (REST) services. For more info see C++ REST SDK (codename “Casablanca”).
C++ Azure Mobile Services SDK The shortest path to a connected C++ app with a Azure backend.
C++ AMP SxS CPU/GPU debugging (for WARP accelerator), enhanced texture support (mipmaps and new sampling modes), and improved diagnostics and exceptions.
IDE productivity features
  • Improved code formatting.
  • Brace completion.
  • Auto-generation of event handler code in C++/CX and C++/CLI.
  • Context-based member list filtering.
  • Parameter help scrolling.
  • Toggle header/code file.
  • Resizable C++ project-properties window.
  • Faster builds. Numerous optimizations and multi-core utilization make builds faster, especially for large projects. Incremental builds for C++ apps that have references to C++ WinMD are also much faster.
App performance
  • Pass vector type arguments by using the __vectorcall calling convention to use vector registers.
  • Reduction or elimination of CPU/GPU data transfer in C++ AMP.
  • Auto-vectorization improvements.
  • C++/CX optimizations in allocations and casting.
  • Performance tuning of C++ AMP runtime libraries.
  • New: PGO for Windows Store app development.
Build-time performance enhancements Compiler throughput improvements for highly parallel builds.


HTML design tools

Area Description of update
CSS animation The timeline editor helps you create CSS animations.
JavaScript behaviors Add JavaScript event listeners to any element without writing code. Choose from a list of supplied event handlers or create your own.
Custom font embedding Create a branded experience by using custom fonts for HTML text.
Data binding Set the data binding for any template.
Rules and guides Create custom guides.
Border radius Easy-to-use handles on each element help you create rounded corners and ellipses.
Searching and setting CSS properties The search box lets you set CSS property values directly and quickly.
Finding elements with CSS syntax The live DOM search now supports CSS syntax. For example, you can automatically select all elements with class “myclass” by searching for “.myclass”.


XAML design tools

Area Description of update
XAML editor improvements The XAML editor in Visual Studio 2013 includes IntelliSense for data bindings and resources, smart commenting, and Go To Definition.
Rulers and guides Create custom guides.
Better style editing support Edit styles and templates in the context of the document where they’re used, even if they’re actually defined in another, shared location.
Sample data support The data panel enhances sample data support in XAML projects for the Windows Store. This includes the ability to create sample data from JSON content. For an example of how to set this up, see the updated Windows Store app project templates for XAML.
View state authoring The device panel in Blend for Microsoft Visual Studio 2013 and Visual Studio 2013 supports updated view states properties and requirements to support variable minimum widths.


Windows App Certification Kit 3.0

Use the latest version of the Windows App Certification Kit to test the readiness of Windows Store apps for Windows 8 and Windows 8.1 before on-boarding, and for the Windows 7, Windows 8, and Windows 8.1 Windows Desktop App Certification.

We’ve also updated the Windows App Certification Kit to give you a smooth experience. For example, you can now run tests in parallel to save time, and you have more flexibility in selecting the tests you run.

New validation tests

As with previous releases of Windows, we’ve revised the kit content to include more validation, helping to make sure that Windows apps running on the latest update are well behaved. Here’s a high-level breakdown of the new tests.

Test Description
Direct3D additional check Validates apps for compliance with Direct3D requirements, and ensures that apps using C++ and XAML are calling a new Trim method upon their suspend callback.
Supported directory structure Ensures that apps don’t create a structure on disk that results in files longer than MAX_PATH (260 characters).
File extensions and protocols Limits the number of file extensions and protocols that an app can register.
Platform appropriate files Checks for packages that contain cross-architecture binaries.
Banned file check Checks apps for use of outdated or prerelease components known to have security vulnerabilities.
JavaScript background tasks Verifies that apps that use JavaScript have the proper close statement in the background task, so the app doesn’t consume battery power unnecessarily.
Framework dependency rules Ensures that apps are taking the right framework dependencies for Windows 8 and Windows 8.1.


Test reports

We’ve made a number of changes to the test report generated by the Windows App Certification Kit. These reports include new information, are easier to read, and provide more links to resources that can help you resolve issues. Significant additions and updates include:

  • Expanded error-message details.
  • Actionable info for supported and deprecated APIs.
  • Details about the configuration of the current test device.
  • A language toggle (if the report is localized).

For more information on how to use this kit, see Using the Windows App Certification Kit.

How To : Use the CSOM to Update SharePoint Web Part Properties

List in SharePoint9

I wanted to share two methods I developed for retrieving and updating web part properties from JavaScript using CSOM in SharePoint 2013 (I haven’t seen a reference for getting a page’s web part manager through REST).

The web part ID should be available through the “webpartid” attribute included in the page markup.

The methods use the jQuery deferred object, but that could easily be replaced with anything else to handle the asynchronous events. Using this I’m hoping to create configurable client side web parts which is a problem I’ve recently had to tackle.

View on GitHub

app.js

  1. //pass in the web part ID as a string (guid)
  2. function getWebPartProperties(wpId) {
  3. var dfd = $.Deferred();
  4.  
  5. //get the client context
  6. var clientContext =
  7. new SP.ClientContext(_spPageContextInfo.webServerRelativeUrl);
  8. //get the current page as a file
  9. var oFile = clientContext.get_web()
  10. .getFileByServerRelativeUrl(_spPageContextInfo.serverRequestPath);
  11. //get the limited web part manager for the page
  12. var limitedWebPartManager =
  13. oFile.getLimitedWebPartManager(SP.WebParts.PersonalizationScope.shared);
  14. //get the web parts on the current page
  15. var collWebPart = limitedWebPartManager.get_webParts();
  16.  
  17. //request the web part collection and load it from the server
  18. clientContext.load(collWebPart);
  19. clientContext.executeQueryAsync(Function.createDelegate(this, function () {
  20. var webPartDef = null;
  21. //find the web part on the page by comparing ID’s
  22. for (var x = 0; x < collWebPart.get_count() && !webPartDef; x++) {
  23. var temp = collWebPart.get_item(x);
  24. if (temp.get_id().toString() === wpId) {
  25. webPartDef = temp;
  26. }
  27. }
  28. //if the web part was not found
  29. if (!webPartDef) {
  30. dfd.reject(“Web Part: “ + wpId + ” not found on page: “
  31. + _spPageContextInfo.webServerRelativeUrl);
  32. return;
  33. }
  34.  
  35. //get the web part properties and load them from the server
  36. var webPartProperties = webPartDef.get_webPart().get_properties();
  37. clientContext.load(webPartProperties);
  38. clientContext.executeQueryAsync(Function.createDelegate(this, function () {
  39. dfd.resolve(webPartProperties, webPartDef, clientContext);
  40. }), Function.createDelegate(this, function () {
  41. dfd.reject(“Failed to load web part properties”);
  42. }));
  43. }), Function.createDelegate(this, function () {
  44. dfd.reject(“Failed to load web part collection”);
  45. }));
  46.  
  47. return dfd.promise();
  48. }
  49.  
  50. //pass in the web part ID and a JSON object with the properties to update
  51. function saveWebPartProperties(wpId, obj) {
  52. var dfd = $.Deferred();
  53.  
  54. getWebPartProperties(wpId).done(
  55. function (webPartProperties, webPartDef, clientContext) {
  56. //set web part properties
  57. for (var key in obj) {
  58. webPartProperties.set_item(key, obj[key]);
  59. }
  60. //save web part changes
  61. webPartDef.saveWebPartChanges();
  62. //execute update on the server
  63. clientContext.executeQueryAsync(Function.createDelegate(this, function () {
  64. dfd.resolve();
  65. }), Function.createDelegate(this, function () {
  66. dfd.reject(“Failed to save web part properties”);
  67. }));
  68. }).fail(function (err) { dfd.reject(err); });
  69.  
  70. return dfd.promise();
  71. }

Microsoft Site Templates Upgraded and are now available


One of the main goals of the application templates is to provide a demonstration of the application building power in SharePoint and as a potential starting point for larger, more robust applications. While these templates are fully functional and usable out-of-the-box, I’ll be happy to reply on your comments and supporting you as needed.


note: those templates were collected from several resources and no source code for them.

All templates are compatible with SharePoint Server 2010 and Foundation Server 2010.

Case Management

The Case Management application template helps case managers track the status and tasks required to complete their work. When a case is created, standard tasks and documents are created which are modified based on the work each case manager has completed.

Clinical Trial Initiation and Management

For those who work in Academic Medical Centers, the Clinical Trial Initiation and Management application template helps teams manage the process of tracking clinical trial protocols, objective setting, subject selection and budget activities.

Employee Activities Site
employee activities
The Employee Activities Site application template helps departments, such as HR and Marketing, manage the creation and attendance of events for employees.

Employee Training Scheduling and Materials

The Employee Training Scheduling and Materials application template helps Instructors add new courses and organize course materials. Employees use the site to schedule attendance at a course, track courses they’ve attended and to provide feedback.

Employee Training 01

Employee Training

Employee Training 03

Absence Request and Vacation Schedule Management

The Absence Request and Vacation Schedule Management application template helps provider departments manage requests for out of office days and provides dashboards showing which users are signed up for a set of responsibilities

Event Planning

The Event Planning application template helps teams organize events efficiently through the use online registration, schedules, communication and feedback.

Discussion Database

The Discussion Database application template provides a location where team members can create and reply to discussion topics.

Team Work Site

The Team Work Site application template provides a place where clinical and business teams, can upload background documents, track scheduled calendar events and submit action items that result from team meetings.

Document Library and Review

The Document Library and Review application template helps people to manage the review cycle common to processes like publication, knowledge management and project plan development.

Knowledgebase

The Knowledgebase application template helps teams manage the information that is resident within their organization. The template enables team members to upload/create documents using Web-based tools and tag them with relevant identifying information.

Policies and Procedures Solution Accelerator

The Policies and Procedures Solution Accelerator assists healthcare organizations create, maintain, publish and easily access policy and procedure information. It also provides the ability to upload documents, maintain a version history and manage tasks.

Board of Directors

The Board of Directors application template provides a single location for an external group of members to store and locate common documents such as quarterly reviews, shareholder meeting notes and annual strategy documents.

Business Performance Reporting

The Business Performance Reporting application template helps health organization managers track the satisfaction of internal customers/patients through a combination of surveys and discussions.

Request for Proposal

The Request for Proposal application template helps manage the process of creating and releasing an initial RFP, collecting submissions of proposals and formally accepting the selected proposal from amongst those submitted.

Compliance Process Support Site

The Compliance Process Support Site application template helps both teams and executive sponsors to manage compliance implementation endeavors, such as HIPAA.

Expense Reimbursement and Approval

The Expense Reimbursement and Approval application template helps manage elements of the expense approval process, including creation and approval. Users can monitor the status of their reimbursement request through a filtered view listing.

Scorecards Solution Accelerator

The Scorecards solution accelerator acts as a template for configuring a management dashboard to track organizational metrics. It contains four example dashboards ranging from a primary care practice to a healthcare organization’s CEO dashboard.

Call Center
call center
The Call Center application template helps departments manage the process of handling customer service requests. The application template helps teams manage service requests from issue identification to cause analysis and resolution.

Help Desk
help desk
The Help Desk application template helps departments manage the process of handling service requests. Team members use the application template to identify a service request, manage identification of the root cause and track solution status.

Physical Asset Tracking and Management

The Physical Asset Tracking and Management application template helps departments, such as Facilities, BioMedical, Surgery, etc. manage requests and the tracking of physical assets.

Inventory Tracking
inventory
The Inventory Tracking application template helps organizations track elements associated with inventory, including creation of inventory. Users are notified when each part reaches the reorder quantity and helps manage customer and supplier information.

Cafeteria Menu Management

The Cafeteria Menu Management application template helps hospital Food & Nutrition staff easily communicate daily menu choices to hospital staff and visitors. It allows staff to develop/schedule menus and provide related nutritional information.

Budgeting and Tracking Multiple Projects

The Budgeting and Tracking Multiple Projects application template helps project teams track and budget multiple, interrelated sets of activities. Management tools such as assignment of new tasks, Gantt Charts and common status designators.

Change Request Management
change request management
The Change Request Management application template helps users track risks associated with a design change. Team members can submit a change request, notifying stakeholders of the risks involved with the change.

IT Team Workspace

The IT Team Workspace application template helps teams manage the development, deployment and support of software projects. It also includes help desk functionality, allowing team members to guide service requests from initiation to resolution.

Project Tracking Workspace

The Project Tracking Workspace application template helps small team projects manage project information in a single location. The application template provides a place where a team can list and view project issues and tasks.


How to : Use JQuery and JSON in MVC 5 for Autocomplete

Image

Imagine that you want to create edit view for Company entity which has two properties: Name (type string) and Boss (type Person). You want both properties to be editable. For Company.Name simple text input is enough but for Company.Boss you want to use jQuery UI Autocomplete widget. This widget has to meet following requirements:

  • suggestions should appear when user starts typing person’s last name or presses down arrow key;
  • identifier of person selected as boss should be sent to the server;
  • items in the list should provide additional information (first name and date of birth);
  • user has to select one of the suggested items (arbitrary text is not acceptable);
  • the boss property should be validated (with validation message and style set for appropriate input field).

Above requirements appear quite often in web applications. I’ve seen many over-complicated ways in which they were implemented. I want to show you how to do it quickly and cleanly… The assumption is that you have basic knowledge about jQuery UI Autocomplete and ASP.NET MVC. In this post I will show only the code which is related to autocomplete functionality but you can download full demo project here. It’s ASP.NET MVC 5/Entity Framework 6/jQuery UI 1.10.4 project created in Visual Studio 2013 Express for Web and tested in Chrome 34, FF 28 and IE 11 (in 11 and 8 mode).

So here are our domain classes:

public class Company
{
    public int Id { get; set; } 

    [Required]
    public string Name { get; set; }

    [Required]
    public Person Boss { get; set; }
}
public class Person
{
    public int Id { get; set; }

    [Required]
    [DisplayName("First Name")]
    public string FirstName { get; set; }
    
    [Required]
    [DisplayName("Last Name")]
    public string LastName { get; set; }

    [Required]
    [DisplayName("Date of Birth")]
    public DateTime DateOfBirth { get; set; }

    public override string ToString()
    {
        return string.Format("{0}, {1} ({2})", LastName, FirstName, DateOfBirth.ToShortDateString());
    }
}

Nothing fancy there, few properties with standard attributes for validation and good looking display. Person class has ToString override – the text from this method will be used in autocomplete suggestions list.

Edit view for Company is based on this view model:

public class CompanyEditViewModel
{    
    public int Id { get; set; }

    [Required]
    public string Name { get; set; }

    [Required]
    public int BossId { get; set; }

    [Required(ErrorMessage="Please select the boss")]
    [DisplayName("Boss")]
    public string BossLastName { get; set; }
}

Notice that there are two properties for Boss related data.

Below is the part of edit view that is responsible for displaying input field with jQuery UI Autocomplete widget for Boss property:

<div class="form-group">
    @Html.LabelFor(model => model.BossLastName, new { @class = "control-label col-md-2" })
    <div class="col-md-10">
        @Html.TextBoxFor(Model => Model.BossLastName, new { @class = "autocomplete-with-hidden", data_url = Url.Action("GetListForAutocomplete", "Person") })
        @Html.HiddenFor(Model => Model.BossId)
        @Html.ValidationMessageFor(model => model.BossLastName)
    </div>
</div>

form-group and col-md-10 classes belong to Bootstrap framework which is used in MVC 5 web project template – don’t bother with them. BossLastName property is used for label, visible input field and validation message. There’s a hidden input field which stores the identifier of selected boss (Person entity). @Html.TextBoxFor helper which is responsible for rendering visible input field defines a class and a data attribute. autocomplete-with-hidden class marks inputs that should obtain the widget. data-url attribute value is used to inform about the address of action method that provides data for autocomplete. Using Url.Action is better than hardcoding such address in JavaScript file because helper takes into account routing rules which might change.

This is HTML markup that is produced by above Razor code:

<div class="form-group">
    <label class="control-label col-md-2" for="BossLastName">Boss</label>
    <div class="col-md-10">
        <span class="ui-helper-hidden-accessible" role="status" aria-live="polite"></span>
        <input name="BossLastName" class="autocomplete-with-hidden ui-autocomplete-input" id="BossLastName" type="text" value="Kowalski" 
         data-val-required="Please select the boss" data-val="true" data-url="/Person/GetListForAutocomplete" autocomplete="off">
        <input name="BossId" id="BossId" type="hidden" value="4" data-val-required="The BossId field is required." data-val-number="The field BossId must be a number." data-val="true">
        <span class="field-validation-valid" data-valmsg-replace="true" data-valmsg-for="BossLastName"></span>
    </div>
</div>

This is JavaScript code responsible for installing jQuery UI Autocomplete widget:

$(function () {
    $('.autocomplete-with-hidden').autocomplete({
        minLength: 0,
        source: function (request, response) {
            var url = $(this.element).data('url');
   
            $.getJSON(url, { term: request.term }, function (data) {
                response(data);
            })
        },
        select: function (event, ui) {
            $(event.target).next('input[type=hidden]').val(ui.item.id);
        },
        change: function(event, ui) {
            if (!ui.item) {
                $(event.target).val('').next('input[type=hidden]').val('');
            }
        }
    });
})

Widget’s source option is set to a function. This function pulls data from the server by $.getJSON call. URL is extracted from data-url attribute. If you want to control caching or provide error handling you may want to switch to $.ajax function. The purpose of change event handler is to ensure that values for BossId and BossLastName are set only if user selected an item from suggestions list.

This is the action method that provides data for autocomplete:

public JsonResult GetListForAutocomplete(string term)
{               
    Person[] matching = string.IsNullOrWhiteSpace(term) ?
        db.Persons.ToArray() :
        db.Persons.Where(p => p.LastName.ToUpper().StartsWith(term.ToUpper())).ToArray();

    return Json(matching.Select(m => new { id = m.Id, value = m.LastName, label = m.ToString() }), JsonRequestBehavior.AllowGet);
}

value and label are standard properties expected by the widget. label determines the text which is shown in suggestion list, value designate what data is presented in the input filed on which the widget is installed. id is custom property for indicating which Person entity was selected. It is used in select event handler (notice the reference to ui.item.id): Selected ui.item.id is set as a value of hidden input field – this way it will be sent in HTTP request when user decides to save Company data.

Finally this is the controller method responsible for saving Company data:

public ActionResult Edit([Bind(Include="Id,Name,BossId,BossLastName")] CompanyEditViewModel companyEdit)
{
    if (ModelState.IsValid)
    {
        Company company = db.Companies.Find(companyEdit.Id);
        if (company == null)
        {
            return HttpNotFound();
        }

        company.Name = companyEdit.Name;

        Person boss = db.Persons.Find(companyEdit.BossId);
        company.Boss = boss;
        
        db.Entry(company).State = EntityState.Modified;
        db.SaveChanges();
        return RedirectToAction("Index");
    }
    return View(companyEdit);
}

Pretty standard stuff. If you’ve ever used Entity Framework above method should be clear to you. If it’s not, don’t worry. For the purpose of this post the important thing to notice is that we can use companyEdit.BossId because it was properly filled by model binder thanks to our hidden input field.

That’s it, all requirements are met! Easy, huh?

You may be wondering why I want to use jQuery UI widget in Visual Studio 2013 project which by default uses Twitter Bootstrap. It’s true that Bootstrap has some widgets and plugins but after a bit of experimentation I’ve found that for some more complicated scenarios jQ UI does a better job. The set of controls is simply more mature…

COMING SOON – The “User Poll” Web Part for SharePoint 2010 & 2013

The User Poll Web Part provides your SharePoint environment with a set of web parts to allow your end users to create simple polls. It does this without the hassle of the standard SharePoint surveys which is not intended to create a simple 1 question poll.

The User Poll Web Part is a poll web part for SharePoint and it allows site users to quickly create polls anywhere in the Site Collection. The poll Web Part is designed to provide a user friendly interface: Important settings and actions are available from within the Web Part.

There is no direct need to work with the SharePoint Web Part setting menu and poll data is managed from normal SharePoint lists. Administrators can manage and keep track of all created polls from a centralized list.

A standard SharePoint installation also comes with a polling mechanism as part of the Survey Lists, but these surveys are complicated and require quite some time to configure.

The The User Poll Web Part allows users to setup a single topic poll within a few minutes.

The roadmap for the project is provided below.

Basic functionality

  • Poll settings are configured directly from the web part display or SharePoint lists
  • Publish and unpublish functionality


Project road map:

  • Release production build of The User Poll Web Part 2013
  • Automated security management on the poll response and answer list
  • Result view only web part
  • Add multiple HTML5 chart options (currently only horizontal bar)
  • Documentation

Contact me at tomas.floyd@outlook.com!!

https://sharepointsamurai.wordpress.com/

Using jQuery Mobile and ASP.NET to Pass Data from one Page to another

ASP.NET developers working on either Web Forms or ASP.NET MVC can integrate jQuery Mobile into their Web sites to create rich mobile Web apps. jQuery Mobile is a lightweight JavaScript framework for developing cross-platform mobile/device Web applications.

In mobile application development, you as a developer must think about how to utilize available space in the best possible manner. For this purpose sometimes the UI needs to be divided in separate pages. In such cases, you may need to transfer value(s) entered in one page, on the second page for the further processing.

Consider a scenario where the end user is asked to select the Product Category on Page 1 and based upon that, Page 2 displays products under that category. To get this done, values must be passed from page 1 to page 2.

In jQuery Mobile, $.mobile object provides the changePage() method which accepts the page url as a first parameter and the values to be transferred as a second parameter using JSON based data. In this article, we will see, how values are passed from one page to another in an ASP.NET application.

Step 1: Open Visual Studio and create a new ASP.NET empty web application, name it as ‘ASPNET_Mobile_PassingValuesAcrossPages’. In this application, using the NuGet Package Manager, add the latest jQuery and jQuery Mobile libraries.

Step 2: To the project, add a new class file, name it as ‘ModelClasses.cs’ and add the following classes in it:

public class Category {     public int CategoryId { get; set; }     public string CategoryName { get; set; } }

public class Product {     public int ProductId { get; set; }     public string ProductName { get; set; }     public int Price { get; set; }     public int CategoryId { get; set; } }

public class CategoryDataStore : List<Category> {     public CategoryDataStore()     {         Add(new Category() { CategoryId = 1, CategoryName = “Food Items” });         Add(new Category() { CategoryId = 2, CategoryName = “Home Appliances” });         Add(new Category() { CategoryId = 3, CategoryName = “Electronics” });         Add(new Category() { CategoryId = 4, CategoryName = “Wear” });     } }

public class CategoryDataSource {     public List<Category> GetCategories()     {         return new CategoryDataStore();     } }

public class ProductDataStore : List<Product> {     public ProductDataStore()     {         Add(new Product() { ProductId = 111, ProductName = “Apples”, Price = 300, CategoryId = 1 });         Add(new Product() { ProductId = 112, ProductName = “Date”,   Price = 600, CategoryId = 1 });         Add(new Product() { ProductId = 113, ProductName = “Fridge”, Price = 34000, CategoryId = 2 });         Add(new Product() { ProductId = 114, ProductName = “T.V.”,   Price = 30000, CategoryId = 2 });         Add(new Product() { ProductId = 115, ProductName = “Laptop”, Price = 72000, CategoryId = 3 });         Add(new Product() { ProductId = 116, ProductName = “Mobile”, Price = 40000, CategoryId = 3 });         Add(new Product() { ProductId = 117, ProductName = “T-Shirt”, Price = 800, CategoryId = 4 });         Add(new Product() { ProductId = 118, ProductName = “Jeans”, Price = 700, CategoryId = 4 });     } }

public class ProductDataSource {     public List<Product> GetProductsByCategoryId(int catId)     {         var Products = from p in new ProductDataStore()                        where p.CategoryId == catId                        select p;

        return Products.ToList();     } }

The above code provides Category and Product entities with data stored in it. The Product is a child of the Category class.

Step 3: In the project, add a WEB API controller class with the following code:

public class CategoryProductController : ApiController {     CategoryDataSource objCatDs;     ProductDataSource objPrdDs;

    public CategoryProductController()     {         objCatDs = new CategoryDataSource();         objPrdDs = new ProductDataSource();     }

    public IEnumerable<Category> Get()     {         return objCatDs.GetCategories();     }

    public IEnumerable<Product> Get(int id)     {         return objPrdDs.GetProductsByCategoryId(id);     } }

Step 4: To define routing for the WEB API class, add a new Global Application Class (Global.asax) in the project and add the following code in the Application_Start method:

protected void Application_Start(object sender, EventArgs e) {     RouteTable.Routes.MapHttpRoute(     name: “DefaultApi”,     routeTemplate: “api/{controller}/{id}”,     defaults: new { id = System.Web.Http.RouteParameter.Optional }     ); }

Step 5: Add two HTML pages, name them as Page_Category.html and Page_Products.html.

Task 6: In both the HTML pages, add the jQuery and jQuery Mobile references:

<link href=”Content/jquery.mobile.structure-1.3.1.min.css” rel=”stylesheet” /> <link href=”Content/jquery.mobile.theme-1.3.1.min.css” rel=”stylesheet” /> <script src=”Scripts/jquery-2.0.2.min.js”></script> <script src=”Scripts/jquery.mobile-1.3.1.min.js”></script>

Add the following HTML in the Page_Category.html page:

<div data-role=”page” id=”catpage”>     <div data-role=”header”>         <h1>Select Category from List</h1>     </div>     <div data-role=”content”>         <div>             <select  id=”lstcat” data-native-menu=”false”>                 <option>List of Categories…..</option>             </select>         </div>         <br />         <br />         <input type=”button” data-icon=”search”            value=”Get Products”  data-inline=”true” id=”btngetproducts” />     </div> </div>

The above code defines a page using <div>  whose data-role attribute is set to page. This page contains a <select> for displaying list of categories in it and an <input> button with a click event on which the control will be transmitted to Page_Products.html page.

In the age_Category.html add the following script. The method loadlistview will make a call to WEB API and retrieve categories. These categories will be added into the <select> with id as lstcat. This method will be executed when the pageinit event is executed. On the click event of the button, the Category Value and Name will be passed to the Page_Products.html.

<script type=”text/javascript”> $(document).on(“pageinit”, “#catpage”, function () {

//Pass the data to the other Page $(“#btngetproducts”).on(‘click’, function () {     var categoryId = $(“#lstcat”).val();     var categoryName = $(“#lstcat”).find(“:selected”).text();     $.mobile.changePage(“Page_Products.html”, { data: { “catid”: categoryId ,”catname”:categoryName}}); });

loadlistview();

///Function to load all categories function loadlistview() {         $.ajax({         type: “GET”,         url: “/api/CategoryProduct”,         contentType: “application/json; charset=utf-8”,         dataType: “json”     }).done(function (data) {         //Convert JSON into Array         var array = $.map(data, function (i, idx) {             return [[i.CategoryId, i.CategoryName]];         });

        //Add each Category Name in the ListView         var res = “”;         $.each(array, function (idx, cat) {             res += ‘<option value=”‘ + cat[0] + ‘”>’ + cat[1] + ‘</option>’;         });         $(“#lstcat”).append(res);         $(“#lstcat”).trigger(“change”);

    }).fail(function (err) {         alert(“Error ” + err.status);     }); } }); </script>

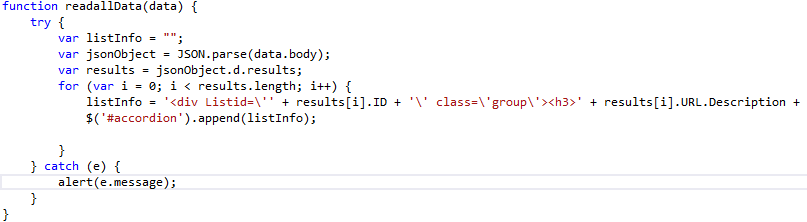
Just look at this piece of code:

$.mobile.changePage(“Page_Products.html”, { data: { “catid”: categoryId ,”catname”:categoryName}});

This code is responsible for passing the CategoryId and Name using JSON expression to the Page_Products.html.

Step 7: Open Page_Products.html and add the following HTML markup:

<div data-role=”page” id=”prodpage” data-add-back-btn=”true”> <div data-role=”header”>         <h1>Products in Category</h1>         <span id=”catName”></span>     </div>          <table style=”border:double” data-role=”table” id=”tblprd”>         <thead>             <tr>                 <td style=’width:100px’>                     ProductId                 </td>                 <td style=’width:100px’>                     ProductName                 </td>                 <td style=’width:100px’>                     Price                 </td>             </tr>         </thead>         <tbody>         </tbody>     </table> </div>

Here the <div> with id as prodpage is set with the attribute as data-role=page. The attribute data-add-back-btn=true, will add the BACK button on the page. On click of this button, we can move back to the Page_Category.html. This is the default style set in jQuery Mobile.

Now here the important thing is how to read values which are send from Page_Category.html in the URL, on the Page_Product.html page. Unlike ASP.NET, in jQuery there is no simple way to read the values passed from one page to another. To read these values we will create a readUrlHelper helper method. This method reads the URL and using JavaScript string functions, reads the Key/Value pairs passed from the Page_Category.html. On the Page_Products.html, add this method using <script> inside the page created using <div> with id as prodpage.

//This helper function will read the URL as //string and provides values for parameters //in the URL function readUrlHelper(pageurl, queryParamName) {     var queryParamValue = “”;

    //Get the Total URL Length     var stringLength = pageurl.length;

    //Get the Index of ? in URL     var indexOfQM = pageurl.indexOf(“?”);

    //Get the Lenght of the String after ?     var stringAfterQM = stringLength – indexofQM;

    //Get the remaining string after ?     var strBeforeQM = pageurl.substr(indexofQM + 1, stringAfterQM);

    //Split the remaining String based upon & sign     var data = strBeforeQM.split(“&”);

    //Iterate through the array of strings after split     $.each(data, function (idx, val) {         //Split the string based upon = sign         var queryExpression = val.split(“=”);

        if (queryExpression[0] == queryParamName)         {             queryParamValue = queryExpression[1];             //If the Query String has Data in Concatination then replace the             //’+’ by blank space ‘ ‘             queryParamValue =  queryParamValue.replace(‘+’, ‘ ‘);         }     });

    return queryParamValue

}

To retrieve the Products based upon the CategoryId, add a new method loadproducts inside the prodpage. This methods makes a call to the WEB API service and passes the CategoryId. This method also makes a call to the generatetable helper method to generate HTML table to display products in it based upon the JSON data received by the loadproducts method:

//Method to make call to WEB API and retrieve //Products based upon the CategoryId. function loadproducts(id) {

    $.ajax({         type: “GET”,         url: “/api/CategoryProduct/” + id,         contentType: “application/json; charset=utf-8″,         dataType: “json”     }).done(function (data) {         generatetable(data);     }).fail(function (err) { }); } //Method to generate HTML table rows from the JSON data function generatetable(data) {

    //Convert JSON into Array     var array = $.map(data, function (i, idx) {         return [[i.ProductId, i.ProductName,i.Price]];     });     var tblbody = $(“#tblprd > tbody”);

    var tblhtml = “”;     //Generate the Table for each Row     for (var i = 0; i < array.length; i++) {         tblhtml = tblhtml + “<tr>”;         for (var j = 0; j < array[i].length; j++) {         tblhtml = tblhtml + “<td style=’width:100px’>” + array[i][j] + “</td>”;        }         tblhtml = tblhtml + “</tr>”;     }

    tblbody.append(tblhtml);     $(“#tblprd”).table(“refresh”);

}

Now inside the prodpage subscribe to the pageshow event which will make a call to the readUrlHelper method and loadproducts method

var catId; $(“#prodpage”).on(“pageshow”, function (e) {     var pgurl = $(“#prodpage”).attr(“data-url”);     //Read the value for catid passed from the Page_Category.html     catId = readUrlHelper(pgurl, “catid”);     //Read the value for catname passed from the Page_Category.html    var catName = readUrlHelper(pgurl,”catname”);

   $(“#catName”).text(catName);

   loadproducts(catId);

});

The above code read the CategoryId and CategoryName passed by the Page_Category.html and based upon it the Products are displayed on the page.

Make the Page_Category.html as a startup page and run the application (IE9, FireFox or Chrome) or in Opera Mobile Emulaor.

On Page-Category.html select Categories as below:

jquery-mob-categories

When you click on Get Products , you will be navigated to the Page_Products.html with the following url:

http://localhost:5506/Page_Products.html?catid=1&catname=Food+Items

The URL contains key and value for CategoryId (catid=1) and CategoryName (catname=Food+Items)

In the Page_Products.html, the readUrlHelper method will read CategoryId and CategoryName and based upon this data, Products will be displayed as below:

jquery-transfer- values

Conclusion: In a Mobile application it is very important for the developer to manage the UI and take care of data communication across these pages. If the data passed is complex (more than one key/value pair) then the URL must be read very carefully. In this article, we saw how we can use jQuery Mobile and ASP.NET to transfer values from one page to another.

FREE SharePoint App – Pictures gallery with cool JQuery animations and effects

Project Description

Galleriffic App is an app part for SharePoint 2013 to display a pictures gallery with cool JQuery animations and effects. This App is an open source tool distributed under MIT license by Olivier Carpentier and based on the excellent Galleriffic jquery extension by Trent Foley.

App Screenshots

 Galleriffic App part sample :

Administration page :

Download it now :

http://1drv.ms/1f1x4vJ

How to use “Accordion” JQuery plug-in on SharePoint 2013

For this solution created by 2 steps:

  • Create a link list in SharePoint Site and call Script Editor to generate the list View using SharePoint COM Script/Jquery.
  • Create a App solutions (SharePoint-Hosted) that creates a custom Link List and integrate a View with the created SharePoint COM Script/Jquery
  • Create a Client Web Part (Host Web) to List the View using the Script List using REST
Expected Result:

First Step:

Create the Script using Jquery(Accordion)/COM to call List Data in SharePoint Site

Add Custom View using Jquery and SharePoint Site

For this example have selected the “Accordion” Jquery plug-in example to apply in the SharePoint 2013 enviroment, this example will be use to display List data and automatic sort order using Drag and Drop.
Access to your SharePoint Site and add a “Links App”, include the following column “OrderLink” as Numeric and default value ‘0’.
The Second step will be add a Script Editor in the Home Page and include the script to create our new View.

Increase the Textbox in Script Editor

One question people make about the Script Editor and how small it is, well this script is normally use from external references for example:“Embeded Youtube Videos” or references to embed Office Documents.
If you want to increase height because you are adding a very extensive script can recomend to include in the Snippet a style for the class “.ms-rte-embeddialog-textarea” and increase the height, for this example was increase to 500px.
PS:This is a example, my recomendation is to use a minify Javascript file and make a reference to him.

Include the Jquery reference files

To work with the “Accordion” Plug-in, some references needs to be made, for this case i added some JS in the SiteAssets Library, but for the support file change to the existing UI page.
Define the Look and Feel of the HTML that will be generated dynamically by JS and changed by the Accordion Plug-in.

Define the Method where will be call that changes the look and feel as “Accordion”.
The Property “ListID=’ListitemID’” will be very important when a item is deleted, the Jquery will delete the DIV Tag and will not be needed a refresh of the Page.
For this example have 2 Methods:
  • Users will be able to expand and collapse items.
  • User will be able to reorder the items if they have permissions
There are some variables that can be changed in order to response other List name, filter Column or row Limit.
You can download the file with all the Script in the following link.
PS: this code was made in 15 minutes and was not optimized.
After the inclusion of the code you should be able to add new items, edit, delete and reorder the position of the items in a more flexible way and the the final result should be something like this:
There is also the possibility to include the JS script code in the View to change the Out of the Box Look and Feel to our new View (needs to be made some changes, that will be shown in the app Solution).

Reoder of the Listitem

After you drag and drop the columns in the new View the  OrderLink will be update with the new Order like is shown in the following image. Step 2:

Create a SharePoint App to create new View with Jquery

The second part of this example is the creating of a SharePoint app call “Custom Links”, using “SharePoint-Host” as support to our application.
This app will create a link in the Main site call “Custom Links” where will redirect to our custom Support Application.
The first thing that we should do is to open and create our App for SharePoint 2013.
This Solution will include the following Main Files:
  • Pages
    • WPReorder Web Part
    • WPReorder.ASPX
  • SharePoint List
    • ListTemplate: 10000
    • Custom Action:ScriptLink :jquery-1.8.2.min.js
    • Custom Action:ScriptLink :jquery-ui.js
  • Images
  • Scripts
    • (OOB Visual Studio Files)
    • Jquery* (Files)
    • ReorderLinks.js
    • WPReorder.js
  • AppManifest.xml
After the Project is created, Visual Studio 2012 will add some default files and pages that can be use to create our App.
For this example the AppManifest.xml was changed to change the Starting Page to our custom View
The second action will be create the Custom List call “ReorderLinks”.
After the Support files are created, you will be able to make some changes in the List definition and proportieslike adding fields.
One option the graphical option dont have is the definition of the Default Value for the Fields, for this example “OrderLink, for that you will need to change the Schema.xml file and include the following XML “0”.
Another option of the Visual Studio 2012 List Management is the definition of the Views and the fields to be Displayed.
Here is very useful to define which one should be the Default.
For this example was created 2 Views:
  • All Items
  • Reorder
One thing that should be done after the creation of the Views, it’s the option on how the View will be Display, for example you are able to use Javascript file to add your custom View “like the example bellow” or to use the .XSL to customize the Look and Feel of the View.
For this example i have define don’t want to use the OOB “main.xsl” but a custom JS file call “ReoderLinks”.
Another thing that was included in the Schema of the List was the inclusion of the Jquery support files to be accessible in the “SharePoint-Host” Site.

After the definition of the List, Views and support Files, we can start to create the code that will change the View “Reorder” Look and Feel.
SharePoint 2013 has new class that can be use to override the existing style and use the Context to access some List Content.
You can find a example in the following Microsoft Article.
This example is creating the HTML tags to include a custom CSS and create the new Look and Feel and include the Jquery plug-in “Accordion” in the New View.

Change Look and Feel of Custom View

The method to make the change is the Method CustomItem(ctx). This Method brings the Object ctx associated with the properties of the List, if you need to know some of the properties you can use “Chrome > Sources>Reoder.aspx”, this page gives a look of the ctx(List) properties.

Validate Permissions

This code will validate if the user has permission to edit the List content and more functionalities like add/Edit/Delete/reordering of the List.

Reordering of the Items

The next code will update the reordering of the List, with a new Method and my recomendation will be to use “SP.SOD.executeFunc” to ensure the SharePoint Client Object files are included in the Page.
By Default the Values are 0 after the Reordering using drag and drop will have a different ordering.

Delete of Item

For the Delete Action was made a Jquery function to delete DIV Tag of the ListItemID.

Change the View

Since we are working over a List we are able to select the Ribbon option associated with the List and change the View to a different View.

Create a Client Web Part

This Client Web Part will support to display the content of the “Reoder Link” from the “SharePoint-Host” to the Production “SharePoint Site” using a Iframe.
This Web Part will have the “Accordion” look and Feel but will not have administration actions, because it’s made in a Iframe.
The fist thing made in Visual Studio was to include a  Client Web Part Feature.
This feature will create a ASPX page, with some OOB HTMl Tag and references.
for this example was included a new File “WPReoder.js” where will be the Script do display the content and the DIV Tag associated with the accordion.
For the Client Web Part example was made some change in the Way to call the Data from the Jquery Call using REST Url.

Using fiddler you can use to make calls to REST Url and validate the content of the JSON and properties Data that returns.
For the output was created a Object Data where all Items are listed and generate the necessary tags.
After our SharePoint App is deployed, you will be able to add the App Part in your Production SharePoint Page as a “App part” call Reoder Links.
After you add the Web Part will make the call to “ReoderLinks” List using Cross-Domain code and display the data in the Production SharePoint Site.
The solution can be acessible in the following link.
There are a lot of things talk in the article that needs to be aware when you are using SharePoint Apps but didn’t have time to explain.