Category Archives: SharePoint

BCS connector for Exchange private mailbox SharePoint and FAST search

SharePoint 2010 BCS Mailbox connector for Microsoft Exchange empowers you search private mailboxes via SharePoint and FAST Search.
SharePoint 2010 BCS Mailbox connector for Microsoft Exchange  allow you:

  • Index all mailboxes, emails and attachments
  • Enable super users from AD group search against all mailboxes
  • Preview Exchange emails and attachments directly from search user interface via SharePoint Business Connectivity services.

    Microsoft provides Exchange OOB connector for SharePoint 2010 search and FAST Search for SharePoint.
    Unfortunately this connector limited to Exchange public folder only.

    Please, make sure you download following dependencies:

How To : Plan the Deployment of Farm Solutions for SharePoint 2013

SharePoint 2013

While everyone is talking about Apps, there are still significant investments in Full Trust Solutions (a.k.a. Farm Solutions) and I am sure that many OnPrem deployments will want to carry these forward when upgrading to SharePoint 2013.  The new SharePoint 2013 upgrade model allows Sites to continue to run in 2010 mode after upgrading and each Site Collection explicitly has to be upgraded individually.

Not the way it worked in 2010 with Visual Upgrade, but this time there is actually both a 14 and 15 Root folder deployed and all the Features and Layout files from SharePoint 2010 are deployed as part of the 2013 installation.

For those of you new to SharePoint, the root folder is where SharePoint keeps most of its application files and the default location for this is “C:\Program Files\Common Files\Microsoft Shared\Web Server Extensions\[SharePoint Internal Version]”, where the versions for the last releases have been 60 (6.0), 12, 14, and now 15. The location is also known as “The xx hive.

This is great in an upgrade scenario, where you may want to do a platform upgrade first or only want to share the new features of 2013 with a few users while maintaining an unchanged experience for the rest of the organization.  This also gives us the opportunity to have different functionality and features for sites running in 2010 and 2013 mode.  However, this requires some extra thought in the development and deployment process that I will give an introduction to here.

Because you can now have Sites running in both 2010 and 2013 mode, SharePoint 2013 introduces a new concept of a Compatibility Level.  Right now it can only be 14 or 15, but you can imagine that there is room for growth.  This Compatibility Level is available at Site Collection and Site (web) level and can be used in code constructs and PowerShell commands.  I will start by explaining how you use it while building and deploying wsp-files for SharePoint 2013 and then finish off with a few things to watch out for and some code tips.

Deployment Considerations

If you take your wsp-files from SharePoint 2010 and just deploy these with Add-SPSolution -> Install-SPSolution as you did in 2010, then SharePoint will assume it is a 2010 solution or a “14” mode solution.  If the level is not specified in the PowerShell command, it determines the level based on the value of the SharePointProductVersion attribute in the Solution manifest file of the wsp-package.  The value can currently be 15.0 or 14.0. If this attribute is missing, it will assume 14.0 (SharePoint 2010) and since this attribute did not exist in 2010, only very well informed people will have this included in existing packages.

For PowerShell cmdlets related to installing solutions and features, there is a new parameter called CompatibilityLevel. This can override the settings of the package itself and can assume the following values: 14, 15, New, Old, All and “14,15” (the latter currently also means All).

The parameter is available for Install-SPSolution, Uninstall-SPSolution, Install-SPFeature and Uninstall-SPFeature.  There is no way to specify “All” versions in the package itself – only the intended target – and therefore these parameters need to be specified if you want to deploy to both targets.

It is important to note that Compatibility Level impacts only files deployed to the Templates folder in the 14/15 Root folder. That is:  Features, Layouts-files, Images, ControlTemplates, etc.

This means that files outside of this folder (e.g. a WCF Service deployed to the ISAPI folder) will be deployed to the 15/ISAPI no matter what level is set in the manifest or PowerShell.  Files such as Assemblies in GAC/Bin and certain resource files will also be deployed to the same location regardless of the Compatibility Level.

It is possible to install the same solution in both 14 and 15 mode, but only if it is done in the same command – specifying Compatibility Level as either “All” or “14,15”.  If it is first deployed with 14 and then with 15, it will throw an exception.  It can be installed with the –Force parameter, but this is not recommended as it could hide other errors and lead to an unknown state for the system.

The following three diagrams illustrate where files go depending on parameters and attributes set (click on the individual images for a larger view). Thanks to the Ignite Team for creating these. I did some small changes from the originals to emphasize a few points.

CompatibilityLevelOld

CompatibilityLevelNew

CompatibilityLevelAll

When retracting the solutions, there is also an option to specify Compatibility Level.  If you do not specify this, it will retract all – both 14 and 15 files if installed.  When deployed to both levels, you can retract one, but the really important thing to understand here is that it will not only retract the files from the version folder, but also all version neutral files – such as Assemblies, ISAPI deployed files, etc. – leaving only the files from the Root folder you did not retract.

To plan for this, my suggestion would be the following during development/deployment:

  • If you want to only run sites in 2013 mode, then deploy the Solutions with CompatibilityLevel 15 or SharePointProductVersion 15.0.
  • If you want to run with both 2010 and 2013 mode, and want to share features and layout files, then deploy to both (All or “14,15”).
  • If you want to differentiate the files and features that are used in 2010 and 2013 mode, then the solutions should be split into two or three solutions:
    • One solution (“Xxx – SP2010”), which contains the files and features to be deployed to the 14 folder for 2010 mode.  including code-behind (for things like feature activation and Application pages), but excluding shared assemblies and files.
    • One solution (“Xxx – SP2013”), which contains the files and features to be deployed to the 15 folder for 2013 mode, including code-behind (for things like feature activation and Application pages), but excluding shared assemblies and files.
    • One solution (“Xxx – Common”), which contains shared files (e.g. common assemblies or web services). This solution would also include all WebApplication scoped features such as bin-deployed assemblies and assemblies with SafeControl entries.
  • If you only want to have two solutions for various reasons, the Common solution can be joined with the SP2013 solution as this is likely to be the one you will keep the longest.
  • The assemblies being used as code-files for the artifacts in SP2010 and SP2013 need to have different names or at least different versions to differentiate them. Web Parts need to go in the Common package and should be shared across the versions, however the installed Web Part templates can be unique to the version mode.

Things to watch out for…

There are a few issues that are worth being aware of that may be fixed in future updates, but you’ll need to watch out for these currently.  I’ve come across an issue where installing the same solution in both levels can go wrong.  If you install it with level All and then uninstall it with level 14 two times, the deployment logic will think that it completely removed the solution, but the files in the 15/Templates folder will still be there.

To recover from this, you can install it with –Force in the orphan level and then uninstall it.  Again, it is better to not get in this situation.

Another scenario that can get you in trouble is if you install a solution in one Compatibility Level (either through PowerShell Parameter or manifest file attribute) and then uninstall with the other level.  It will then remove the common files but leave the specific 14 or 15 folder files and display the solution as fully retracted.

Unfortunately there is no public API to query which Compatibility Levels a package is deployed to.  So you need to get it right the first time or as quickly as possible move to native 2013 mode and packages (this is where we all want to be anyway).

Code patterns

An additional tip is to look for hard coded paths in you custom code such as _layouts and _controltemplates.  The SPUtility class has been updated with static methods to help you parse the current location based on the upgrade status of the Site.   For example, SPUtility.ContextLayoutsFolder will give you the path to the correct layouts folder.  See the reference article on SPUtility properties for more examples.

Round up

I hope this gave you an insight into some of the things you need to consider when deploying Farm Solutions for SharePoint 2013. There are lots of scenarios that are not covered here. If you find some, please share these or share your concerns and I will try to add it as comments or an additional post.

How To : Implement Business Data Connectivity in SharePoint 2013

Business Data Connectivity

Business Connectivity Services is a centralized infrastructure in SharePoint 2013 and Office 2013 that supports integrated data solutions. With Business Connectivity Services, you can use SharePoint 2013 and Office 2013 clients as interfaces into data that doesn’t live in SharePoint 2013 itself. For example, this external data may be in a database and it is accessed by using the out-of-the-box Business Connectivity Services connector for that database.

DuetEnterpriseDesign[1]

Business Connectivity Services can also connect to data that is available through a web service, or data that is published as an OData source or many other types of external data. Business Connectivity Services does this through out-of-the box or custom connectors.

External Content Types in BCS

External content types are the core of BCS. They enable you to manage and reuse the metadata and behaviors of a business entity, such as Customer or Order, from a central location. They enable users to interact with that external data and process it in a more meaningful way.

For more information about using external content types in BCS, see External content types in SharePoint 2013.

How to Connect With SQL External Data Source

Open the SharePoint Designer 2013 and click on the open site icon:

Input the site URL which we need to open:

Enter your site credentials here:

Now we need to create the new external content type and here we have the options for changing the name of the content type and creating the connection for external data source:

And click on the hyperlink text “Click here to discover the external data source operations, now this window will open:

Click on the “Add Connection “button, we can create a new connection. Here we have the different options to select .NET Type, SQL Server, WCF Service.

Here we selected SQL server, now we need to provide the Server credentials:

Now, we can see all the tables and views from the database.

In this screen, we have the options for creating different types of operations against the database:

Click on the next button:

Parameters Configurations:

Options for Filter parameters Configuration:

Here we need to add new External List, Click on the “External List”:

Select the Site here and click ok button:

Enter the list name here and click ok button:

After that, refresh the SharePoint site, we can see the external list here and click on the list:

Here we have the error message “Access denied by Business Connectivity.”

Solution for this Error

SharePoint central admin, click on the Manage service application:

Click on the Business Data Connectivity Service:

Set the permission for this list:

Click ok after setting the permissions:

After that, refresh the site and hope this will work… but again, it has a problem. The error message like Login failed for user “NT AUTHORITY\ANONYMOUS LOGON”.

Solution for this Error

We need to edit the connection properties, the Authentication mode selects the value ‘BDC Identity’.

Then follow the below mentioned steps.

Open PowerShell and type the following lines:

$bdc = Get-SPServiceApplication | 
where {$_ -match “Business Data Connectivity Service”}
$bdc.RevertToSelfAllowed = $true
$bdc.Update();

Now it’s working fine.

And there is a chance for one more error like:

Database Connector has throttled the response.
The response from database contains more than '2000' rows. 
The maximum number of rows that can be read through Database Connector is '2000'. 
The limit can be changed via the 'Set-SPBusinessDataCatalogThrottleConfig' cmdlet

It’s because it depends on the number of recodes that exist in the table.

Solution for this Error

Follow the below steps:

Open PowerShell and type the following lines and execute:

$bcs = Get-SPServiceApplicationProxy | where{$_.GetType().FullName 
-eq (‘Microsoft.SharePoint.BusinessData.SharedService.’ + ‘BdcServiceApplicationProxy’)}
$BCSThrottle = Get-SPBusinessDataCatalogThrottleConfig -Scope database 
-ThrottleType items -ServiceApplicationProxy $bcs
Set-SPBusinessDataCatalogThrottleConfig -Identity $BCSThrottle -Maximum 1000000 -Default 20000

How To : SAP Integration with .Net 4.0 (SAP Connection Manager) & SharePoint

This is a simple, C# class library project to connect .NET applications with SAP.

ppt_img[1]


This component internally implements SAP .NET Connector 3.0. The SAP .NET Connector is a development environment that enables communication between the Microsoft .NET platform and SAP systems.

This connector supports RFCs and Web services, and allows you to write different applications such as Web form, Windows form, or console applications in the Microsoft Visual Studio .NET.

With the SAP .NET Connector, you can use all common programming languages, such as Visual Basic. NET, C#, or Managed C++.

Features
Using the SAP .NET Connector you can:

Write .NET Windows and Web form applications that have access to SAP business objects (BAPIs).

Develop client applications for the SAP Server.

Write RFC server applications that run in a .NET environment and can be installed starting from the SAP system.

Following are the steps to configure this utility on your project

Download and extract the attached file and place it on your machine. This package contains 3 libraries:

SAPConnectionManager.dll
sapnco.dll
sapnco_utils.dll

Now go to your project and add the reference of all these four libraries. Sapnco.dll and sapnco_utils.dll are inbuilt libraries used by SAP .NET Connector. SAPConnectionManager.dll is the main component which provides the connection between .NET and SAP.

Once the above steps are complete, you need to make certain entries related to SAP server on your configuration file. Here are the sample entries that you have to maintain on your own project. You need to change only the values which are marked in Bold. Rest remains unchanged.

<appSettings>
<add key=”ServerHost” value=”127.0.0.1″/>
<add key=”SystemNumber” value=”00″/>
<add key=”User” value=”sample”/>
<add key=”Password” value=”pass”/>
<add key=”Client” value=”50″/>
<add key=”Language” value=”EN”/>
<add key=”PoolSize” value=”5″/>
<add key=”PeakConnectionsLimit” value=”10″/>
<add key=”IdleTimeout” value=”600″/>
</appSettings>

To test this component, create one windows application. Add the reference of sapnco.dll, sapnco_utils.dll, andSAPConnectionManager.dll on your project.

Paste the below code on your Form lode event

SAPSystemConnect sapCfg = new SAPSystemConnect();
RfcDestinationManager.RegisterDestinationConfiguration(sapCfg);
RfcDestination rfcDest = null;
rfcDest = RfcDestinationManager.GetDestination(“Dev”);

sap_integration_en_round[1]
That’s it. Now you are successfully connected with your SAP Server. Next you need to call SAP business objects (BAPIs) and extract the data and stored it in DataSet or list.

Demo Code available on request!!

How To : Add a Promoted Links Web Part to SharePoint 2013 App Default page

This article helps you to add Promoted links web part to your default app page as the following figure:


To do this follow the following steps:
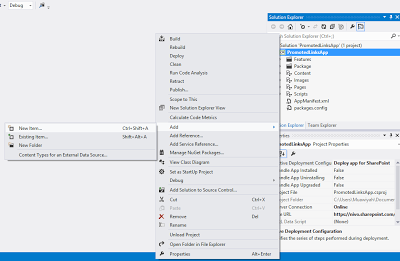
Open the shortcut menu for the project, and then choose Add, New Item
Add Picture Textbox, and two buttons to infopath form


In the Templates pane, choose the List template, and then choose the Add button :

Enter list name and choose the Create a non-customizable list based on an existing list type of option button, and then, in its list, choose Promoted links, and then choose the Finish button

Binding the CAPTCHA image
In Solution Explorer, under the list instance node, open the Elements.xml file.
Add the promoted links items as the following:
<?versionencodingutf-8?>
Elementsxmlnshttp://schemas.microsoft.com/sharepoint/
ListInstanceTitleMyPromotedLinks
OnQuickLaunch
TemplateType
FeatureId192efa95-e50c-475e-87ab-361cede5dd7f
Lists/MyPromotedLinks
DescriptionMy List Instance
FieldTitleTwitter</Field
FieldBackgroundImageLocation/PromotedLinksApp/Images/twitter.png
FieldDescriptionMuawiyah Shannak Twitter
FieldLinkLocationhttps://twitter.com/MuShannak</Field
FieldOrder</Field
</
FieldTitle</Field
FieldBackgroundImageLocation/PromotedLinksApp/Images/blogger.png
FieldDescriptionMuawiyah Shannak Blog
FieldLinkLocationhttp://mushannak.blogspot.com</Field
FieldOrder</Field
</
FieldTitleLinkedin</Field
FieldBackgroundImageLocation/PromotedLinksApp/Images/linkedin.png
FieldDescriptionMuawiyah Shannak Linkedin
FieldLinkLocationhttp://ae.linkedin.com/in/shannak</Field
FieldOrder</Field
</
</
</
<!–ListInstance
</Elements
In Solution Explorer, under the Pages node, open the Default.aspx file. Add following tags inside the PlaceHolderMain Place Holder:
WebPartPagesWebPartZone=”WebPartZone”runat=”server”FrameType=”None”>
WebPartPagesXsltListViewWebPart=”XsltListViewAppPromotedList”
runat=”server”ListUrl=”Lists/MyPromotedLinks”IsIncluded=”True”
NoDefaultStyle=”TRUE”Title=”Images used in switcher”
PageType=”PAGE_NORMALVIEW”Default=”False”
ViewContentTypeId=”0x”>
</WebPartPagesXsltListViewWebPart
</WebPartPagesWebPartZone

Deploy a solution and you will find nice promoted links web part in the app default page!

How to : From the Trenches – Use SharePoint to Implement an ALM in Your Orginisation

After my successful creation and implementation of an ALM for Business Connexion using the SharePoint Platform, I thought I’d share the lessons I have learned and show you step for step how you can implement your own ALM leveraging the power of the SharePoint Platform

slide5[1]

In this article,

  • An Overview : SharePoint Application Lifecycle Management:
  • Learn how to plan and manage Application Lifecycle Management (ALM) in Microsoft SharePoint 2010 projects by using Microsoft Visual Studio 2010 and Microsoft SharePoint Designer 2010.
  • Also learn what to consider when setting up team development environments,
  • Establishing upgrade management processes,
  • Creating a standard SharePoint development model.
  • Extending your SharePoint ALM to include other Departments like Java, Mobile, .Net and even SAP Development
Introduction to Application Lifecycle Management in SharePoint 2010

The Microsoft SharePoint 2010 development platform, which includes Microsoft SharePoint Foundation 2010 and Microsoft SharePoint Server 2010, contains many capabilities to help you develop, deploy, and update customizations and custom functionalities for your SharePoint sites. The activities that take advantage of these capabilities all fall under the category of Application Lifecycle Management (ALM).

Key considerations when establishing ALM processes include not only the development and testing practices that you use before the initial deployment of a single customization, but also the processes that you must implement to manage updates and integrate customizations and custom functionality on an existing farm.

This article discusses the capabilities and tools that you can use when implementing an ALM process on a SharePoint farm, and also specific concerns and things to consider when you create and hone your ALM process for SharePoint development.

This article assumes that each development team will develop a unique ALM process that fits its specific size and needs, so its guidance is necessarily broad. However, it also assumes that regardless of the size of your team and the specific nature of your custom solutions, you will need to address similar sets of concerns and use capabilities and tools that are common to all SharePoint developers.

The guidance in this article will help you as create a development model that exploits all the advantages of the SharePoint 2010 platform and addresses the needs of your organization.

SharePoint Application Lifecycle Management: An Overview

Although the specific details of your SharePoint 2010 ALM process will differ according the requirements of your organizations, most development teams will follow the same general set of steps. Figure 1 depicts an example ALM process for a midsize or large SharePoint 2010 deployment. Obviously, the process and required tasks depend on the project size.

Figure 1. Example ALM process
Example ALM process

The following are the specific steps in the process illustrated in Figure 1 (see corresponding callouts 1 through 10):

  1. Someone (for example, a project manager or lead developer) collects initial requirements and turns them into tasks.
  2. Developers use Microsoft Visual Studio Team Foundation Server 2010 or other tools to track the development progress and store custom source code.
  3. Because source code is stored in a centralized location, you can create automated builds for integration and unit testing purposes. You can also automate testing activities to increase the overall quality of the customizations.
  4. After custom solutions have successfully gone through acceptance testing, your development team can continue to the pre-production or quality assurance environment.
  5. The pre-production environment should resemble the production environment as much as possible. This often means that the pre-production environment has the same patch level and configurations as the production environment. The purpose of this environment is to ensure that your custom solutions will work in production.
  6. Occasionally, copy the production database to the pre-production environment, so that you can imitate the upgrade actions that will be performed in the production environment.
  7. After the customizations are verified in the pre-production environment, they are deployed either directly to production or to a production staging environment and then to production.
  8. After the customizations are deployed to production, they run against the production database.
  9. End users work in the production environment, and give feedback and ideas concerning the different functionalities. Issues and bugs are reported and tracked through established reporting and tracking processes.
  10. Feedback, bugs, and other issues in the production environment are turned into requirements, which are prioritized and turned into developer tasks. Figure 2 shows how multiple developer teams can work with and process bug reports and change requests that are received from end users of the production environment. The model in Figure 2 also shows how development teams might coordinate their solution packages. For example, the framework team and the functionality development team might follow separate versioning models that must be coordinated as they track bugs and changes.
    Figure 2. Change management involving multiple developer teams
    Change management involving multiple teams

Integrating Testing and Build Verification Environments into a SharePoint 2010 ALM Process

In larger projects, quality assurance (QA) personnel might use an additional build verification or user acceptance testing (UAT) farm to test and verify the builds in an environment that more closely resembles the production environment.

Typically, a build verification farm has multiple servers to ensure that custom solutions are deployed correctly. Figure 3 shows a potential model for relating development integration and testing environments, build verification farms, and production environments. In this particular model, the pre-production or QA farm and the production farm switch places after each release. This model minimizes any downtime that is related to maintaining the environments.

Figure 3. Model for relating development integration and testing environments
Model for relating development environments

Integrating SharePoint Designer 2010 into a SharePoint 2010 ALM Process

Another significant consideration in your ALM model is Microsoft SharePoint Designer 2010. SharePoint 2010 is an excellent platform for no-code solutions, which can be created and then deployed directly to the production environment by using SharePoint Designer 2010. These customizations are stored in the content database and are not stored in your source code repository.

General designer activities and how they interact with development activities are another consideration. Will you be creating page layouts directly within your production environment, or will you deploy them as part of your packaged solutions? There are advantages and disadvantages to both options.

Your specific ALM model depends completely on the custom solutions and the customizations that you plan to make, and on your own policies. Your ALM process does not have to be as complex as the one described in this section. However, you must establish a firm ALM model early in the process as you plan and create your development environment and before you start creating your custom solutions.

Next, we discuss specific tools and capabilities that are related to SharePoint 2010 development that you can use when considering how to create a model for SharePoint ALM that will work best for your development team.

Solution Packages and SharePoint Development Tools

One major advantage of the SharePoint 2010 development platform is that it provides the ability to save sites as solution packages. A solution package is a deployable, reusable package stored in a CAB file with a .wsp extension. You can create a solution package either by using the SharePoint 2010 user interface (UI) in the browser, SharePoint Designer 2010, or Microsoft Visual Studio 2010. In the browser and SharePoint Designer 2010 UIs, solution packages are also called templates. This flexibility enables you to create and design site structures in a browser or in SharePoint Designer 2010, and then import these customizations into Visual Studio 2010 for more development. Figure 4 shows this process.

Figure 4. Flow through the SharePoint development tools
Flow through the SharePoint development tools

When the customizations are completed, you can deploy your solution package to SharePoint for use. After modifying the existing site structure by using a browser, you can start the cycle again by saving the updated site as a solution package.

This interaction among the tools also enables you to use other tools. For example, you can design a workflow process in Microsoft Visio 2010 and then import it to SharePoint Designer 2010 and from there to Visual Studio 2010. For instructions on how to design and import a workflow process, see Create, Import, and Export SharePoint Workflows in Visio.

For more information about creating solution packages in SharePoint Designer 2010, see Save a SharePoint Site as a Template. For more information about creating solution packages in Visual Studio 2010, see Creating SharePoint Solution Packages.

Using SharePoint Designer 2010 as a Development Tool

SharePoint Designer 2010 differs from Microsoft Office SharePoint Designer 2007 in that its orientation has shifted from the page to features and functionality. The improved UI provides greater flexibility for creating and designing different functionalities. It provides rich tooling for building complete, reusable, and process-centric applications. For more information about the new capabilities and features of SharePoint Designer 2010, see Getting Started with SharePoint Designer.

You can also use SharePoint Designer 2010 to modify modular components developed with Visual Studio 2010. For example, you can create Web Parts and other controls in Visual Studio 2010, deploy them to a SharePoint farm, and then edit them in SharePoint Designer 2010.

The primary target users for SharePoint Designer 2010 are IT personnel and information workers who can use this application to create customizations in a production environment. For this reason, you must decide on an ALM model for your particular environment that defines which kinds of customizations will follow the complete ALM development process and which customizations can be done by using SharePoint Designer 2010. Developers are secondary target users. They can use SharePoint Designer 2010 as a part of their development activities, especially during initial creation of customization packages and also for rapid development and prototyping. Your ALM process must also define where and how to fit SharePoint Designer 2010 into the broader development model.

A key challenge of using SharePoint Designer 2010 is that when you use it to modify files, all of your changes are stored in the content database instead of in the file system. For example, if you customize a master page for a specific site by using SharePoint Designer 2010 and then design and deploy new branding elements inside a solution package, the changes are not available for the site that has the customized master page, because that site is using the version of the master page that is stored in the content database.

To minimize challenges such as these, SharePoint Designer 2010 contains new features that enable you to control usage of SharePoint Designer 2010 in a specific environment. You can apply these control settings at the web application level or site collection level. If you disable some action at the web application level, that setting cannot be changed at the site collection level.

SharePoint Designer 2010 makes the following settings available:

  • Allow site to be opened in SharePoint Designer 2010.
  • Allow customization of files.
  • Allow customization of master pages and layout pages.
  • Allow site collection administrators to see the site URL structure.

Because the primary purpose of SharePoint Designer 2010 is to customize content on an existing site, it does not support source code control. By default, pages that you customize by using SharePoint Designer 2010 are stored inside a versioned SharePoint library. This provides you with simple support for versioning, but not for full-featured source code control.

Ads by CeheuapMMeAd Options
Importing Solution Packages into Visual Studio 2010

When you save a site as a solution package in the browser (from the Save as Template page in Site Settings), SharePoint 2010 stores the site as a solution package (.wsp) file and places it in the Solution Gallery of that site collection. You can then download the solution package from the Solution Gallery and import it into Visual Studio 2010 by using the Import SharePoint Solution Package template, as shown in Figure 5.

Figure 5. Import SharePoint Solution Package template
Import SharePoint Solution Package template

SharePoint 2010 solution packages contain many improvements that take advantage of new capabilities that are available in its feature framework. The following list contains some of the new feature elements that can help you manage your development projects and upgrades.

  • SourceVersion for WebFeature and SiteFeature
  • WebTemplate feature element
  • PropertyBag feature element
  • $ListId:Lists
  • WorkflowAssociation feature element
  • CustomSchema attribute on ListInstance
  • Solution dependencies

After you import your project, you can start customizing it any way you like.

Note Note
Because this capability is based on the WebTemplate feature element, which is based on a corresponding site definition, the resulting solution package will contain definitions for everything within the site. For more information about creating and using web templates, see Web Templates.

Visual Studio 2010 supports source code control (as shown in Figure 6), so that you can store the source code for your customizations in a safer and more secure central location, and enable easy sharing of customizations among developers.

Figure 6. Visual Studio 2010 source code control
Visual Studio 2010 source code control

The specific way in which your developers access this source code and interact with each other depends on the structure of your team development environment. The next section of this article discusses key concerns and considerations that you should consider when you build a team development environment for SharePoint 2010.

Team Development Environment for SharePoint 2010: An Overview

As in any ALM planning process, your SharePoint 2010 planning should include the following steps:

  1. Identify and create a process for initiating projects.
  2. Identify and implement a versioning system for your source code and other deployed resources.
  3. Plan and implement version control policies.
  4. Identify and create a process for work item and defect tracking and reporting.
  5. Write documentation for your requirements and plans.
  6. Identify and create a process for automated builds and continuous integration.
  7. Standardize your development model for repeatability.

Microsoft Visual Studio Team Foundation Server 2010 (shown in Figure 7) provides a good potential platform for many of these elements of your ALM model.

Figure 7. Visual Studio 2010 Team Foundation Server
Visual Studio 2010 Team Foundation Server

When you have established your model for team development, you must choose either a collection of tools or Microsoft Visual Studio Team Foundation Server 2010 to manage your development. Microsoft Visual Studio Team Foundation Server 2010 provides direct integration into Visual Studio 2010, and it can be used to manage your development process efficiently. It provides many capabilities, but how you use it will depend on your projects.

You can use the Microsoft Visual Studio Team Foundation Server 2010 for the following activities:

  • Tracking work items and reporting the progress of your development. Microsoft Visual Studio Team Foundation Server 2010 provides tools to create and modify work items that are delivered not only from Visual Studio 2010, but also from the Visual Studio 2010 web client.
  • Storing all source code for your custom solutions.
  • Logging bugs and defects.
  • Creating, executing, and managing your testing with comprehensive testing capabilities.
  • Enabling continuous integration of your code by using the automated build capabilities.

Microsoft Visual Studio Team Foundation Server 2010 also provides a basic installation option that installs all required functionalities for source control and automated builds. These are typically the most used capabilities of Microsoft Visual Studio Team Foundation Server 2010, and this option helps you set up your development environment more easily.

Setting Up a Team Development Environment for SharePoint 2010

SharePoint 2010 must be installed on a development computer to take full advantage of its development capabilities. If you are developing only remote applications, such as solutions that use SharePoint web services, the client object model, or REST, you could potentially develop solutions on a computer where SharePoint 2010 is not installed. However, even in this case, your developers’ productivity would suffer, because they would not be able to take advantage of the full debugging experience that comes with having SharePoint 2010 installed directly on the development computer.

The design of your development environment depends on the size and needs of your development team. Your choice of operating system also has a significant impact on the overall design of your team development process. You have three main options for creating your development environments, as follows:

  1. You can run SharePoint 2010 directly on your computer’s client operating system. This option is available only when you use the 64-bit version of Windows 7, Windows Vista Service Pack 1, or Windows Vista Service Pack 2.
  2. You can use the boot to Virtual Hard Drive (VHD) option, which means that you start your laptop by using the operating system in VHD. This option is available only when you use Windows 7 as your primary operating system.
  3. You can use virtualization capabilities. If you choose this option, you have a choice of many options. But from an operational viewpoint, the option that is most likely the easiest to implement is a centralized virtualized environment that hosts each developer’s individual development environment.

The following sections take a closer look at these three options.

SharePoint 2010 on a Client Operating System

If you are using the 64-bit version of Windows 7, Windows Vista Service Pack 1, or Windows Vista Service Pack 2, you can install SharePoint Foundation 2010 or SharePoint Server 2010. For more information about installing SharePoint 2010 on supported operating systems, see Setting Up the Development Environment for SharePoint 2010 on Windows Vista, Windows 7, and Windows Server 2008.

Figure 8 shows how a computer that is running a client operating system would operate within a team development environment.

Figure 8. Computer running a client operating system in a team development environment
Computer running a client operating system

A benefit of this approach is that you can take full advantage of any of your existing hardware that is running one of the targeted client operating systems. You can also take advantage of pre-existing configurations, domains, and enterprise resources that your enterprise supports. This could mean that you would require little or no additional IT support. Your developers would also face no delays (such as booting up a virtual machine or connecting to an environment remotely) in accessing their development environments.

However, if you take this approach, you must ensure that your developers have access to sufficient hardware resources. In any development environment, you should use a computer that has an x64-capable CPU, and at least 2 gigabytes (GB) of RAM to install and run SharePoint Foundation 2010; 4 GB of RAM is preferable for good performance. You should use a computer that has 6 GB to 8 GB of RAM to install and run SharePoint Server 2010.

A disadvantage of this approach is that your environments will not be centrally managed, and it will be difficult to keep all of your project-dependent environmental requirements in sync. It might also be advisable to write batch files that start and stop some of the SharePoint-related services so that when your developers are not working with SharePoint 2010, these services will not consume resources and degrade the performance of their computers.

The lack of centralized maintenance could hurt developer productivity in other ways. For example, this might be an unwieldy approach if your team is working on a large Microsoft SharePoint Online project that is developing custom solutions for multiple services (for example, the equivalents of http://intranet, http://mysite, http://teams, http://secure, http://search, http://partners, and http://www.internet.com) and deploying these solutions in multiple countries or regions.

If you are developing on a computer that is running a client operating system in a corporate domain, each development computer would have its own name (and each local domain name would be different, such as http://dev 1 or http://dev2). If each developer is implementing custom functionalities for multiple services, you must use different port numbers to differentiate each service (for example, http://dev1 for http://intranet and http://dev1:81 for http://mysite). If all of your developers are using the same Visual Studio 2010 projects, the project debugging URL must be changed manually whenever a developer takes the latest version of a project from your source code repository.

This would create a manual step that could hurt developer productivity, and it would also diminish the efficiency of any scripts that you have written for setting up development environments, because the individual environments are not standardized. Some form of centralization with virtualization is preferable for large enterprise development projects.

SharePoint 2010 on Windows 7 and Booting to Virtual Hard Drive

If you are using Windows 7, you can also create a VHD out of an existing Windows Server 2008 image on which SharePoint 2010 is installed in Windows Hyper-V, and then configure Windows 7 with BDCEdit.exe so that it boots directly to the operating system on the VHD. To learn more about this kind of configuration, see Deploy Windows on a Virtual Hard Disk with Native Boot and Boot from VHD in Win 7.

Figure 9 shows how a computer that is running Windows 7 and booting to VHD would operate within a team development environment.

Figure 9. Windows 7 and booting to VHD in a team environment
Windows 7 and booting to VHD in a team environment

An advantage of this approach is the flexibility of having multiple dedicated environments for an individual project, enabling you to isolate each development environment. Your developers will not accidentally cross-reference any artifacts within their projects, and they can create project-dependent environments.

However, this option has considerable hardware requirements, because you are using the available hardware and resources directly on your computers.

SharePoint 2010 in Centralized Virtualized Environments

In a centralized virtualized environment, you host your development environments in one centralized location, and developers access these environments through remote connections. This means that you use Windows Hyper-V in the centralized location and copy a VHD for every developer as needed. Each VHD is configured to be available from the corporate network, so that when it starts, it can be accessed by using remote connections.

Figure 10 shows how a centralized virtualized team development environment would operate.

Figure 10. Centralized virtualized team development environment
Centralized virtualized development environment

An advantage of this approach is that the hardware requirements for individual developer computers are relatively few because the actual work happens in a centralized environment. Developers could even use computers with 1 GB of RAM as their clients and then connect remotely to the centralized location. You can also manage environments easily from one centralized location, making adjustments to them whenever necessary.

Your centralized host will have significantly high hardware requirements, but developers can easily start and stop these environments. This enables you to use the hardware that you have allocated for your development environments more efficiently. Additionally, this approach provides a ready platform for more extensive testing environments for your custom code (such as multi-server farms).

After you set up your team development environment, you can start taking advantage of the deployment and upgrade capabilities that are included with the new solution packaging model in SharePoint 2010. The following sections describe how to take advantage of these new capabilities in your ALM model.

Models for Solution Lifecycle Management in SharePoint 2010

The SharePoint 2010 solution packaging model provides many useful features that will help you plan for deploying custom solutions and managing the upgrade process. You can implement assembly versioning by applying binding redirects in your web application configuration file. You can also apply versioning to your feature upgrades, and feature upgrade actions enable you to manage changes that will be necessary on your existing sites to accommodate feature upgrades. These upgrade actions can be handled declaratively or programmatically.

The feature upgrade query object model enables you to create queries in your code that look for features on your existing sites that can be upgraded. You can use this object model to obtain relevant information about all of the features and feature versions that are deployed on your SharePoint 2010 sites. In your solution manifest file, you can also configure the type of Internet Information Services (IIS) recycling to perform during a solution upgrade.

The following sections go into greater details about these capabilities and how you can use them.

Using Assembly BindingRedirect with SharePoint 2010 Assemblies

The BindingRedirect feature element can be added to your web applications configuration file. It enables you to redirect from earlier versions of installed assemblies to newer versions. Figure 11 shows how the XML configuration from the solution manifest file instructs SharePoint to add binding redirection rules to the web application configuration file. These rules forward any reference to version 1.0 of the assembly to version 2.0. This is required in your solution manifest file if you are upgrading a custom solution that uses assembly versioning and if there are existing instances of the solution and the assembly on your sites.

Figure 11. Binding redirection rules in a solution manifest file
Binding redirection rules in a solution manifest

It is a best practice to use assembly versioning, because it gives you an easy way to track the versions of a solution that are deployed to your production environments.

SharePoint 2010 Feature Versioning

The support for feature versioning in SharePoint 2010 provides many capabilities that you can use when you are upgrading features. For example, you can use the SPFeature.Version property to determine which versions of a feature are deployed on your farm, and therefore which features must be upgraded. For a code sample that demonstrates how to do this, see Version.

Feature versioning in SharePoint 2010 also enables you to define a value for the SPFeatureDependency.MinimumVersion property to handle feature dependencies. For example, you can use the MinimumVersion property to ensure that a particular version of a dependent feature is activated. Feature dependencies can be added or removed in each new version of a feature.

The SharePoint 2010 feature framework has also enhanced the object model level to support feature versioning more easily. You can use the QueryFeatures method to retrieve a list of features, and you can specify both feature version and whether a feature requires an upgrade. The QueryFeatures method returns an instance of SPFeatureQueryResultCollection, which you can use to access all of the features that must be updated. This method is available from multiple scopes, because it is available from the SPWebService, SPWebApplication, SPContentDatabase, and SPSite classes. For more information about this overloaded method, see QueryFeatures(), QueryFeatures(), QueryFeatures(), and QueryFeatures(). For an overview of the feature upgrade object model, see Feature Upgrade Object Model.

The following section summarizes many of the new upgrade actions that you can apply when you are upgrading from one version of a feature to another.

SharePoint 2010 Feature Upgrade Actions

Upgrade actions are defined in the Feature.xml file. The SPFeatureReceiver class contains a FeatureUpgrading method, which you can use to define actions to perform during an upgrade. This method is called during feature upgrade when the feature’s Feature.xml file contains one or more <CustomUpgradeAction> tags, as shown in the following example.

<UpgradeActions>
  <CustomUpgradeAction Name="text">
    ...
  </CustomUpgradeAction>
</UpgradeActions>

Each custom upgrade action has a name, which can be used to differentiate the code that must be executed in the feature receiver. As shown in following example, you can parameterize custom action instances.

<Feature xmlns="http://schemas.microsoft.com/sharepoint/">
  <UpgradeActions>
    <VersionRange EndVersion ="2.0.0.0">
      <!-- First action-->
      <CustomUpgradeAction Name="example">
        <Parameters>
          <Parameter Name="parameter1">Whatever</Parameter>
          <Parameter Name="anotherparameter">Something meaningful</Parameter>
          <Parameter Name="thirdparameter">additional configurations</Parameter>
        </Parameters>
      </CustomUpgradeAction>
      <!-- Second action-->
      <CustomUpgradeAction Name="SecondAction">
        <Parameters>
          <Parameter Name="SomeParameter1">Value</Parameter>
          <Parameter Name="SomeParameter2">Value2</Parameter>
          <Parameter Name="SomeParameter3">Value3</Parameter>
        </Parameters>
      </CustomUpgradeAction>
    </VersionRange>
  </UpgradeActions>
</Feature>

This example contains two CustomUpgradeAction elements, one named example and the other named SecondAction. Both elements have different parameters, which are dependent on the code that you wrote for the FeatureUpgrading event receiver. The following example shows how you can use these upgrade actions and their parameters in your code.

 <summary>
 Called when feature instance is upgraded for each of the custom upgrade actions in the Feature.xml file.
 </summary>
 <param name="properties">Feature receiver properties</param>
 <param name="upgradeActionName">Upgrade action name</param>
 <param name="parameters">Custom upgrade action parameters</param>

public override  FeatureUpgrading(SPFeatureReceiverProperties properties, 
                                        string upgradeActionName, 
                                        System.Collections.Generic.IDictionary<string, string> parameters)
{

    // Do not do anything, if feature scope is not correct.
     (properties.Feature.Parent  SPWeb)
    {

        // Log that feature scope is incorrect.
        return;
    }

    switch (upgradeActionName)
    {
         "example":
            FeatureUpgradeManager.UpgradeAction1(parameters["parameter1"], parameters["AnotherParameter"],
                                                 parameters["ThirdParameter"]);
            break;
         "SecondAction":
            FeatureUpgradeManager.UpgradeAction1(parameters["SomeParameter1"], parameters["SomeParameter2"],
                                                 parameters["SomeParameter3"]);
            break;
        default:

            // Log that code for action does not exist.
            break;
    }
}

You can have as many upgrade actions as you want, and you can apply them to version ranges. The following example shows how you can apply upgrade actions to version ranges of a feature.

<Feature xmlns="http://schemas.microsoft.com/sharepoint/">
  <UpgradeActions>
    <VersionRange BeginVersion="1.0.0.0" EndVersion ="2.0.0.0">
      ...
    </VersionRange>
    <VersionRange BeginVersion="2.0.0.1" EndVersion="3.0.0.0">
      ...
    </VersionRange>
    <VersionRange BeginVersion="3.0.0.1" EndVersion="4.0.0.0">
      ...
    </VersionRange>
  </UpgradeActions>
</Feature>

The AddContentTypeField upgrade action can be used to define additional fields for an existing content type. It also provides the option of pushing these changes down to child instances, which is often the preferred behavior. When you initially deploy a content type to a site collection, a definition for it is created at the site collection level. If that content type is used in any subsite or list, a child instance of the content type is created. To ensure that every instance of the specific content type is updated, you must set the PushDown attribute to , as shown in the following example.

<Feature xmlns="http://schemas.microsoft.com/sharepoint/">
  <UpgradeActions>
    <VersionRange EndVersion ="2.0.0.0">
      <AddContentTypeField ContentTypeId="0x0101002b0e208ace0a4b7e83e706b19f32cab9"
                           FieldId="{ccbcd479-94c9-4f3a-95c4-58897da434fe}"
                           PushDown="True"/>
    </VersionRange>
  </UpgradeActions>
</Feature>

For more information about working with content types programmatically, see Introduction to Content Types.

The ApplyElementManifests upgrade action can be used to apply new artifacts to a SharePoint 2010 site without reactivating features. Just as you can add new elements to any new SharePoint elements.xml file, you can instruct SharePoint to apply content from a specific elements file to sites where a given feature is activated.

You can use this upgrade action if you are upgrading an existing feature whose FeatureActivating event receiver performs actions that you do not want to execute again on sites where the feature is deployed. The following example demonstrates how to include this upgrade action in a Feature.xml file.

<Feature xmlns="http://schemas.microsoft.com/sharepoint/">
  <UpgradeActions>
    <VersionRange EndVersion ="2.0.0.0">
      <ApplyElementManifests>
        <ElementManifest Location="AdditionalV2Fields\Elements.xml"/>
      </ApplyElementManifests>
    </VersionRange>
  </UpgradeActions>
</Feature>

An example of a use case for this upgrade action involves adding new .webpart files to a feature in a site collection. You can use the ApplyElementManifest upgrade action to add those files without reactivating the feature. Another example would involve page layouts, which contain initial Web Part instances that are defined in the file element structure of the feature element file. If you reactivate this feature, you will get duplicates of these Web Parts on each of the page layouts. In this case, you can use the ElementManifest element of the ApplyElementManifests upgrade action to add new page layouts to a site collection that uses the feature without reactivating the feature.

The MapFile element enables you to map a URL request to an alternative URL. The following example demonstrates how to include this upgrade action in a Feature.xml file.

<Feature xmlns="http://schemas.microsoft.com/sharepoint/">
  <UpgradeActions>
    <MapFile FromPath="Features\MapPathDemo_MapPathDemo\PageDeployment\MyExamplePage.aspx"
             ToPath="Features\MapPathDemo_MapPathDemo\PageDeployment\MyExamplePage2.aspx" />
  </UpgradeActions>
</Feature>

Mapping URLs in this way would be useful to you in a case where you have to deploy a new version of a page that was customized by using SharePoint Designer 2010. The resulting customized page would be served from the content database. When you deploy the new version of the page, the new version will not appear because content for that page is coming from the database and not from the file system. You could work around this problem by using the MapFile element to redirect requests for the old version of the page to the newer version.

It is important to understand that the FeatureUpgrading method is called for each feature instance that will be updated. If you have 10 sites in your site collection and you update a web-scoped feature, the feature receiver will be called 10 times for each site context. For more information about how to use these new declarative feature elements, see Feature.xml Changes.

Upgrading SharePoint 2010 Features: A High-Level Walkthrough

This section describes at a high level how you can put these feature-versioning and upgrading capabilities to work. When you create a new version of a feature that is already deployed on a large SharePoint 2010 farm, you must consider two different scenarios: what happens when the feature is activated on a new site and what happens on sites where the feature already exists. When you add new content to the feature, you must first update all of the existing definitions and include instructions for upgrading the feature where it is already deployed.

For example, perhaps you have developed a content type to which you must add a custom site column named City. You do this in the following way:

  1. Add a new element file to the feature. This element file defines the new site column and modifies the Feature.xml file to include the element file.
  2. Update the existing definition of the content type in the existing feature element file. This update will apply to all sites where the feature is newly deployed and activated.
  3. Define the required upgrade actions for the existing sites. In this case, you must ensure that the newly added element file for the additional site column is deployed and that the new site column is associated with the existing content types. To achieve these two objectives, you add the ApplyElementManifests and the AddContentTypeField upgrade actions to your Feature.xml file.

When you deploy the new version of the feature to existing sites and upgrade it, the upgrade actions are applied to sites one by one. If you have defined custom upgrade actions, the FeatureUpgrading method will be called as many times as there are instances of the feature activated in your site collection or farm.

Figure 12 shows how the different components of this scenario work together when you perform the upgrade.

Figure 12. Components of a feature upgrade that adds a new element to an existing feature
Add a new element to an existing feature

Different sites might have different versions of a feature deployed on them. In this case, you can create version ranges, which define specific actions to perform when you are upgrading from one version to another. If a version range is not defined, all upgrade actions will be applied during each upgrade.

Figure 13 shows how different upgrade actions can be applied to version ranges.

Figure 13. Applying different upgrade actions to version ranges.
Applying upgrade actions to version ranges

In this example, if a given site is upgrading directly from version 1.0 to version 3.0, all configurations will be applied because you have defined specific actions for upgrading from version 1.0 to version 2.0 and from 2.0 to version 3.0. You have also defined actions that will be applied regardless of feature version.

Code Design Guidelines for Upgrading SharePoint 2010 Features

To provide more flexibility for your code, you should not place your upgrade code directly inside the FeatureUpgrading event receiver. Instead, put the code in some centralized location and refer to it inside the event receiver, as shown in Figure 14.

Figure 14. Centralized feature upgrade manager
Centralized feature upgrade manager

By placing your upgrade code inside a centralized utility class, you increase both the reusability and the testability of your code, because you can perform the same actions in multiple locations. You should also try to design your custom upgrade actions as generically as possible, using parameters to make them applicable to specific upgrade scenarios.

Solution Lifecycles: Upgrading SharePoint 2010 Solutions

If you are upgrading a farm (full-trust) solution, you must first deploy the new version of your solution package to a farm.

Execute either of the following scripts from a command prompt to deploy updates to a SharePoint farm. The first example uses the Stsadm.exe command-line tool.

stsadm -o upgradesolution -name solution.wsp -filename solution.wsp

The second example uses the Update-SPSolution Windows PowerShell cmdlet.

UpdateSPSolution Identity contoso_solution.wsp LiteralPath c:\contoso_solution_v2.wsp GACDeployment

After the new version is deployed, you can perform the actual upgrade, which executes the upgrade actions that you defined in your Feature.xml files.

A farm solution upgrade can be performed either farm-wide or at a more granular level by using the object model. A farm-wide upgrade is performed by using the Psconfig command-line tool, as shown in the following example.

psconfig -cmd upgrade -inplace b2b
NoteNote
This tool causes a service break on the existing sites. During the upgrade, all feature instances throughout the farm for which newer versions are available will be upgraded.

You can also perform upgrades for individual features at the site level by using the Upgrade method of the SPFeature class. This method causes no service break on your farm, but you are responsible for managing the version upgrade from your code. For a code example that demonstrates how to use this method, see SPFeature.Upgrade.

Upgrading a sandboxed solution at the site collection level is much more straightforward. Just upload the SharePoint solution package (.wsp file) that contains the upgraded features. If you have a previous version of a sandboxed solution in your solution gallery and you upload a newer version, an Upgrade option appears in the UI, as shown in Figure 15.

Figure 15. Upgrading a sandboxed solution
Upgrading a sandboxed solution

After you select the Upgrade option and the upgrade starts, all features in the sandboxed solution are upgraded.

Conclusion

This article has discussed some considerations and examples of Application Lifecycle Management (ALM) design that are specific to SharePoint 2010, and it has also enumerated and described the most important capabilities and tools that you can integrate into the ALM processes that you choose to establish in your enterprise. The SharePoint 2010 feature framework and solution packaging model provide flexibility and power that you can put to work in your ALM processes.

How To : SharePoint Cross-site Publishing and Free code for Web Part

Cross-site publishing is one of the powerful new capabilities in SharePoint 2013.  It enables the separation of data entry from display and breaks down the container barriers that have traditionally existed in SharePoint (ex: rolling up information across site collections). 

 cross-site-publishing

Cross-site publishing is delivered through search and a number of new features, including list/library catalogs, catalog connections, and the content search web part.  Unfortunately, SharePoint Online/Office 365 doesn’t currently support these features.  Until they are added to the service (possibly in a quarterly update), customers will be looking for alternatives to close the gap.  In this post, I will outline several alternatives for delivering cross-site and search-driven content in SharePoint Online and how to template these views for reuse

I’m a huge proponent of SharePoint Online.  After visiting several Microsoft data centers, I feel confident that Microsoft is better positioned to run SharePoint infrastructure than almost any organization in the world.  SharePoint Online has very close feature parity to SharePoint on-premise, with the primary gaps existing in cross-site publishing and advanced business intelligence.  Although these capabilities have acceptable alternatives in the cloud (as will be outlined in this post), organizations looking to maximize the cloud might consider SharePoint running in IaaS for immediate access to these features.


Apps for SharePoint

The new SharePoint app model is fully supported in SharePoint Online and can be used to deliver customizations to SharePoint using any web technology.  New SharePoint APIs can be used with the app model to deliver an experience similar to cross-site publishing.  In fact, the content search web part could be re-written for delivery through the app model as an “App Part” for SharePoint Online. 
Although the app model provides great flexibility and reuse, it does come with some drawbacks.  Because an app part is delivered through a glorified IFRAME, it would be challenging to navigate to a new page from within the app part.  A link within the app would only navigate within the IFRAME (not the parent of the IFRAME).  Secondly, there isn’t a great mechanism for templating a site to automatically leverage an app part on its page(s).  Apps do not work with site templates, so a site that contains an app cannot be saved as a template.  Apps can be “stapled” to sites, but the app installed event (which would be needed to add the app part to a page) only fires when the app is installed into the app catalog.

REST APIs and Script Editor

The script editor web part is a powerful new tool that can help deliver flexible customization into SharePoint Online.  The script editor web part allows a block of client-side script to be added to any wiki or web part page in a site.  Combined with the new SharePoint REST APIs, the script editor web part can deliver mash-ups very similar to cross-site publishing and the content search web part.  Unlike apps for SharePoint, the script editor isn’t constrained by IFRAME containers, app permissions, or templating limitations.  In fact, a well-configured script editor web part could be exported and re-imported into the web part gallery for reuse.

Cross-site publishing leverages “catalogs” for precise querying of specific content.  Any List/Library can be designated as a catalog.  By making this designation, SharePoint will automatically create managed properties for columns of the List/Library and ultimately generate a search result source in sites that consume the catalog.  Although SharePoint Online doesn’t support catalogs, it support the building blocks such as managed properties and result sources.  These can be manually configured to provide the same precise querying in SharePoint Online and exploited in the script editor web part for display.

Calling Search REST APIs

<div id=”divContentContainer”></div>
<script type=”text/javascript”>
    $(document).ready(function ($) {
        var basePath = “https://tenant.sharepoint.com/sites/somesite/_api/&#8221;;
        $.ajax({
            url: basePath + “search/query?Querytext=’ContentType:News'”,
            type: “GET”,
            headers: { “Accept”: “application/json;odata=verbose” },
            success: function (data) {
                //script to build UI HERE
            },
            error: function (data) {
                //output error HERE
            }
        });
    });
</script>


An easier approach might be to directly reference a list/library in the REST call of our client-side script.  This wouldn’t require manual search configuration and would provide real-time publishing (no waiting for new items to get indexed).  You could think of this approach similar to a content by query web part across site collections (possibly even farms) and the REST API makes it all possible!

List REST APIs

<div id=”divContentContainer”></div>
<script type=”text/javascript”>
    $(document).ready(function ($) {
        var basePath = “https://tenant.sharepoint.com/sites/somesite/_api/&#8221;;
        $.ajax({
            url: basePath + “web/lists/GetByTitle(‘News’)/items/?$select=Title&$filter=Feature eq 0”,
            type: “GET”,
            headers: { “Accept”: “application/json;odata=verbose” },
            success: function (data) {
                //script to build UI HERE
            },
            error: function (data) {
                //output error HERE
            }
        });
    });
</script>


The content search web part uses display templates to render search results in different arrangements (ex: list with images, image carousel, etc).  There are two types of display templates the content search web part leverages…the control template, which renders the container around the items, and the item template, which renders each individual item in the search results.  This is very similar to the way a Repeater control works in ASP.NET.  Display templates are authored using HTML, but are converted to client-side script automatically by SharePoint for rendering.  I mention this because our approach is very similar…we will leverage a container and then loop through and render items in script.  In fact, all the examples in this post were converted from display templates in a public site I’m working on. 

Item display template for content search web part

<!–#_
var encodedId = $htmlEncode(ctx.ClientControl.get_nextUniqueId() + “_ImageTitle_”);
var rem = index % 3;
var even = true;
if (rem == 1)
    even = false;

var pictureURL = $getItemValue(ctx, “Picture URL”);
var pictureId = encodedId + “picture”;
var pictureMarkup = Srch.ContentBySearch.getPictureMarkup(pictureURL, 140, 90, ctx.CurrentItem, “mtcImg140”, line1, pictureId);
var pictureLinkId = encodedId + “pictureLink”;
var pictureContainerId = encodedId + “pictureContainer”;
var dataContainerId = encodedId + “dataContainer”;
var dataContainerOverlayId = encodedId + “dataContainerOverlay”;
var line1LinkId = encodedId + “line1Link”;
var line1Id = encodedId + “line1”;
 _#–>
<div style=”width: 320px; float: left; display: table; margin-bottom: 10px; margin-top: 5px;”>
   <a href=”_#= linkURL =#_”>
      <div style=”float: left; width: 140px; padding-right: 10px;”>
         <img src=”_#= pictureURL =#_” class=”mtcImg140″ style=”width: 140px;” />
      </div>
      <div style=”float: left; width: 170px”>
         <div class=”mtcProfileHeader mtcProfileHeaderP”>_#= line1 =#_</div>
      </div>
   </a>
</div>


Script equivalent

<div id=”divUnfeaturedNews”></div>
<script type=”text/javascript”>
    $(document).ready(function ($) {
        var basePath = “https://richdizzcom.sharepoint.com/sites/dallasmtcauth/_api/&#8221;;
        $.ajax({
            url: basePath + “web/lists/GetByTitle(‘News’)/items/?$select=Title&$filter=Feature eq 0”,
            type: “GET”,
            headers: { “Accept”: “application/json;odata=verbose” },
            success: function (data) {
                //get the details for each item
                var listData = data.d.results;
                var itemCount = listData.length;
                var processedCount = 0;
                var ul = $(“<ul style=’list-style-type: none; padding-left: 0px;’ class=’cbs-List’>”);
                for (i = 0; i < listData.length; i++) {
                    $.ajax({
                        url: listData[i].__metadata[“uri”] + “/FieldValuesAsHtml”,
                        type: “GET”,
                        headers: { “Accept”: “application/json;odata=verbose” },
                        success: function (data) {
                            processedCount++;
                            var htmlStr = “<li style=’display: inline;’><div style=’width: 320px; float: left; display: table; margin-bottom: 10px; margin-top: 5px;’>”;
                            htmlStr += “<a href=’#’>”;
                            htmlStr += “<div style=’float: left; width: 140px; padding-right: 10px;’>”;
                            htmlStr += setImageWidth(data.d.PublishingRollupImage, ‘140’);
                            htmlStr += “</div>”;
                            htmlStr += “<div style=’float: left; width: 170px’>”;
                            htmlStr += “<div class=’mtcProfileHeader mtcProfileHeaderP’>” + data.d.Title + “</div>”;
                            htmlStr += “</div></a></div></li>”;
                            ul.append($(htmlStr))
                            if (processedCount == itemCount) {
                                $(“#divUnfeaturedNews”).append(ul);
                            }
                        },
                        error: function (data) {
                            alert(data.statusText);
                        }
                    });
                }
            },
            error: function (data) {
                alert(data.statusText);
            }
        });
    });

    function setImageWidth(imgString, width) {
        var img = $(imgString);
        img.css(‘width’, width);
        return img[0].outerHTML;
    }
</script>


Even one of the more complex carousel views from my site took less than 30min to convert to the script editor approach.

Advanced carousel script

<div id=”divFeaturedNews”>
    <div class=”mtc-Slideshow” id=”divSlideShow” style=”width: 610px;”>
        <div style=”width: 100%; float: left;”>
            <div id=”divSlideShowSection”>
                <div style=”width: 100%;”>
                    <div class=”mtc-SlideshowItems” id=”divSlideShowSectionContainer” style=”width: 610px; height: 275px; float: left; border-style: none; overflow: hidden; position: relative;”>
                        <div id=”divFeaturedNewsItemContainer”>
                        </div>
                    </div>
                </div>
            </div>
        </div>
    </div>
</div>
<script type=”text/javascript”>
    $(document).ready(function ($) {
        var basePath = “https://richdizzcom.sharepoint.com/sites/dallasmtcauth/_api/&#8221;;
        $.ajax({
            url: basePath + “web/lists/GetByTitle(‘News’)/items/?$select=Title&$filter=Feature eq 1&$top=4”,
            type: “GET”,
            headers: { “Accept”: “application/json;odata=verbose” },
            success: function (data) {
                var listData = data.d.results;
                for (i = 0; i < listData.length; i++) {
                    getItemDetails(listData, i, listData.length);
                }
            },
            error: function (data) {
                alert(data.statusText);
            }
        });
    });
    var processCount = 0;
    function getItemDetails(listData, i, count) {
        $.ajax({
            url: listData[i].__metadata[“uri”] + “/FieldValuesAsHtml”,
            type: “GET”,
            headers: { “Accept”: “application/json;odata=verbose” },
            success: function (data) {
                processCount++;
                var itemHtml = “<div class=’mtcItems’ id=’divPic_” + i + “‘ style=’width: 610px; height: 275px; float: left; position: absolute; border-bottom: 1px dotted #ababab; z-index: 1; left: 0px;’>”
                itemHtml += “<div id=’container_” + i + “‘ style=’width: 610px; height: 275px; float: left;’>”;
                itemHtml += “<a href=’#’ title='” + data.d.Caption_x005f_x0020_x005f_Title + “‘ style=’width: 610px; height: 275px;’>”;
                itemHtml += data.d.Feature_x005f_x0020_x005f_Image;
                itemHtml += “</a></div></div>”;
                itemHtml += “<div class=’titleContainerClass’ id=’divTitle_” + i + “‘ data-originalidx='” + i + “‘ data-currentidx='” + i + “‘ style=’height: 25px; z-index: 2; position: absolute; background-color: rgba(255, 255, 255, 0.8); cursor: pointer; padding-right: 10px; margin: 0px; padding-left: 10px; margin-top: 4px; color: #000; font-size: 18px;’ onclick=’changeSlide(this);’>”;
                itemHtml += data.d.Caption_x005f_x0020_x005f_Title;
                itemHtml += “<span id=’currentSpan_” + i + “‘ style=’display: none; font-size: 16px;’>” + data.d.Caption_x005f_x0020_x005f_Body + “</span></div>”;
                $(‘#divFeaturedNewsItemContainer’).append(itemHtml);

                if (processCount == count) {
                    allItemsLoaded();
                }
            },
            error: function (data) {
                alert(data.statusText);
            }
        });
    }
    window.mtc_init = function (controlDiv) {
        var slideItems = controlDiv.children;
        for (var i = 0; i < slideItems.length; i++) {
            if (i > 0) {
                slideItems[i].style.left = ‘610px’;
            }
        };
    };

    function allItemsLoaded() {
        var slideshows = document.querySelectorAll(“.mtc-SlideshowItems”);
        for (var i = 0; i < slideshows.length; i++) {
            mtc_init(slideshows[i].children[0]);
        }

        var div = $(‘#divTitle_0’);
        cssTitle(div, true);
        var top = 160;
        for (i = 1; i < 4; i++) {
            var divx = $(‘#divTitle_’ + i);
            cssTitle(divx, false);
            divx.css(‘top’, top);
            top += 35;
        }
    }


bottlenecks[1]


    function cssTitle(div, selected) {
        if (selected) {
            div.css(‘height’, ‘auto’);
            div.css(‘width’, ‘300px’);
            div.css(‘top’, ’10px’);
            div.css(‘left’, ‘0px’);
            div.css(‘font-size’, ’26px’);
            div.css(‘padding-top’, ‘5px’);
            div.css(‘padding-bottom’, ‘5px’);
            div.find(‘span’).css(‘display’, ‘block’);
        }
        else {
            div.css(‘height’, ’25px’);
            div.css(‘width’, ‘auto’);
            div.css(‘left’, ‘0px’);
            div.css(‘font-size’, ’18px’);
            div.css(‘padding-top’, ‘0px’);
            div.css(‘padding-bottom’, ‘0px’);
            div.find(‘span’).css(‘display’, ‘none’);
        }
    }

    window.changeSlide = function (item) {
        //get all title containers
        var listItems = document.querySelectorAll(‘.titleContainerClass’);
        var currentIndexVals = { 0: null, 1: null, 2: null, 3: null };
        var newIndexVals = { 0: null, 1: null, 2: null, 3: null };

        for (var i = 0; i < listItems.length; i++) {
            //current Index
            currentIndexVals[i] = parseInt(listItems[i].getAttribute(‘data-currentidx’));
        }

        var selectedIndex = 0; //selected Index will always be 0
        var leftOffset = ”;
        var originalSelectedIndex = ”;

        var nextSelected = ”;
        var originalNextIndex = ”;

        if (item == null) {
            var item0 = document.querySelector(‘[data-currentidx=”‘ + currentIndexVals[0] + ‘”]’);
            originalSelectedIndex = parseInt(item0.getAttribute(‘data-originalidx’));
            originalNextIndex = originalSelectedIndex + 1;
            nextSelected = currentIndexVals[0] + 1;
        }
        else {
            nextSelected = item.getAttribute(‘data-currentidx’);
            originalNextIndex = item.getAttribute(‘data-originalidx’);
        }

        if (nextSelected == 0) { return; }

        for (i = 0; i < listItems.length; i++) {
            if (currentIndexVals[i] == selectedIndex) {
                //this is the selected item, so move to bottom and animate
                var div = $(‘[data-currentidx=”0″]’);
                cssTitle(div, false);
                div.css(‘left’, ‘-400px’);
                div.css(‘top’, ‘230px’);

                newIndexVals[i] = 3;
                var item0 = document.querySelector(‘[data-currentidx=”0″]’);
                originalSelectedIndex = item0.getAttribute(‘data-originalidx’);

                //annimate
                div.delay(500).animate(
                    { left: ‘0px’ }, 500, function () {
                    });
            }
            else if (currentIndexVals[i] == nextSelected) {
                //this is the NEW selected item, so resize and slide in as selected
                var div = $(‘[data-currentidx=”‘ + nextSelected + ‘”]’);
                cssTitle(div, true);
                div.css(‘left’, ‘-610px’);

                newIndexVals[i] = 0;

                //annimate
                div.delay(500).animate(
                    { left: ‘0px’ }, 500, function () {
                    });
            }
            else {
                //move up in queue
                var curIdx = currentIndexVals[i];
                var div = $(‘[data-currentidx=”‘ + curIdx + ‘”]’);

                var topStr = div.css(‘top’);
                var topInt = parseInt(topStr.substring(0, topStr.length – 1));

                if (curIdx != 1 && nextSelected == 1 || curIdx > nextSelected) {
                    topInt = topInt – 35;
                    if (curIdx – 1 == 2) { newIndexVals[i] = 2 };
                    if (curIdx – 1 == 1) { newIndexVals[i] = 1 };
                }

                //move up
                div.animate(
                    { top: topInt }, 500, function () {
                    });
            }
        };

        if (originalNextIndex < 0)
            originalNextIndex = itemCount – 1;

        //adjust pictures
        $(‘#divPic_’ + originalNextIndex).css(‘left’, ‘610px’);
        leftOffset = ‘-610px’;

        $(‘#divPic_’ + originalSelectedIndex).animate(
            { left: leftOffset }, 500, function () {
            });

        $(‘#divPic_’ + originalNextIndex).animate(
            { left: ‘0px’ }, 500, function () {
            });

        var item0 = document.querySelector(‘[data-currentidx=”‘ + currentIndexVals[0] + ‘”]’);
        var item1 = document.querySelector(‘[data-currentidx=”‘ + currentIndexVals[1] + ‘”]’);
        var item2 = document.querySelector(‘[data-currentidx=”‘ + currentIndexVals[2] + ‘”]’);
        var item3 = document.querySelector(‘[data-currentidx=”‘ + currentIndexVals[3] + ‘”]’);
        if (newIndexVals[0] != null) { item0.setAttribute(‘data-currentidx’, newIndexVals[0]) };
        if (newIndexVals[1] != null) { item1.setAttribute(‘data-currentidx’, newIndexVals[1]) };
        if (newIndexVals[2] != null) { item2.setAttribute(‘data-currentidx’, newIndexVals[2]) };
        if (newIndexVals[3] != null) { item3.setAttribute(‘data-currentidx’, newIndexVals[3]) };
    };
</script>


End-result of script editors in SharePoint Online

Separate authoring site collection

Final Thoughts

How To : Create, Edit and Maintaining a Coded UI Test for Silverlight Application

Using the Microsoft Visual Studio 2013 Coded UI Test plugin for Silverlight, you can create Coded UI Tests or action recordings for Silverlight 5.0 applications.

Using Microsoft Microsoft Visual Studio 2010 Feature Pack 2, you can create coded UI tests or action recordings for Silverlight 4 applications. Action recordings let you fast forward through steps in a manual test. For more information about action recordings or coded UI tests, see How to: Create an Action Recording or How to: Create a Coded UI Test.

In this walkthrough, you will learn the procedures that are required to test a Silverlight control in a Silverlight based application. The walkthrough takes you through the following procedures:

Prerequisites


For this walkthrough you will need:

To prepare the walkthrough

  1. Verify that you have the Silverlight 4 developer runtime available at Silverlight Developer 4 for Developers.

  2. Verify that you have completed the procedures in Walkthrough: Creating a RIA Services Solution.

    The result will be a simple Silverlight application that uses a Silverlight grid control. Later, you will use the grid control in this walkthrough and perform coded UI tests on it.

  3.  


    For more information about supported and unsupported Silverlight controls, see How to: Set Up Your Silverlight Application for Testing.

  4. With the RIAServicesExample you created in Walkthrough: Creating a RIA Services Solution running, copy the address of the Web application to the clipboard or a notepad file. For example, the address might resemble this: http://localhost: <port number>/RIAServicesExampleTestPage.aspx.

Add the SilverlightUIAutomationHelper.dll to Your Silverlight 4 Project


To test your Silverlight applications, you must add Microsoft.VisualStudio.TestTools.UITest.Extension.SilverlightUIAutomationHelper.dll as a reference to your Silverlight 4 application so that the Silverlight controls can be identified. This helper assembly instruments your Silverlight application to enable the information about a control to be available to the Silverlight plugin API that you use in your coded UI test or is used for an action recording.This assembly cannot be redistributed. Therefore, you must add this reference conditionally when you want to build the application. By taking this approach the assembly is not redistributed when you deploy your software to a customer.

To add the SilverlightUIAutomationHelper.dll

  1. For each Silverlight project in your solution that you want to test, you must add the SilverlightUIAutomationHelper.dll. In Solution Explorer, right-click the RIAServicesExample project, select Unload Project.

    The project is displayed in Solution Explorer as RIAServicesExample (unavailable).

  2. Right-click the project again and then click Edit RIAServicesExample.csproj.

    The RIAServicesExample.csproj file is opened in the Code Editor. You will see <PropertyGroup> nodes followed by <ItemGroup> nodes. You must make the following two modifications:

    1. To set the production condition, add the following entry to the first <PropertyGroup> node:

       
      <Production Condition="'$(Production)'==''">False</Production>
      
    2. To add the DLL when the build is not a production build, insert the following <Choose> node after the <PropertyGroup> nodes, but before the <ItemGroup> nodes:

       
      <Choose>
         <When Condition=" '$(Production)'=='False' ">
               <ItemGroup>
                 <Reference Include="Microsoft.VisualStudio.TestTools.UITest.Extension.SilverlightUIAutomationHelper">
                 </Reference>
               </ItemGroup>
             </When>
       </Choose>
      
  3. To save the file, click Save.

  4. To reload these changes, right-click the server project and then click Reload Project

    Caution noteCaution

    If you have multiple Silverlight projects that you want to test, you must follow these steps for each project.

    Important noteImportant

    To remove the SilverlightUIAutomationHelper.dll so that it is not redistributed with your production code, set the production condition value to true in the first <PropertyGroup> node. In in this manner, the DLL is no longer added as a reference by the Choose node that you added to the project in the previous procedure. You can also set an environment variable named Production to the value True. Then you can use msbuild to build the Silverlight project and remove the SilverlightUIAutomationHelper.dll.

Create a Coded UI Test for RIAServicesExample Silverlight Application


To Create a Coded UI Test

  1. In Solution Explorer, right-click the solution, click Add and then select New Project.

    The Add New Project dialog box appears.

  2. In the Installed Templates pane, expand either Visual C# or Visual Basic, and then select Test.

  3. In the middle pane, select the Test Project template.

  4. Click OK.

    In Solution Explorer, the new test project named TestProject1 is added to your solution. Either the UnitTest1.cs or UnitTest1.vb file appears in the Code Editor. You can close the UnitTest1 file because it is not used in this walkthrough.

  5. In Solution Explorer, right-click TestProject1, click Add and then select Coded UI test.

    The Generate Code for Coded UI Test dialog box appears.

  6. Select the Record actions, edit UI map or add assertions option and then click OK.

    The UIMap – Coded UI Test Builder appears.

    For more information about the options in the dialog box, see How to: Create a Coded UI Test.

  7. Click Start Recording on the UIMap – Coded UI Test Builder. In several seconds, the Coded UI Test Builder will be ready.

    Start recording UI

  8. Launch Internet Explorer.

  9. In Internet Explorer’s address bar, enter the address of the Web application that you copied in a previous procedure. For example:

    http://localhost: <port number>/RIAServicesExampleTestPage.aspx

  10. Click one or two of the column headers to sort the data.

  11. Close Internet Explorer.

  12. On the UIMap – Coded UI Test Builder, click Generate Code.

  13. In the Method Name type SimpleSilverlightAppTest and then click Add and Generate. In several seconds, the Coded UI test appears and is added to the Solution.

  14. Close the UIMap – Coded UI Test Builder.

    The CodedUITest1.cs file appears in the Code Editor.

    NoteNote

    You can assign a unique automation property based on the type of Silverlight control in your application. For more information, see Set a Unique Automation Property for Silverlight Controls for Testing.

Run the Coded UI Test on the RIAServicesExample Silverlight Application


To run the coded UI test

  • On the Test menu, select Windows and then click Test View.In Test View, select CodedUITestMethod1 under the Test Name column and then click Run Selection in the toolbar.

    The coded UI test should successfully run using the Silverlight data grid control.

A Look At : The New Search Functionality in SharePoint Online and how Developers can make use of it

SharePointOnline2L-1[2]hero-for-hire_basic-layout_600http://en.gravatar.com/sharepointsamurai/


Search functionality in SharePoint 2013 includes several enhancements, custom content processing and a new framework for presenting search result types. SharePoint Server 2013 presents a new search architecture that includes substantial changes and additions to the search components and databases.

Also, there have been significant enhancements made to the Keyword Query Language (KQL).

Some of the features and functionalities have been depreciated from the previous version of SharePoint 2013. There has been a more search user interface improvement which brings the user more interactive with search results. For example, users can rest the pointer over a search result to see the content preview in the hover panel to the right of the result.

Now you can see Office 365 SharePoint 2013 and its admin features of Search Service Application. It’s a breakthrough advancing; nearly all the new features listed here are missed in Office 365 – SharePoint 2010. The following screen capture shows the SharePoint central administrator view for the Search section.

Manage all aspects of the Search experience for your end users improving the relevancy of your results per your content and metadata.

Search helps users quickly return to important sites and documents by remembering what they have previously searched and clicked. The results of previously searched and clicked items are displayed as query suggestions at the top of the results page.

In addition to the default manner in which search results are differentiated, site collection administrators and site owners can create and use result types to customize how results are displayed for important documents. A result type is a rule that identifies a type of result and a way to display it.


Manage Search Schema

Managed properties are used to restrict search results, and present the content of the properties in search results. Crawled properties are automatically extracted from crawled content. All the changes to properties will take effect only after the next full crawl.

Under the search schema section, administrator can:

  • View, create, or modify Managed Properties and map crawled properties to managed properties
  • View or modify Crawled Properties, or to view crawled properties in a particular category
  • View or modify Categories, or view crawled properties in a particular category.

While creating a new managed property, the ‘Mappings to crawled properties’ is one of the key attributes for the configuration set in our new property.


Manage Search Dictionaries

  Taxonomy Term Store  
People Search Dictionaries System
Department Company Exclusions Hashtags
Job Title Company Inclusions Keywords
Location Query Spelling Exclusions Orphaned terms
  Query Spelling Includings  


Manage Authoritative Pages

Search in SharePoint 2013 will analyze the collection of authoritative and non-authoritative pages to determine the ranking of search results. The authoritative sites are of two kinds:

  • Authoritative Site Pages
  • Non-authoritative Site Pages

Authoritative site pages are the links, which administrator authorized to be the most relevant information. There can be multiple authoritative pages in each environment. There is an option for specifying second and third-level authorities for search ranking. Non-authoritative site pages are the content from certain sites can be ranked lower than the rest of the content in the site.


Query Suggestion Settings

SharePoint Search comprises various features that you can leverage for building productivity solutions. One of the interesting and useful competencies are Query Suggestions. The query suggestions are administrated by two options as follows:

  • Always Suggest Phrases
  • Never Suggest Phrases

Manage Result Sources

Result Sources are used to frame the search results and confederate queries to external sources, such as internet search engines, etc. Once the result source are defined, we can configure search web parts and query rule actions to use the result source.

How the Result Source is managed? A SharePoint Online administrator of SharePoint Online Tenant can manage result sources for all site collections and sites reside under the same tenant. A site collection administrator or a site owner can manage result sources for a site collection or a site, respectively.

SharePoint 2013 provides 16 pre-defined result sources. The pre-configured default result source is Local SharePoint Results. We can state a different result source as the default as per our requirement

.

While creating a new Result Source, there is Protocol and Query transform are the two important parameters which tells the Result Source what to do in the SharePoint.

Protocol – Local SharePoint for results from the index of this Search Service. OpenSearch 1.0/1.1 for results from a search engine that uses that protocol. Exchange for results from an exchange source. Remote SharePoint for results from the index of a search service hosted in another farm.

Query Transform – Change incoming queries to use this new query text instead. Include the incoming query in the new text by using the query variable “{searchTerms}“.

Use this to scope results. For example, to only return OneNote items, set the new text to “{searchTerms} fileextension=one“. Then, an incoming query “sharepoint” becomes “sharepoint fileextension=one“. Launch the Query Builder for additional options.


Manage Query Rules

Query rules are to conditionally stimulate the search results and show hunks of supplementary results based on the rules created in the SharePoint. In a query rule, you can specify conditions and correlated actions without any help of code. The user with Site Collection, Site owner permission level can create and manage the query rules.


Manage Query Client Types

Query Client Types are one of the new search features in SharePoint 2013. Client Type identifies an application where a search query is sent from. Applications are prioritized by tiers. Top tier has the highest priority. When resource limit is reached, query throttling becomes ON, and search system will process the queries from top tier to bottom tier.

System Client Types are available out-of-the box, and cannot be deleted. We can add a new custom Client Type by clicking on New Client Type.


Remove Search Results

To remove data from the search results, type the URLs which needed to remove from it. All the URLs listed in the textbox will be removed from search results immediately, once after the Remove Now button is clicked.

View Usage Reports

Here the administrator will be able to see the usage reports and search related report, example Query Rules usage by day, Top Queries by Day, etc.

Search Center Settings

In this setting, the default search system will be mapped. Usually the Enterprise Search Center site that has been created for search entire SharePoint sites in the organization.

Export Search Configuration

Create a file that includes all customized query rules, result sources, result types, ranking models and site search settings but not any that shipped with SharePoint, in the current tenant that can be imported to other tenants.

Import Search Configuration

If you have a search configuration you’d like to import, browse for it below. Settings imported from the file will be created and activated as part of the site. You can modify any of the settings after import.

Crawl Log Permissions

Grant users read access to crawl log information for this tenant.

Search Client Object Model

SharePoint 2013 Search includes a client object model (CSOM) that enables access to most of the Query object model functionality for online, on-premises, and mobile development. You can use the Search CSOM to create client applications that run on a machine that does not have SharePoint 2013 installed to return SharePoint 2013 Preview search results.

The Search CSOM includes a Microsoft .NET Framework managed client object model and JavaScript object model, and it is built on SharePoint 2013. First, client code accesses the SharePoint CSOM. Then, client code accesses the Search CSOM.

NOTE: Custom search solutions in SharePoint Server 2013 do not support SQL syntax. Search in SharePoint 2013 supports FQL syntax and KQL syntax for custom search solutions.

We can configure crawled and managed properties. Configure Result Sources which were Federated Result / Scopes in SharePoint Search 2010.


Introduction to Business Connectivity Services (BCS)

BCS has the ability to connect and query the data sources and returns the results to the user through an external list, or app for SharePoint, or Office 2013. The Microsoft Office 2013 and SharePoint 2013 include Microsoft Business Connectivity Services (BCS).

The SharePoint 2013 and the Office 2013 suites include Microsoft Business Connectivity Services. With Business Connectivity Services, you can use SharePoint 2013 and Office 2013 clients as an interface into data that doesn’t live in SharePoint 2013 itself. It does this by making a connection to the data source, running a query, and returning the results.

Business Connectivity Services returns the results to the user through an external list, or app for SharePoint, or Office 2013 where you can perform different operations against them, such as Create, Read, Update, Delete, and Query (CRUDQ). Business Connectivity Services can access external data sources through Open Data (OData), Windows Communication Foundation (WCF) endpoints, web services, cloud-based services, and .NET assemblies, or through custom connectors.

Business Connectivity Services can access external data sources through Open Data (OData), Windows Communication Foundation (WCF) endpoints, web services, cloud-based services, and .NET assemblies, or through custom connectors. The Open Data Protocol is known as OData. It is an open web protocol for querying and updating data.

Business Connectivity Services uses SharePoint 2013 and Office 2013 as a client interface for data which doesn’t reside SharePoint 2013 environment.

The following screen capture is the BCS features and configuration options available under the SharePoint Administration Center in the Office 365.

A Look At : Application Management and Governance in SharePoint 2013

Summary:Learn how to govern applications for SharePoint 2013 by creating a customization policy and understanding the app model, branding, and life-cycle management.

8322.sharepoint_2D00_2010_5F00_4855E582[1]

How will you manage the applications that are developed for your environment? What customizations do you allow in your applications, and what are your processes for managing those applications?


For effective and manageable applications, your organization should consider the following:

  • Customization policy   SharePoint 2013 includes customizable features and capabilities that span multiple product areas, such as business intelligence, forms, workflow, and content management. Customization can introduce risks to the stability, maintenance, and security of the environment. To support customization while controlling its scope, you should develop a customization policy.
  • Life-cycle management   Follow best practices to manage applications and keep your environments in sync.
  • Branding   If you are designing an information architecture and a set of sites to use across an organization, consider including branding in your governance plan. A formal set of branding policies helps ensure that sites consistently use enterprise imagery, fonts, themes, and other design elements.
  • Solutions or apps for SharePoint?   Decide whether a solution or an app for SharePoint would be the best choice for specific customizations.

Get developer guidance about customizing and branding SharePoint 2013 on MSDN: Build sites for SharePoint 2013.

Foundation icon This article is part of a set of articles about governance. The following articles describe other aspects of governance:

The What is governance? poster gives a summary of this content. Download the PDF version or Visio version, or Zoom into the model in full detail with Zoom.it from Microsoft.

Determine the types of customizations you want to allow and how to manage them. Your customization policy should include:

  • Service-level descriptions   What are the parameters for supporting and managing customizations in your environments? See Service-level agreements.
  • Guidelines for updating customizations   How do you manage changes to customizations, and how do you roll out those changes to your environments? Consider ways to manage source code, such as a source control system and standards for documenting the code.
  • Processes for analyzing   How do you understand whether a particular customization is working well in your environment, or how do you decide which ones to create, change, or retire?
  • Approved tools for customization   Consider development standards, such as coding best practices and the tools that you will to use across your organization. For example, you should decide whether to allow the use of SharePoint Designer 2013 and Design Manager, and specify which site elements can be customized and by whom.
  • Process for piloting and testing customizations   How do you test and deploy customizations? How many people should be in a pilot testing group? What are your standards for testing and validating customizations?
  • Who is responsible for ongoing support   Who will be responsible for supporting customizations in your environments—individual teams or a central group?
  • Guidelines for packaging and deploying customizations   Do you have individual packages for each, or do you include several in a feature or solution? Which customizations should be apps for SharePoint instead of solutions? How do you ensure that customizations in one environment do not affect the rest of your SharePoint implementation?
  • Specific policies regarding each potential type of customization   What types of customizations do you allow?

    For more information about kinds of customizations and their potential risks, see the Customizations table later in this article. For more information about processes for managing customizations, see the white paper SharePoint Products and Technologies customization policy. Most of this content still applies to SharePoint 2013.

  • Policies around using the App Catalog and SharePoint Store Which apps for SharePoint do you want to make available to your organization? Can users purchase apps directly? See Solutions or apps for SharePoint? later in this article for more information.

The highly customizable design of SharePoint products enables you to provide the look, behavior, or functionality that meets your business needs. Customizations can introduce risk to your environment, whether that risk is to the environment’s performance, availability, or supportability. Conversely, a “no customizations” policy severely restricts your organization’s ability to take advantage of the SharePoint platform.

All customizations are not the same. You must decide carefully which kinds of customizations to allow in your environment. You must ensure the customizations support the performance, availability, and supportability you want for your environment. Your governance policy should balance a level of acceptable risk against the business needs for your organization.

What is considered a customization? All of the following are considered kinds of customizations in SharePoint products:

  • Configuration   Using the SharePoint user interface to configure SharePoint products.
  • Branding   Changing logos, styles, colors, master pages and page layouts, and so on to create a custom look for your SharePoint sites. See more about branding.
  • Custom code   Using developer tools to add or change functionality in SharePoint products or to interact with other applications. Risk can vary depending on kind of functionality and level of trust (full trust solutions should be rarely used; consider apps for SharePoint first).
    TipTip:
    Sandboxed solutions are deprecated in this release, so they are not the best option for custom code in the long term

Some customizations have very little risk or impact on your environment. Others have the potential for much higher risk and impact. The following table provides examples of different kinds of customizations, the risk level associated with that kind of customization, and potential issues that you might face if you allow that kind of customization.

Customizations

Risk level Types of customizations and examples Considerations or impact
Unsupported/High Unsupported customizations such as direct changes to the database schema or modifying files on the file system.
  • Will not be supported through Microsoft Customer Support.
  • Will be unable to upgrade.

Do not use.

Moderate to high Creating applications that interact with or redirect actions in key pipelines, such as events, claims, and so on.
  • Potential for service outage or performance issues.
  • Might require rework at upgrade.
Moderate to low Using a custom Web Part outside a sandbox environment, creating custom actions such as adding a menu item, or creating a custom site provisioning process.
  • Short or long-term performance issues or page errors.
  • Might require rework at upgrade.
Low Using solutions in a sandbox environment. Short-term performance issues; you can avoid some performance issues by using resource throttling and quotas.
Very low to no risk Using apps for SharePoint or using functionality within the product or configurations, such as associating a workflow with a list or using an instance of a built in Web Part. Minor configuration or page errors that would have to be addressed. Apps can be uninstalled or updated.
NoteNote:
For more information about customizations and upgrade, see Considerations for specific customizations.


Also, when you think through the customizations to allow in your environment, consider carefully whether a particular customization is necessary. If it recreates functionality that is already available in the product (such as creating a Web Part that does the same thing as the Content Editor Web Part or the Content by Query Web Part), then that might be unnecessary work.

Consider first whether the standard functionality can do what you want, or check the SharePoint Store to see if there is an app for SharePoint available that does what you need.

Follow these best practices to manage applications based on SharePoint 2013 throughout their life cycle:

  • Use separate development, preproduction, and production environments, and keep these environments as synchronized as possible so that you can accurately test your customizations.
  • Test all customizations before releasing the first time and after any updates have been made before you release them to your production environment.
  • Use source code control and solution and feature versioning to track changes to code.

Development, test, and production environments

Consistent branding with a corporate style guide makes for more cohesive-looking sites and easier development. Store approved themes in the theme gallery for consistency so that users will know when they visit the site that they are in the right place.

SharePoint 2013 includes a new feature to use for branding, Design Manager. By using Design Manager, you can create a visual design for your website with whatever web design tool or HTML editor you prefer and then upload that design into SharePoint. Design Manager is the central hub and interface where you manage all aspects of a custom design.

Creating the visual design of a site often fits into a larger process, in which multiple people or organizations are involved. For a roadmap of the tasks from a larger perspective, see Design and branding in SharePoint 2013.

SharePoint 2013 has a new development model based on apps for SharePoint. Apps for SharePoint are self-contained pieces of functionality that extend the capabilities of a SharePoint website. An app may include SharePoint features such as lists, workflows, and site pages, but it can also use a remote web application and remote data in SharePoint. An app has few or no dependencies on any other software on the device or platform where it is installed, other than what is built into the platform. Apps have no custom code that runs on the SharePoint servers.

The guidance for whether to use apps for SharePoint or SharePoint solutions is to:

  • Design apps for end users

    Apps for SharePoint:

    • Are easy for users (tenant administrators and site owners) to discover and install.
    • Use safe SharePoint extensions.
    • Provide the flexibility to develop future upgrades.
    • Can integrate with cloud-based resources.
    • Are available for both SharePoint Online and on-premises SharePoint sites.
  • Use farm solutions for administrators

    SharePoint solutions:

    • Can access the server-side object-model APIs that are needed to extend SharePoint management, configuration, and security
    • Can extend Central Administration, Windows PowerShell cmdlets, timer jobs, custom backups, and so on.
    • Are installed by administrators.
    • Can have farm, web application, or site-collection scope.

Go to MSDN to get more information about the new development model, Apps for SharePoint compared with SharePoint solutions, and Deciding between apps for SharePoint and SharePoint solutions.

Set a policy for using apps for SharePoint in your organization. Can users purchase and download apps? How do you make your organization’s apps available? How do you tell if they’re being used?

  • SharePoint Store   Determine whether users can purchase or download apps from the SharePoint Store.
  • App Catalog   Make specific apps for SharePoint available to your users by adding them to the App Catalog.
  • App requests   Configure app requests to control which apps are purchased and how many licenses are available.
  • Monitor apps   Monitor specific apps in SharePoint Server 2013 to check for errors and to track usage.

In the market

A look at : ALM and Lab Environments

What is a lab environment?

A lab environment is a collection of computers that are managed as a single unit, and on which you deploy the system under test along with test software. Here is a typical configuration of machines in a lab environment:

JJ159341.75955053636946458F51D7F086CADE6D(en-us,PandP.10).png


Typical lab environment configuration

This one is set up for automated tests of an ice cream vending service. The software product itself consists of a web service that runs on Internet Information Services (IIS) and a database that runs on a separate machine. The tests drive a web browser on a client machine.

With a lab environment, you can run a build-deploy-test workflow in which you can automatically build your system, deploy its components to the appropriate machines in the environment, run the tests, and collect test data. (The fully automated version of this is described in Chapter 5, “Automating System Tests.”)

The workflow is controlled by a test controller with the help of test agents installed on each test machine. The test controller runs on a separate computer.

Now you might ask why you need lab environments, since you could deploy your system and tests to any machines you choose.

Well, you could, but lab environments make several things easier:

  • You can set up automated build-deploy-test workflows. The scripts in the workflow use the lab role names of the machines, such as “Web Client,” so that they are independent of the domain names of the computers.
  • The results of tests can be shown on charts that relate them to requirements.
  • Lab Manager automatically installs test agents on each machine, enabling test data to be collected. Lab Manager manages the test settings of the virtual environment, which define what data to collect.
  • You can view the consoles of the machines through a single viewer, switching easily from one machine to the other.
  • Lab environments manage the allocation of machines to tests for reasons that include preventing two team members from mistakenly assigning the same machine to different tests.

Lab environments come in two varieties. A standard lab environment (roughly equivalent to a physical environment in Visual Studio 2010) can be composed of any computers that you have available, such as physical computers or virtual machines running on third-party frameworks.

An SCVMM environment is made up entirely of virtual machines controlled by System Center Virtual Machine Manager (SCVMM). SCVMM environments provide you with several valuable facilities; they allow you to:

  • Create fresh test environments within minutes. You can store a complete environment in a library and deploy running copies of it. For example, you could store an environment of three machines containing a web client, a web server, and a database. Whenever you want to test a system in that configuration, you deploy and run a new instance of it.
  • Take snapshots of the states of the machines. For example whenever you start a test, you can revert to a snapshot that you took when everything was freshly installed. Also, when you find a bug, you can take a snapshot of the environment for later investigation.
  • Pause and resume all the virtual machines in the environment at the same time.

Standard environments are useful for tests that have to run on real hardware, such as some kinds of performance tests. You can also use them if you haven’t installed SCVMM or Hyper-V, as would be the case if, for example, you already use another virtualization framework. But as you can see, we think there are great benefits to using SCVMM environments.

Stored SCVMM environments

Because you can store them in a library, SCVMM environments help to make your tests repeatable; when you run them for the next build, or when a new release is planned after a six-month break, you can be sure that the tests are running under the same conditions.

JJ159341.94F2E0510A25C5D3BB02389020654B0D(en-us,PandP.10).png


A stored SCVMM environment

For example, on Fabrikam’s ice cream sales project, the team often wants to deploy and test a new build of the sales system. It has several components that have to be installed on different machines. Of course, the sales system software is a new build each time. But the platform software, such as operating system, database, and web browser don’t change.

So at the start of the project, the team creates an environment that has the platform software, but no installation of the ice cream system. In addition, each machine has a test agent. The Fabrikam team stores this environment in the library as a template.

Whenever a new build is to be tested, a team member selects the stored platform environment, and chooses Deploy. Lab Manager takes a few minutes to copy and start the environment. Then they only have to install the latest build of the system under test.

While an environment is running, its machines execute on one or more virtualization hosts that have been set up by the system administrator. The stored version from which new copies can be deployed is stored on an SCVMM library server.

Lab management with third-party virtualization frameworks

Some teams have already invested in other virtualization frameworks such as VMware or Citrix XenServer. If that is your situation, the case for switching to Hyper-V and SCVMM might be less clear. But even if you don’t install SCVMM or Hyper-V, you can still use Lab Manager by using standard environments.

With standard environments, you get many of the benefits of lab management, but without the ability to save and quickly set up fresh environments. Instead, you’d have to use your third-party machine manager to set up new machines.

When you assign a machine to a standard environment, Lab Manager will automatically install a test agent and couple it to your test controller. This makes the machine ready for an automatic build-deploy-test workflow and for test data collection. (In Visual Studio 2010, you have to install the test agent manually, but coupling it to the test controller is automatic.)

How to use lab environments

Prerequisites

To enable your team to use lab environments, you first have to set up:

  • Visual Studio Team Foundation Server, with the Lab Manager feature enabled.
  • A test controller, linked to your team project in Team Foundation Server.
  • (Preferable, but not mandatory) System Center Virtual Machine Manager (SCVMM) and Hyper-V.

You only need to set up these things once for the whole team, so we have put the details in the Appendix. If someone else has kindly set up SCVMM, Lab Manager, and a test controller, just continue on here.

Lab center

You manage environments by using Lab Center, which is part of Microsoft Test Manager (MTM). MTM is installed as part of Visual Studio Ultimate or Test Professional. You’ll find it on the Windows Start menu under Visual Studio. If it’s your first time using it, you’ll be asked for the URL of your team project collection. Switch to the Lab Center view (it’s the alternative to Test Center). On the Environments page, you’ll see a list of environments that are in use by your team. Some of them might be marked “in use” by individual team members:

JJ159341.C0DD8E47801E316B77E376F020E16388(en-us,PandP.10).png


Managing environments in Lab Center

(Use the Home button if you want to switch to another team project.)

More information is available from the MSDN website topic: Getting Started with Lab Management.

Connecting to a lab environment

If your team has been using lab environments for a while, then when you open Lab Center, you might already see some environments that are available to use. Pick an environment with a status of Ready, without an In Use flag, and that looks as if it has the characteristics you want, which ought to be indicated by its name. Select it and choose Connect.

The Environment View opens. From here you can log into any of the machines in the environment.

JJ159341.551E17E6D88750A24E53C143E0C6CB73(en-us,PandP.10).png


The environment view

Typically, a deployed environment will have a recent build of your system already installed. If you’re sure that it’s free for you to use, you could decide to run some tests on it. However, make sure you know your team’s conventions; for example, if the environment’s name contains the name of a team member, ask if it is ok to use.

Using a deployed (running) environment

Log in. Choose the Connect button to open a console view of the environment. From there you can log into any of its machines. More about the Connect button can be found on MSDN in the topic How to: Connect to a Virtual Environment.

Reserve the environment. You can mark it as In Useto discourage other team members from interfering with it. This doesn’t prevent access by others, but simply sets a flag in Lab Center.

Revert a virtual environment to a clean snapshot. In the environment viewer, look at the Snapshots tab. If the Snapshots tab isn’t available, then this is a standard environment composed of existing machines. You might need to make sure that the latest version of your system is installed.

In a virtual environment, the team member who created the environment should have made a snapshot immediately after installing the system under test. Select the snapshot and restore the environment to that state. If there isn’t a snapshot available, that’s (hopefully) because the previous user has already restored it to the clean state. Again, you might need to check the conventions of your team.

Explore and test your system. Now you can start testing your system, which is the topic of the next chapter.

Restore the snapshot when you’re done with a virtual environment, to restore it to the newly installed state. This makes it easier for other team members to use. This option isn’t available for standard environments, so you might want to clean up any test materials that you have created.

Clear the “in use” flag when you’re done.Typically, a team will keep a number of running environments that contain a recent build, and share them. Reusing the environment and restoring it to its initial snapshot is the quickest way of assigning an environment for a test run.

Deploying an environment

If there is no running environment that is suitable for what you want to do, you can look for one in the library. The library contains a selection of stored virtual environments that have previously been created by your colleagues. You can learn more from the topic: Using a Virtual Lab for Your Application Lifecycle, on MSDN.

JJ159341.DDEFBF57250131604C3C6FD0605EAC74(en-us,PandP.10).png


The environment library in MTM Lab Center

(If the library isn’t available, that might mean that your team has not set Lab Manager to use SCVMM. But you can still create standard environments, which are made up of computers not controlled by SCVMM. Skip to the section about them near the end of this chapter. Alternatively, you could set up SCVMM as we describe in the Appendix.)

Environments stored in the library are templates; you can’t connect to one because its virtual machines aren’t running. Instead, you must first deploy it. Deploying copies the virtual machines from the library to the virtual machine host, and then starts them.

In MTM, in Lab Center, choose Deploy. Choose an environment from the list. They should have names that help you decide which one you want.

After you have picked an environment, Lab Center takes a few minutes to copy the virtual machines and to make sure that the test agents (which help deploy software and collect data) are running.

Eventually the environment is listed under the Lab tab as Ready (or Running in Visual Studio 2010). Then you’re all set to use it. If it shows up as Not Ready, then try the Repair command. This reinstalls test agents and reconnects them to your test controller. In most cases that fixes it.

Install your system

Typically, stored environments contain installations of the base platform: operating systems, databases, and so on. They don’t usually include an installation of the system under test. Your next step is therefore to install the latest build of your system.

To help choose a good recent build, open the build status report in your web browser. The URL is similar to http://contoso-tfs:8080/tfs/web. Click on Builds. You might have to set the date and other filters. The quality and location of each build is summarized.

In Lab Center, under the Lab tab, select the running environment and choose Connect. Log into the environment’s machines.

Use the installer (typically an .msi file) that is generated by the build process. The location can be obtained from the build status reports. Pick an installer that was generated from the Debug build configuration. You need to put each component on the right machine. Each machine has a role name such as Client, Web Server, or Database, to help you make the right choice.

Later we’ll discuss how you can write scripts to automate the deployment of the system under test.

Review the name you gave to the environment to make sure it reflects the system and build you installed.

Take a snapshot of the environment

Create a snapshot of the environment. This will enable subsequent users to get the environment back to its nice clean state. Do this immediately after you have installed your system, and before you run any tests, other than perhaps a quick smoke test to make sure the installation is OK.

You can create a snapshot either from the Snapshots tab in Environment Viewer, or from the context menu of the environment in the Lab listing.

Use it

After you’ve taken a snapshot, you can start using it as we described earlier. When you’ve finished testing, you can revert to the snapshot.

Delete it (eventually)

Delete an environment when the build it uses is superseded.

Creating a new virtual environment

What if there are no environments in the stored library, or none have the mix of machines you need? Then you’ll have to create one. And if you’re feeling generous, you could add it to the library for other team members to use.

You can either store an environment directly in the library, or you can create it as a running environment and then store it in the library. Storing directly is preferable if you don’t need to configure the constituent virtual machines in any way.

To add a new environment directly to the library, open MTM; choose Lab Center, Library, Environments, and then the New command.

Follow link to expand image


Creating a new environment in the library

Alternatively, to create a new running environment that you can store later, choose Lab Center, Lab, and then New. In the wizard, choose SCVMM Environment. (In Visual Studio 2010, the New command has a submenu, New Virtual Environment.)

In either method, you continue through the wizard to choose virtual machines from the library. If your team has been working for a while, there should be a good stock of virtual machines. Their names should indicate what software is installed on them.

Choose library machines that have type Template if they are available. Unlike a plain virtual machine, you can deploy more than one copy of a template. This is because when a template VM is deployed, it gets a new ID so that there are no naming conflicts on your network. Using templates to create a stored environment allows more than one copy of it to be deployed at a time.

JJ159341.11F88DD461E5D5629797A0A64190C808(en-us,PandP.10).png


Creating a new virtual environment

You have to name each machine uniquely within your new lab environment. Notice that the name of the computer in the environment is not automatically the same as its name in the domain or workgroup.

You also have to assign a role name to each machine, such as Desktop Client or Web Server. More than one machine can have the same role name. There is a predefined set to choose from, but you can also invent your own role names. These roles are used to help deploy the correct software to each machine. If you automate the deployment process, you will use these names; if you deploy manually, they will just help you remember which machine you intended for each software component.

When you complete the wizard, there will be a few minutes’ wait while VMs are copied.

MTM should now show that your environment is in the library, or that it is already deployed as a running environment, depending on what method of creation you chose to begin with. If it’s in the library, you can deploy it as we described before.

After creating an environment, you typically deploy software components and then keep the environment in existence until you want to move to a new build. Different team members might use it, or you might keep it to yourself. You can mark an environment as “In Use” to discourage others from interfering with it while your work is in progress.

Stored and running machines

The lab manager library can store both individual virtual machines and complete environments. There are command buttons for creating new environments, storing them in the library, and for deploying environments from the library. You have to shut down an environment before you can store it.

JJ159341.915E41C06D69548CC8AE9616387F13A5(en-us,PandP.10).png


Stored and deployed environments

Creating and importing virtual machines

You can store individual virtual machines from the test host to the library. Therefore, if your team starts off with a set of virtual machines in the library that include a basic set of platforms—for example, Windows 7 and Windows Server 2008—then you can deploy a machine in an environment, add extra bits, and then store it back in the library.

JJ159341.50A8846DD943403543185DF65F8DC37E(en-us,PandP.10).png


System Center Virtual Machine Manager (SCVMM)

But how do you create those first virtual machines? For this you need to access SCVMM, on which Lab Manager is based. It’s typically an administrator’s task, so you’ll find those details in the Appendix. Briefly:

  1. You can create a new machine in the SCVMM console and then install an operating system on it, either with your DVD or from your corporate PXE server.
  2. Every test machine needs a copy of the Team Foundation Server Test Agent, which you can get from the Team Foundation Server installation DVD.
  3. Use the SCVMM console to store the VM in the library as a template. This is preferable to storing it as a plain VM.
  4. In Lab Manager, use the Import command on the Library tab in order to make the SCVMM library items visible in the Lab Center library.

JJ159341.84682E4E4DA4A8940F44677579E69D0A(en-us,PandP.10).png


How environments are managed

Composed environments

A composed environment is made up of virtual machines that are already running. When you compose an environment from running machines, they are assigned to your environment; when you delete the environment, they are returned to the available pool. You can create a composed environment very quickly because there is no copying of virtual machines.

We recommend composed environments for quick exploratory tests of a recent build. The team should periodically place new machines in the pool on which a recent build is installed. Team members should remember to delete composed environments when they are no longer using them.

JJ159341.B7D97B097F6BCBF97980D943DEF5EEA8(en-us,PandP.10).png


Composed environments

In Visual Studio 2012, you make a composed environment the same way you create a virtual environment: by choosing New and then SCVMM environment. In the wizard, you’ll see that the list of available machines includes both VM templates and running pool machines. If you want, you can mix pool machines and freshly created VMs both in the same environment. For example, you might use new VMs for your system under test, and a pool machine for a database of test data, or a fake of an external system. Because the external system doesn’t change, there is no need to keep creating new versions of it.

In Visual Studio 2010, use the New Composed Environment command and choose machines from the list.

Standard environments

Standard environments are made up of existing computers. They can be either physical or virtual machines, or a mixture. They must be domain-joined.

You can create standard environments even if your team hasn’t yet set up SCVMM. For example, if you are already using VMware to run virtual machines and don’t want to switch to Hyper-V and SCVMM, you can use Lab Manager to set up standard environments. You can’t stop, start, or take snapshots of standard environments, but Lab Manager will install test agents on them and you can use them to run a build-deploy-test workflow.

You can also use standard environments when it is important to use a real machine—for example, in performance tests.

To create a standard environment, click New and then choose Standard Environment.

(In Visual Studio 2010, choose New Physical Environment. You must manually install test and lab agents on the computers. These agents can be installed from the Team Foundation Server DVD.)

For an example, see Lab Management walkthrough using Visual Studio 11 Developer Preview Virtual Machine on the Visual Studio Lab Management team blog.

Summary

There’s a lot of pain and overhead in configuring physical boxes to build test environments. The task is made much easier by Visual Studio Lab Manager, particularly if you use virtual environments.

With Lab Manager you can:

  • Manage the allocation of lab machines, grouping them into lab environments.
  • Configure machines for the collection of test data.
  • Rapidly create fresh virtual environments already set up with a base platform of operating system, database, and so on.

Differences between Visual Studio 2010 and Visual Studio 2012

  • System Center Virtual Machine Manager 2012. Lab Management in Visual Studio 2012 works with SCVMM 2012 in addition to SCVMM 2008.
  • Standard environments. Lab Manager in Visual Studio 2012 is easier to use with third-party virtualization frameworks as well as physical computers. It will install test agents if necessary.
  • Test agents. In Visual Studio 2010, you must install test and lab agents on the machines that you want to use in the lab. In Visual Studio 2012, there is only one type of agent, and it is installed automatically by Lab Manager on each of the machines in a lab environment. You can still install the test agent yourself to save time when lab environments are created.
  • Compatibility. Most combinations of 2010 and 2012 RC products work together. For example, you can create environments on Visual Studio Team Foundation Server 2010 using Microsoft Test Manager 2012 RC.

JJ159341.133AB26540FC407EBE448F1A9C7558A7(en-us,PandP.10).png

Latest SharePoint 2013 Resources

Introduction


Best practices are, and rightfully so, always a much sought-after topic. There are various kinds of best practices:


•Microsoft best practices. In real life, these are the most important ones to know, as most companies implementing SharePoint best practices have a tendency to follow as much of these as possibly can. Independent consultants doing architecture and code reviews will certainly take a look at these as well. In general, you can safely say that best practices endorsed by Microsoft have an added bonus and it will be mentioned whenever this is the case.

 
•Best practices. These practices are patterns that have proven themselves over and over again as a way to achieve a high quality of your solutions, and it’s completely irrelevant who proposed them. Often MS best practices will also fall in this category. In real life, these practices should be the most important ones to follow.

 
•Practices. These are just approaches that are reused over and over again, but not necessarily the best ones. Wiki’s are a great way to discern best practices from practices. It’s certainly possible that this page refers to these “Practices of the 3rd kind”, but hopefully, the SharePoint community will eventually filter them out. Therefore, everybody is invited and encouraged to actively participate in the various best practices discussions.
This Wiki page contains an overview of SharePoint 2013 Best Practices of all kinds, divided by categories.

Performance

This section discusses best practices regarding performance issues.
•http://gallery.technet.microsoft.com/The-SharePoint-Flavored-5b03f323     , the SharePoint Flavored Weblog Reader (SFWR) helps troubleshooting performance problems by analyzing the IIS log files of SharePoint WFEs.
•http://gallery.technet.microsoft.com/office/PressurePoint-Dragon-for-87572ee1   , PressurePoint Dragon for SharePoint 2013 helps executing performance tests.
•http://gallery.technet.microsoft.com/Maxer-for-SharePoint-2013-52208636     , a tool for checking capacity planning limits.
•http://gallery.technet.microsoft.com/Ping-Dragon-for-SharePoint-70fb299e   , a command line tool for pinging SharePoint and getting the response time of a SharePoint page.
•http://gallery.technet.microsoft.com/WinPing-Dragon-for-eefb6dd3   , a WPF client for  for pinging SharePoint and getting the response time of a SharePoint page.
•http://social.technet.microsoft.com/wiki/contents/articles/16218.sharepoint-2013-best-practices-in-depth-performance-counters.aspx , in depth info about performance counters relevant to SharePoint 2013.
•http://technet.microsoft.com/en-us/library/ff758658.aspx   , TechNet performance monitoring tips.
•http://www.iis.net/downloads/community/2007/05/wcat-63-(x64)   , the Web Capacity Analysis Tool (WCAT) is a lightweight HTTP load generation tool to measure the performance of a web server. Used by MS support in various capacity analysis plans.
•Improve SharePoint Speed by fixing a SSL Trust Issue,  http://sharepoint-community.net/profiles/blogs/how-to-improve-speed-on-sharepoint-2013
•http://technet.microsoft.com/en-us/library/cc262813.aspx   , Large Lists.
•http://technet.microsoft.com/en-us/library/hh395916.aspx   , Estimating performance and capacity.

SharePoint Server 2013 Build Numbers


Version Build # Type Server
Package (KB) Foundation
Package (KB) Language
specific Notes
Public Beta Preview   15.0.4128.1014 Beta n/a n/a yes Known issues
SPS 2013   RTM 15.0.4420.1017 RTM n/a n/a yes Setup, Install
Dec. 2012 Fix 15.0.4433.1506 update 2752058
2752001   n/a yes Known Issue
March 2013   15.0.4481.1005 PU 2767999   2768000   global New Baseline
April 2013    15.0.4505.1002 CU – 2751999   global Known Issue
April 2013   15.0.4505.1005 CU 2726992   – global Known Issue
June 2013   15.0.4517.1003 CU   2817346   global Known Issue   1
Known Issue 2
June 2013   15.0.4517.1005 CU 2817414   – global Known Issue 1  Known Issue 2
August 2013   15.0.4535.1000 CU 2817616   2817517   global –
October 2013   15.0.4551.1001 CU   2825674   global –
October 2013   15.0.4551.1005 CU 2825647     global –
December 2013   15.0.4551.1508 CU   2849961   global –
December 2013   15.0.4551.1511 CU 2850024     global see KB
Feb. 2014 – skipped! n/a – – – – –
SP1-released Apr.2014   15.0.4569.1000
(15.0.4569.1506) SP 2817429

2880552   –   yes

Re-released SP

SP1-released Apr.2014
(15.0.4569.1509)
fixed Build:
15.0.4571.1502
SP  –
2817439
2760625   – Fix
2880551   – Current
yes

Known Issue

Re-released SP

April 2014   15.0.4605.1004 CU 2878240   2863892   global Known Issue
MS14-022 15.0.4615.1001 PU 2952166   2952166   n/a Security fix
June 2014   15.0.4623.1001 CU 2881061   2881063   global n/a

reference: http://blogs.technet.com/b/steve_chen/archive/2013/03/26/3561010.aspx

Feature Overview

This section discusses best places to get SharePoint feature overviews.
•http://www.apps4rent.com/sharepoint-2013-features-comparison.html   , nice feature comparison.
•http://technet.microsoft.com/en-us/library/jj819267.aspx   , extensive SharePoint Online overview.
•http://technet.microsoft.com/en-us/library/ff607742(v=office.15).aspx   , deprecated features.
•http://www.andrewconnell.com/blog/archive/2013/01/11/sharepoint-2013-amp-office-365-feature-matrixndashan-easier-way-to.aspx   , matrix overview.
•http://www.rharbridge.com/www.rharbridge.com/?page_id=966   , nice overview including SharePoint 2013, 2010, 2007, and Office 365.
•http://www.fpweb.net/sharepoint-hosting/2013/compare-sharepoint-server-standard-enterprise/   , 2013 standard vs enterprise.
•http://www.khamis.net/Blog/Post/275/SharePoint-2013-Standard-vs–Enterprise-vs–Foundation-Feature-Comparison-Matrix  , 2013 standard vs enterprise vs foundation.
•http://blog.blksthl.com/2013/01/14/sharepoint-2013-feature-comparison-chart-all-editions/#SIT   , overview of all 2013 versions.

Capacity Planning
•http://technet.microsoft.com/en-us/library/cc261834.aspx   , excellent planning resource.
•http://technet.microsoft.com/en-us/library/cc263199.aspx   , overview of various technical diagrams.
•http://technet.microsoft.com/en-us/library/jj219628.aspx#HW_Enterprise   , info about scaling search.
•http://technet.microsoft.com/en-us/library/cc262787.aspx   , capacity boundaries.

Installation

This section discusses installation best practices.
•http://social.technet.microsoft.com/wiki/contents/articles/15289.sharepoint-2013-best-practices-creating-a-development-environment.aspx , provides a detailed explanation how to create a SharePoint 2013 development environment.
•http://technet.microsoft.com/en-us/library/cc262749.aspx   , system requirements overview.
•http://technet.microsoft.com/en-us/library/ee662513.aspx   , provides an overview of the administrative and service accounts you need for a SharePoint 2013 installation.
•http://technet.microsoft.com/en-us/library/cc678863.aspx   , describes SharePoint 2013 administrative and service account permissions for SQL Server, the File System, File Shares, and Registry entries.
•http://social.technet.microsoft.com/wiki/contents/articles/14500.sharepoint-2013-best-practices-service-accounts.aspx , naming conventions and permission overview for service accounts.
•http://www.slideshare.net/michaeltnoel/spcsea-2013-upgrading-to-sharepoint-2013  , a methodical approach to upgrading to SharePoint 2013.
•http://autospinstaller.codeplex.com/   , Automated SharePoint 2010/2013 installation using PowerShell and XML configuration.
•http://autospinstallergui.codeplex.com/   , GUI tool for configuring the AutoSPInstaller configuration XML.
•http://social.technet.microsoft.com/wiki/contents/articles/16343.sharepoint-2013-best-practices-setting-up-a-dev-environment-for-windows-apps-and-sharepoint.aspx , describes how to set up a dev environment needed for creating Windows Apps that leverage SharePoint.
•http://technet.microsoft.com/en-us/library/jj658588.aspx   , installing workflows.
•Install SharePoint 2013 on a single server with SQL Server
•Install SharePoint 2013 on a single server with a built-in database
•Install SharePoint 2013 across multiple servers for a three-tier farm
•Install and configure a virtual environment for SharePoint 2013
•Install or uninstall language packs for SharePoint 2013
•Add web or application servers to farms in SharePoint 2013
•Add a database server to an existing farm in SharePoint 2013
•Remove a server from a farm in SharePoint 2013
•Uninstall SharePoint 2013
•Install and configure a virtual environment for SharePoint 2013

Upgrade and Migration

This section discusses how to upgrade to SharePoint 2013 from a previous version.
•http://blogs.msdn.com/b/russmax/archive/2013/04/01/why-sharepoint-2013-cumulative-update-takes-5-hours-to-install.aspx?CommentPosted=true#commentmessage   Why SharePoint 2013 Cumulative Update takes 5 hours to install, improve CU (patch) Installation times from 5 hours to 30 mins.
•http://social.technet.microsoft.com/wiki/contents/articles/15743.sharepoint-2013-best-practices-upgrading-from-sharepoint-2007.aspx discusses best practices for upgrading from SharePoint 2007 to 2013.
•http://social.technet.microsoft.com/wiki/contents/articles/16033.sharepoint-2013-best-practices-migrate-from-sharepoint-foundation-2013-to-sharepoint-server-2013.aspx , upgrade SharePoint Foundation 2013 to SharePoint Server 2013.
•http://technet.microsoft.com/en-us/library/cc262483.aspx   , SharePoint 2010 to 2013.
•http://technet.microsoft.com/en-us/library/cc303436.aspx   , upgrade databases from SharePoint 2010 to 2013.
•http://www.google.nl/url?sa=t&rct=j&q=download%20proven%20practices%20for%20upgrading%20or%20migrating%20to%20sharepoint%202013&source=web&cd=1&ved=0CEgQFjAA&url=http%3A%2F%2Feu.avepoint.com%2Fassets%2Fpdf%2Fwhite-papers%2Femea%2FSharePoint-2013-Migration-White-Paper.pdf&ei=L2FRUdPHJoqX1AWy44CgBw&usg=AFQjCNHA6Iuoigex0xyHb-EuPdBDIiLrhw&bvm=bv.44158598,d.d2k   , PDF document containing extensive info about Proven Practices for Upgrading or Migrating to SharePoint 2013.
•http://technet.microsoft.com/en-us/library/ee947141.aspx   , upgrade from sharepoint 2007 or wss 3 to sharepoint 2013.

Infrastructure

This section discusses infrastructure best practices.
•http://technet.microsoft.com/en-us/library/cc263199(v=office.15)   , infrastructure diagrams.
•http://social.technet.microsoft.com/wiki/contents/articles/16180.sharepoint-2013-best-practices-dealing-with-geographically-dispersed-locations.aspx , dealing with geographically dispersed locations.

Backup and Recovery
This section deals with best practices about the back up and restore of SharePoint environments. •http://technet.microsoft.com/en-us/library/ee663490.aspx   , general overview of backup and recovery.
•http://technet.microsoft.com/en-us/library/ee428315.aspx   , back-up solutions for specific parts of SharePoint.
•http://www.slideshare.net/thomasvochten/sharepoint-high-availability-disaster-recovery   , good info about disaster recovery.
•http://technet.microsoft.com/en-us/library/cc748824.aspx   , high availability architectures.
•http://social.technet.microsoft.com/wiki/contents/articles/17195.sharepoint-2013-best-practices-back-up-sharepoint-online.aspx , how to back up SharePoint online?

Database
•http://technet.microsoft.com/en-us/library/cc678868.aspx   , great resource about SharePoint databases.
•http://technet.microsoft.com/en-us/library/ff851878.aspx   , removing ugly GUIDs from SharePoint database names.

Implementation and Maintenance

This section deals with best practices about implementing SharePoint.
•http://social.technet.microsoft.com/wiki/contents/articles/6575.ten-steps-to-a-successful-sharepoint-implementation-en-us.aspx explains how to implement SharePoint.
•http://technet.microsoft.com/en-us/library/ff851878.aspx   , rename service applications.

Apps

This section deals with best practices regarding SharePoint Apps.
•http://technet.microsoft.com/en-us/library/fp161237(v=office.15).aspx   , great resource for planning Apps.
•http://msdn.microsoft.com/en-us/library/jj163230.aspx  ,  a resource for building apps for SharePoint.
•http://msdn.microsoft.com/en-us/library/jj163264.aspx   , Best practices and design patterns for app license checking.

Every day use
•http://social.technet.microsoft.com/wiki/contents/articles/16166.sharepoint-2013-best-practices-using-folders.aspx , using folders
•http://social.technet.microsoft.com/wiki/contents/articles/17829.sharepoint-2013-going-up-in-the-navigation.aspx , discusses options for navigating up
•http://social.technet.microsoft.com/wiki/contents/articles/17997.sharepoint-2013-best-practice-choosing-between-a-choice-lookup-or-taxonomy-managed-metadata-column.aspx , discusses best practices for choosing between choice, lookup or taxonomy column

Add-ons

This section deals with useful SharePoint add-ons.
•http://www.infragistics.com/products/sharepoint/  , an collection of web parts for an enterprise dashboard.
•http://harmon.ie/Products/Mobile  , an app for iPhone/iPad that enhances mobile access to SharePoint documents.

Development
This section covers best practices targeted towards software developers. •http://social.technet.microsoft.com/wiki/contents/articles/13373.sharepoint-2013-what-to-do-farm-solution-vs-sandbox-vs-app.aspx , discusses when to use farm solutions, sandbox solutions, or sharepoint apps.
•http://social.technet.microsoft.com/wiki/contents/articles/13637.sharepoint-2013-best-practices-what-client-api-should-you-choose-when-building-apps.aspx , guidelines to help you pick the correct client API to use with your app.
•http://msdn.microsoft.com/en-us/library/jj164060(v=office.15).aspx   , guidelines to help you pick the correct client API for your SharePoint solution.
•http://social.technet.microsoft.com/wiki/contents/articles/16343.sharepoint-2013-best-practices-setting-up-a-dev-environment-for-windows-apps-and-sharepoint.aspx , describes how to set up a dev environment needed for creating Windows Apps that leverage SharePoint.
•http://social.technet.microsoft.com/wiki/contents/articles/16353.sharepoint-2013-best-practices-working-with-connection-strings-in-auto-hosted-sharepoint-apps.aspx , discusses how to deal with connection strings in auto-hosted apps.

Debugging

This section contains debugging tips for SharePoint.
•Use WireShark to capture traffic on the SharePoint server.
•Use a Text Differencing tool to compare if web.config files on WFEs are identical.
•Use Fiddler to monitor web traffic using the People Picker. This will provide insight in how to use the people picker for custom development. Please note: the client People Picker web service interface is located in SP.UI.ApplicationPages.ClientPeoplePickerWebServiceInterface.

Troubleshooting
•Troubleshooting Office Web Apps
•http://social.technet.microsoft.com/wiki/contents/articles/16640.sharepoint-2013-tips-for-troubleshooting-search-suggestions.aspx , troubleshooting search suggestions.
•http://technet.microsoft.com/en-us/library/jj906556.aspx   , troubleshooting claims authentication.
•http://technet.microsoft.com/en-us/library/dn169566.aspx   , troubleshooting fine grained permissions.
•http://social.technet.microsoft.com/Forums/sharepoint/en-US/02b78299-bc7f-448b-b233-f9cae0da8466/sharepoint-2013-alerts-are-not-firing-any-mails-for-the-normal-alerts-and-search-alerts-can-someone , troubleshooting email alerts.

Farms

This section discusses best practices regarding SharePoint 2013 farm topologies.
•Office Web Apps topologies
•How to configure SharePoint Farm
•How to install SharePoint Farm
•Overview of farm virtualization and architectures

Accessibility

This section discusses SharePoint accessibility topics.
•http://office.microsoft.com/en-us/sharepoint-foundation-help/keyboard-shortcuts-for-sharepoint-products-HA102772894.aspx   , shortcuts for SharePoint.
•http://technet.microsoft.com/en-us/library/ff852108.aspx   , conformance statement A-level (WCAG 2.0).
•http://technet.microsoft.com/en-us/library/ff852107.aspx   , conformance statement AA-level (WCAG 2.0).

Top 10 Blogs to Follow
It’s certainly a best practice to keep up to date with the latest SharePoint news. Therefore, a top 10 of blog suggestions to follow is included. 1.Corey Roth at http://www.dotnetmafia.com/blogs/dotnettipoftheday/
2.Jeremy Thake at http://jeremythake.com
3.Nik Patel at http://nikspatel.wordpress.com/
4.Yaroslav Pentsarskyy at http://www.sharemuch.com/
5.Giles Hamson at http://spandps.com/author/ghamson/
6.Danny Jessee at http://www.dannyjessee.com/blog/
7.Marc D Anderson at http://sympmarc.com/
8.Andrew Connell at http://www.andrewconnell.com/blog
9.Geoff Evelyn at http://www.sharepointgeoff.com/
10.http://sharepointdragons.com /  , Nikander & Margriet on SharePoint.

Recommended SharePoint Related Tools

What to put in your bag of tools?
1.http://gallery.technet.microsoft.com/The-SharePoint-Flavored-5b03f323    , the SharePoint Flavored Weblog Reader (SFWR) helps troubleshooting performance problems by analyzing the IIS log files of SharePoint WFEs.
2.http://gallery.technet.microsoft.com/PressurePoint-Dragon-for-87572ee1   , PressurePoint Dragon for SharePoint 2013 helps executing performance tests.
3.http://gallery.technet.microsoft.com/Maxer-for-SharePoint-2013-52208636   , a tool for checking capacity planning limits.
4.http://visualstudiogallery.msdn.microsoft.com/36a6eb45-a7b1-47c3-9e85-09f0aef6e879    , Muse.VSExtensions, a great tool for referencing assemblies located in the GAC.
5.http://www.quest.com/powergui-freeware/   , helps with all your PowerShell development. In a SharePoint environment, there usually will be some.
6.http://powerguivsx.codeplex.com/   , Visual Studio extension based on PowerGUI that adds PowerShell IntelliSense support to Visual Studio.
7.http://visualstudiogallery.msdn.microsoft.com/4784e790-32f4-455f-9228-53f537c03787   , FishBurn Systems provides some sort of CKSDev lite for VS.NET 2012/SharePoint 2013. Very useful.
8.http://visualstudiogallery.msdn.microsoft.com/6ed4c78f-a23e-49ad-b5fd-369af0c2107f   , web extensions make creating CSS in VS.NET a lot easier and supports CSS generation for multiple platforms.
9.http://technet.microsoft.com/en-us/library/cc508851  , the SharePoint 2010 Administration Toolkit (works on 2013).
10.http://clumsyleaf.com/products/cloudxplorer   , a great tool when you’ve installed your SharePoint farm on Azure.

Training

If you want to learn about SharePoint 2013, there are valuable resources out there to get started.
•http://technet.microsoft.com/en-us/sharepoint/fp123606.aspx%20  , basic training for IT Pros.
•http://www.microsoft.com/en-us/download/details.aspx?id=35396   , free eBook.
•www.MicrosoftVirtualAcademy.com   , great resource with advanced online and interactive sessions.
http://technet.microsoft.com/en-us/library/gg609831.aspx   , at the end there’s a nice overview of training resources.

See Also
•SharePoint 2013 Portal
•SharePoint 2013 – Service Applications
•SharePoint 2013 – Resources for Developers
•SharePoint 2013 – Resources for IT Pros


HTML5 SharePoint Pic Web Part Released and Available !!

This is a Sandbox web part control to display a matrix of image thumbnails.

For a build a Metro IDE or a Picture Gallery to show products, news, or a social team that integrates with pictures, etc. All this, from any SharePoint picture library.

Supports : SharePoint 2010 & 2013 On-Premise Web Part,  SharePoint Online Web Part

FEATURES OF THE WEB PART** ver. 1.0


**PREVIEW EXAMPLE OF THE CONTROL**


1

How to: Customize the SharePoint HTML Editor Field Control using ECM

You can use the HTML Editor field control to insert HTML content into a publishing page. Page templates that include a Publishing HTML column type also include the HTML Editor field control.

This editor has special capabilities, such as customized styles, editing constraints, reusable content support, a spelling checker, and use of asset pickers to select documents and images to insert into a page’s content. This topic describes how to modify some features and attributes of the HTML Editor field control.

Image

If the content type of a page layout supports the Page Content column, you can add a Rich HTML field control to your page layout by using markup such as the following.

<PublishingWebControls:RichHtmlField id="ArticleAbstract" FieldName="ArticleAbstract" 
          AllowExternalUrls="false" 
          AllowFonts="true" 
          AllowReusableContent="false" 
          AllowHeadings="false"
          AllowHyperlinks="false"
          AllowImages="false"
          AllowLists="false"
          AllowTables="false"
          AllowTextMarkup="false" 
          AllowHTMLSourceEditing="false"
          DisalbeBasicFormattingButtons="false"
          runat="server"/>

In the example above, RichHTMLField is the name of the field control that provides the richer HTML editing experience. Attributes such as AllowFonts and AllowTables specify restrictions on the field.

The HTML field control allows font tags, but the control does not allow URLs that are external to the current site collection, reusable content stored in a centralized list, standard HTML heading tags, hyperlinks, images, numbered or bulleted lists, tables, or text markup.

Table 1. HTML editor field control properties
Attribute Description
AllowExternalUrls Only URLs internal to the current site collection are allowed to be referenced in a link or an image.
AllowFonts Content may contain Font tags.
AllowHtmlSourceEditing HTML Editor can be switched into a mode that allows the HTML to be edited directly.
AllowReusableContent Content may contain reusable content fragments stored in a centralized list.
AllowHeadings Content may contain HTML heading tags (H1, H2, and so on).
AllowTextMarkup Content may contain bold, italic, and underlined text.
AllowImages Content may contain images.
AllowLists Content may contain numbered or bulleted lists.
AllowTables Content may contain table-related tags such as <table>, <tr>, and <td>.
AllowHyperlinks Content may contain links to other URLs.
AllowHtmlSourceEditing When set to false, the HTML editor is disabled from switching to HTML source editing mode.
AllowHyperlinks Gets or sets the constraint that allows hyperlinks to be added to the HTML. If this flag is set to false, <A>, <AREA>, and <MAP> tags are removed from the HTML. Default is true. This property also determines whether the editing user interface (UI) enables these operations.
AllowImageFormatting Gets or sets image formatting items. This restriction disables only menus and does not force the content to adhere to this restriction
AllowImagePositioning Gets or sets the position of the image. This restriction disables only menus and does not force the content to adhere to this restriction.
AllowImageStyles Gets or sets whether the Table Styles menu is enabled. This restriction disables only the menu and does not force the content to adhere to this restriction.
AllowInsert Gets or sets whether Insert options are shown. This restriction disables only the menu and does not force the content to adhere to this restriction.
AllowLists Gets or sets the constraint that allows list tags to be added to the HTML. If this flag is set to false, <LI>, <OL>, <UL>, <DD>, <DL>, <DT>, and <MENU> tags are removed from the HTML. Default is true. This also determines whether the editing UI enables these operations.
AllowParagraphFormatting Gets or sets whether paragraph formatting items are enabled. This restriction disables only menus and does not force the content to adhere to this restriction.
AllowStandardFonts Gets or sets whether standard fonts are enabled. This restriction disables only menus and does not force the content to adhere to this restriction.
AllowStyles Gets or sets whether the Style menu is enabled. This restriction disables only the menu and does not force the content to adhere to this restriction.
AllowTables Gets or sets the constraint to allow tables to be added when editing this field.
AllowTableStyles Gets or sets whether the Table Styles menu is enabled. This restriction disables only the menu and does not force the content to adhere to this restriction.
AllowTextMarkup Get or set the constraint to allow text markup to be added when editing this field.
AllowThemeFonts Gets or sets whether theme fonts are enabled. This restriction disables only menus and does not force the content to adhere to this restriction.
Predefined Table Formats

The HTML editor includes a set of predefined table formats, but it can be customized to fit the styling of an individual page. Each table format is a collection of cascading style sheet (CSS) classes for each table tag. You can define styling for the first and last row, odd and even rows, first and last column, and so on.

The HTML Editor dynamically applies certain styles from the referenced style sheets on the page and makes them available to users when formatting a table. For a custom style to be available when formatting a table, the relevant class names must follow the PREFIXTableXXX-NNN format, where:

  • PREFIX is ms-rte by default, but you can override the default by using the control PrefixStyleSheet() property of the RichHTML field control.
  • XXX is the specific table section, such as EvenRow or OddRow.
  • NNN is the name to identify the table styling.

The following example presents a complete set of classes for a table styling format.

.ms-rteTable-1 {border-collapse:collapse;border-top:gray 1.5pt;
    border-left:gray 1.5pt;border-bottom:gray 1.5pt;
    border-right:gray 1.5pt;border-style:solid;}
.ms-rteTableHeaderRow-1 {color:Green;background:yellow;text-align:left}
.ms-rteTableHeaderFirstCol-1 {padding:0in 5.4pt 0in 5.4pt;}
.ms-rteTableHeaderLastCol-1 {padding:0in 5.4pt 0in 5.4pt;}
.ms-rteTableHeaderOddCol-1 {padding:0in 5.4pt 0in 5.4pt;}
.ms-rteTableHeaderEvenCol-1 {padding:0in 5.4pt 0in 5.4pt;}
.ms-rteTableOddRow-1 {color:black;background:#FFFFDD;}
.ms-rteTableEvenRow-1 {color:black;background:#FFB4B4;}
.ms-rteTableFirstCol-1 {padding:0in 5.4pt 0in 5.4pt;}
.ms-rteTableLastCol-1 {padding:0in 5.4pt 0in 5.4pt;}
.ms-rteTableOddCol-1 {padding:0in 5.4pt 0in 5.4pt;}
.ms-rteTableEvenCol-1 {padding:0in 5.4pt 0in 5.4pt;}
.ms-rteTableFooterRow-1 {color:blue;font-style:bold;
    font-weight:bold;background:white;border-top:solid gray 1.0pt;
    border-bottom:solid gray 1.0pt;border-right:solid silver 1.0pt; 
    border-style:solid;}
.ms-rteTableFooterFirstCol-1 {padding:0in 5.4pt 0in 5.4pt;
    border-top:solid gray 1.0pt;text-align:left}
.ms-rteTableFooterLastCol-1 {padding:0in 5.4pt 0in 5.4pt;
    border-top:solid gray 1.0pt;text-align:left}
.ms-rteTableFooterOddCol-1 {padding:0in 5.4pt 0in 5.4pt;
    text-align:left;border-top:solid gray 1.0pt;}
.ms-rteTableFooterEvenCol-1 {padding:0in 5.4pt 0in 5.4pt;
    text-align:left;border-top:solid gray 1.0pt;}

Microsoft SharePoint Server 2010 includes a set of default table styles. However, if the system detects new styles that did not originate in the default .css file, it removes the default set and presents only those newly defined styles in the HTML editor dialog box.

Spelling Checker

In SharePoint Server 2010, the HTML editor includes a spelling checker, which can be customized by developers by using the SpellCheckV4Action Web control and the SpellCheckToolbarButton Web control. The spelling checker action registers client files and data during a spelling check.

It also includes a method to get the console tab and calls the user rights to verify that the current user has rights to perform a spelling check operation on the selected item. The spelling checker action calls the appropriate ECMAScript (JavaScript, JScript) code, and sends information to the client about available spellings and the default language to use for the request.

How To : Peel back the layers of data and information and reveal meaningful BI with SharePoint

Business Intelligence (BI) often takes on the mantel of exotic, rare, and almost unattainable technology. But at its core, business intelligence is simply a method of reporting on what happened.

Image


Granted it is a type of reporting that reaches beyond an ordinary peek into the rearview mirror of past business events; business intelligence helps to spot future trends, make informed go/no-go decisions, or identify potential threats. BI technology is strongest when it rests on a large supply of valid, diverse and current data, and can leverage the proper tools to help users understand and visualize queries about that data.

This blog post is about how SharePoint 2013 can help users solve practical business information problems, even though they don’t have the time or the budget to custom build an enterprise-scale BI system. The underlying premise of this blog is – show how SharePoint 2013 can provide a reasonable cost-benefit ratio and justify investing in BI technology.


Before we jump into SharePoint 2013 and its capabilities, let’s take a high-level look at Business Intelligence.

What Problems Can BI Solve?


If the only tool you have in your toolbox is a hammer, then every problem might look like a nail. The fact is, most businesses are able to solve most problems without spending a dime on more technology. In other words, the ‘hammer’ most businesses have been using works just fine, because most of their problems look like nails. The challenge they face only comes into focus when their competition is able to solve the same type of problems, but they do it faster, cheaper, and with less effort. Obviously, this can be a doomsday scenario for the company falling behind, technologically speaking.

That said; Business Intelligence is a great tool…but what problems will it solve? Perhaps a better question would be…how do I figure out if BI can help my company? You are not alone in asking these questions. Just because we have the tools to do something amazing like BI, doesn’t mean you need it or can afford it. But it certainly would be beneficial for you to find out if and how a Business Intelligence capability would help your business.

The starting-line to find out if BI makes sense for your organization runs right through your own conference room. You need to sit down with your senior executives and managers and talk to them about the information they rely on to run their part of the business. What information do they need, when do they need it, what do they do with it, what information are they missing, and so on? Initiate this type of conversation and you will, undoubtedly, open up a window of opportunity to discuss the merits of Business Intelligence.

SharePoint 2013 and Business Intelligence

Assuming that you see value in establishing BI capabilities in your organization, a very good first step would be to evaluate Microsoft’s SharePoint 2013. Because Microsoft products are generally used throughout both the back-office and front-office of most businesses, SharePoint 2013 is a very powerful tool to integrate the data with the technical systems required to build BI capabilities.

The main theme for BI is aggregation of data from multiple sources and then making that data available when, where, and how it is needed. BI must also be in complete alignment with all corporate goals while it supports the needs of individual managers who are responsible for achieving those goals. SharePoint 2013 is designed to access information and put it in the hands of employees when and where they need it. Because of SharePoint 2013’s capabilities to enable collaboration and teamwork, its very nature aligns the goals of the business with the goals of the employees.

Data Warehousing Measures and Dimensions

Perhaps the most fundamental requirement of BI is the need for information or data. Often this data is distributed throughout multiple databases and must be aggregated in some form.

In data warehousing, which is the term used to describe the functions necessary to aggregate, store and access data for the purpose of Business Intelligence and analytics, the data is often loaded into Online Analytical Processing (OLAP) cubes. The data stored in a cube can be sorted and filtered based on measures and dimensions. This technique lets users query the cube based on practical business categories which enable calculations to be made such as sum, count, average, min/max, etc. This is called a measure.

The other characteristic used in a cube is called a dimension. Dimensions are a collection of information or references about a measureable event. Each dimension can be measured.
For example, let’s say you wanted to run a report that gives you an up-to-the-minute total on sales volume and the number of units sold for each region of your company. In this example, the regions would be the dimensions and the sales volume and number of units are the measures.

SharePoint is designed to access cubes and work with the data stored in the cube, based on the available measures and dimensions.

Key Performance Indicators Business Intelligence enables visualization of raw data in the form of charts, graphs, pictures, etc. Typically Key Performance Indicators (KPIs), Score Cards, and Dashboards use the raw data and turn it into something that can be easily consumed by a viewer. For example, a project status KPI is commonly displayed as green, yellow or red lights to indicate that the project is on target/no issues, there are minor issues, or the project is in trouble. This BI technique is an easy way to visualize the data and cut through all the non-essential information and get to the point. This also allows the viewer to quickly gauge if the corporate goals are being met or are in jeopardy.

SharePoint 2013 Business Intelligence Solutions

SharePoint 2013 has several products that may be used as part of a BI system. The following is a list of commonly used MS components, all or just some of them can be used to create a practical and powerful BI system:

  • BI Data Services – MS SQL Server Data Services and Integration services (both used to extract, transform and load data from disparate sources)
  • BI Engine MS SQL Server Analysis Services (supports OLAP cubes by letting you design, create, and manage multidimensional structures that contain data aggregated from other data sources, such as relational databases.)
  • PowerShell (a Microsoft task automation framework, consists of a command-line shell and associated scripting language built on .NET technology)
  • PowerPivot for SharePoint (Analysis Servicess server running in SharePoint mode and provides server hosting of PowerPivot data)
  • Microsoft Excel (commonly used spreadsheet with Pivot Tables and Pivot Charts and can be used with SharePoint)
  • Microsoft Performance Point Designer (is integrated with SharePoint to create dashboards, score cards, and analytics.

Setting Up SharePoint 2013


When SharePoint 2013 is installed and configured, Central Administration (CA) is provisioned. Central Administration is where you control all the settings and features of SharePoint Product sites for Web applications, like Excel or Performance Point. CA is a convenient tool that helps in linking the applications and tools required by SharePoint to set up a BI system. You will also use Microsoft’s PowerShell to set up the infrastructure for SharePoint sites so they can run in a multi-tenant environment on a single physical server or virtual server.

Excel Services or Performance Point

You can use either or both of these tools to create dashboards. Either one will help you establish trusted locations (e.g. http:// links), data providers, libraries, and databases.
Excel is often the easiest and most familiar tool to display and analyze BI data. Since Excel has been around a long time and so many people are experienced when it comes to using Excel, it is a good choice as the front-end tool to put on your BI environment.

With Excel you can add measures and dimensions from a source data cube (created by Analysis Services) and then use the Pivot Chart capabilities in Excel to select the fields you want to display, such as sales amount, product categories, sales by geography, etc. You can also create Pivot Tables is you want to display a spreadsheet with multiple columns and rows, also using the fields from the cube.

SharePoint’s Practical Solution


Microsoft and SharePoint have all the tools you need to create a very robust and practical BI solution. It is probable that you currently own licenses to many of the components, if not all, that are required to build a solution. If you are interested in Business Intelligence and you would consider a Microsoft-based solution, you might find that you can be up and running in a matter of days with a minimal investment.

How To : Use a Site mailbox to collaborate with your team

Share documents with others

Image

Every team has documents of some kind that need to be stored somewhere, and usually need to be shared with others. If you store your team’s documents on your SharePoint site, you can easily leverage the Site Mailbox app to share those documents with those who have site access.

 Important    When users view a site mailbox in Outlook, they will see a list of all the documents in that site’s document libraries. Site mailboxes present the same list of documents to all users, so some users may see documents they do not have access to open.

If you’re using Exchange, your documents will also appear in a folder in Outlook, making it even easier to forward documents to others.

Forwarding a document from the site mailbox

Organizations, and teams within organizations, often have several different email threads going in all directions at one time. It’s easy for lines to cross, information to get lost or overlooked, and for communication to break down. Site mailboxes enable you to store team or project-related email in one place, so that everyone on the team can see all communication.

On the Quick Launch, click Mailbox.

Mailbox on the Quick Launch

The site mailbox opens as a second, separate inbox and folder structure, next to your personal email account. Mail sent to and from the site mailbox account will be shared between all those who have Contributor permissions on the SharePoint site.

 Tip    Did you know you can also use a site mailbox to collaborate on documents?

Add a site mailbox as a mail recipient

By including the site mailbox on an important email thread, you ensure that a copy of the information in that thread is stored in a location that can be accessed by anyone on the team.

Simply add the site mailbox in the To, CC, or BCC line of an email message.

Email message with site mailbox included in CC field.

You could even consider adding the site mailbox email address to any team contact groups or distribution lists. That way, relevant email automatically gets stored in the team’s site mailbox.

Send email from the site mailbox

When you write and send email from the site mailbox, it will look as though it came from you.

Because everyone with Contributor permissions on a site can access the site mailbox, several people can work together to draft an email message.

To compose a message, simply click New Mail.

New mail button for site mailboxes.

This will open a new message in your site mailbox.

New mail message in a site mailbox.

How To : Use Javascript to enable Listview Folder Navigation

list view webpart is added to page and user navigate to different folders in the list view, there’s no way for users to know current folder hierarchy. So basically breadcrumb for the list view webpart missing. If there would be a way of showing users the exact location in the folder hierarchy the user is current in (as shown in the image below), wouldn’t be that great?


Image 1: Folder Navigation in action

Deploy the FolderNavigation.js File

Download the FolderNavigation.js and then you can deploy the script either in Layouts folder (in case of full trust solutions) or in Master Page gallery (in case of SharePoint Online or full trust). I would recommend to deploy in Master Page Gallery so that even if you move to cloud, it works without modification. If you deploy in Master page gallery, you don’t need to make any changes, but if you deploy in layouts folder, you need to make small changes in the script which is described in section ‘Deploy JS Link file in Layouts folder’.


Option 1: Deploy in Master Page Gallery (Suggested)

If you are dealing with SharePoint Online, you don’t have the option to deploy in Layouts folder. In that case you need to deploy it in Master page gallery. Note, deploying the script in other libraries (like site assets, site library) will not work, you need to deploy in master page gallery. Otherwise you can deploy in Layouts folder as described in next section. To deploy in master page gallery manually, please follow the steps:

  1. Download the JavaScript file attached.
  2. Navigate to Root web => site settings => Master Pages (under group ‘Web Designer Galleries’).
  3. From the ‘New Document’ ribbon try adding ’JavaScript Display Template’ and then upload the FolderNavigation.js file and set properties as shown below:

    Image 2: Upload the JavaScript file in master page gallery

    In the above image, we’ve specified the content type to ‘JavaScript Display Template’, ‘target control type’ to view to use the js file in list view. Also I’ve set target scope to ‘/’ which means all sites and subsites will be applied. If you have a site collection ‘/sites/HR’, then you need to use ‘/Sites/HR’ instead. You can also use List Template ID, if you need.


Option 2: Deploy in Layouts Folder

If you are deploying the FolderNavigation.js file in Layouts folder, you need to make small changes in the downloaded script’s RegisterModuleInti method as shown below:

RegisterModuleInit(FolderNavigation.js, folderNavigation);


In this case the ‘RegisterModuleInit’ first parameter will be the path relative to Layouts folder. If you deploy your file in path ‘/_Layouts/folder1’, the then you need to modify code as shown below:

RegisterModuleInit(Folder1/FolderNavigation.js, folderNavigation);


If you are deploying in other subfolders in Layouts folder, you need to update the path accordingly. What I’ve found till now, you can only deploy in Layouts and Master page gallery. But if you find deploying in other folders works, please share. Basically first paramter in RegisterModuleInti is the file either:

  • Relative to ‘_Layouts’ folder
  • Or Master page gallery in which case the path is started with ‘/_catalogs/masterpage’


Use the FolderNavigation.js in List View WebPart

Once you deploy the JavaScript file in Master page gallery or Layouts folder, you need to use it in List View WebPart. Once you deploy the FolderNavigation.js file, you can start using it in list view webpart. Edit the list view web part properties and then under ‘Miscellaneous’ section put the file url for JS Link as shown below:

Image 3: List View WebPart’s JS Like Propery


Few points to note for this JS Link:

  • if you have deployed the js file in Master Page Gallery, You can use ~site or ~SiteCollection token, which means current site or current site collection respectively. The URL for JS Link then might be ‘~siteCollection/_catalogs/masterpage/FolderNavigatin.js’ or  ‘~site/_catalogs/masterpage/FolderNavigatin.js’. If you deploy the file in Site Collection Master Page gallery only, you need to use ~siteCollection token in subsites so that it uses the JavaScript file from Site Collection.
  • If you have deployed in Layouts folder, you need to use corresponding path in the JS Link properties. For example if you are deploying the file in Layouts folder, then use ‘/_layouts/15/FolderNavigation.js’, if you are deploying in ‘Layouts/Folder1’ then, use ‘/_layouts/15/Folder1/FolderNavigation.js’. Just to inform again, if you deploy in Layouts folder, you need to make small changes in the JavaScript file as described under ‘Option 2: Deploy in Layouts Folder’ section.


JavaScript file Description

In case you are interested to know how the code works, the code snippet is given below:

JavaScript

function replaceQueryStringAndGet(url, key, value) { 
    var re = new RegExp("([?|&])" + key + "=.*?(&|$)""i"); 
    separator = url.indexOf('?') !== -1 ? "&" : "?"; 
    if (url.match(re)) { 
        return url.replace(re, '$1' + key + "=" + value + '$2'); 
    } 
    else { 
        return url + separator + key + "=" + value; 
    } 
} 
 
 
function folderNavigation() { 
    function onPostRender(renderCtx) { 
        if (renderCtx.rootFolder) { 
            var listUrl = decodeURIComponent(renderCtx.listUrlDir); 
            var rootFolder = decodeURIComponent(renderCtx.rootFolder); 
            if (renderCtx.rootFolder == '' || rootFolder.toLowerCase() == listUrl.toLowerCase()) 
                return; 
 
            //get the folder path excluding list url. removing list url will give us path relative to current list url 
            var folderPath = rootFolder.toLowerCase().indexOf(listUrl.toLowerCase()) == 0 ? rootFolder.substr(listUrl.length) : rootFolder; 
            var pathArray = folderPath.split('/'); 
            var navigationItems = new Array(); 
            var currentFolderUrl = listUrl; 
 
            var rootNavItem = 
                { 
                    title: 'Root', 
                    url: replaceQueryStringAndGet(document.location.href, 'RootFolder', listUrl) 
                }; 
            navigationItems.push(rootNavItem); 
 
            for (var index = 0; index < pathArray.length; index++) { 
                if (pathArray[index] == '') 
                    continue; 
                var lastItem = index == pathArray.length - 1; 
                currentFolderUrl += '/' + pathArray[index]; 
                var item = 
                    { 
                        title: pathArray[index], 
                        url: lastItem ? '' : replaceQueryStringAndGet(document.location.href, 'RootFolder'encodeURIComponent(currentFolderUrl)) 
                    }; 
                navigationItems.push(item); 
            } 
            RenderItems(renderCtx, navigationItems); 
        } 
    } 
 
 
    //Add a div and then render navigation items inside span 
    function RenderItems(renderCtx, navigationItems) { 
        if (navigationItems.length == 0return; 
        var folderNavDivId = 'foldernav_' + renderCtx.wpq; 
        var webpartDivId = 'WebPart' + renderCtx.wpq; 
 
 
        //a div is added beneth the header to show folder navigation 
        var folderNavDiv = document.getElementById(folderNavDivId); 
        var webpartDiv = document.getElementById(webpartDivId); 
        if(folderNavDiv!=null){ 
            folderNavDiv.parentNode.removeChild(folderNavDiv); 
            folderNavDiv =null; 
        } 
        if (folderNavDiv == null) { 
            var folderNavDiv = document.createElement('div'); 
            folderNavDiv.setAttribute('id', folderNavDivId) 
            webpartDiv.parentNode.insertBefore(folderNavDiv, webpartDiv); 
            folderNavDiv = document.getElementById(folderNavDivId); 
        } 
 
 
        for (var index = 0; index < navigationItems.length; index++) { 
            if (navigationItems[index].url == ''{ 
                var span = document.createElement('span'); 
                span.innerHTML = navigationItems[index].title; 
                folderNavDiv.appendChild(span); 
            } 
            else { 
                var span = document.createElement('span'); 
                var anchor = document.createElement('a'); 
                anchor.setAttribute('href', navigationItems[index].url); 
                anchor.innerHTML = navigationItems[index].title; 
                span.appendChild(anchor); 
                folderNavDiv.appendChild(span); 
            } 
 
            //add arrow (>) to separate navigation items, except the last one 
            if (index != navigationItems.length - 1{ 
                var span = document.createElement('span'); 
                span.innerHTML = '&nbsp;> '; 
                folderNavDiv.appendChild(span); 
            } 
        } 
    } 
 
 
    function _registerTemplate() { 
        var viewContext = {}; 
 
        viewContext.Templates = {}; 
        viewContext.OnPostRender = onPostRender; 
        SPClientTemplates.TemplateManager.RegisterTemplateOverrides(viewContext); 
    } 
    //delay the execution of the script until clienttempltes.js gets loaded 
    ExecuteOrDelayUntilScriptLoaded(_registerTemplate, 'clienttemplates.js'); 
}; 
 
//RegisterModuleInit ensure folderNavigation() function get executed when Minimum Download Strategy is enabled. 
//if you deploy the FolderNavigation.js file in '_layouts' folder use 'FolderNavigation.js' as first paramter. 
//if you deploy the FolderNavigation.js file in '_layouts/folder/subfolder' folder, use 'folder/subfolder/FolderNavigation.js as first parameter' 
//if you are deploying in master page gallery, use '/_catalogs/masterpage/FolderNavigation.js' as first parameter 
RegisterModuleInit('/_catalogs/masterpage/FolderNavigation.js', folderNavigation); 
 
//this function get executed in case when Minimum Download Strategy not enabled. 
folderNavigation(); 

Let me explain the code briefly:

  • The method ‘replaceQueryStringAndGet’ is used to replace query string parameter with new value. For example if you have url http://abc.com?key=value&name=sohel’  and you would like to replace the query string ‘key’ with value ‘New Value’, you can use the method like

    replaceQueryStringAndGet(http://abc.com?key=value&name=sohel&#8221;,“key”,“New Value”)

  • The function folderNavigation has three methods. Function ‘onPostRender’ is bound to rendering context’s OnPostRender event. The method first checks if the list view’s root folder is not null  and root folder url is not list url (which means user is browsing list’s/library’s root). Then the method split the render context’s folder path and creates navigation items as shown below:

    var item = { title: title, url: lastItem ? : replaceQueryStringAndGet(document.location.href, ‘RootFolder’, encodeURIComponent(rootFolderUrl)) };

    As shown above, in case of last item (which means current folder user browsing), the url is empty as we’ll show a text instead of link for current folder.

  • Function ‘RenderItems’ renders the items in the page. I think this is the place of customisation you might be interested. Having all navigation items passed to this function, you can render your navigation items in your own way. renderContext.wpq is unique webpart id in the page. As shown below with the wpq value of ‘WPQ2’ the webpart is rendered in a div with id ‘WebPartWPQ2’.

    Image 4: List View WebPart in Firebug

    In ‘RenderItems’ function I’ve added a div just before the webpart div ‘WebPartWPQ2’ to put the folder navigation as shown in the image 1.

  • In the method ‘_registerTemplate’, I’ve registered the template and bound the OnPostRender event.
  • The final piece is RegisterModuleInit. In some example you will find the function folderNavigation is executed immediately along with the declaration. However, there’s a problem with Client Side Rendering and Minimal Download Strategy (MDS) working together.
  • To avoid this problem, we need to Register foldernavigation function with RegisterModuleInit to ensure the script get executed in case of MDS-enabled site. The last line ‘folderNavigation()’ will execute normally in case of MDS-disabled site.

SharePoint 2013 and CRM 2011 integration. A customer portal approach

A Look At : Federated Authentication

More and more organisations are looking to collaborate with partners and customers in their ecosystem to help them achieve mutual goals. SharePoint is a great tool for enabling this collaboration but many organisations are reluctant to create and maintain identities for users from other organisations just to allow access to their own SharePoint farm. It’s hardly surprising; identity management is complex and expensive.

You have to pay for servers to host your identity provider (Microsoft Active Directory if you are using Windows); you have to keep it secure; you have to back it up and ensure that it is always available, and you have to pay for someone to maintain and administer it. Identity management becomes even more complicated when your organisation wants to give external users access to SharePoint; you have to ensure that they can only access SharePoint and can’t gain access to other systems; you have to buy additional client access licenses (CALs) for each external user because by adding them to your Active Directory you are making them an internal user.


Imageare

Microsoft, Google and others all offer identity providers (also known as IdPs or claims providers) that are free to use, and by federating with a third party IdP you shift the ownership and management of identities on to them. You may even find that the partner or customer you are looking to collaborate with may offer their own IdP (most likely Active Directory Federation Services if they themselves run Windows). Of course, you have to trust whichever IdP you choose; they will be responsible for authenticating the user instead of you so you must be confident that they will do a good job. You must also check what pieces of information about a user (also known as claims; for example, name, email address etc) IdPs offer to ensure they can tell you enough about a user for your purposes as they don’t all offer the same.

Having introduced support for federated authentication in SharePoint 2010, Microsoft paved the way for us to federate with third party IdPs within SharePoint itself. Unfortunately, configuring SharePoint to do this is fiddly and there is no user interface for doing so (a task made more onerous if you want to federate with multiple IdPs or tweak the configuration at a later date). Fortunately Microsoft has also introduced Azure Access Control Services (ACS) which makes the process of federating with one or more IdPs simple and easy to maintain. ACS is a cloud-based service that enables you to manage the IdPs used by your applications. The following diagram illustrates, at a high-level, the components of ACS.

An ACS namespace is a container for mappings between IdPs and one or more relying parties (the applications that want to use ACS), in our case SharePoint. Associated with each mapping is a rule group with defines how the relying party handles the individual claims associated with an identity. Using rule groups you can choose to hide or expose certain claims to specific relying parties within the namespace.

So by creating an ACS namespace you are in effect creating your own unique IdP that encapsulates the configuration for federating with one or more additional IdPs. A key point to remember is that your ACS namespace can be used by other applications (relying parties) that want to share the same identities, not just SharePoint. 

Once your ACS namespace has been created you need to configure SharePoint to trust it, which most of the time will be a one off task and from that point on you can manage and maintain the IdPs you support from within ACS. The following diagram illustrates, at a high-level, the typical architecture for integrating SharePoint and ACS.


In the scenario above the SharePoint web application is using two different claims providers (they are referred to as claims providers in SharePoint rather than IdPs). One is for internal users and trusts an internal AD domain and another is for external users and trusts an ACS namespace.

When a user tries to access a site within the web application they will get the default SharePoint Sign In page asking them which provider they want to use.

This page can be customised and branded as required. If the user selects Windows Authentication they will get the standard authentication dialog. If they select Azure Provider (or whatever you happen to have called your claims provider) they will be redirected to your ACS Sign In page.

Again this page can be customised and branded as required. By clicking on one of the IdPs the user will be redirected to the appropriate Sign In page. Once they have been successfully authenticated by the IdP they will be redirected back to SharePoint.


Conclusion

By integrating SharePoint with ACS you can simplify the process of giving external users access to SharePoint. It could also save you money in licence fees and administration costs[i].

An important point to bear in mind when planning federated authentication for SharePoint is that in order for Search to be able to index content within SharePoint, you must enable Windows authentication on at least one zone within your web application. Also, if you use a reverse proxy to perform authentication, such as Microsoft Threat Management Gateway, before allowing traffic to hit your SharePoint servers, you will need to disable the authentication checks


[i] The licensing model for external users differs between SharePoint 2010 and SharePoint 2013. With SharePoint 2010 if you expose your farm to external users, either anonymously or not, you have to purchase a separate licence for each server. The license covers you for any number of external users and you do not need to by a CAL for each user. With SharePoint 2013, Microsoft did away with the server license for external users and you still don’t need to buy CALs for the external users.

A Look At : The importance of people in a SharePoint project

Image

As with all other sizeable new business software implementations, a successful SharePoint deployment is one that is well thought-out and carefully managed every step of the way.

However in one key respect a SharePoint deployment is different from most others in the way it should be carried out. Whereas the majority of ERP solutions are very rigid in terms of their functionality and in the nature of the business problems they solve, SharePoint is far more of a jack-of-all-trades type of system. It’s a solution that typically spreads its tentacles across several areas within an organisation, and which has several people putting in their two cents worth about what functions SharePoint should be geared to perform.

So what is the best approach? And what makes for a good SharePoint project manager?

From my experience with SharePoint implementations, I would say first and foremost that a SharePoint deployment should be approached from a business perspective, rather than from a strictly technology standpoint. A SharePoint project delivered within the allotted time and budget can still fail if it’s executed without the broader business objectives in mind. If the project manager understands, and can effectively demonstrate, how SharePoint can solve the organisation’s real-world business problems and increase business value, SharePoint will be a welcome addition to the organisation’s software arsenal.

Also crucial is an understanding of people. An effective SharePoint project manager understands the concerns, limitations and capabilities of those who will be using the solution once it’s implemented. No matter how technically well-executed your SharePoint implementation is, it will amount to little if hardly anyone’s using the system. The objective here is to maximise user adoption and engagement, and this can be achieved by maximising user involvement in the deployment process.


Rather than only talk to managers about SharePoint and what they want from the system, also talk to those below them who will be using the product on a day-to-day basis. This means not only collaborating with, for example, the marketing director but also with the various marketing executives and co-ordinators.


It means not only talking with the human resources manager but also with the HR assistant, and so on. By engaging with a wide range of (what will be) SharePoint end-users and getting them involved in the system design process, the rate of sustained user adoption will be a lot higher than it would have been otherwise.


An example of user engagement in action concerns a SharePoint implementation I oversaw for an insurance company. The business wanted to improve the tracking of its documentation using a SharePoint-based records management system. Essentially the system was deployed to enhance the management and flow of health insurance and other key documentation within the organisation to ensure that the company meets its compliance obligations.


The project was a great success, largely because we ensured that there was a high level of end-user input right from the start. We got all the relevant managers and staff involved from the outset, we began training people on SharePoint early on and we made sure the change management part of the process was well-covered.


Also, and very importantly, the business value of the project was sharply defined and clearly explained from the get-go. As everyone set about making the transition to a SharePoint-driven system, they knew why it was important to the company and why it was going to be good for them too.

By contrast a follow-up SharePoint project for the company some months later was not as successful. Why? Because with that project, in which the company abandoned its existing intranet and developed a new one, the business benefits were poorly defined and were not effectively communicated to stakeholders. That particular implementation was driven by the company’s IT department which approached the project from a technical, rather than a business, perspective. User buy-in was not sought and was not achieved.


When the SharePoint solution went live hardly anyone used it because they didn’t see why they should. No-one had educated them on that. That’s the danger when you don’t engage all your prospective system end-users throughout every phase of a SharePoint implementation project.

As can be seen, while it is of course critical that the technical necessities of a SharePoint deployment be met, that’s only part of the picture. Without people using the system, or with people using the system to less than its maximum potential, the return on your SharePoint investment will never materialize.

Comprehensive engagement with all stakeholders, that’s where the other part of the picture comes in. That’s where a return on investment, an investment of time and effort, will most assuredly be achieved.

How To : 8 Steps for a successful SharePoint Change Management

As with virtually any other significant IT implementation project, a SharePoint deployment is as dependent on people as it is on technology for its success. If your system end users are in fact not using the system, or are not using it correctly or to its full potential, you will never achieve that all ‑ important return on investment.

dsadsa

ImageGen[1]            hero-for-hire_basic-layout_600

One hundred percent adoption by users who are proficient with SharePoint and are committed to gaining the greatest value from the software should be a key objective for all SharePoint project leaders. To bring this about it is crucial to develop and execute an effective change management strategy as a key component of your SharePoint implementation.

At Professional Advantage we have had great success with our SharePoint clients by informally following a change management process that was thought up by Dr John Kotter, an American professor whose 1966 book, Leading Change, is still highly influential in the world of change management theory.

In his book Dr Kotter puts forward an eight step process that change leaders can follow to avoid failure and adjust successfully to change. These steps, which can be usefully applied to a SharePoint deployment project, are:


1. Create a sense of urgency

No SharePoint project will get off the ground, let alone become successful, if there is no buy-in at the executive level. Here it is important to put a strong case forward as to why the move to SharePoint is very much in the organisation’s best interests. Begin by doing lots of research. Examine, for example, the competitive disadvantages that will be suffered if no change is made. Also highlight those business functions and processes within the organisation that could be significantly improved with SharePoint. Tie the benefits of SharePoint to the organisation’s broad business goals and ongoing strategic objectives. Explain as persuasively as possible why the current situation is unsustainable and why, when it comes to moving to SharePoint, it’s a case of ‘the sooner the better.’ The stronger your business case for a SharePoint implementation, the more likely it is that it will get the green light.


2. Create a guiding coalition

Once you’ve received the go-ahead for the SharePoint deployment the next step is to put together a coalition of people with the power and commitment to lead the change. This team will ideally be comprised of a wide variety of motivated individuals: department managers, technical experts and those at the coalface who will be using SharePoint on a day-to-day basis should all form part of the coalition. They should also be people who have grasped the urgency of the task ahead, who understand the business goals that will be achieved with a successful implementation and who recognise that 100% user adoption is a central goal of the project.

Crucial to the success of the coalition’s efforts is that its members all work well together. As the project evolves these change-drivers will be sharing ideas, making decisions and identifying and solving problems. Team members must be able to trust each other and collaborate effectively; if this does not occur the project will almost certainly stall.


3. Develop a change vision

By developing a clear vision for the project you give those involved a direction to follow and a goal to achieve. Ideally the vision will be easy to comprehend, achievable, flexible and something that all stakeholders can get enthusiastic about.

While the vision will by definition be broad, the strategies that underpin it will be specific. Priorities for the project should be defined and acted upon, with priority given to ‘low hanging fruit’, ie tasks that can be easily achieved and which will deliver visible, measurable and meaningful change within the organisation. This approach will add momentum to the project by enabling stakeholders to gain a real-world perspective on the changes that are in progress and why they’re good both for the organisation and for individual SharePoint users.


4. Communicate the vision for buy-in

Communicating your vision and promoting the behavioural changes that will drive it are critical for a successful SharePoint deployment. This step requires a top-down communications strategy that is consistent, creative, inspiring and ongoing.

At Professional Advantage our communication strategy forms part of our SharePoint adoption plan and includes a variety of tactics designed to get staff using SharePoint, and using it properly. In the past such tactics have included SharePoint launch parties, lunch sessions, system design competitions amongst staff, social media, blogs and the putting up of posters around the office promoting the use of SharePoint. The objective here is, of course, to get users educated and engaged. The more creative you are, the better. And always keep in mind that user adoption will likely be low unless you can answer the ‘What’s in it for me’ question.


5. Empower broad-based action

To achieve the highest possible level of SharePoint user adoption it’s best to remove any barriers that might impede that objective. This particularly applies to the laggards, ie those who are most resistant to change and least likely to make full use of the system.

Typically this will involve removing software and other technologies that make it easy for workers to continue doing things the old way. Too often organisations include this as an afterthought, resulting in smaller and slower user adoption. Here it is important to plan from the beginning, anticipate what systems will be made redundant (or scaled down) and schedule that in to the SharePoint implementation plan.

Also important here is encouragement from above. Supported by proper ongoing training, those who will be using SharePoint need to be encouraged to step out of their comfort zone and embrace the new system.


6. Celebrate short-term wins

Short-term wins are essential to the success of your SharePoint deployments, as are the active celebration of these wins when they occur. The transition to a SharePoint environment is a long-term process and momentum must be maintained every step of the way. Perhaps, as a result of SharePoint, a new level of intra-office collaboration has been achieved, or the organisation has experienced dramatic time savings with particular processes, or has achieved new standards of compliance. Whatever the win, the broadcasting of it should form part of the SharePoint communications plan. If people can see how and why SharePoint is working, they will be more likely to embrace the system and, in so doing, contribute to the achievement of the organisation’s business goals.


7. Consolidate gains and generate more change

You’ve scored some wins and people are now comfortable using SharePoint. While that is a wonderful thing, the danger at this stage is complacency. Rather than take your foot off the accelerator it’s important to build on what’s been achieved and pursue larger, more ambitious objectives. To fully ingrain SharePoint into your organisation’s culture (and to avoid regression) ramp things up with new projects and initiatives.


8. Making it stick

To fully embed SharePoint into your organisation’s culture and business practices everyone needs to be on board. Just as during a life-threatening cyclone there are always some residents who refuse to heed advice to leave town, with a SharePoint deployment there will always be some who are unwilling to move. Here it is important to reinforce, and continue to celebrate, the victories that have been achieved and communicate how important it is that everyone adopt the system.

As the SharePoint project continues to evolve so too will its vision and purpose. With the right planning and execution, and with the right leadership, people will, over time, forget the old ways of doing things and fully embrace the new.

The “Hybrid” SharePoint Online Model

Hybrid

The hybrid approach is not merging information from two different site collections into one. Or making sure an on-premise document library has the same content as the document library in an online environment. So what does hybrid technically mean then? It basically means we have two separate environments that act and operate completely independent of each other.

SharePointOnline
SharePointOnline


Even the SharePoint service applications such as the user profile service, managed metadata service, and search cannot be shared between the on-premises farm(s) and SharePoint Online environment. Instead, administrators should choose to either fully deploy a service application in only one location, or configure an instance of the service in each environment. But still there are ways to integrate functionality between the two environments.

The idea is that you first segment the different workloads from SharePoint across the on-premise and online environment. You often see that the commodity services like collaboration on team sites, news sites, projects sites and so on are stored in the Online environment, while the more advanced scenario’s often remain on-premise (think of BI capabilities, Fast Search or advanced custom solutions).


So where does the hybrid word come from then? It basically means that we stitch these two environments together using the same look and feel, so that the end users have a complete transparent and rich experience and do not notice the difference between working in the on-premise environment or in the online environment. They can only see the difference by looking at the URL.

Single Sign On

In order to have such a complete transparent and rich experience from an end user perspective, it is important that the end users only need to authenticate once. This can be accomplished by implementing and configuring single sign on. Once this has been set up there is a trust relationship between the on-premise and online environment. This will make sure that if the end users that already authenticated in the on-premise environment (Active Directory), don’t need to re-enter their password in the online environment. So navigating between the on-premise and online environment will be transparent without password prompts. Should you require more information on how this technology exactly works or need more information on how to implement it, please see the following links:


How Single Sign-On Works in Office 365
http://community.office365.com/en-us/w/sso/727.aspx

Prepare for Single Sign on:
http://onlinehelp.microsoft.com/en-us/office365-enterprises/ff652540.aspx

Plan for and deploy Active Directory Federation Services 2.0 for use with single sign-on
http://onlinehelp.microsoft.com/en-us/office365-enterprises/ff652539.aspx

Single sign-on: Roadmap
http://onlinehelp.microsoft.com/en-us/office365-enterprises/hh125004.aspx

Deploying and Configuring ADFS 2.0
http://www.youtube.com/watch?v=fwHIKlAPV0g

Questions about Single Sign On (SSO) with Office 365 for Education
http://blogs.technet.com/b/educloud/archive/2011/09/23/questions-about-single-sign-on-sso-with-office-365-for-education.aspx

Video Screencast: Complete setup details for federated identity access from on-premise AD to Office 365
http://blogs.msdn.com/b/plankytronixx/archive/2011/01/24/video-screencast-complete-setup-details-for-federated-identity-access-from-on-premise-ad-to-office-365.aspx

Branding

So how do we give these two environments the same look and feel (branding), so that the end user doesn’t notice the difference? This is not as simple as it sounds. In order to make the environments look and feel the same, you would need to design and apply the same master pages, use the same icons, images and style sheets. Next to that you need to make sure the global navigation of both environments will integrate seamlessly by linking to each other’s environment.

clip_image001

More detailed information and things to consider when branding a SharePoint Online environment can be found here.

Search

Search is one area which has some integration capabilities. Thought the integration is not ideal, as we can’t share the relevance of the search results between the two environments. But what we can do is to have either two search boxes, one for on-premise content and one for the online content, or use federated search. With federated search you can do one search query, but get two separated results from two difference content sources showing up in two separate result sets. Below is a screenshot of search results from SharePoint and search results from Bing.

clip_image001[6]

Obviously you can customize the search results page and its layout so that it will fit your needs. Bear in mind though, that you can only setup federated search in an on-premise environment and is not available in the Online environment (see also the Microsoft SharePoint Online for Enterprises Service Description). More info about the search integration capabilities can be found in the whitepaper “Hybrid SharePoint Environments with Office 365”.


User profile

A user’s my site and my profile should exist in a single environment only to ensure that there is a single correct and complete source of user data. Although the user profile service cannot be shared between environments, it is possible to link on-premises SharePoint User Profiles to Office 365 and vice versa. So whichever environment a user is currently browsing, if they access their own or another user’s profile, it will redirect to the environment that is hosting the service. More information on how to implement user profiles and my sites in a hybrid environment can be found in the whitepaper “Hybrid SharePoint Environments with Office 365”.


Business Connectivity Services

Since the November update of SharePoint Online, we can connect to Line Of Business (LOB) data stored in either your on-premise environment or in Azure using the Business Connectivity Services (BCS) component. As long as you have your LOB application exposed to the web, you should be able to hookup the data into SharePoint Online. For more information about BCS in SharePoint Online, please see the following resources:

Introduction to Business Connectivity Services in SharePoint Online
http://msdn.microsoft.com/en-us/library/hh412217.aspx

What’s New for BCS in SharePoint Online
http://msdn.microsoft.com/en-us/library/hh418045.aspx

SharePoint Online Developer Resource Center
http://msdn.microsoft.com/en-us/sharepoint/gg153540.aspx


Integrating other components

Though it can be challenging to accomplish forms of integration for other SharePoint components between the two environments, there are techniques and strategies to take into account when you are planning and designing for a hybrid environment. A lot more detail about these techniques and strategies can be found in a blog post soon to follow on the power of Prointsm in SharePi

Creating Your Own Document Management System With SharePoint and Dynamix

Image

With the R2 release of Dynamics AX 2012, a new feature was quietly snuck into the product that allows you to store document attachments from Dynamics AX within SharePoint rather than within an archive location, or within the database. This opens up a whole slew of possibilities when it comes to document management within SharePoint.

In this example we will show how you can create a document management structure within SharePoint that you can use in conjunction with the Dynamics AX attachments feature, and also we will show a few tweaks that you can make that may make managing your documents within SharePoint just a little easier.

Creating a new Document Management Site

The first step that we are going to work through is the creation of a new Document Management site where we will put all of our Dynamics AX document attachments. We are just creating a site to separate out the documents from other items that you may already have stored within SharePoint.

How to do it…

To create a new Document Management Site in SharePoint, follow these steps:

  1. Open up the SharePoint Workspace that you want to use to house your Document Management site and from the Site Actions menu, select the New Site option.
  2. When the Site Templates are displayed, select the Blank Site template. Give your site a name, and also a sub site name (probably the same as your site name). When you are done, click on the Create button for start the site creation process.

How it works…

When the site is created, you should be taken to a new blank site which you will be able to use as a document repository.

Creating Document Libraries for the Business Areas

The next step in the process is to create document libraries to store all of your documents away in. You could create one big library, or a number of smaller ones, broken out into groups based on business area or function. In this example we will do the latter because it will give us more flexibility with the indexing of the documents, and also make it easier to find particular documents.

How to do it…

To create document libraries for the business areas, follow these steps:

  1. From within your new Document Management site, select the New Document Library option from the Site Actions menu.
  2. When the Document Library Creation dialog box appears, give your library a Name, Description, and also set the Document Template to None. In this example we are creating a library for all of the AP Documents.
    When you are done, click on the Create button to start the document library creation process.

How it works…

After it finishes you should have a new library for you to use. You can repeat the process for all of the other business areas that you want to manage documents for – in our example we just used the standard business areas from the Dynamics AX navigation menu.

Creating Dynamics AX Document Types that Link to the Document Libraries

Once you have created your document libraries, you can connect them to Dynamics AX with the new SharePoint option so that the users are able to attach documents from the client and then store them within SharePoint for everyone to access.

How to do it…

To create a file attachment type that links to SharePoint, follow these steps:

  1. From the Organization administration area page, select the Document types menu item from the Document management folder of the Setup group.
  2. When the Document types maintenance form is displayed, click on the New button in the menu bar to create a new entry.
  3. We will start by creating a link for all of our generic Accounts Payable documents by giving our new Document type a Name and Description. In the Group select File from the dropdown options and select SharePoint for the Location option.
  4. Now return back to your document libraries within SharePoint and copy the URL for the document library.
  5. Paste the URL into the Archive
    directory field.

    Note: Remove all of the extra parameters though so that you are just referencing the base folder location.
    Also, if you click on the folder browser to the right of the Archive directory field you can test the link to SharePoint.

How it works…

Now, if you attach a document, then you will see the option for your new document type.

It will allow you to attach any file that you have on your desktop.

And rather than showing you the thumbnail image, it will show you a reference link to your SharePoint document library.

After attaching the document, if you look within SharePoint, you will see your document is saved away for you.

You can repeat this process for all of your other document libraries that were created in the previous step.

Adding Columns to your Document Libraries for Better Indexing

One of the reasons why you want to start using SharePoint is so that you can take advantage of the indexing functionality to code and classify your documents. Now that you have people storing the documents away, it’s time to add some indexes to you document libraries.

How to do it…

To create new indexes for your document libraries, follow these steps:

  1. Open up your document libraries within SharePoint and select the Library ribbon bar. Then click on the Create Column button within the Manage Views group.
  2. When the Create Column form opens, set the Column Name to be the field that you want to index, select the type of the column, and also set the columns Description.
  3. Note: Sometimes it’s a good idea not to have spaces in the column name, later on when we add filters, it becomes a litter easier to manage this way.
  4. After you have finished defining the column, click on the OK button to add the column to your library.
  5. When you return back to your document library, there will be a new column on the form.
  6. Repeat the process for all of the columns that you want to use as index fields for the library.

    Note: All of the columns do not have to be used during the indexing process, so it’s OK to have variations of columns, like InvoiceNum, CreditNoteNum, etc.

How it works…

To edit the columns, select the options menu for the document, and choose the Edit Properties option.

This will allow you to update the fields that Dynamics AX did not populate initially.

Now when you look at the document within SharePoint, you will see the additional metadata that is associated with the document.

Embedding Document Libraries into Dynamics AX Forms

Now that we are able to index documents a little more effectively within SharePoint, we can go the extra step, and link SharePoint to our forms within Dynamics AX so that we are able to access them without even leaving the application. Doing this just requires a little bit of coding, but is well worth the effort.

Getting Started…

You can manipulate the information that is displayed by SharePoint, and also how it is displayed through the URL that you use.

If you filter any of the views, then you will notice that it uses two qualifiers – FilterFieldX
and FilterValueX to restrict the viewed records.

Also, if you add a IsDlg=1 qualifier, then all of the navigation areas are hidden giving you a clean list of filtered documents.

This is the perfect type of view to embed within Dynamics AX.

The other half of this step is to choose a form to add your document libraries to. In this case we will update the Vendors form.

How to do it…

To embed your SharePoint document libraries within Dynamics AX forms, follow these steps:

  1. Start the process by opening up AOT, and create a new project for this tweak.
  2. From the Forms area in the AOT, drag over the form that you want to add the documents to – in this case it’s the VendTable form.
  3. Expand out the form within the project, and navigate to the group that you want to add your document library view into.
  4. Right-mouse-click on the parent tab, and select the TabPane option from the New Control sub-menu.
  5. Reorder your tabs (ALT+UpArrow/DownArrow) so that they are in the sequence that you want and then give your new Tab Control a Name and Caption in the Properties section.
  6. Right-mouse-click on the new tab that you added for the document library and select the ActiveX control from the New Control sub menu.
  7. When the list of ActiveX controls are displayed, select the Microsoft Web Browser control, and click the OK button to add it.
  8. Rename your ActiveX control, and set the Width to Column width
    and Height to Column height.
  9. Now we need to have Dynamics AX update the URL that is navigated to when the form is opened. To do this, right-mouse-click on the parent Methods group for the form, and select the activate method from the Override methods submenu.
  10. Update the activate method by building the URL that will define the specific document index that you are wanting to show. You are able to now add conditional filters that pick up the record values, and filter based on the current record – in this case the vendor number.
  11. Once you have finished the update, save the project.

How it works…

Now when you open up the Vendor form, there will be a Documents tab that shows all of the documents that are associated with the current record.

If you select a record that does not have attached documents, then you will not see anything there.

How cool is that.

Creating Custom Views for the Document Libraries

Now that all of the heavy lifting has been done, you can now start tweaking the SharePoint libraries and the way that the information is displayed. Based on the form that you are in you may want to show only particular information. You can do that by creating new custom views.

How to do it…

To create a custom view for your document libraries, follow these steps:

  1. Open up your document libraries within SharePoint and select the Library ribbon bar. Then click on the Library Settings button within the Settings group.
  2. When the document library settings maintenance form is displayed, scroll down to the bottom of the page, and there will be a section for Views that will show you all of the different ways that the form could be displayed. In this case there is only one, but we can fix that by clicking on the Create View link.
  3. Select the Standard View option from the format templates that are displayed.
  4. Assign your new view a Name and select the fields that you want to be displayed in the view.
  5. Once you have made the changes, click on the OK button to save your new view.

How it works…

When you return to the document library you will be able to see the new format of the view.

You can then change the view within the URL of your project to make it the default view for the form.

Now when you see all of the documents within your Dynamics AX form you will see just the information that you need.

Using the SharePoint Designer to Edit Document Libraries

Although you can do everything that we have shown so far within SharePoint, you can also take advantage of the SharePoint Designer application to update your SharePoint document libraries. You don’t even have to search for the install kit, because it is embedded within your SharePoint site, just waiting to be downloaded and installed.

How to do it…

To access the SharePoint Designer to manipulate your SharePoint site, follow these steps:

  1. To use the SharePoint Designer to update your SharePoint site, just select the Edit in SharePoint Designer option from the Site Actions menu.

    Note: If you don’t have SharePoint Designer installed then it will ask you to install it, and download the kit directly from your SharePoint installation.

How it works…

When SharePoint Designer opens up, it will be connected to your current SharePoint site, showing you all of the libraries, etc. that you have been creating.

If you select the Lists and Libraries option from the navigation pad, you will be able to see all of the document libraries that you created in the previous steps.

Drilling into the libraries you will be able to also see all of the views etc. that you configured within SharePoint.

Creating New Content Types to Manage Document Types

When we set up our document libraries we deliberately created them so that all of the documents for a particular area are within the same library. This allows us to save multiple types of documents away within the library like Invoices, Credit Notes, Vendor Certificates etc. The way that we can identify the type of document is through the creation of Content Types.

How to do it…

To create custom Content Types to help make classification easier, follow these steps:

  1. Open up SharePoint Designer (although you can also do this within SharePoint itself) and select the Content Types from the navigation menu and click on the Content type menu button within the New group
    of the Content Types ribbon bar.
  2. When the Content Type creation form is displayed, give your Content Type a Name, and Description, select a parent content type, and also a group that you want to show the Content Type in.

    Note: For the first content type that you create, you may want to create a new Content Type Group so that it isn’t intermingled with all of the other content types.

  3. When you have finished creating your Content Type click on the OK button to add it to SharePoint.
  4. When you return to your SharePoint Designer workspace you will be able to see your new Content Type.
  5. Repeat the process for all of the other types of documents that you want to file away within SharePoint.
  6. Now we need to enable Content Types within our document libraries, and then assign them. To do this, open up your Document Library within SharePoint Designer, and within the Settings group, check the Allow management of content types check box.
  7. Then click on the Add button to the right of the Content Types group to open up the Content Type Picker. Find the new Content Types that you just created, and click on the OK button to assign them to your Document Library.
  8. Now the Content Type will show up as a valid option for the document library.
  9. Repeat the process for all of the other content types that you created.

How it works…

Now when you edit the properties for your documents, there will be a new indexing option for your documents that allows you to define the type of document that you are looking at.

Specifying Document Columns by Content Types to Simplify Indexing

There is an additional benefit that you get from using Content Types within SharePoint, which is the ability to specify what columns are applicable to different Content Types at the time of indexing. For example, you probably don’t want to specify a Invoice Number when indexing a Vendor Insurance Certificate, but would definitely would want to when indexing an Invoice and even a Credit Note.

How to do it…

To modify your Content Types within your Document Libraries to only require certain columns to be indexed, follow these steps:

  1. From within your SharePoint Document Library (or from within SharePoint Designer) click on the Library Settings button within the Settings group of the Library ribbon bar.
  2. Within the Library Settings you will be able to see all of your Content Types that have been assigned. Select any of them to edit their options.
  3. When you first create the Content Types then they will have no columns assigned to them. Click on the Add from existing site or list columns link to assign the valid columns to your Content Type.
  4. When the Add columns to Content Type form is displayed, you will be able to see all of the available columns within the Document Library.
  5. Just select the ones that you want to use for the indexing, and then click the Add button. Once you have selected all the ones that you want to use, click on the OK button to save your changes.

How it works…

Now you will have indexing by Content Type.

Showing the Content Type in the Document View

Now that we are classifying documents by Content Type we might as well show it in the views so that we are able to differentiate different document types.

How to do it…

To add the Content Type field to our Document View, follow these steps:

  1. From within your SharePoint Document Library (or from within SharePoint Designer) click on the Modify View button within the Manage Views group of the Library ribbon bar.
  2. Now that the Content Type is enabled on our Document Library, it will show up on the list of valid columns. To add it to our view, just check the Display checkbox, and possibly change the order of the field so that it is first in the table.
  3. When you’re done, click on the OK button to update the view.

How it works…

Now the Content Type is shown in the document library view.

And also will show up when we browse to the documents within Dynamics AX.

How neat is that.

Grouping Records in the Document View by Key Columns

One final tweak that we will show within SharePoint is the ability to group columns within our document library views so that common information is shown together. These groupings can be different by view, and just make it a little easier to find information if we don’t’ initially filter the data.

How to do it…

To group records within your document library view, follow these steps:

  1. From within your SharePoint Document Library (or from within SharePoint Designer) click on the Modify View button within the Manage Views group of the Library ribbon bar.
  2. Scroll down your view definition until you see the Group By configuration options. Here you will be able to change the Group By fields.

How it works…

Now when you look at your documents, they will be classified by key fields.

Summary

In this walkthrough we have shown how you can:

  • Create a simple document management repository within SharePoint
  • Link the document attachments function within Dynamics AX to SharePoint to make the acquisition of the documents easier
  • Index your documents more effectively by defining custom columns
  • Embed SharePoint back into Dynamics AX and also
  • Tweak your views within SharePoint to make it easier to find and view documents

This is really just a starting point, and once you have mastered the basics, you can start investigating:

  • Assigning workflows to documents for approvals and updates
  • Enabling version control for your documents
  • Acquire documents into SharePoint through scanning technologies
  • Link the index column fields to Dynamics AX for validation of key information
  • And much more.

SharePoint is a great document management tool, and can usually handle all of your document indexing needs. Especially now that it is connected with Dynamics AX natively.

How to add a Link to a Document external to SharePoint

Image

You can add links to external file shares or/and file server documents to your document library very easily. Why would you want to do this? Primarily so all your MetaData to all your documents are searchable in the same place.First a Farm Administrator will need to modify a core file on the front end server.  Then you must create a custom Content Type. If you use the built in content type you will not be able to link to a Folder directly.
Edit the NewLink.aspx page to allow the Document Library to accept a File:// entry.

  1. Go to the Front End Web Server \12\template\layouts directory.
  2. Open the file NewLink.aspx using NotePad. If I have to tell you to take a backup of this file first then you have no business editing this file (really).
  3. Go to the end of the script section near top of page and add:

    function HasValidUrlPrefix_UNC(url)
    {
    var urlLower=url.toLowerCase();
    if (-1==urlLower.search(”^http://”) &&
    -1==urlLower.search(”^https://”) && -1==urlLower.search(”^file://”))
    return false;
    return true;
    }

  • Use Edit Find to search for HasValidURLPrefix and replace it with HasValidURLPrefix_UNC (you should find it two times).
  • File – Save.
  • Open command prompt and enter IISreset /noforce.

Important: To link to Folders correctly you must create your own content type exactly as below and not use the built in URL or Link to Document at all.

Create custom Content Type

  1. Go to your Site Collection logged in as a Site Collection Administrator.
  2. Site actions – Site Settings – Modify All Site Settings.
  3. Content Types
  4. Create
  5. Name = URL or UNC
  6. Description = Use this content type to add a Link column that allows you to put a hyperlink or UNC path to external files, pages or folders. Format is File://\\ServerName\Folder , or http://
  7. Parent Content Type,
    1. Select parent content type from = Document Content Types
    2. Parent Content Type = Link to a Document
  8. Put this site content type into = Existing Group:  Company Custom
    1. image
  9. OK
  10. At the Site Content Type: URL or UNC page click on the URL hyperlink column and change it to Optional so that multiple documents being uploaded will not remain checked out.
  11. OK
    1. image

Add Custom Content Type to Document Library

  1. Go to a Document Library
  2. Settings – Library Settings
  3. Advanced Settings
  4. Allow Management Content Types = Yes
  5. OK
  6. Content Types – Add from existing site content types
  7. Select site content types from: Company Custom
  8. URL or UNC – Add – OK
  9. Click on URL or UNC hyperlink
  10. Click on Add from existing site
  11. Add all your Available Columns – OK
  12. Column Order – change the order to be consistant with the Document content type orders.
  13. Click on your Document Library breadcrumb to test.
  14. View – Modify your view to add the new URL or UNC column to your view next to your Name column.

Create Link to Document

  1. Go to the Document Library
  2. New – URL or UNC
  3. Document Name: This must equal the exact file or folder name less the extension.
    1. Example: My Resume 
    2. Example: Folder2
    3. Example: Doc1
  4. Document URL: This must be the UNC path to the folder or file.
    1. Example: http://LindaChapman.BlogSpot.com/Folder1/Folder2/My Resume.doc
    2. Example: http://LindaChapman.BlogSpot.com/Folder1/Folder2
    3. Example: File://\\ServerName\FolderName\FolderName2\Doc1.doc

You might see other blogs that say you can’t connect to a folder and must create a shortcut first. They are wrong. You can by the method above.

The biggest mistakes I see are:

  1. People click on the NAME field instead of the URL field. They are not the same. You MUST click on the URL field to access the Folder properly.
  2. People use the built in Link to Document content type thinking it is the same or will save them a step. It is not the same.
  3. People type the document extension in the Name field. You can not type the extension in the name field. It will see it is a UNC path and ignore the .aspx extension.
  4. People enter their slashes the wrong direction for UNC paths.

Should we replace our File Shares with SharePoint?

One of the biggest areas of confusion for our customers who are new to SharePoint through Office 365 is whether they should put their documents and files into SharePoint instead of their existing file shares on the network or clients.
Konsort_DocManagement2_Large[1]
This is not as simple as it seems and in fact requires a fairly major change in mind sets regarding document storage and management.Most organizations have become used to storing documents in the traditional file folder structure.

We all use files that are shared on the network. They are used for sharing documents and files in a central location. Security is set on

file shares, folders and files and the end user has been taug

ht how to use network drive letters for finding, opening and saving documents.  Also they are used to cascading down folder structures to find their document (assuming they are familiar with the structure.

The folder based filing system has some disadvantages though.  Administrators and end users must learn how to work with the files and make sure that the files have the correct access permissions. Linking documents together, adding customized attributes (meta data) and specifying the way the documents are presented for a subset of users is not easy.


Searching through all file shares for documents containing specific words or created by a specific user can also be quite a slow process.  There is limited document management – check out / check in, no way to apply approval processes and compliance rules are not easily achieved.  Linking documents to subjects in business processes such as linking an employee record to employee documents requires programming.

Picture
Using SharePoint for Document ManagementWith Office 365 and SharePoint, you can now have a powerful alternative to the File Share.  With SharePoint Online you can now store your files on the web and manage them with powerful document management tools.  SharePoint Online provides additional features compared to the typical Windows file share. With SharePoint Online they can be arranged in folders as usual, but also could be given tags or “metadata” to classify the documents to allow alternative multiple classifications.


Combine this with a full text search across all types of documents in all libraries and folders and the issue of finding that important document is a thing of the past.  Additionally you can link the documents to SharePoint lists to provide powerful links between business applications and documents.

For example; now you can find an agreement related to an account by going to the Account (see example here) and looking at related documents.

You can filter and sort document attributes to find all the agreements for a certain type of account.  Or if you are creating a new HR policy, you can collaborate as a team on it, with check-in check-out control, approvals, even moving it to a portal library for access by all employees in a read only mode.  These and other endless examples are powered by a list of document management features in SharePoint Online.  Here are a few.

  • Workflows, such as approval procedure, help automating simple or complex tasks – with or without user interference
  • Versioning adds the ability to see older versions of documents and controls which users can see the latest published version and who can edit the draft for the next published version of the file or document
  • Item visibility – Users do not have the ability to see information that they do not have permission to see.
  • Set Alerts for changes –  you can set different types of email notifications when changes are made to the documents
  • Sharing  – choose to share libraries, or individual documents with internal and external users
  • Link to Subject – link documents to list items through lookups in the metadata.  This allows you to view the subject (ex. Account, Contact) and reference all the documents related to them.
  • Lifecycle management that can be activated for archiving old content
  • Powerful Filtering and Search – With SharePoint Online, cascading up and down directory trees is a thing of the past.  Now you can use Meta Data to filter and find documents, as well as a powerful search capability.

Finally you can access documents from anywhere, at any time on any device!   Making it easy to review and collaborate on documents even from the road.

Mindset Mistake: Creating a File Share on SharePoint

Now I am sure you are thinking, wow this SharePoint stuff sound pretty neat!   Well it is if implemented correctly.  A major mistake many organizations make is to deploy document management just like a file share on SharePoint.  They create a single massive site for all documents, create libraries with folder structures and load documents into them.  This is way underutilizing SharePoint!  It like driving a 6 speed car and never getting out of second gear.

Because SharePoint can do much more than just document management, you may want to think through where you put libraries.  With SharePoint you can create team sites for departments or teams where they can collaborate, track tasks, and manage documents.  So create an HR team site with document libraries and put the HR related documents there.  Add metadata to the document items in the library which identifies what employee the document is for, so you can attach it to their record (see example here).  Put sales documents in a sales team site.  Create a folder for proposal templates, and link documents to accounts through metadata also.   Create a Project Site and link project documents to specific projects.  Now you are using SharePoint as a real collaboration engine!

When to use SharePoint for Document Storage and When not to.

Some might ask themselves if they should move all their existing file shares to SharePoint Online to take advantage of the features.

The real answer is no not all. It depends on which kind of data you have and how you want to use or present it”.   SharePoint is excellent for “active” files.  Files that are used as part of the business.   It does have storage limits so you want to be careful how much storage you use.  Here is some guidelines:

Windows file share

  • Large file size
  • Do not change much
  • Archives, backups. Etc.

Typical files for placement on Windows file shares are old archives, backup files and installation files for operating systems.

SharePoint document library

  • Small and midsized in size
  • Changes regularly
  • Files used by teams on projects
  • Files and folders that need custom attributes and links/filters to these
  • Files that need to be indexed and searched for

Documents, spreadsheets and presentations that would benefit from the SharePoint features.

Keep in mind that the user experience can differ very much and you may have to educate your users to use a new place to store files. If they are used to using network drives they may see a web interface as a challenge.

Tool to analyse and then upgrade your old SharePoint VBA Web Parts to Apps!!

office365[1]

Welcome to Microsoft VBA and SharePoint Code Analyzer

 Now is the time to still use that old VBA code you have!!

This is an online tool where you can upload your file and generate reports collecting detailed statistics about the user’s VBA and SharePoint source code files, providing useful information about migrating VBA and SharePoint applications.

To analyze your files please follow up this simple 4 steps:

Features from SharePoint 2010 Integration with SAP BusinessObjects BI 4.0

ImageOne of the core concepts of Business Connectivity Services (BCS) for SharePoint 2010 are the external content types. They are reusable metadata descriptions of connectivity information and behaviours (stereotyped operations) applied to external data. SharePoint offers developers several ways to create external content types and integrate them into the platform.


The SharePoint Designer 2010, for instance, allows you to create and manage external content types that are stored in supported external systems. Such an external system could be SQL Server, WCF Data Service, or a .NET Assembly Connector.

This article shows you how to create an external content type for SharePoint named Customer based on given SAP customer data. The definition of the content type will be provided as a .NET assembly, and the data are displayed in an external list in SharePoint.

The SAP customer data are retrieved from the function module SD_RFC_CUSTOMER_GET. In general, function modules in a SAP R/3 system are comparable with public and static C# class methods, and can be accessed from outside of SAP via RFC (Remote Function Call). Fortunately, we do not need to program RFC calls manually. We will use the very handy ERPConnect library from Theobald Software. The library includes a LINQ to SAP provider and designer that makes our lives easier.

.NET Assembly Connector for SAP

The first step in providing a custom connector for SAP is to create a SharePoint project with the SharePoint 2010 Developer Tools for Visual Studio 2010. Those tools are part of Visual Studio 2010. We will use the Business Data Connectivity Model project template to create our project:

After defining the Visual Studio solution name and clicking the OK button, the project wizard will ask what kind of SharePoint 2010 solution you want to create. The solution must be deployed as a farm solution, not as a sandboxed solution. Visual Studio is now creating a new SharePoint project with a default BDC model (BdcModel1). You can also create an empty SharePoint project and add a Business Data Connectivity Model project item manually afterwards. This will also generate a new node to the Visual Studio Solution Explorer called BdcModel1. The node contains a couple of project files: The BDC model file (file extension bdcm), and the Entity1.cs and EntityService.cs class files.

Next, we add a LINQ to SAP file to handle the SAP data access logic by selecting the LINQ to ERP item from the Add New Item dialog in Visual Studio. This will add a file called LINQtoERP1.erp to our project. The LINQ to SAP provider is internally called LINQ to ERP. Double click LINQtoERP1.erp to open the designer. Now, drag the Function object from the designer toolbox onto the design surface. This will open the SAP connection dialog since no connection data has been defined so far:

Enter the SAP connection data and your credentials. Click the Test Connection button to test the connectivity. If you could successfully connect to your SAP system, click the OK button to open the function module search dialog. Now search for SD_RFC_CUSTOMER_GET, then select the found item, and click OK to open the RFC Function Module /BAPI dialog:

SP2010SAPToBCS/BCS12.png

The dialog provides you the option to define the method name and parameters you want to use in your SAP context class. The context class is automatically generated by the LINQ to SAP designer including all SAP objects defined. Those objects are either C# (or VB.NET) class methods and/or additional object classes used by the methods.

For our project, we need to select the export parameters KUNNR and NAME1 by clicking the checkboxes in the Pass column. These two parameters become our input parameters in the generated context class method named SD_RFC_CUSTOMER_GET. We also need to return the customer list for the given input selection. Therefore, we select the table parameter CUSTOMER_T on the Tables tab and change the structure name to Customer. Then, click the OK button on the dialog, and the new objects get added to the designer surface.

IMPORTANT: The flag “Create Objects Outside Of Context Class” must be set to TRUE in the property editor of the LINQ designer, otherwise LINQ to SAP generates the Customer class as nested class of the SAP context class. This feature and flag is only available in LINQ to SAP for Visual Studio 2010.

The LINQ designer has also automatically generated a class called Customer within the LINQtoERP1.Designer.cs file. This class will become our BDC model entity or external content type. But first, we need to adjust and rename our BDC model that was created by default from Visual Studio. Currently, the BDC model looks like this:

Rename the BdcModel1 node and file into CustomerModel. Since we already have an entity class (Customer), delete the file Entity1.cs and rename the EntityService.cs file to CustomerService.cs. Next, open the CustomerModel file and rename the designer object Entity1. Then, change the entity identifier name from Identifier1 to KUNNR. You can also use the BDC Explorer for renaming. The final adjustment result should look as follows:

SP2010SAPToBCS/BCS4.png

The last step we need to do in our Visual Studio project is to change the code in the CustomerService class. The BDC model methods ReadItem and ReadList must be implemented using the automatically generated LINQ to SAP code. First of all, take a look at the code:

SP2010SAPToBCS/BCS6.png

As you can see, we basically have just a few lines of code. All of the SAP data access logic is encapsulated within the SAP context class (see the LINQtoERP1.Designer.cs file). The CustomerService class just implements a static constructor to set the ERPConnect license key and to initialize the static variable _sc with the SAP credentials as well as the two BDC model methods.

The ReadItem method, BCS stereotyped operation SpecificFinder, is called by BCS to fetch a specific item defined by the identifier KUNNR. In this case, we just call the SD_RFC_CUSTOMER_GET context method with the passed identifier (variable id) and return the first customer object we get from SAP.

The ReadList method, BCS stereotyped operation Finder, is called by BCS to return all entities. In this case, we just return all customer objects the SD_RFC_CUSTOMER_GET context method returns. The returned result is already of type IEnumerable<Customer>.

The final step is to deploy the SharePoint solution. Right-click on the project node in Visual Studio Solution Explorer and select Deploy. This will install and deploy the SharePoint solution on the server. You can also debug your code by just setting a breakpoint in the CustomerService class and executing the project with F5.

That’s all we have to do!

Now, start the SharePoint Central Administration panel and follow the link “Manage Service Applications”, or navigate directly to the URL http://<SERVERNAME>/_admin/ServiceApplications.aspx. Click on Business Data Connectivity Service to show all the available external content types:

On this page, we find our deployed BDC model including the Customer entity. You can click on the name to retrieve more details about the entity. Right now, there is just one issue open. We need to set permissions!

Mark the checkbox for our entity and click on Set Object Permissions in the Ribbon menu bar. Now, define the permissions for the users you want to allow to access the entity, and click the OK button. In the screen shown above, the user administrator has all the permissions possible.

In the next and final step, we will create an external list based on our entity. To do this, we open SharePoint Designer 2010 and connect us with the SharePoint website.

Click on External Content Types in the Site Objects panel to display all the content types (see above). Double click on the Customer entity to open the details. The SharePoint Designer is reading all the information available by BCS.

In order to create an external list for our entity, click on Create Lists & Form on the Ribbon menu bar (see screenshot below) and enter CustomerList as the name for the external list.

OK, now we are done!

Open the list, and you should get the following result:

The external list shows all the defined fields for our entity, even though our Customer class, automatically generated by the LINQ to SAP, has more than those four fields. This means you can only display a subset of the information for your entity.

Another option is to just select those fields required within the LINQ to SAP designer. With the LINQ designer, you can access not just the SAP function modules. You can integrate other SAP objects, like tables, BW cubes, SAP Query, or IDOCs. A demo version of the ERPConnect library can be downloaded from the Theobald Software homepage.

If you click the associated link of one of the customer numbers in the column KUNNR (see screenshot above), SharePoint will open the details view:

SP2010SAPToBCS/BCS10.png


How To : A library to create .mht files (available at request)

There are a number of ways to do this, including hosting Word or Excel on the Web Server and dealing with COM Interop issues, or purchasing third – party MIME encoding libraries, some of which sell for $250.00 or more. But, there is no native .NET solution. So, being the curious soul that I am, I decided to investigate a bit and see what I could come up with. Internet Explorer offers a File / Save As option to save a web page as “Web Archive, single file (*.mht)”.

Image

What this does is create an RFC – compliant Multipart MIME Message. Resources such as images are serialized to their Base64 inline encoding representations and each resource is demarcated with the standard multipart MIME header – breaks. Internet Explorer, Word, Excel and most newsreader programs all understand this format. The format, if saved with the file extension “.eml”, will come up as a web page inside Outlook Express; if saved with “.mht”, it will come up in Internet Explorer when the file is double-clicked out of Windows Explorer, and — what many do not know — if saved with a “*.doc” extension, it will load in MS Word, each with all the images intact, and in the case of the EML and MHT formats, with all of the hyperlinks fully-functioning. The primary advantage of the format is, of course, that all the resources can be consolidated into a single file,. making distribution and archiving much easier — including database storage in an NVarchar or NText type field.


System.Web.Mail, which .NET provides as a convenient wrapper around the CDO for Windows COM library, offers only a subset of the functionality exposed by the CDO library, and multipart MIME encoding is not a part of that functionality. However, through the wonders of COM Interop, we can create our own COM reference to CDO in the Visual Studio IDE, allowing it to generate a Runtime Callable Wrapper, and help ourselves to the entire rich set of functionality of CDO as we see fit.


One method in the CDO library that immediately came to my notice was the CreateMHTMLBody method. That’s MHTMLBody, meaning “Multipurpose Internet Mail Extension HTML (MHTML) Body”. Well!– when I saw that, my eyes lit up like the LED’s on a 32 – way Unisys box! This is a method on the CDO Message class; the method accepts a URI to the requested resource, along with some enumerations, and creates a MultiPart MIME – encoded email message out of the requested URI responses — including images, css and script — in one fell swoop.


“Ah”, you say, “How convenient”! Yes, and not only that, but we also get a free “multipart COM Interop Baggage” reference to the ADODB.Stream object – and by simply calling the GetStream method on the Message Class, and then using the Stream’s SaveToFile method, we can grab any resource including images, javascript, css and everything else (except video) and save it to a single MHT Web Archive file just as if we chose the “Save As” option out of Internet Explorer.


If we choose not to save the file, but instead want to get back the stream contents, no problem. We just call Stream.ReadText(Stream.Size) and it returns a string containing the entire MHT encoded content. At that point we can do whatever we want with it – set a content – header and Response .Write the content to the browser, for instance — or whatever.


For example, when we get back our “MHT” string, we can write the following code:

Response.ContentType=”application/msword”;
Response.AddHeader( “Content-Disposition”, “attachment;filename=NAME.doc”);
Response.Write(myDataString);


— and the browser will dutifully offer to save the file as a Word Document. It will still be Multipart MIME encoded, but the .doc extension on the filename allows Word to load it, and Word is smart enough to be able to parse and render the file very nicely. “Ah”, you are saying, “this is nice, and so is the price!”. Yup!

And, if you are serving this MIME-encoded file from out of your database, for example, and you would like it to be able to be displayed in the browser, just change the “NAME.doc” to “NAME.MHT”, and don’t set a content-type header. Internet Explorer will prompt the user to either save or open the file. If they choose “open”, it will be saved to the IE Temporary files and open up in the browser just as if they had loaded it from their local file system.


So, to answer a couple of questions that came up recently, yes — you can use this method to MHTML – encode any web page – even one that is dynamically generated as with a report — provided it has a URL, and save the MIME-encoded content as a string in either an NVarchar or NText column in your database. You can then bring this string back out and send it to the browser, images,css, javascript and all.

Now here is the code for a small, very basic “Converter” class I’ve written to take advantage of the two scenarios specified above. Bear in mind, there is much more available in CDO, but I leave this wondrous trail of ecstatic discovery to your whims of fancy:

using System;
using System.Web;
using CDO;
using ADODB;
using System.Text;
namespace PAB.Web.Utils
{
 public class MIMEConverter
 {
  //private ctor as our methods are all static here
  private MIMEConverter()
  {
   
  }   
  public static bool SaveWebPageToMHTFile( string url, string filePath)
  {
   bool result=false;
   CDO.Message  msg = new CDO.MessageClass(); 
   ADODB.Stream  stm=null ;
   try
   {
    msg.MimeFormatted =true;   
    msg.CreateMHTMLBody(url,CDO.CdoMHTMLFlags.cdoSuppressNone, "" ,"" );
stm = msg.GetStream(); stm.SaveToFile(filePath,ADODB.SaveOptionsEnum.adSaveCreateOverWrite); msg=null; stm.Close(); result=true; } catch {throw;} finally { //cleanup here } return result; } public static string ConvertWebPageToMHTString( string url ) { string data = String.Empty; CDO.Message msg = new CDO.MessageClass(); ADODB.Stream stm=null; try { msg.MimeFormatted =true; msg.CreateMHTMLBody(url,CDO.CdoMHTMLFlags.cdoSuppressNone,
"", "" );
stm = msg.GetStream(); data= stm.ReadText(stm.Size); } catch { throw; } finally { //cleanup here } return data; } } }


NOTE: When using this type of COM Interop from an ASP.NET web page, it is important to remember that you must set the AspCompat=”true” directive in the Page declaration or you will be very disappointed at the results! This forces the ASP.NET page to run in STA threading model which permits “classic ASP” style COM calls. There is, of course, a significant performance penalty incurred, but realistically, this type of operation would only be performed upon user request and not on every page request.

<

p align=”left”>The downloadable zip file below contains the entire class library and a web solution that will exercise both methods when you fill in a valid URI with protocol, and a valid file path and filename for saving on the server. Unzip this to a folder that you have named “ConvertToMHT” and then mark the folder as an IIS Application so that your request such as “http://localhost/ConvertToMHT/WebForm1.aspx&#8221; will function correctly. You can then load the Solution file and it should work “out of the box”. And, don’t forget – if you have an ASP.NET web application that wants to write a file to the file system on the server, it must be running under an identity that has been granted this permission.

How To : Use JSON and SAP NetWeaver together

Background

Imagesap2[1]
In this example, SAP is used as the backend data source and the NWGW (Netweaver Gateway) adapter to consumable from .NET client as OData format.

Since the NWGW component is hosted on premise and our .NET client is hosted in Azure, we are consuming this data from Azure through the Service Bus relay. While transferring data from on premise to Azure over SB relay, we are facing performance issues for single user for large volumes of data as well as in relatively small data for concurrent users. So I did some POC for improving performance by consuming the OData service in JSON format.

What I Did?

I’ve created a simple WCF Data Service which has no underlying data source connectivity. In this service when the context is initializing, a list of text messages is generated and exposed as OData.

Here is that simple service code:

[Serializable]
public class Message
{
public int ID { get; set; }
public string MessageText { get; set; }
}
public class MessageService
{
List<Message> _messages = new List<Message>();
public MessageService()
{
for (int i = 0; i < 100; i++)
{
Message msg = new Message
{
ID = i,
MessageText = string.Format(“My Message No. {0}”, i)
};
_messages.Add(msg);

}
}
public IQueryable<Message> Messages
{
get
{
return _messages.AsQueryable<Message>();
}
}
}
[ServiceBehavior(IncludeExceptionDetailInFaults = true)]
public class WcfDataService1 : DataService
{
// This method is called only once to initialize service-wide policies.
public static void InitializeService(DataServiceConfiguration config)
{
// TODO: set rules to indicate which entity sets
// and service operations are visible, updatable, etc.
// Examples:
config.SetEntitySetAccessRule(“Messages”, EntitySetRights.AllRead);
config.SetServiceOperationAccessRule(“*”, ServiceOperationRights.All);
config.DataServiceBehavior.MaxProtocolVersion = DataServiceProtocolVersion.V3;
}
}
Exposing one endpoint to Azure SB so that client can consume this service through SB endpoint. After hosting the service, I’m able to fetch data by simple OData query from browser.

I’m also able to fetch the data in JSON format.

After that, I create a console client application and consume the service from there.

Sample Client Code

class Program
{
static void Main(string[] args)
{
List lst = new List();

for (int i = 0; i < 100; i++)
{
Thread person = new Thread(new ThreadStart(MyClass.JsonInvokation));
person.Name = string.Format(“person{0}”, i);
lst.Add(person);
Console.WriteLine(“before start of {0}”, person.Name);
person.Start();
//Console.WriteLine(“{0} started”, person.Name);
}
Console.ReadKey();
foreach (var item in lst)
{
item.Abort();
}
}
}

public class MyClass
{
public static void JsonInvokation()
{
string personName = Thread.CurrentThread.Name;
Stopwatch watch = new Stopwatch();
watch.Start();
try
{
SimpleService.MessageService svcJson =
new SimpleService.MessageService(new Uri
(“https://abc.servicebus.windows.net/SimpleService /WcfDataService1”));
svcJson.SendingRequest += svc_SendingRequest;
svcJson.Format.UseJson();
var jdata = svcJson.Messages.ToList();

watch.Stop();
Console.WriteLine(“Person: {0} – JsonTime First Call time: {1}”,
personName, watch.ElapsedMilliseconds);

for (int i = 1; i <= 10; i++)
{
watch.Reset(); watch.Start();
jdata = svcJson.Messages.ToList();
watch.Stop();
Console.WriteLine(“Person: {0} – Json Call {1} time:
{2}”, personName, 1 + i, watch.ElapsedMilliseconds);
}

Console.WriteLine(jdata.Count);
}
catch (Exception ex)
{
Console.WriteLine(personName + “: ” + ex.Message);
}
Thread.Sleep(100);
}

public static void AtomInvokation()
{
string personName = Thread.CurrentThread.Name;

try
{
Stopwatch watch = new Stopwatch();
watch.Start();
SimpleService.MessageService svc =
new SimpleService.MessageService(new Uri
(“https://abc.servicebus.windows.net/SimpleService/WcfDataService1&#8221;));
svc.SendingRequest += svc_SendingRequest;
var data = svc.Messages.ToList();

watch.Stop();
Console.WriteLine(“Person: {0} – XmlTime First Call time: {1}”,
personName, watch.ElapsedMilliseconds);

for (int i = 1; i <= 10; i++)
{
watch.Reset(); watch.Start();
data = svc.Messages.ToList();
watch.Stop();
Console.WriteLine(“Person: {0} – Xml Call {1} time:
{2}”, personName, 1 + i, watch.ElapsedMilliseconds);
}

Console.WriteLine(data.Count);
}
catch (Exception ex)
{
Console.WriteLine(personName + “: ” + ex.Message);
}
Thread.Sleep(100);
}
}9pt;”>


What I Test After That
I tested two separate scenarios:

Scenario I: Single user with small and large volume of data
Measuring the data transfer time periodically in XML format and then JSON format. You might notice that first call I’ve printed separately in each screen shot as it is taking additional time to connect to SB endpoint. In the first call, the secret key authentication is happening.

Small data set (array size 10): consume in XML format.


Consume in JSON format:


For small set of data, Json and XML response time over service bus relay is almost same.

Consuming Large volume of data (Array Size 100)


Here the XML message size is around 51 KB. Now I’m going to consume the same list of data (Array size 100) in JSON format.


So from the above test scenario, it is very clear that JSON response time is much faster than XML response time and the reason for that is message size. In this test, when I’m getting the list of 100 records in XML format message size is 51.2 KB but JSON message size is 4.4 KB.

Scenario II: 100 Concurrent user with large volume of data (array size 100)
In this concurrent user load test, I’ve done any service throttling or max concurrent connection configuration.


In the above screen shot, you will find some time out error that I’m getting in XML response. And it is happening due to high response time over relay. But when I execute the same test with JSON response, I found the response time is quite stable and faster than XML response and I’m not getting any time out.


How Easy to Use UseJson()
If you are using WCF Data Service 5.3 and above and VS2012 update 3, then to consume the JSON structure from the client, I have to instantiate the proxy / context with .Format.UseJson().

Here you don’t need to load the Edmx structure separately by writing any custom code. .NET CodeGen will generate that code when you add the service reference.


But if that code is not generated from your environment, then you have to write a few lines of code to load the edmx and use it as .Format.UseJson(LoadEdmx());

Sample Code for Loading Edmx

public static IEdmModel LoadEdmx(string srvName)
{
string executionPath = Directory.GetCurrentDirectory();
DirectoryInfo di = new DirectoryInfo(executionPath).Parent;
var parent1 = di.Parent;
var srv = parent1.GetDirectories(“Service References\\” +
srvName)[0].GetFiles(“service.edmx”)[0].FullName;

XmlDocument doc = new XmlDocument();
doc.Load(srv);
var xmlreader = XmlReader.Create(new StringReader(doc.DocumentElement.OuterXml));

IEdmModel edmModel = EdmxReader.Parse(xmlreader);
return edmModel;
}

DRY Architecture, Layered Architecture, Domain Driven Design and a Framework to build great Single Web Pages – BiolerPlate Part 1

DRY – Don’t Repeat Yourself! is one of the main ideas of a good developer while developing a software. We’re trying to implement it from simple methods to classes and modules. What about developing a new web based application? We, software developers, have similar needs when developing enterprise web applications.

Enterprise web applications need login pages, user/role management infrastructure, user/application setting management, localization and so on. Also, a high quality and large scale software implements best practices such as Layered Architecture, Domain Driven Design (DDD), Dependency Injection (DI). Also, we use tools for Object-Releational Mapping (ORM), Database Migrations, Logging… etc. When it comes to the User Interface (UI), it’s not much different.

Starting a new enterprise web application is a hard work. Since all applications need some common tasks, we’re repeating ourselves. Many companies are developing their own Application Frameworks or Libraries for such common tasks to do not re-develop same things. Others are copying some parts of existing applications and preparing a start point for their new application. First approach is pretty good if your company is big enough and has time to develop such a framework.

As a software architect, I also developed such a framework im my company. But, there is some point it feels me bad: Many company repeats same tasks. What if we can share more, repeat less? What if DRY principle is implemented universally instead of per project or per company? It sounds utopian, but I think there may be a starting point for that!

What is ASP.NET Boilerplate?

http://www.aspnetboilerplate.com/

ASP.NET Boilerplate [1] is a starting point for new modern web applications using best practices and most popular tools. It’s aimed to be a solid model, a general-purpose application framework and a project template. What it does?

  • Server side
    • Based on latest ASP.NET MVC and Web API.
    • Implements Domain Driven Design (Entities, Repositories, Domain Services, Application Services, DTOs, Unif Of Work… and so on)
    • Implements Layered Architecture (Domain, Application, Presentation and Infrastructure Layers).
    • Provides an infrastructure to develop reusable and composable modules for large projects.
    • Uses most popular frameworks/libraries as (probably) you’re already using.
    • Provides an infrastructure and make it easy to use Dependency Injection (uses Castle Windsor as DI container).
    • Provides a strict model and base classes to use Object-Releational Mapping easily (uses NHibernate, can work with many DBMS).
    • Implements database migrations (uses FluentMigrator).
    • Includes a simple and flexible localization system.
    • Includes an EventBus for server-side global domain events.
    • Manages exception handling and validation.
    • Creates dynamic Web API layer for application services.
    • Provides base and helper classes to implement some common tasks.
    • Uses convention over configuration principle.
  • Client side
    • Provides two project templates. One for Single-Page Applications using Durandaljs, other one is a Multi-Page Application. Both templates uses Twitter Bootstrap.
    • Most used libraries are included by default: Knockout.js, Require.js, jQuery and some useful plug-ins.
    • Creates dynamic javascript proxies to call application services (using dynamic Web API layer) easily.
    • Includes unique APIs for some sommon tasks: showing alerts & notifications, blocking UI, making AJAX requests.

Beside these common infrastructure, the “Core Module” is being developed. It will provide a role and permission based authorization system (implementing ASP.NET Identity Framework), a setting systems and so on.

What ASP.NET Boilerplate is not?

ASP.NET Boilerplate provides an application development model with best practices. It has base classes, interfaces and tools that makes easy to build maintainable large-scale applications. But..

  • It’s not one of RAD (Rapid Application Development) tools those provide infrastructure for building applications without coding. Instead, it provides an infrastructure to code in best practices.
  • It’s not a code generation tool. While it has several features those build dynamic code in run-time, it does not generate codes.
  • It’s not a all-in-one framework. Instead, it uses well known tools/libraries for specific tasks (like NHibernate for O/RM, Log4Net for logging, Castle Windsor as DI container).

Getting started

In this article, I’ll show how to deleveop a Single-Page and Responsive Web Application using ASP.NET Boilerplate (I’ll call it as ABP from now). This sample application is named as “Simple Task System” and it consists of two pages: one for list of tasks, other one is to add new tasks. A Task can be related to a person, can be completed. The application is localized in two languages. Screenshot of Task List in the application is shown below:

A screenshot of 'Simple Task System'

Creating empty web application from template

ABP provides two templates to start a new project (Even if you can manually create your project and get ABP packages from nuget, template way is much more easy). Go to www.aspnetboilerplate.com/Templates to create your application from one of twotemplates (one for SPA (Single-Page Application), one for MPA (classic, Multi-Page Application) projects):

Creating template from ABP web site

I named my project as SimpleTaskSystem and created a SPA project. It downloaded project as a zip file. When I open the zip file, I see a solution is ready that contains assemblies (projects) for each layer of Domain Driven Design:

Project files

Created project’s runtime is .NET Framework 4.5.1, I advice to open with Visual Studio 2013. The only prerequise to be able to run the project is to create a database. SPA template assumes that you’re using SQL Server 2008 or later. But you can change it easily to another DBMS.

See the connection string in web.config file of the web project:

<add name="MainDb" connectionString="Server=localhost; Database=SimpleTaskSystemDb; Trusted_Connection=True;" />

You can change connection string here. I don’t change the database name, so I’m creating an empty database, named SimpleTaskSystemDb, in SQL Server:

Empty database

That’s it, your project is ready to run! Open it in VS2013 and press F5:

First run

Template consists of two pages: One for Home page, other is About page. It’s localized in English and Turkish. And it’s Single-Page Application! Try to navigate between pages, you’ll see that only the contents are changing, navigation menu is fixed, all scripts and styles are loaded only once. And it’s responsive. Try to change size of the browser.

Now, I’ll show how to change the application to a Simple Task System application layer by layer in the coming part 2

How To : Use Powershell and TFS together

The absolute basics

Where does a newbie to Windows PowerShell start—particularly in regards to TFS? There are a few obvious places. I’m hardly the first person to trip across the natural peanut-butter-and-chocolate nature of TFS and Windows PowerShell together. In fact, the TFS Power Tools contain a set of cmdlets for version control and a few other functions.

Image

There is one issue when downloading them, however. The “typical” installation of the Power Tools leaves out the Windows PowerShell cmdlets! So make sure you choose “custom” and select those Windows PowerShell cmdlets manually.

After they’re installed, you also might need to manually add them to Windows PowerShell before you can start using them. If you try Get-Help for one of the cmdlets and see nothing but an error message, you know you’ll need to do so (and not simply use Update-Help, as the error message implies).

Fortunately, that’s simple. Using the following command will fix the issue:

add-pssnapin Microsoft.TeamFoundation.PowerShell

See the before and after:

Image of command output

A better way to review what’s in the Power Tools and to get the full list of cmdlets installed by the TFS Power Tools is to use:

Get-Command -module Microsoft.TeamFoundation.PowerShell

This method doesn’t depend on the developers including “TFS” in all the cmdlet names. But as it happens, they did follow the Cmdlet Development Guidelines, so both commands return the same results.

Something else I realized when working with the TFS PowerShell cmdlets: for administrative tasks, like those I’m most interested in, you’ll want to launch Windows PowerShell as an administrator. And as long-time Windows PowerShell users already know, if you want to enable the execution of remote scripts, make sure that you set your script execution policy to RemoteSigned. For more information, see How Can I Write and Run a Windows PowerShell Script?.

Of all the cmdlets provided with the TFS Power Tools, one of my personal favorites is Get-TfsServer, which lets me get the instance ID of my server, among other useful things.  My least favorite thing about the cmdlets in the Power Tools? There is little to no useful information for TFS cmdlets in Get-Help. Awkward! (There’s a community bug about this if you want to add your comments or vote on it.)

A different favorite: Get-TFSItemHistory. His following example not only demonstrates the power of the cmdlets, but also some of their limitations:

Get-TfsItemHistory -HistoryItem . -Recurse -Stopafter 5 |

    ForEach-Object { Get-TfsChangeset -ChangesetNumber $_.ChangesetId } |

    Select-Object -ExpandProperty Changes |

    Select-Object -ExpandProperty Item

This snippet gets the last five changesets in or under the current directory, and then it gets the list of files that were changed in those changesets. Sadly, this example also highlights one of the shortcomings of the Power Tools cmdlets: Get-TfsItemHistory cannot be directly piped to Get-TfsChangeset because the former outputs objects with ChangesetId properties, and the latter expects a ChangesetNumber parameter.

One of the nice things is that raw TFS API objects are being returned, and the snap-ins define custom Windows PowerShell formatting rules for these objects. In the previous example, the objects are instances of VersionControl.Client.Item, but the formatting approximates that seen with Get-ChildItem.

So the cmdlets included in the TFS Power Tools are a good place to start if you’re just getting started with TFS and Windows PowerShell, but they’re somewhat limited in scope. Most of them are simply piping results of the tf.exe commands that are already available in TFS. You’ll probably find yourself wanting to do more than just work with these.


XI/PI: Understanding the RFC Adapter

SAP XI provides different ways for SAP systems to communicate via SAP XI. You have three options namely IDoc Adapters, RFC Adapters and Proxies. In one of the earlier posts that spoke about your first XI scenario, we learned configuring the IDoc receiver adapter. And in the coming articles, I shall throw light on different adapters. This article specifically deals with understanding basics of RFC adapter on sender and the receiver side.
 
 Image
SAP XI provides different ways for SAP systems to communicate via SAP XI. You have three options namely IDoc Adapters, RFC Adapters and Proxies. In one of the earlier posts that spoke about your first XI scenario, we learned configuring the IDoc receiver adapter. And in the coming articles, I shall throw light on different adapters. This article specifically deals with understanding basics of RFC adapter on sender and the receiver side.

SAP XI RFC Sender AdapterRFC Adapter converts the incoming RFC calls to XML and XML messages to outgoing RFC calls. We can have both synchronous (sRFC) and asynchronous (tRFC) communication with SAP systems. The former works with Best Effort QoS (Quality of Service) while the later by Exactly Once (EO).

Unlike IDoc adapter, RFC Adapter is installed on the J2EE Adapter Engine and can be monitored via Adapter Monitoring and Communication Channel Monitoring in the Runtime Workbench.

Now let us understand the configuration needed to set up RFC communication.

RFC Sender Adapter

In this case, Sender SAP system requests XI Integration Engine to process RFC calls. This could either be synchronous or asynchronous.

On the source SAP system, go to transaction SM59 and create a new RFC connection of type ‘T’ (TCP/IP Connection). On the Technical Settings tab, select “Registered Server Program” radio button and specify an arbitrary Program ID. Note that the same program ID must be specified in the configuration of the sender adapter communication channel. Also note that this program ID is case-sensitive.

When using the RFC call in your ABAP program you should specify the RFC destination created above. For example,

CALL FUNCTION ‘<NAME_OF_THE_RFC_FUNCTION_MODULE>’
DESTINATION ‘<RFC_DESTINATION_NAME>’.

Also, in case you are setting up asynchronous interface, the RFC should be called in the background. For example,

CALL FUNCTION ‘<NAME_OF_THE_RFC_FUNCTION_MODULE>’
IN BACKGROUND TASK
DESTINATION ‘<RFC_DESTINATION_NAME>’.

SAP XI RFC Receiver AdapterNow, create the relevant communication channel in the XI Integration Directory. Select the Adapter Type as RFC Sender (Please see the figure above). Specify the Application server and Gateway service of the sender SAP system. Specify the program ID. Specify exactly the same program ID that you provided while creating the RFC destination in SAP system. Note that this program ID is case-sensitive. Provide Application server details and logon credentials in the RFC metadata repository parameter. Save and activate the channel. Note that the RFC definition that you import in the Integration Repository is used only at design time. At runtime, XI loads the metadata from the sender SAP system by using the credentials provided here.

RFC Receiver Adapter

In this case, XI sends the data in the RFC format (after conversion from XML format by the receiver adapter) to the target system where the RFC is executed.

Configuring the receiver adapter is even simpler. Create a communication channel in ID of type RFC Receiver (Please see the figure above on the left). Specify the RFC Client parameters like the Application server details, logon credentials etc and activate the channel.

Testing the Connectivity

Sometimes, especially when new SAP environments are setup, you may want to test their RFC connectivity to SAP XI before you create your actual RFC based interfaces/scenarios. There is a quick and easy way to accomplish this.

STFC_CONNECTION InputCreate a RFC destination of type ‘T’ in the SAP system as described previously. Then, go to XI Integration Repository and import the RFC Function Module STFC_CONNECTION from the SAP system. Activate your change list.

Configure sender and receiver communication channels in ID by specifying the relevant parameters of the SAP system as discussed previously. Remember that the Program ID in sender communication channel and RFC destination in SAP system must match (case-sensitive).

STFC_CONNECTION OutputAccordingly, complete the remaining ID configuration objects like Sender Agreement, Receiver Determination, Interface Determination and Receiver Agreement. No Interface mapping is necessary. Activate your change list.

Now, go back to the SAP system and execute the function module STFC_CONNECTION using transaction SE37. Specify the above RFC destination in ‘RFC target sys’ input box. You can specify any arbitrary input as REQUTEXT. If everything works fine, you should receive the same text as a response. You can also see two corresponding messages in SXMB_MONI transaction in SAP XI. This verifies the connection between SAP system and SAP XI.

How To : Use SharePoint Dashboards & MSRS Reports for your Agile Development Life Cycle

The Problem We Solve

Agile BI is not a term many would associate with MSRS Reports and SharePoint Dashboards. While many organizations first turn to the Microsoft BI stack because of its familiarity, stitching together Microsoft’s patchwork of SharePoint, SQL Server, SSAS, MSRS, and Office creates administrative headaches and requires considerable time spent integrating and writing custom code.

This Showcase outlines the ease of accomplishing three of the most fundamental BI tasks with LogiXML technology as compared to MSRS and SharePoint:

  • Building a dashboard with multiple data sources
  • Creating interactive reports that reduce the load on IT by providing users self-service
  • Integrating disparate data sources

Read below to learn how an agile BI methodology can make your life much easier when it comes to dashboards and reports. Don’t feel like reading?

Building a Dashboard with LogiXML vs. MSRS + SharePoint

Microsoft’s only solution for dashboards is to either write your own code from scratch, manipulate SharePoint to serve a purpose for which it wasn’t initially designed, or look to third party apps. Below are some of the limitations to Microsoft’s approach to dashboards:

  • Limited Pre-Built Elements: Microsoft components come with only limited libraries of pre-built elements. In addition to actual development work, you will need to come up with an idea of how everything will work together. This necessitates becoming familiar with best practices in dashboards and reporting.
  • Sophisticated Development Expertise Required: While Microsoft components provide basic capabilities, anything more sophisticated is development resource-intensive and requires you to take on design, execution, and delivery. Any complex report visualizations and logic, such as interactive filters, must be written in code by the developer.
  • Limited Charts and Visualizations: Microsoft has a smaller sub-set of charts and visualization tools. If you want access to the complete library of .NET-capable charts, you’ll still need to OEM another charting solution at additional expense.
  • Lack of Integrated Workflow: Microsoft does not include workflow features sets out of the box in their BI offering.

LogiXML technology is centered on Logi Studio: an elemental, agile BI design environment which lets you simply choose from hundreds of powerful and configurable pre-built elements. Logi’s pre-built elements equip developers with tools to speed development, as well as the processes and logic required to build and manage BI projects. Below is a screen shot of the Logi Studio while building new dashboards.

agile-bi.jpg

Start a free LogiXML trial now.

Logi developers can easily create static or user-customizable dashboards using the Dashboard element. A dashboard is a collection of panels containing Logi reports, which in turn contain table, charts, images, etc. At runtime, the user can customize the dashboard by rearranging these panels on the browser page, by showing or hiding them, and even by changing their contents using adjustable reporting criteria. The data displayed within the panels can be configured, as in any Logi report, to link to other reports, providing drill-down functionality.


logi2.jpg

The dashboard displayed above has tabs and user customization enabled. The Dashboard element provides customization features, such as drag-and-drop panel positioning, support for built-in parameters the user can access to adjust the panel’s data contents, and a panel selection list that determines which panels will be displayed. AJAX techniques are utilized for web server interactions, allowing selective updates of portions of the dashboard. Dashboard customizations can be saved on an individual-user basis to create a highly personalized view of the data.

The Dashboard Wizard

The ‘Create a Dashboard’ wizard assists developers in creating dashboards by populating the report definition with the necessary dashboard-related elements. You can easily point to any data source by selecting from a variety of DataLayer types, including SQL, StoredProcedures, Web Services, Files, and more. A simple to use drag and drop SQL Query builder is also integrated, to offer a guided approach to constructing queries when connecting to your database.

logi3.jpg

Using the Dashboard Element

The Dashboard element is used to create the top level structure for all of your interactive panels within the final output. Under your dashboards, you can optionally add any number of Dashboard Panels, Panel Parameters for dynamic filtering, and even automatic refresh features with AJAX-based refresh timers.

logi4.jpg

Changing Appearance Using Themes and Style Sheets

The appearance of a dashboard can be changed easily by assigning a theme to your report. In addition, or as an alternative, you can change dashboard appearance using style. The Dashboard element has its own Cascading Style Sheet (CSS) file containing predefined classes that affect the display colors, font sizes, button labels, and spacing seen when the dashboard is displayed. You can override these classes by adding classes with the same name to your own style sheet file.

See us build a BI app with 3 data sources in under 10 minutes.

Ad Hoc Reporting Creation with LogiXML: Analysis Grid

The Analysis Grid is a managed reporting feature giving end users virtual ad hoc capability. It is an easy to use tool that allows business users to analyze and manipulate data and outputs in multiple and powerful ways.

logi5.jpg

Start a free LogiXML trial now.

Create an Analysis Grid by using the “Create Analysis Grid” wizard, or by simply adding the AnalysisGrid element into your definition file. Like the dashboard, data for the Analysis Grid can be accessed from any of the data options, including SQL databases, web sources, or files. You also have the option to launch the interactive query builder wizard for easy, drag-drop, SQL query creation.

The Analysis Grid is composed of three main parts: the data grid itself, i.e. a table of data to be analyzed; various action buttons at the top, allowing the user to perform actions such as create new columns with custom calculations, sort columns, add charts, and perform aggregations; and the ability to export the grid to Excel, CSV, or PDF format.

The Analysis Grid makes it easy to perform what-if analyses through features like filtering. The Grid also makes data-presentation impactful through visualization features including data driven color formatting, inline gauges, and custom formula creation.

Ad Hoc Reporting Creation with Microsoft

While simple ad hoc capabilities, such as enabling the selection of parameters like date ranges, can be accomplished quickly and easily with Microsoft, more sophisticated ad hoc analysis is challenging due to the following shortcomings.

Platform Integration Problems

Microsoft BI strategy is not unified and is strongly tied to SQL Server. To obtain analysis capabilities, you must build cubes through to the Analysis Service, which is a separate product with its own different security architecture. Next, you will need to build reports that talk to SQL server, also using separate products.

Dashboards require a SharePoint portal which is, again, a separate product with separate requirements and licensing. If you don’t use this, you must completely code your dashboards from scratch. Unfortunately, Microsoft Reporting Services doesn’t play well with Analysis Services or SharePoint since these were built on different technologies.

SharePoint itself offers an out of the box portal and dashboard solution but unfortunately with a number of significant shortcomings. SharePoint was designed as a document management and collaboration tool as opposed to an interactive BI dashboard solution. Therefore, in order to have a dashboard solution optimized for BI, reporting, and interactivity you are faced with two options:

  • Build it yourself using .NET and a combination of third party components
  • Buy a separate third party product

Many IT professionals find these to be rather unappealing options, since they require evaluating a new product or components, and/or a lot of work to build and make sure it integrates with the rest of the Microsoft stack.

Additionally, while SQL Server and other products support different types of security architectures, Analysis Services only has support for using integrated Windows NT security models to access cubes and therefore creates integration challenges.

Moreover, for client/ad hoc tools, you need Report Writer, a desktop product, or Excel – another desktop application. In addition to requiring separate licenses, these products don’t even talk to one another in the same ways, as they were built by different companies and subsequently acquired by Microsoft.

Each product requires a separate and often disconnected development environment with different design and administration features. Therefore to manage Microsoft BI, you must have all of these development environments available and know how to use them all.

Integration of Various Data Sources: LogiXML vs. Microsoft

LogiXML is data neutral, allowing you to easily connect to all of your organization’s data spread across multiple applications and databases. You can connect with any data source or data model and even combine data sources such as current data accessed through a web service with past data in spreadsheets.

Integration of Various Data Sources with Microsoft

Working with Microsoft components for BI means you will be faced with the challenge of limited support for non-Microsoft based databases and outside data sources. The Microsoft BI stack is centered on SQL Server databases and therefore the data source is optimized to work with SQL Server. Unfortunately, if you need outside content it can be very difficult to integrate.

Finally, Microsoft BI tools are designed with the total Microsoft experience in mind and are therefore optimized for Internet Explorer. While other browsers and devices might be useable, the experience isn’t optimized and may potentially lack in features or visualize differently.


Free & Licensed Windows 8, Azure, Office 365, SharePoint On-Premise and Online Tools, Web Parts, Apps available.
For more detail visit https://sharepointsamurai.wordpress.com or contact me at tomas.floyd@outlook.com

PressurePoint – great tool to Stress, Load and Performance test your SharPoint Site

SharePoint2013


Awesome tool developed by

 MargrietBruggeman

This version of PressurePoint only works with SharePoint 2013.

There’s a generic version of PressurePoint that works for all versions of SharePoint and even normal web sites at: http://gallery.technet.microsoft.com/PressurePoint-Dragon-for-58648ae4

Requires: The presence of the .NET 4.5 framework, because it makes extensive use of Parallel Programming techniques. Supports anonymous and Windows (NTLM) authentication.

About PressurePoint

When you apply enough pressure, every application you or somebody else builds has a point where it breaks. I call this point the pressure point.

I’d say it’s a strong advisory positive to undertake some activities to find out where the pressure point of the application that you’re responsible for lies. Several kinds of tests are commonly used to find out about these:

  • Performance testing, the umbrella term for testing applications responsiveness and stability. Following, I’ll list some more specific relevant types of performance testing.
  • Load testing, makes requests of an application to simulate normal or anticipated load conditions. This kind of test helps greatly when you want to determine what your end users should expect.
  • Endurance testing, tests if an application is able to hold up under continuous prolonged, but normal or expected, load. Typically looks for memory consumption and gradually decreasing performance.
  • Stress testing, here, you try to find the breaking point by applying maximum application capacity and observe in what ways the application breaks. It finds bottlenecks and root causes for performance degradation.
  • Spike testing, applies a sudden and dramatic increase in load and sees how the application responds to that.
  • Isolation testing, tests a specific part of the application. Usually, this involves an area that has proved to be troublesome.

It helps a lot if such tests are repeated throughout development/test/staging/production environments. This allows you to get a feel for your application.

During these tests, you’ll typically look at server response time (instead of rendering time), the time it takes the client to make the request and get the final response back. Because of this, I can advise to execute performance tests as close to the server or server farm as possible to eliminate network latency issues.

Most of the times, as an application developer or admin you don’t have much or any control over the network and you’ll be more interested how the specific application holds up.

Also, but this is quite obvious, if you can avoid it don’t place test clients on the server or server farm itself, or on the host hosting the virtual machines containing server or server farms. This can have quite the effect on the test outcome, although I have to say that in my experience the effect is limited enough to be able to undertake meaningful performance tests launched from the server or server farm. Other quick tips: it typically works better if you execute performance tests using multiple client computers and you should preferably execute performance tests using multiple user accounts.

Whatever types of tests you’re planning to do, please remember that forgetting to do any type of performance testing will result in an interesting product release experience. Lately, I can’t keep track anymore of the number of times companies contact me wishing they would have spent some time doing performance testing.

Lots of Tools

There are lots of tools out there that can help you do performance testing, but in my experience (and I have looked at 100+ of these tools) there are two types of tools: tools that are just a preview of a commercial version and too limited to do anything useful without buying the license and then there are tools that are insanely complex to use. See my blog post at http://sharepointdragons.com/2012/12/26/the-great-free-performance-load-and-stress-testing-tools-that-can-be-used-with-sharepoint-verdict/ for more information. The following overview at http://en.wikipedia.org/wiki/Test_tool is also nice and more objective (well, it would be more accurate to say that it refrains from giving any opinion).

So, it depends on your situation how to proceed. If you have budget, you can buy a great performance test tool and use that. I found myself in situations where I had to do performance testing in companies that didn’t have a budget to invest in performance tooling. There was also another issue…

About SharePoint

As I mainly work in SharePoint environments, I prefer to use a tool that is able to do performance testing specifically targeted towards SharePoint. I found none. During my SharePoint testing, uhm, dare I say, adventures, I found that SharePoint page requests are typically handled just fine and it’s hard to get a SharePoint environment to its knees just doing that. Request times tend to increase linearly, which is a good sign for an application. On top, SharePoint handles excessive page requests gracefully, without falling back in throwing all kinds of errors. Things get a lot more interesting and dangerous when you do one of the following things:

  • Execute custom code
  • Upload and retrieve documents of various sizes and batch sizes
  • Work with custom SharePoint Services, such as Search, Forms Services or SQL Server Reporting Services (let’s just say I picked out these as examples for no particular reason)

When using a testing tool that doesn’t have knowledge about SharePoint, it will be quite hard to test these aspects.

My conclusion

It may come as no surprise that eventually I decided that it was easier to build my own tool that has specific knowledge about SharePoint, can be extended by me at will, and is easy to use. Making extensive use of the .NET parallel programming capabilities, I found it was quite easy to do. When I was done, I decided that I wanted to share the basic version of it (basic, since I build custom extensions in it dedicated to the projects I’m doing) with the community. Later, I’m planning to add a specific version dedicated to SharePoint 2013, but I’m not quite there yet.

What to look for?

Doing performance testing in SharePoint environments without knowing what to look for is not the most useful thing one can do with one’s time. There are specific performance counters you should look out for on SharePoint WFE’s and different ones to check out on the back-end databases server. Depending on your needs, you might also need to spend some time coming up with the right set of performance counters you need for monitoring dedicated application servers. If you want to learn more about this topic, I can definitely recommend my gallery contribution at: http://gallery.technet.microsoft.com/PowerShell-script-for-59cf3f70 I’d also recommend the use of my SharePoint Flavored Weblog Reader (SFWR) tool at http://gallery.technet.microsoft.com/The-SharePoint-Flavored-5b03f323 which helps to analyze IIS log files.

Whether you use these tools or not: bear in mind that running a performance test tool without analyzing what happens on the server is absolutely useless!

How to use the PressurePoint Dragon for SharePoint

PressurePoint is a command line tool that reads an XML file that describes the test you want to execute. Currently, it only supports Windows (NTLM) or anonymous authentication. When you download the PressurePoint ZIP file it contains three things:

  • PressurePoint.exe, the actual performance test tool that can be executed by calling it from the command line. It requires the presence of the .NET 4 framework since it makes extensive use of parallel programming techniques.
  • PressurePoint.exe.config, the configuration file that is mandatory for the PressurePoint tool. Check out the TestLocation app setting and point it to the location of the XML file describing your test:

    Copy Code

    XML
    Edit|Remove
      <appSettings> 
        <add key="TestLocation" value="C:\Clients\XYZ\PressurePoint\test.xml"/> 
    </appSettings> 
    
  • Test.xml, an example XML Test Description file describing an example test.

Explanation of the structure of a Test Description file

The test description file can do a couple of simple things. It contains a test body that is repeated x times, determined by the repeat attribute of the <Test> element.

Copy Code

XML
Edit|Remove
<!--?xml version="1.0" encoding="utf-8" ?> 
<Test repeat="10"> 
[body omitted for clarity] 
</Test>

The <Test> element is the root element and only occurs once. It contains 1 or more <Session> elements. In a Session, you can specify important configuration info, such as the user name (user attribute), password (password attribute), domain name (domain attribute), the number of concurrent users that start a session (e.g. 20 instances of user A start executing the actions as described in a session) via the concurrentUsers attribute, a friendly name that is outputted to the console window to make it easier to identify which session is executed at a given time (friendlySessionName attribute).

Please note: If you’re using anonymous authentication, the values for user, password, and domain can just be left blank.

The following example shows the Session section:

Copy Code

XML
Edit|Remove
<Session user="administrator" password="verySecret" domain="lc" concurrentUsers="1" friendlySessionName="SessionA"> 
[body omitted for clarity] 
</Session>

Then there are various actions that can be used within a Session. These are:

  • Comment, outputs a text to the console window. Example:

    Copy Code

    XML
    Edit|Remove
    <Comment>Start Moon session A for administrator</Comment> 
    
  • Request, makes a request to a page. Please note: specify a page here, instead of a generic site url such as http://moon. Because right now, PressurePoint doesn’t support redirects. Example:

    Copy Code

    XML
    Edit|Remove
    <Request>http://moon/pages/default.aspx</Request>
  • DelaySeconds, waits for a given amount of time to simulate think time. Example:

    Copy Code

    XML
    Edit|Remove
    <DelaySeconds value="3" />
  • RandomDelaySeconds, waits for a random amount of time within a given range to provide a more realistic simulation of think time (which might not be what you want, since the action keeps the test more predictable. Example:

    Copy Code

    XML
    Edit|Remove
    <RandomDelaySeconds min="1" max="3" />
  • RandomRequest, makes a random request to a page from a given list. Example:

    Copy Code

    XML
    Edit|Remove
    <RandomRequest> 
      <URL>http://moon/pages/default.aspx</URL> 
      <URL>http://moon:28827/sitepages/home.aspx</URL> 
    <!--RandomRequest>  
    

    The next example is a full blown example of a single session by a single user repeated 10 times:

Copy Code

XML
Edit|Remove
<?xml version="1.0" encoding="utf-8" ?> 
<Test repeat="10"> 
  <Session user="administrator" password="superSecret" domain="lc" concurrentUsers="1" friendlySessionName="SessionA"> 
    <Comment>Start Moon session A for administrator</Comment>    <Request>http://moon/pages/default.aspx</Request> 
    <RandomRequest> 
      <URL>http://moon/pages/default.aspx</URL> 
      <RandomDelaySeconds min="1" max="3" />  <URL>http://moon:28827/sitepages/home.aspx</URL> 
    </RandomRequest> 
  </Session> 
</Test>

The next example shows how to simulate 1000 concurrent users, using 2 different user accounts in a test that is repated 100 times:

Copy Code

XML
Edit|Remove
<?xml version="1.0" encoding="utf-8" ?> 
<Test repeat="100"> 
  <Session user="administrator" password="secretPwd" domain="test" concurrentUsers="500" friendlySessionName="SessionA"> 
    <Comment>Start session "Home page" for administrator</Comment>    <Request>http://mysrv/sitepages/home.aspx</Request> 
  </Session>  
 
  <Session user="jBlack" password="superSecret" domain="test" concurrentUsers="500" friendlySessionName="SessionA"> 
    <Comment>Start session A for Jack Black</Comment>    <Request>http://mysrv/sitepages/home.aspx</Request> 
  </Session> 
</Test>

The following section contains SharePoint 2013 specific actions.

  • ClientSite, fetches the URL of a SharePoint site collection. Looks like this:

    Copy code

    XML
    Edit|Remove
    <ClientSite  <Url>http://moon</Url> 
    </ClientSite> 


Quick tips for constructing performance test cases

The following link contains interesting information about the typical type of use of a SharePoint environment: http://office.microsoft.com/en-us/windows-sharepoint-services-it/capacity-planning-for-windows-sharepoint-services-HA001160774.aspx . The quick take away is this:

  • Light usage: the end user makes 20 requests per hour.
  • Typical usage: the end user makes 36 requests per hour.
  • Heavy usage: the end user makes 60 requests per hour.
  • Extreme usage: the end user makes 120 requests per hour.

This will help you build test cases that are more realistic; especially in situations where the customer isn’t really sure how much the application will be used. Concerning this topic, I’ve also found the following topic to be quite interesting: http://blogs.technet.com/b/wbaer/archive/2007/07/06/requests-per-second-required-for-sharepoint-products-and-technologies.aspx

As a final guideline, I’ve also worked with the following rule of thumb that may help you: in a typical enterprise application, 1% of the users makes a request per second during peak time, in an enterprise application that is used extremely, 3% of the users makes a request per second during peak time.

Support Tools

It can be frustrating to try a new community tool that doesn’t seem to work. It makes you wonder whether you made a mistake in constructing the XML for the test case, or whether the tool simply doesn’t work. I’ve built two tools that support PressurePoint: Ping Dragon for SharePoint 2010 (http://gallery.technet.microsoft.com/Ping-Dragon-for-SharePoint-70fb299e ) and WinPing Dragon for SharePoint 2010 (http://gallery.technet.microsoft.com/WinPing-Dragon-for-eefb6dd3 ). The tools fulfill a single purpose: ping SharePoint using the same method leveraged by PressurePoint. In other words, if these tools work, PressurePoint will work too. The difference between both support tools is that the WinPing Dragon tool hides the password from view, while the Ping Dragon doesn’t.

What’s going on under the covers?

Usethe Resource Monitor tool (resmon.exe) to “check the heartbeat” of PressurePoint, since the tool is a bit of a black box to you and watching it doing its work can be a boring experience. Resource Monitor clearly shows how PressurePoint is building up to the point where it can simulate the load you require to simulate the number of different users and sessions you need. PressurePoint executes each session in a separate thread and Resource Monitor will show an increase of the PressurePoint thread counter until it approximates the intended load.

The System image normally, as you’d expect, has the highest number of active threads (a couple of 100s), but once you’re simulating loads of 100s or even 1000s of end users,

PressurePoint surpasses this. One of the things that I found interesting was that it can take quite a long time until you get to the point where you can actually run 100s or even 1000s of separate threads in a single application (on the environments I’ve tested it on, it can take 1 hour or more to reach those kinds of numbers). It makes sense, since those are a lot of threads, other threads finish their work, and your system has other tasks to take care of. But still, before building the tool, I didn’t anticipate this.

FREE Microsoft Dynamics CRM 2011 List Component for Microsoft SharePoint Server 2010


CRM2011 – SharePoint 2010 Integration? Glue CRM 2011 & Share Point 2010 together? Make CRM 2011 and Share Point 2010 converse? I wasn’t sure what to call this exactly. “Hooking together” works for me!

Now that we have a CRM 2011 instance and a Share Point site working, let’s get them connected up! Go to this website and download Microsoft Dynamics CRM 2011 List Component for Microsoft SharePoint Server 2010:

Accept the License Terms.

Extract the files to a folder (I chose C:\CRM List).

You will get a prompt “The Installation is complete.” Click OK.

Let’s go over to the Share Point Central Administration Server to install the list component we just extracted. Connect to http://localhost:48835/ (your port might be different, be aware of this). Click Manage web applications.

Click the new Share Point site, and then “General Settings” (the blue cogs).

Scroll down to Browser File Handling and choose Permissive, Click OK.

Let’s head back over to our new Share Point Site. Click Site Actions up top left, and then “Site Settings”.

Under Galleries click “Solutions”.


Click the Word “Solutions” up top (you have to click the word “Solutions”, even though it looks selected), and then click “Upload Solution”.

Select the .wsp component that we extracted wayyy back at the top of this. I used C:CRM List as my extract folder. Click OK.

You’ll get prompted at this point, I couldn’t active the control on this screen (but it still needs to be done). We need to make sure some services are running to activate the solution. Click Close.

Head back to the Share Point Central Administration. http://localhost:48835. Found at

Click System Settings –> Manage Services on this server

Click Start beside “Share Point Foundation Sandboxed Code Service”. I also started “Microsoft SharePoint Foundation Subscription Settings Service (by accident)” so that’s why that ones started.

Now to head back to our Share Point site http://localhost:39083/

Under Galleries click “Solutions”.

Click Solutions again, select crmlistcomponent, and the click “Activate” up top. Activate is now un-greyed out! Click Activate!

The solution has now been activated! Hurray!

There seems to be some confusion whether or not you need to run a power shell script to enable Activation of Share Point 2010 solutions (AllowHtcExtn). According to what I’ve read, you would need to run this if Share Point 2010 is running on a domain controller. I didn’t have to do this (and we’re on a domain controller), and I’ve yet to run into a problem with .htc stuff. Even in the Microsoft Dynamics CRM 2011 Readme it says:
“If you are using Microsoft SharePoint Server 2010 (On-Premises), you must add .htc extensions to the list of allowed file types:
a. Copy the AllowHtcExtn.ps1 script file to the server that is running Microsoft SharePoint Server 2010.
b. In the Windows PowerShell window or in the SharePoint Management Console, run the command: AllowHtcExtn.ps1 .
Example: AllowHtcExtn.ps1 http://servername%E2%80%9D

Some people say the script works for them , and some say that using just the blog method (what we did) works
The sharepoint configuration is complete at this point. You probably want to take a snapshot, name it “After Sharepoint Configuration”. Let’s head over to our CRM server (localhost:85).

In CRM Click Settings –> Document Management –> Document Management Settings

Select the entities that you want to have documents enabled on. This will create a “Documents” area when you open an instance of the entity. I’ll just leave the defaults for now. At the bottom punch in your Share Point site that you’ve created and click Next. This is the Share Point server we installed the list component on. You’re not allowed to use localhost:port, just use the computer name:port like below.

Don’t select the box, otherwise it will relate the files to those entities. Without checking the box you will end up with something like Site/EntityName/Record Name (which is what I want, especially if you’re using custom entities). Click Next.

If “Libraries are being created in the path”, click Next.

Everything should “Succeed”, Click Finish.

Let’s test this bad boy out now.

Create a new account called “Test”.

Click Save! Click “Documents” on the left side. You’ll get a prompt saying that the folder (Test) is being created under “Account”. Click OK.

Click Add.

Now you’ll probably get these errors! /crmgrid/scripts/DialogContainer.js and 403 FORBIDDEN! Depressing. The only real information on this error was here: . It wasn’t very clear, but I stumbled through it. It seems that CRM 2011 doesn’t enjoy being called localhost. Let’s fix these up.

The fix for this was to run inetmgr –> Click Microsoft Dynamics CRM –> click Stop

Click “Bindings…” on the right side. Click “Edit” on the items that show “localhost” and change it to my machine name: “win-b80icqrvluf”. This is so it has a a “real” name to connect to.

Before:

After:

Now click “Start” on the right side.

Head back over to the CRM (http://win-b80icqrvluf:85/CRMTest/main.aspx) make sure to use the host name, as it might give you the error if you use localhost. Open your Test Account again.

Click Documents –> Add, you should now see this popup (it can take a while to load for the first time on the VM). If you continue to get the error, stop both CRM 2011 and Share Point 2010 servers and restart them. If that doesn’t work, try restarting the whole server.

Pick a file, and click OK.

The file should be uploaded to Share Point now.

Head over to Share Point at http://win-b80icqrvluf:39083 and click “All Site Content” or “Libraries”.

Click Account.

You can see that CRM has created a folder “Test” (for our record). It creates 1 folder per record. Click it to see the files associated to that record!!

The files associated to the record “Test” in Accounts.

Share Point and CRM have combined into a super awesome force of doom. But we’re still missing 1 core piece of functionality (due to not picking a port when we installed CRM).


Resource – Office 365 Powershell Commandlets

Before you can start working with the SharePoint Online cmdlets you must first download those cmdlets. Having the cmdlets as a separate download (separate from SharePoint on-premises that is) allows you to use any machine to run the cmdlets.

blog-office365


All we have to do is make sure we have PowerShell V3 installed along with the .NET Framework v4 or better (required by PowerShell V3). With these prerequisites in place simply download and install the cmdlets from Microsoft: http://www.microsoft.com/en-us/download/details.aspx?id=35588.

Once installed open the SharePoint Online Management Shell by clicking Start > All Programs > SharePoint Online Management Shell > SharePoint Online Management Shell.

Just like with the SharePoint Management Shell for on-premises deployments the SharePoint Online Management Shell is just a standard PowerShell window. You can see this by looking at the target attribute of the shortcut properties:

C:\Windows\System32\WindowsPowerShell\v1.0\powershell.exe -NoExit -Command “Import-Module Microsoft.Online.SharePoint.PowerShell -DisableNameChecking;”

As you can see from the shortcut, a PowerShell module is loaded: Microsoft.Online.SharePoint.PowerShell. Unlike with SharePoint on-premises, this is not a snap-in but a module, which is basically the new, better way of loading cmdlets. The nice thing about this is that, like with the snap-in, you can load the module in any PowerShell window and are not limited to using the SharePoint Online Management Shell.

(The -DisableNameChecking parameter of the Import-Module cmdlet simply tells PowerShell to not bother checking for valid verbs used by the loaded cmdlets and avoids warnings that are generated by the fact that the module does use an invalid verb – specifically, Upgrade). Note that unlike with the snap-in, there’s no need to specify the threading options because the cmdlets don’t use any unmanaged resources which need disposal.

Getting Connected

Now that you’ve got the SharePoint Online Management Shell installed you are now ready to connect to your tenant administration site. This initial connection is necessary to establish a connection context which stores the URL of the tenant administration site and the credentials used to connect to the site. To establish the connection use the Connect-SPOService cmdlet:

Connect-SPOService -Url https://contoso-admin.sharepoint.com -Credential gary@contoso.com


Running this cmdlet basically just stores a Microsoft.SharePoint.Client.ClientContext object in an internal static variable (or a sub-classed version of it at least). Future cmdlet calls then use this object to connect to the site, thereby negating the need to constantly provide the URL and credentials. (The downside of this object being internal is that we can’t extend the cmdlets to add our own, unless we want to use reflection which would be unsupported). To clear this internal variable (and make the session secure against other code that may attempt to use it) you can run the Disconnect-SPOService cmdlet. This cmdlet takes no parameters.

One tip to help make loading the module and then connecting to the site a tad bit easier would be to encapsulate the commands into a single helper method. In the following example I created a simple helper method named Connect-SPOSite which takes in the user and the tenant administration site to connect to, however, I default those values so that I only have to provide the password when I wish to get connected. I then put this method in my profile file (which you can edit by typing “ise $profile.CurrentUsersAllHosts”):

function Connect-SPOSite() {

    param (

        $user = “gary@contoso.com”,

        $site = https://contoso-admin.sharepoint.com&#8221;

    )

    if ((Get-Module Microsoft.Online.SharePoint.PowerShell).Count -eq 0) {

        Import-Module Microsoft.Online.SharePoint.PowerShell -DisableNameChecking

    }

    $cred = Get-Credential $user

    Connect-SPOService -Url $site -Credential $cred

}


SPO Cmdlets

Now that you’re connected you can finally do something interesting. First let’s look at the cmdlets that are available. There are currently only 30 cmdlets available to us and you can see the list of those cmdlets by typing “Get-Command -Module Microsoft.Online.SharePoint.PowerShell”. Note that all of the cmdlets will have a noun which starts with “SPO”. The following is a list of all the available cmdlets:

  • Site Groups
  • Users
    • Add-SPOUser – Add a user to an existing Site Collection Site Group.
    • Get-SPOUser – Get an existing user.
    • Remove-SPOUser – Remove an existing user from the Site Collection or from an existing Site Collection Group.
    • Set-SPOUser – Set whether an existing Site Collection user is a Site Collection administrator or not.
    • Get-SPOExternalUser – Returns external users from the tenant’s folder.
    • Remove-SPOExternalUser – Removes a collection of external users from the tenancy’s folder.
  • Site Collections
    • Get-SPOSite – Retrieve an existing Site Collection.
    • New-SPOSite – Create a new Site Collection.
    • Remove-SPOSite – Move an existing Site Collection to the recycle bin.
    • Repair-SPOSite – If any failed Site Collection scoped health check rules can perform an automatic repair then initiate the repair.
    • Set-SPOSite – Set the Owner, Title, Storage Quota, Storage Quota Warning Level, Resource Quota, Resource Quota Warning Level, Locale ID, and/or whether the Site Collection allows Self Service Upgrade.
    • Test-SPOSite – Run all Site Collection health check rules against the specified Site Collection.
    • Upgrade-SPOSite – Upgrade the Site Collection. This can do a build-to-build (e.g., RTM to SP1) upgrade or a version-to-version (e.g., 2010 to 2013) upgrade. Use the -VersionUpgrade parameter for a version-to-version upgrade.
    • Get-SPODeletedSite – Get a Site Collection from the recycle bin.
    • Remove-SPODeletedSite – Remove a Site Collection from the recycle bin (permanently deletes it).
    • Restore-SPODeletedSite – Restores an item from the recycle bin.
    • Request-SPOUpgradeEvaluationSite  – Creates a copy of the specified Site Collection and performs an upgrade on that copy.
    • Get-SPOWebTemplate – Get a list of all available web templates.
  • Tenants
    • Get-SPOTenant – Retrieves information about the subscription tenant. This includes the Storage Quota size, Storage Quota Allocated (used), Resource Quota size, Resource Quota Allocated (used), Compatibility Range (14-14, 14-15, or 15-15), whether External Services are enabled, and the No Access Redirect URL.
    • Get-SPOTenantLogEntry – Retrieves company logs (as of B2 only BCS logs are available).
    • Get-SPOTenantLogLastAvailableTimeInUtc – Returns the time when the logs are collected.
    • Set-SPOTenant – Sets the Minimum and Maximum Compatibility Level, whether External Services are enabled, and the No Access Redirect URL.
  • Apps
  • Connections

It’s important to understand that when working with all of the cmdlets which retrieve an object you will only ever be getting a simple data object which has no ability to act upon the source object. For example, the Get-SPOSite cmdlet returns an SPOSite object which has no methods and, though some properties do have a setter, they are completely useless and the object and its properties are not used by any other cmdlet (such as Set-SPOSite). This also means that there is no ability to access child objects (such as SPWeb or SPList items, to name just a couple).

The other thing to note is the lack of cmdlets for items at a lower scope than the Site Collection. Specifically there is no Get-SPOWeb or Get-SPOList cmdlet or anything of the sort. This can be potentially be quite limiting for most real world uses of PowerShell and, in my opinion, limit the usefulness of these new cmdlets to just the initial setup of a subscription and not the long-term maintenance of the subscription.

In the following examples I’ll walk through some examples of just a few of the more common cmdlets so that you can get an idea of the general usage of them.

Get a Site Collection

To see the list of Site Collections associated with a subscription or to see the details for a specific Site Collection use the Get-SPOSite cmdlet. This cmdlet has two parameter sets:

Get-SPOSite [[-Identity] <SpoSitePipeBind>] [-Limit <string>] [-Detailed] [<CommonParameters>]

Get-SPOSite [-Filter <string>] [-Limit <string>] [-Detailed] [<CommonParameters>]

The parameter that you’ll want to pay the most attention to is the -Detailed parameter. If this optional switch parameter is omitted then the SPOSite objects that will be returned will only have their properties partially set. Now you might think that this is in order to reduce the traffic between the server and the client, however, all the properties are still sent over the wire, they simply have default values for everything other than a couple core properties (so I would assume the only performance improvement would be in the query on the server). You can see the difference in the values that are returned by looking at a Site Collection with and without the details:

PS C:\> Get-SPOSite https://contoso.sharepoint.com/ | select *

LastContentModifiedDate   : 1/1/0001 12:00:00 AM
Status                    : Active
ResourceUsageCurrent      : 0
ResourceUsageAverage      : 0
StorageUsageCurrent       : 0
LockIssue                 :
WebsCount                 : 0
CompatibilityLevel        : 0
Url                       :
https://contoso.sharepoint.com/
LocaleId                  : 1033
LockState                 : Unlock
Owner                     :
StorageQuota              : 1000
StorageQuotaWarningLevel  : 0
ResourceQuota             : 300
ResourceQuotaWarningLevel : 255
Template                  : EHS#1
Title                     :
AllowSelfServiceUpgrade   : False

PS C:\> Get-SPOSite https://contoso.sharepoint.com/ -Detailed | select *

LastContentModifiedDate   : 11/2/2012 4:58:50 AM
Status                    : Active
ResourceUsageCurrent      : 0
ResourceUsageAverage      : 0
StorageUsageCurrent       : 1
LockIssue                 :
WebsCount                 : 1
CompatibilityLevel        : 15
Url                       :
https://contoso.sharepoint.com/
LocaleId                  : 1033
LockState                 : Unlock
Owner                     : s-1-5-21-3176901541-3072848581-1985638908-189897
StorageQuota              : 1000
StorageQuotaWarningLevel  : 0
ResourceQuota             : 300
ResourceQuotaWarningLevel : 255
Template                  : STS#0
Title                     : Contoso Team Site
AllowSelfServiceUpgrade   : True

Create a Site Collection

When we’re ready to create a Site Collection we can use the New-SPOSite cmdlet. This cmdlet is very similar to the New-SPSite cmdlet that we have for on-premises deployments. The following shows the syntax for the cmdlet:

New-SPOSite [-Url] <UrlCmdletPipeBind> -Owner <string> -StorageQuota <long> [-Title <string>] [-Template <string>] [-LocaleId <uint32>] [-CompatibilityLevel <int>] [-ResourceQuota <double>] [-TimeZoneId <int>] [-NoWait] [<CommonParameters>]

The following example demonstrates how we would call the cmdlet to create a new Site Collection called “Test”:

New-SPOSite -Url https://contoso.sharepoint.com/sites/Test -Title “Test” -Owner “gary@contoso.com” -Template “STS#0” -TimeZoneId 10 -StorageQuota 100


Note that the cmdlet also takes in a -NoWait parameter; this parameter tells the cmdlet to return immediately and not wait for the creation of the Site Collection to complete. If not specified then the cmdlet will poll the environment until it indicates that the Site Collection has been created. Using the -NoWait parameter is useful, however, when creating batches of Site Collections thereby allowing the operations to run asynchronously.

One issue you might bump into is in knowing which templates are available for your use. In the preceding example we are using the “STS#0” template, however, there are other templates available for our use and we can discover them using the Get-SPOWebTemplate cmdlet, as shown below:

PS C:\> Get-SPOWebTemplate

Name                     Title                         LocaleId  CompatibilityLevel
—-                     —–                         ——–  ——————
STS#0                    Team Site                         1033                  15
BLOG#0                   Blog                              1033                  15
BDR#0                    Document Center                   1033                  15
DEV#0                    Developer Site                    1033                  15
DOCMARKETPLACESITE#0     Academic Library                  1033                  15
OFFILE#1                 Records Center                    1033                  15
EHS#1                    Team Site – SharePoint Onl…     1033                  15
BICenterSite#0           Business Intelligence Center      1033                  15
SRCHCEN#0                Enterprise Search Center          1033                  15
BLANKINTERNETCONTAINER#0 Publishing Portal                 1033                  15
ENTERWIKI#0              Enterprise Wiki                   1033                  15
PROJECTSITE#0            Project Site                      1033                  15
COMMUNITY#0              Community Site                    1033                  15
COMMUNITYPORTAL#0        Community Portal                  1033                  15
SRCHCENTERLITE#0         Basic Search Center               1033                  15
visprus#0                Visio Process Repository          1033                  15

Give Access to a Site Collection

Once your Site Collection has been created you may wish to grant users access to the Site Collection. First you may want to create a new SharePoint group (if an appropriate one is not already present) and then you may want to add users to that group (or an existing one). To accomplish these tasks you use the New-SPOSiteGroup cmdlet and the Add-SPOUser cmdlet, respectively.

Looking at the New-SPOSiteGroup cmdlet you can see that it takes only three parameters, the name of the group to create, the permissions to add to the group, and the Site Collection within which to create the group:

New-SPOSiteGroup [-Site] <SpoSitePipeBind> [-Group] <string> [-PermissionLevels] <string[]> [<CommonParameters>]

In the following example I’m creating a new group named “Designers” and giving it the “Design” permission:

$site = Get-SPOSite https://contoso.sharepoint.com/sites/Test -Detailed

$group = New-SPOSiteGroup -Site $site -Group “Designers” -PermissionLevels “Design“

(Note that I’m seeing the Site Collection to a variable just to keep the commands a little shorter, you could just as easily provide the string URL directly).

Once the group is created we can then use the Add-SPOUser cmdlet to add a user to the group. Like the New-SPOSiteGroup cmdlet this cmdlet takes three parameters:

Add-SPOUser [-Site] <SpoSitePipeBind> [-LoginName] <string> [-Group] <string> [<CommonParameters>]

In the following example I’m adding a new user to the previously created group:

Add-SPOUser -Site $site -Group $group.LoginName -LoginName “tessa@contoso.com”

Delete and Recover a Site Collection

If you’ve created a Site Collection that you now wish to delete you can easily accomplish this by using the Remove-SPOSite cmdlet. When this cmdlet finishes the Site Collection will have been moved to the recycle bin and not actually deleted.

If you wish to permanently delete the Site Collection (and thus remove it from the recycle bin) then you must use the Remove-SPODeletedSite cmdlet. So to do a permanent delete it’s actually a two step process, as shown in the example below where I first move the “Test” Site Collection to the recycle bin and then delete it from the recycle bin:

Remove-SPOSite http://contoso.sharepoint.com/sites/test&#8221; -Confirm:$false

Remove-SPODeletedSite -Identity http://contoso.sharepoint.com/sites/test&#8221; -Confirm:$false


If you decide that you’d actually like to restore the Site Collection from the recycle bin you can simply use the Restore-SPODeletedSite cmdlet:

Restore-SPODeletedSite http://contoso.sharepoint.com/sites/test

Both the Remove-SPOSite and the Restore-SPODeletedSite cmdlets accept a –NoWait parameter which you can provide to tell the cmdlet to return immediately.

Parting Thoughts

There are obviously many other cmdlets available to explore (per the previous list), however, I hope that in the simple samples shown in this article you will find that working with the cmdlets is quite easy and fairly intuitive.

The key thing to remember is that you are working in a stateless environment so changes to an object such as SPOSite will not affect the actual Site Collection in any way and cmdlets like the Set-SPOSite cmdlet will not honor changes made to the properties as it will use nothing more than the URL property to know which Site Collection you are updating.

Though the existence of these cmdlets is definitely a good start and absolutely better than nothing, I have to say that I’m extraordinarily displeased with the number of available cmdlets and with how the module was implemented.

My biggest gripe is that the module is not extensible in any way so if I wish to add cmdlets for the management of SPWeb objects or SPList objects I’d have to create a whole new framework which would require an additional login as I wouldn’t be able to leverage the context object created by Connect-SPOService cmdlet.

This results in a severely limiting product that prevents community and ISV generated solutions from “fitting in” to the existing model. Perhaps one day I’ll create my own set of cmdlets to show Microsoft how it should have been done…perhaps one day I’ll have time for such frivolities :) .


Select Master Page App for SharePoint 2013 now available!! (Get the SharePoint 2010 Select Master Page Web Part Free)

In Publishing sites, there will be a layouts or application page through which we can set a custom
or another master page as a default master page. Unfortunately, this is missing in Team Sites.

This is what this solution is all about. It is targeted mainly for Team sites, since publishing sites already have a provision.

It adds a custom ribbon button in the Share and Track group of the Files group of Master Page Gallery. This is a SharePoint 2013 Hosted App. Refer the documentation for the technical details.


The following screen shots depict the functionality.


The custom ribbon button will not be enabled if a folder is selected or more than 1 item is selected.
But if a file is selected, the button will be enabled, irrespective of the file extension. Upon selecting a file and clicking on the ribbon button, a pop up dialog will appear with the text “Working on it..”.

Then a confirmation alert will appear, asking “Are you sure?”. Once confirmed by the user, a progress message will be displayed in the pop up dialog. If the file selected is not of .master extension, then the user will be displayed an alert “This will work only for master pages.”.

If a master page, which is already set as default, is selected and the ribbon button is clicked, the user will be displayed an alert “The file at <url> is the current default master page. So please select another master page.”. If another master page is selected, then the user will be displayed an alert “Master Page Changed Successfully.

Please press CTRL + F5 for changes to reflect.”. Once the user clicks OK on the alert, the pop up dialog also closes and pressing CTRL + F5 will reflect the updated master page. Any time, the user clicks OK or cancel on the alert screens, the parent screen will be refreshed and the current selection will be cleared.

The app requires a Full Control on the host web, since this is required for setting the master page and thats precisely the reason why, I couldn’t publish this in the Office store.

The app has been tested on IE9 and the latest version of Chrome and Firefox. It may not work on IE8 or lower version of other browsers also, in case they don’t support HTML5. Also, the app currently supports only English. Also, the app will set the default master only on the host web (where the app is installed) and not on the sub webs.

The app uses jQuery AJAX and REST APIs of SharePoint 2013.

To use the app, just upload the app (.app file) to the App Catalog and add/install it to the host team site and trust it and navigate to the Master Page Gallery and you are good to go.


With this App, you will also receive the FREE SharePoint 2010 Select Master Page Web Part!!

It adds a custom ribbon button in the Share and Track group of the Documents group of Master Page Gallery.

It is a Sandbox solution and it is implemented to set the master of only the root site of a site collection, though it can be customized / extended for sub sites. It requires a user to be at least a Site owner to avoid unnecessary manipulation of master page by contributors or other users. Refer the documentation for the technical details.

The following screen shots depict the functionality.


How To : Setup MyTask List in SharePoint 2013

Overview

You are using SharePoint 2013, you have deployed My Sites. You or your users have tasks assigned. But when you or your users visit their MySite, they see below screen. Despite the users having assigned tasks elsewhere in the system, MySite still shows no tasks which is incorrect.

123


What is My Task List in SharePoint 2013?

By architecture of the Newsfeed site on SharePoint 2013, My Tasks list puts together and shows all the SharePoint and Project Server (if installed) task assignment right into the users My Site page. The tasks can be either private tasks or public tasks.

Pre-requisites for proper sync of My Task?

  • Search Service Application – very important to have this service enabled and running. Aggregator checks every 3 hours for any new “Tasks Lists”. Though the aggregator would look for SharePoint events / hints, they are known to have not activated an aggregation and hence the importance given to the indexer. Very important to have an Incremental / Continuous Crawl running.
  • Work Management Service Application (WMA) and the service running on the server.
  • User Profile Synchronization Service

Refreshing the My Tasks Page

The code behind aggregator is triggered by simply visiting the page within Newsfeed Site as long as the last trigger was older than 5 minutes. This delay is to preserve the performance of the SharePoint farm. This can be changed using PowerShell but highly recommend against the same for large farm deployments.

Possible problems causing sync not work?

  1. Work Management Service wasn’t running
  2. Search wasn’t indexing anything yet. No indexer meant aggregator could potentially be not performing any aggregation as well.

1234

Solution

  1. Work management Service should run on App Server. If required create one from Central Admin
  2. Work management service application should be created with an app pool which must run with profile app pool account
  3. Create/ensure Incremental Crawls to happen across all the content sources, setup people search, my sites search.
  4. Ensure that continuous crawl is running
  5. Wait till the crawl completes
  6. Review the permission of profile app pool and portal app pool account on the specific databases with dbowner permissions
  • social db
  • sync db
  • profile db
  • state service db
  • manage metadata db
  • my site db
  • portal content db
  • projects content db
  • teams content db
  • communities content db
  • Search db.
  1. User profile synchronization service should be running.
  2. Run IIS reset on all app and WFE servers at the same time.

12345

Introduction to the Unified Logging Service and Creating a Javascript Logging System

Microsoft SharePoint Foundation exposes a rich logging mechanism known as the Unified Logging Service (ULS) that enables developers to write useful information helping them to identify and troubleshoot issues during the application lifecycle. The ULS writes SharePoint Foundation events to the SharePoint Trace Log, and stores them in the file system, typically inside the SharePoint root folder in files named \14\LOGS\SERVERYYYmmDDID.log.

ULS exposes a rich managed object model enabling developers to specify their own configurations such as categories and severity while writing exceptions or trace message to the ULS logs. You can find more details on the managed API in the article Writing to the Trace Log from Custom Code.

With the evolution of a rich client object model in SharePoint 2010 that enables developers to build complex client applications, it is very important to write useful information that is not visible in the user interface but is recorded on the server so it can be monitored by administrators and developers.

To address these scenarios for applications running in thin-client browsers, SharePoint Foundation provides a web service named SharePoint Diagnostics (diagnostics.asmx). This web service enables a client application to submit diagnostic reports directly to the ULS logs.

This article focuses on how you can leverage the SharePoint Diagnostics web service to write trace messages from a custom JavaScript application into the ULS logs.

The following points are discussed:

  • Overview of the SendClientScriptErrorReport web method
  • Creating a simple JavaScript application to log trace messages by using SharePoint Diagnostics web service
  • Setting up the required configurations for enabling logging via the Diagnostics web service
  • Using the application
  • Using the ULS logging script with sandboxed solutions
The Diagnostics web service exposes a single method named SendClientScriptErrorReport that enables client applications to report errors to the ULS service. The following table summarizes the parameter list required by the SendClientScriptErrorReport method.

Parameter Name Description Value Examples
Message A string containing the message to display to the client The value of the displaypage property is null or undefined; not a function object.
File The URL file name associated with the current error customscript.js
Line A string containing the line of code from which the error is being generated 9
Client A string containing the client name that is experiencing the error <client><browser name=’Internet Explorer’ version=’9.0′></browser><language> en-us </language></client>
Stack A string containing the call-stack information from the generated error <stack><function depth=’0′ signature=’ myFunction() ‘>function myFunction() { ‘displaypage ();}</function></stack>
Team A string containing a team or product name Custom SharePoint Application
originalFile The physical file name associated with the current error customscript.js

In the table, notice that the example values for Client and Stack depict a XML fragments, not single lines of text. This information is stated in the protocol specification documented in 3.1.4.1.2.1 SendClientScriptErrorReport. Even though the protocol specification for these parameters requires a valid XML fragment, the web-service call to this method still succeeds even if the values supplied for these parameters do not follow this schema, despite the fact that creating the client and stack in this way would add more information to the trace.

The parameter list in the table shows that, unlike the managed API, the SendClientScriptErrorReport web method does not provide any option to specify the category or severity of the message being logged. Also looking at the method name and description, it appears that the exception logged should specify the severity level as Error. However, any message logged through the SharePoint Diagnostics web service is always displayed under the category Unified Logging Service and has a trace log severity level set to Verbose.

Later in this article, you will see the steps required to view the traces written through the SharePoint Diagnostics web service.

In this section, you create a JavaScript application that uses the Diagnostics web service to report errors to the ULS. The application contains a JavaScript file named ULSLogScript.js that contains the necessary functions to communicate and log traces to the Diagnostics web service. These functions are then called directly from any consumer script.

Note
This is a relatively simple application with just one file, so you are not creating a formal SharePoint solution; instead, you save the files directly to the Layouts directory in the SharePoint hive structure.

To create a JavaScript library containing the ULS logging logic

  1. Start Microsoft Visual Studio 2010.
  2. From the File menu, create a new JScript file and save it in the following path: <SharePoint Installation Folder>\14\TEMPLATE\LAYOUTS\LoggingSample\ULSLogScript.js.

    For example, C:\Program Files\Common Files\Microsoft Shared\Web Server Extensions\14\TEMPLATE\LAYOUTS\LoggingSample\ULSLogScript.js.

    Note
    You need to create a new directory named LoggingSample in the Layouts folder.
  3. Because you are using the JQuery library in the application, download the jquery-1.6.4.min.js file from the JQuery portal and add it to the LoggingSample folder created previously.
  4. Type or paste the following code into the ULSLogScript.js file.
    // Creates a custom ulslog object 
    // with the required properties.
    function ulsObject() {
        this.message = null;
        this.file = null;
        this.line = null;
        this.client = null;
        this.stack = null;
        this.team = null;
        this.originalFile = null;
    }
    

    The ulsObject function returns a new instance of a custom object with properties mapped to the parameters required by the SendClientScriptErrorReport method. This object is used throughout the script for performing various operations.

  5. Define the methods that populate the property values specified in the ulsObject method. Begin by defining the function that retrieves the client property. Following the ulsObject method, type or paste the following code.
    // Detecting the browser to create the client information
    // in the required format.
    function getClientInfo() {
        var browserName = '';
    
        if (jQuery.browser.msie)
            browserName = "Internet Explorer";
        else if (jQuery.browser.mozilla)
            browserName = "Firefox";
        else if (jQuery.browser.safari)
            browserName = "Safari";
        else if (jQuery.browser.opera)
            browserName = "Opera";
        else
            browserName = "Unknown";
    
        var browserVersion = jQuery.browser.version;
        var browserLanguage = navigator.language;
        if (browserLanguage == undefined) {
            browserLanguage = navigator.userLanguage;
        }
    
        var client = "<client><browser name='{0}' version='{1}'></browser><language>{2}</language></client>";
        client = String.format(client, browserName, browserVersion, browserLanguage);
     
        return client;
    }
    
    // Utility function to assist string formatting.
    String.format = function () {
        var s = arguments[0];
        for (var i = 0; i < arguments.length - 1; i++) {
            var reg = new RegExp("\\{" + i + "\\}", "gm");
            s = s.replace(reg, arguments[i + 1]);
        }
    
        return s;
    }
    

    The getClientInfo function uses the JQuery library to detect the current browser properties, such as the name and version, and then creates a XML fragment (as discussed previously) describing the browser details where the application is currently running. Additionally, a utility function named String.format assists string formatting through the code.

  6. Next, you need a function to create the call stack for the exception raised in the script. Add the following functions to the ULSLogScript.js code.
    // Creates the callstack in the required format 
    // using the caller function definition.
    function getCallStack(functionDef, depth) {
        if (functionDef != null) {
            var signature = '';
            functionDef = functionDef.toString();
            signature = functionDef.substring(0, functionDef.indexOf("{"));
            if (signature.indexOf("function") == 0) {
                signature = signature.substring(8);
            }
    
            if (depth == 0) {
                var stack = "<stack><function depth='0' signature='{0}'>{1}</function></stack>";
                stack = String.format(stack, signature, functionDef);
            }
            else {
                var stack = "<stack><function depth='1' signature='{0}'></function></stack>";
                stack = String.format(stack, signature);
            }
    
            return stack;
        }
    
        return "";
    }
    

    The getCallStack function receives the function definition where the exception occurred and a depth as a parameter. The depth parameter is used by the function to decide if only the caller function signature is required or the complete function definition is to be included. Based on the caller function definition, the getCallStack function extracts the required information such as the signature, body, and creates an XML fragment as described in the protocol specification.

  7. Next, create a function that creates a SOAP packet in the format expected by the Diagnostics web service SendClientScriptErrorReport method. Type or paste the following functions in the ULSLogScript.js file.
    // Creates the SOAP packet required by SendClientScriptErrorReport
    // web method.
    function generateErrorPacket(ulsObj) {
        var soapPacket = "<?xml version=\"1.0\" encoding=\"utf-8\"?>" +
                            "<soap:Envelope xmlns:xsi=\"http://www.w3.org/2001/XMLSchema-instance\" " +
                                           "xmlns:xsd=\"http://www.w3.org/2001/XMLSchema\" "+
                                           "xmlns:soap=\"http://schemas.xmlsoap.org/soap/envelope/\">" +
                              "<soap:Body>" +
                                "<SendClientScriptErrorReport " +
                                  "xmlns=\"http://schemas.microsoft.com/sharepoint/diagnostics/\">" +
                                  "<message>{0}</message>" +
                                  "<file>{1}</file>" +
                                  "<line>{2}</line>" +
                                  "<stack>{3}</stack>" +
                                  "<client>{4}</client>" +
                                  "<team>{5}</team>" +
                                  "<originalFile>{6}</originalFile>" +
                                "</SendClientScriptErrorReport>" +
                              "</soap:Body>" +
                            "</soap:Envelope>";
     
        soapPacket = String.format(soapPacket, encodeXmlString(ulsObj.message), encodeXmlString(ulsObj.file), 
                     ulsObj.line, encodeXmlString(ulsObj.stack), encodeXmlString(ulsObj.client), 
                     encodeXmlString(ulsObj.team), encodeXmlString(ulsObj.originalFile));
     
        return soapPacket;
    }
    
    // Utility function to encode special characters in XML.
    function encodeXmlString(txt) {
        txt = String(txt);
        txt = jQuery.trim(txt);
        txt = txt.replace(/&/g, "&amp;");
        txt = txt.replace(/</g, "&lt;");
        txt = txt.replace(/>/g, "&gt;");
        txt = txt.replace(/'/g, "&apos;");
        txt = txt.replace(/"/g, "&quot;");
     
        return txt;
    }
    

    The generateErrorPacket function receives an instance of the ulsObj object and returns the SOAP packet for the SendClientScriptErrorReport function as a string in the expected format. Because the values for the some parameters are expected as an XML fragment, the encodeXmlString function is used to encode the special characters.

  8. When the SOAP packet has been defined, you need a function to issue an asynchronous request to the Diagnostics web service. Add the code below to the ULSLogScript.js file.
    // Function to form the Diagnostics service URL.
    function getWebSvcUrl() {
        var serverurl = location.href;
        if (serverurl.indexOf("?") != -1) {
            serverurl = serverurl.replace(location.search, '');
        }
     
        var index = serverurl.lastIndexOf("/");
        serverurl = serverurl.substring(0, index - 1);
        serverurl = serverurl.concat('/_vti_bin/diagnostics.asmx');
     
        return serverurl;
    }
    
    // Method to post the SOAP packet to the Diagnostic web service.
    function postMessageToULSSvc(soapPacket) {
        $(document).ready(function () {
            $.ajax({
                url: getWebSvcUrl(),
                type: "POST",
                dataType: "xml",
                data: soapPacket, //soap packet.
                contentType: "text/xml; charset=\"utf-8\"",
                success: handleResponse, // Invoke when the web service call is successful.
                error: handleError// Invoke when the web service call fails.
            });
        });
    }
    
    // Invoked when the web service call succeeds.
    function handleResponse(data, textStatus, jqXHR) {
        // Custom code...
        alert('Successfully logged trace to ULS');
     }
     
    // Invoked when the web service call fails.
    function handleError(jqXHR, textStatus, errorThrown) {
        //Custom code...
            alert('Error occurred in executing the web request');
    }
    

    The postMessageToULSSvc function perform an asynchronous HTTP request and posts the SOAP packet to the Diagnostics web service. The URL of the Diagnostics web service is dynamically constructed in the getWebSvcUrl function. The postMessageToULSSvc function also defines respective handlers for success or error responses. Instead of displaying alerts on the handlers, other logic can be written as required by the application.

  9. Finally, you need a function that is invoked automatically when an error occurs in the code. To register this function globally for all the JavaScript functions on the page, you attach this function to the window.onerror event. Add the following lines of code as the first line of the ULSLogScript.js file.
    // Registering the ULS logging function on a global level.
    window.onerror = logErrorToULS;
    
    // Set default value for teamName.
    var teamName = "Custom SharePoint Application";
    
    // Further add the logErrorToULS method at the end of the script.
    
    // Function to log messages to Diagnostic web service.
    // Invoked by the window.onerror message.
    function logErrorToULS(msg, url, linenumber) {
        var ulsObj = new ulsObject();
        ulsObj.message = "Error occurred: " + msg;
        ulsObj.file = url.substring(url.lastIndexOf("/") + 1); // Get the current file name.
        ulsObj.line = linenumber;
        ulsObj.stack = getCallStack(logErrorToULS.caller); // Create error call stack.
        ulsObj.client = getClientInfo(); // Create client information.
        ulsObj.team = teamName; // Declared in the consumer script.
        ulsObj.originalFile = ulsObj.file;
    
        var soapPacket = generateErrorPacket(ulsObj); // Create the soap packet.
        postMessageToULSSvc(soapPacket); // Post to the web service.
    
        return true;
    }
    

    The line window.onerror = logErrorToULS links the function logErrorToULS with the window.onerror event. This enables you to capture the required information such as the error message, line number, and error file. The teamName variable enables you to set a unique value with respect to the calling application. This can be overridden in the consumer scripts. The logErrorToULS function creates an instance of the ulsObj object and populates all of its properties. Here, you see that the stack property of the ulsObj object is set to logErrorToULS.caller. This provides the function definition of the method that invoked this function. The postMessageToULSSvc function is called to write the error information to the trace logs.

    Note
    Because you cannot specify the security level of the trace message in the SendClientScriptErrorReport method, the message property of the ulsObj object is prepended with text indicating that the message logged is part of an exception.
  10. The logErrorToULS function is called automatically when an error occurs on the page, but to intentionally write a trace message to the ULS, you need one more function which can be called specifically. Add the following function just below the logErrorToULS function.
    // Function to log message to Diagnostic web service.
    // Specifically invoked by a consumer method.
    function logMessageToULS(message, fileName) {
        if (message != null) {
            var ulsObj = new ulsObject();
            ulsObj.message = message;
            ulsObj.file = fileName;
            ulsObj.line = 0; // We don't know the line, so we set it to zero.
            ulsObj.stack = getCallStack(logMessageToULS.caller);
            ulsObj.client = getClientInfo();
            ulsObj.team = teamName;
            ulsObj.originalFile = ulsObj.file;
    
            var soapPacket = generateErrorPacket(ulsObj);
            postMessageToULSSvc(soapPacket);
        }
    }
    

    Unlike the logErrorToULS function, the logMessageToULS function accepts the message to be logged and the file name where the error occurred as parameters.

So far, you have created the required logic to write trace messages or exceptions to the ULS logs. Now you need to write a function that consumes the logErrorToULS or logMessageToULS functions.

To create the consumer application

  1. Navigate to your SharePoint site.
  2. Create a new Web Parts page.
  3. Add a Content Editor Web Part in any of the available Web Part zones.
  4. Edit the Web Part and type or paste the following text in the HTML source.
    <script src="/_layouts/LoggingSample/jquery-1.6.4.min.js" type="text/javascript"></script>
     <script src="/_layouts/LoggingSample/ULSLogScript.js" type="text/javascript"></script>
     <script type="text/javascript">
            var teamName = "Simple ULS Logging";
            function doWork() {
                unknownFunction();
            }
            function logMessage() {
                logMessageToULS('This is a trace message from CEWP', 'loggingsample.aspx');
            }
     </script>
    
    <input type="button" value="Log Exception" onclick="doWork();" />
        <br /><br />
      <input type="button" value="Log Trace" onclick="logMessage();" />


    This HTML code contains the required script references to include the JQuery library and the ULSLogScript.js file that you created in the previous section. It also contains two inline JavaScript functions and the respective input buttons to invoke them.

    To demonstrate exception handling, the doWork function makes a call to an unknownFunction function that does not exist. This invokes an exception that is intercepted and logged by the ULSLogScript.js code. To demonstrate message logging, the logMessage function calls the logMessageToULS function to write trace messages to ULS.

  5. Exit the web page design mode.
  6. Save the Web Parts page.
Finally, you need to configure the Diagnostic Logging Service in SharePoint Central Administration to ensure that the traces and exceptions logged from the Diagnostics web service are visible in the ULS logs.

To configure the Diagnostic Logging Service

  1. Open SharePoint Central Administration.
  2. From the Quick Launch, click Monitoring.
    Figure 1. Click the Monitoring option

    Click the Monitoring option

  3. On the monitoring page, in the Reporting section, click Configure diagnostic logging.
    Figure 2. Click Configure diagnostic logging

    Click Configure diagnostic logging

  4. From all categories, expand the SharePoint Foundation category.
    Figure 3. Expand the SharePoint Foundation category

    Expand the SharePoint Foundation category

  5. Select the Unified Logging Service category.
    Figure 4. Select Unified Logging Service

    Select Unified Logging Service

  6. In the Least critical event to report to the trace log list, select Verbose.
    Figure 5. In the dropdown list, select Verbose

    From the dropdown list, select Verbose

  7. Click OK to save the configuration.

The server is now ready to log traces sent by the Diagnostics web service to ULS. These traces appear under the category Unified Logging Service with a severity set to Verbose.

In this section, you test the application by raising an alert that is logged to the ULS.

To test the logging application

  1. Click the Log Exception button inside the Content Editor Web Part (CEWP).
    Figure 6. Click the Log Exception button

    Click the Log Exception button

  2. An alert indicates that the message has been logged successfully to ULS.
    Figure 7. Confirmation message

    Confirmation message

  3. To see the exception details in the ULS logs, navigate to the Logs folder in the SharePoint hive ({SP Installation Path}\14\LOGS\)
  4. Because multiple log files can be present in the Logs folder, perform a descending sort on the Date modified field.
  5. Open the recent log file in a text editor such as Notepad and then search for Simple ULS Logging (the team name specified previously). Now you should see all the web service parameters as supplied from the client application, from Message to OriginalFileName, in the following text:

    10/14/2011 21:00:37.87 w3wp.exe (0x097C) 0x14DCSharePoint Foundation Unified Logging Service a084Verbose Message: Error occured: The value of the property ‘unknownFunction’ is null or undefined, not a Function object543a6672-9078-452f-93bd-545c4babefd510/14/2011 21:00:37.87 w3wp.exe (0x097C) 0x14DCSharePoint Foundation Unified Logging Service a085Verbose File: ULS%20Logging%20Sample.aspx543a6672-9078-452f-93bd-545c4babefd510/14/2011 21:00:37.87 w3wp.exe (0x097C) 0x14DCSharePoint Foundation Unified Logging Service a086Verbose Line: 676543a6672-9078-452f-93bd-545c4babefd510/14/2011 21:00:37.87 w3wp.exe (0x097C) 0x14DCSharePoint Foundation Unified Logging Service a087Verbose Client: <client><browser name=’Internet Explorer’ version=’8.0′></browser><language>en-us</language></client>543a6672-9078-452f-93bd-545c4babefd510/14/2011 21:00:37.87 w3wp.exe (0x097C) 0x14DCSharePoint Foundation Unified Logging Service a088Verbose Stack: <stack><function depth=’0′ signature=’ doWork() ‘>function doWork() { unknownFunction(); }</function></stack>543a6672-9078-452f-93bd-545c4babefd510/14/2011 21:00:37.87 w3wp.exe (0x097C) 0x14DCSharePoint Foundation Unified Logging Service a089Verbose TeamName: Simple ULS Logging543a6672-9078-452f-93bd-545c4babefd510/14/2011 21:00:37.87 w3wp.exe (0x097C) 0x14DCSharePoint Foundation Unified Logging Service a08aVerbose OriginalFileName: ULS%20Logging%20Sample.aspx543a6672-9078-452f-93bd-545c4babefd5

    Looking at the log message, you can easily determine that the exception occurred because unknownFunction was not defined, along with other relevant details such as the line number.

  6. Similarly, clicking Log Trace on the CEWP writes the following trace message:

    10/14/2011 21:29:55.76 w3wp.exe (0x097C) 0x0F6CSharePoint Foundation Unified Logging Service a084Verbose Message: This is a trace message from CEWP8c182889-c323-46f3-a287-a538c379f15210/14/2011 21:29:55.76 w3wp.exe (0x097C) 0x0F6CSharePoint Foundation Unified Logging Service a085Verbose File: loggingsample.aspx8c182889-c323-46f3-a287-a538c379f15210/14/2011 21:29:55.76 w3wp.exe (0x097C) 0x0F6CSharePoint Foundation Unified Logging Service a086Verbose Line: 08c182889-c323-46f3-a287-a538c379f15210/14/2011 21:29:55.76 w3wp.exe (0x097C) 0x0F6CSharePoint Foundation Unified Logging Service a087Verbose Client: <client><browser name=’Internet Explorer’ version=’8.0′></browser><language>en-us</language></client>8c182889-c323-46f3-a287-a538c379f15210/14/2011 21:29:55.76 w3wp.exe (0x097C) 0x0F6CSharePoint Foundation Unified Logging Service a088Verbose Stack: <stack><function depth=’1′ signature=’ logMessage() ‘></function></stack>8c182889-c323-46f3-a287-a538c379f15210/14/2011 21:29:55.76 w3wp.exe (0x097C) 0x0F6CSharePoint Foundation Unified Logging Service a089Verbose TeamName: Simple ULS Logging8c182889-c323-46f3-a287-a538c379f15210/14/2011 21:29:55.76 w3wp.exe (0x097C) 0x0F6CSharePoint Foundation Unified Logging Service a08aVerbose OriginalFileName: loggingsample.aspx8c182889-c323-46f3-a287-a538c379f152

    In this log, you see that a trace message was sent by the logMessage function.

In a sandboxed solution, you cannot deploy any file to the server file system (the Layouts folder), so to make the ULS logging script work, you need to make the following two changes:

  1. Provision the jquery-1.6.4.min.js and ULSLogScript.js file to a Site Collection–relative Styles Library folder (or any other library with appropriate read access).
  2. Update the script references in the consumer Content Query Web Part (CQWP), as needed.

The remaining functionality should work as is.

What is Kendo UI

Kendo UI is an HTML5, jQuery-based framework for building modern web apps. The framework features lots of UI widgets, a rich data vizualization framework, an auto-adaptive Mobile framework, and all of the tools needed for HTML5 app development, such as Data Binding, Templating, Drag-and-Drop API, and more.

Kendoui


Kendo UI comes in different bundles:

  • Kendo UI Web – HTML5 widgets for desktop browsing experience.
  • Kendo UI DataViz – HTML5 data vizualization widgets.
  • Kendo UI Mobile – HTML5 framework for building hybrid mobile applications.
  • Kendo UI Complete – includes Kendo UI Web, Kendo UI DataViz and Kendo UI Mobile.
  • Telerik UI for ASP.NET MVC – Kendo UI Complete plus ASP.NET MVC wrappers for Kendo UI Web, DataViz and Mobile.
  • Telerik UI for JSP – Kendo UI Complete plus JSP wrappers for Kendo UI Web and Kendo UI DataViz.
  • Telerik UI for PHP – Kendo UI Complete plus PHP wrappers for Kendo UI Web and Kendo UI DataViz.

Installing and Getting Started with Kendo UI

You can download all Kendo UI bundles from the download page.

The distribution zip file contains the following:

  • /examples – quick start demos.
  • /js – minified JavaScript files.
  • /src – complete source code. Not available in the trial distribution.
  • /styles – minified CSS files and theme images.
  • /wrappers – server-side wrappers. Available in Telerik UI for ASP.NET MVC, JSP or PHP.
  • changelog.html – Kendo UI release notes.

Using Kendo UI

To use Kendo UI in your HTML page you need to include the required JavaScript and CSS files.

Kendo UI Web

  1. Download Kendo UI Web and extract the distribution zip file to a convenient location.
  2. Copy the /js and /styles directories of the Kendo UI Web distribution to your web application root directory.
  3. Include the Kendo UI Web JavaScript and CSS files in the head tag of your HTML page. Make sure the common CSS file is registered before the theme CSS file. Also make sure only one combined script file is registered. For more information, please refer to the Javascript Dependencies page.
    <!-- Common Kendo UI Web CSS -->
    <link href="styles/kendo.common.min.css" rel="stylesheet" />
    <!-- Default Kendo UI Web theme CSS -->
    <link href="styles/kendo.default.min.css" rel="stylesheet" />
    <!-- jQuery JavaScript -->
    <script src="js/jquery.min.js"></script>
    <!-- Kendo UI Web combined JavaScript -->
    <script src="js/kendo.web.min.js"></script>
    
  4. Initialize a Kendo UI Web Widget (the KendoDatePicker in this example):
    <!-- HTML element from which the Kendo DatePicker would be initialized -->
    <input id="datepicker" />
    <script>
    $(function() {
        // Initialize the Kendo DatePicker by calling the kendoDatePicker jQuery plugin
        $("#datepicker").kendoDatePicker();
    });
    </script>
    

Here is the complete example:

<!--doctype html>
<html>
    <head>
        <title>Kendo UI Web</title>
        <link href="styles/kendo.common.min.css" rel="stylesheet" />
        <link href="styles/kendo.default.min.css" rel="stylesheet" />
        <script src="js/jquery.min.js"></script>
        <script src="js/kendo.web.min.js"></script>
    </head>
    <body>
        <input id="datepicker" />
        <script>
            $(function() {
                $("#datepicker").kendoDatePicker();
            });
        </script>
    </body>
</html>

Kendo UI DataViz

  1. Download Kendo UI DataViz and extract the distribution zip file to a convenient location.
  2. Copy the /js and /styles directories of the Kendo UI DataViz distribution to your web application root directory.
  3. Include the Kendo UI DataViz JavaScript and CSS files in the head tag of your HTML page:
    <!-- Kendo UI DataViz CSS -->
    <link href="styles/kendo.dataviz.min.css" rel="stylesheet" />
    <!-- jQuery JavaScript -->
    <script src="js/jquery.min.js"></script>
    <!-- Kendo UI DataViz combined JavaScript -->
    <script src="js/kendo.dataviz.min.js"></script>
    
  4. Initialize a Kendo UIDataViz Widget (the Kendo Radial Gauge in this example):
    <!-- HTML element from which the Kendo Radial Gauge would be initialized -->
    <div id="gauge"></div>
    <script>
    $(function() {
        $("#gauge").kendoRadialGauge();
    });
    </script>
    

Here is the complete example:

<!--doctype html>
<html>
    <head>
        <title>Kendo UI DataViz</title>
        <link href="styles/kendo.dataviz.min.css" rel="stylesheet" />
        <script src="js/jquery.min.js"></script>
        <script src="js/kendo.dataviz.min.js"></script>
    </head>
    <body>
        <div id="gauge"></div>
        <script>
        $(function() {
            $("#gauge").kendoRadialGauge();
        });
        </script>
    </body>
</html>

Kendo UI Mobile

  1. Download Kendo UI Mobile and extract the distribution zip file to a convenient location.
  2. Copy the /js and /styles directories of the Kendo UI Mobile distribution to your web application root directory.
  3. Include the Kendo UI Mobile JavaScript and CSS files in the head tag of your HTML page:
    <!-- Kendo UI Mobile CSS -->
    <link href="styles/kendo.mobile.all.min.css" rel="stylesheet" />
    <!-- jQuery JavaScript -->
    <script src="js/jquery.min.js"></script>
    <!-- Kendo UI Mobile combined JavaScript -->
    <script src="js/kendo.mobile.min.js"></script>
    
  4. Initialize a Kendo Mobile Application
    <!-- Kendo Mobile View -->
    <div data-role="view" data-title="View" id="index">
        <!--Kendo Mobile Header -->
        <header data-role="header">
            <!--Kendo Mobile NavBar widget -->
            <div data-role="navbar">
                <span data-role="view-title"></span>
            </div>
        </header>
        <!--Kendo Mobile ListView widget -->
        <ul data-role="listview">
          <li>Item 1</li>
          <li>Item 2</li>
        </ul>
        <!--Kendo Mobile Footer -->
        <footer data-role="footer">
            <!-- Kendo Mobile TabStrip widget -->
            <div data-role="tabstrip">
                <a data-icon="home" href="#index">Home</a>
                <a data-icon="settings" href="#settings">Settings</a>
            </div>
        </footer>
    </div>
    <script>
    // Initialize a new Kendo Mobile Application
    var app = new kendo.mobile.Application();
    </script>
    

Here is the complete example:

<!--doctype html>
<html>
    <head>
        <title>Kendo UI Mobile</title>
        <link href="styles/kendo.mobile.all.min.css" rel="stylesheet" />
        <script src="js/jquery.min.js"></script>
        <script src="js/kendo.mobile.min.js"></script>
    </head>
    <body>
        <div data-role="view" data-title="View" id="index">
            <header data-role="header">
                <div data-role="navbar">
                    <span data-role="view-title"></span>
                </div>
            </header>
            <ul data-role="listview">
              <li>Item 1</li>
              <li>Item 2</li>
            </ul>
            <footer data-role="footer">
                <div data-role="tabstrip">
                    <a data-icon="home" href="#index">Home</a>
                    <a data-icon="settings" href="#settings">Settings</a>
                </div>
            </footer>
        </div>
        <script>
        var app = new kendo.mobile.Application();
        </script>
    </body>
</html>

Server-side wrappers

Kendo UI provides server-side wrappers for ASP.NET, PHP and JSP. Those are classes (ASP.NET and PHP) or XML tags (JSP) which allow configuring the Kendo UI widgets with server-side code.

You can find more info about the server-side wrappers here:

  • Get Started with Telerik UI for ASP.NET MVC
  • Get Started with Telerik UI for JSP
  • Get Started with Telerik UI for PHP

Next Steps

Kendo UI videos

You can watch the videos in the Kendo UI YouTube channel.

Kendo UI Dojo

A lot of interactive tutorials are available in the Kendo UI Dojo.

Further reading

  1. Kendo UI Widgets
  2. Data Attribute Initialization
  3. Requirements

Examples

  1. Online demos
  2. Code library projects
  3. Examples availableongithub
    • ASP.NET MVC examples
    • ASP.NET MVC Kendo UI Music Store
    • ASP.NET WebForms examples
    • JSP examples
    • Kendo Mobile Sushi
    • PHP examples
    • Ruby on Rails examples

Help Us Improve Kendo UI Documentation, Samples, Tutorials and Demos

The Kendo UI team would LOVE your help to improve our documentation. We encourage you to contribute in the way that you choose:

Submit a New Issue at GitHub

Open a new issue on the topic if it does not exist already.When creating an issue, please provide a descriptive title, be as specific as possible and link to the document in question. If you can provide a link to the closest anchor to the issue, that is even better.

Update the Documentation at GitHub

This is the most direct method. Follow the contribution instructions. The basic steps are that you fork our documentation and submit a pull request. That way you can contribute to exactly where you found the error and our technical writing team just needs to approve your change request. Please use only standard Markdown and follow the directions at the link. If you find an issue in the docs, or even feel like creating new content, we are happy to have your contributions!

Forums

You can also go to the Kendo UI Forums and leave feedback. This method will take a bit longer to reach our documentation team, but if you like the accountability of forums and you want a fast reply from our amazing support team, leaving feedback in the Kendo UI forums guarantees that your suggestion has a support number and that we’ll follow up on it.Thank you for contributing to the Kendo UI community!

NEW “Filter My Lists” Web Part now available + FREE Metro UI Master Page when ordering

“Filter My Lists” Web Part

Saves you time with optimal performance

Find what you are looking for with a few clicks, even in cluttered sites and lists with masses of items and documents.

Find exactly what you need and stop wasting your time browsing SharePoint.
Filter the content of multiple lists and libraries in a single   step.

Combine search and metadata filters

In a single panel combine item, document and attachment searches with metadata keyword searches and managed metadata filters.

Select multiple filter values from drop-down lists or alternatively use the keyword search of metadata fields with the help of wildcard characters and logical operators.

Export filtered views to Excel

Export filtered views and data to Excel. A print view enables you to print your results in a clear printable format with a single  click.

Keep views clear and concise

Provides a complete set of filters without cluttering list views and keeps your list views clear, concise and speedy. Enables you to filter SharePoint using columns which aren’t visible in list views.

Refine filters and save them for future use, whether private, to share with others or to use as default filters.

FREE Metro Style UI Master Page


Screen Capture Medium

Modern UI Master Page and Styles for SharePoint 2010.

This will give the Metro/Modern UI styling of SharePoint 2013 to your SharePoint 2010 team sites.

Features include:
– Quick launch styling
– Global navigation and drop-down styling
– Search box styling and layout change
– Web part header styling
– Segoe UI font

SharePoint 2013 Basic Search Center Branding Problem

So, I had thought we were in the clear from the old 2010 Search Center branding disaster.

For the most part custom branding applies pretty easily to search sites in SharePoint 2013 thanks to the fact that it just uses the default Seattle.master for search branding.

?????????????????????????????????????????????


However there is a gotcha, specifically related to the Basic Search Center template. I think the problem is only this one template, but maybe there are other areas affected. I tested the Enterprise Search Center and the default search and neither had issues.

Basically what happens is when you are creating your custom branding, chances are you will be applying a customized master page (one that is edited with a mapped drive or SharePoint Designer), and the Basic Search Center uses a snippet of code block to try to hide the ribbon when the Web Part management panel is up (I have no idea why this was so important but I digress).

Okay, “so what” you might think… well code blocks are not permitted to run by default in customized master pages. They will work just fine in a custom master page deployed with a farm solution (according to comments below a sandbox solution will not fix the problem) but they will fail miserably in a customized master page like this:

4-27-2013 4-05-07 PM

So, how do you fix this problem. Well, easiest solution is to package your custom master page into a farm solution and apply it to the site. The error should go away immediately. That doesn’t really help if you are still iterating in development or if you are using SharePoint Online (farm solutions are not allowed there).

Another option is to edit the aspx files on the Basic Search Site. From a mapped drive or from SPD you can edit default.aspx and results.aspx removing this StyleBlock section:


  <SharePoint:StyleBlock runat="server"> 
    <%          
    WebPartManager webPartManager = SPWebPartManager.GetCurrentWebPartManager(this.Page);
    if (webPartManager != null && webPartManager.DisplayMode == SPWebPartManager.BrowseDisplayMode)
    { 
    %>#s4-ribbonrow
    { 
    display: none;
    }
    <%                                          
    }
  %>

Note: one gotcha you may run into with this method is sometimes the search web parts will error on the page when you refresh it. You can fix this by removing the old web parts and re-adding them. I’m not sure why you have to do this sometimes, but it’s a relatively painless fix.

For some of you, editing these search files won’t be an acceptable solution. I’m hopeful someone will create a nice sandbox solution to fix the problem like we had in 2010…

SAP Weekend : Part 2 – Using the Microsoft BizTalk Server for B2B Integration with SharePoint

This is Part 2 of my past weekend’s activities with SharePoint and SAP Integration methods.


In this post I am looking at how to use the BizTalk Adapter with SharePoint


Topics

  • Abstract
  • Goal
  • Business Scenario
  • Environment
  • Document Flow
  • Integration Steps
  • .NET Support
  • Summary


Abstract

In the past few years, the whole perspective of doing business has been moved towards implementing Enterprise Resource Planning Systems for the key areas like marketing, sales and manufacturing operations. Today most of the large organizations which deal with all major world markets, heavily rely on such key areas.

Operational Systems of any organization can be achieved from its worldwide network of marketing teams as well as from manufacturing and distribution techniques. In order to provide customers with realistic information, each of these systems need to be integrated as part of the larger enterprise.

This ultimately results into efficient enterprise overall, providing more reliable information and better customer service. This paper addresses the integration of Biztalk Server and Enterprise Resource Planning System and the need for their integration and their role in the current E-Business scenario.


Goal

There are several key business drivers like customers and partners that need to communicate on different fronts for successful business relationship. To achieve this communication, various systems need to get integrated that lead to evaluate and develop B2B Integration Capability and E–Business strategy. This improves the quality of business information at its disposal—to improve delivery times, costs, and offer customers a higher level of overall service.

To provide B2B capabilities, there is a need to give access to the business application data, providing partners with the ability to execute global business transactions. Facing internal integration and business–to–business (B2B) challenges on a global scale, organization needs to look for required solution.

To integrate the worldwide marketing, manufacturing and distribution facilities based on core ERP with variety of information systems, organization needs to come up with strategic deployment of integration technology products and integration service capabilities.


Business Scenario

Now take the example of this ABC Manufacturing Company: whose success is the strength of its European-wide trading relationships. Company recognizes the need to strengthen these relationships by processing orders faster and more efficiently than ever before.

The company needed a new platform that could integrate orders from several countries, accepting payments in multiple currencies and translating measurements according to each country’s standards. Now, the bottom line for ABC’s e-strategy was to accelerate order processing. To achieve this: the basic necessity was to eliminate the multiple collections of data and the use of invalid data.

By using less paper, ABC would cut processing costs and speed up the information flow. Keeping this long term goal in mind, ABC Manufacturing Company can now think of integrating its four key countries into a new business-to-business (B2B) platform.


Here is another example of this XYZ Marketing Company. Users visit on this company’s website to explore a variety of products for its thousands of customers all over the world. Now this company always understood that they could offer greater benefits to customers if they could more efficiently integrate their customers’ back-end systems. With such integration, customers could enjoy the advantages of highly efficient e-commerce sites, where a visitor on the Web could place an order that would flow smoothly from the website to the customer’s order entry system.


Some of those back-end order entry systems are built on the latest, most sophisticated enterprise resource planning (ERP) system on the market, while others are built on legacy systems that have never been upgraded. Different customers requires information formatted in different ways, but XYZ has no elegant way to transform the information coming out of website to meet customer needs. With the traditional approach:

For each new e-commerce customer on the site, XYZ’s staff needs to work for significant amounts of time creating a transformation application that would facilitate the exchange of information. But with better approach: XYZ needs a robust messaging solution that would provide the flexibility and agility to meet a range of customer needs quickly and effectively. Now again XYZ can think of integrating Customer Backend Systems with the help of business-to-business (B2B) platform.


Environment

Many large scale organizations maintain a centralized SAP environment as its core enterprise resource planning (ERP) system. The SAP system is used for the management and processing of all global business processes and practices. B2B integration mainly relies on the asynchronous messaging, Electronic Data Interchange (EDI) and XML document transformation mechanisms to facilitate the transformation and exchange of information between any ERP System and other applications including legacy systems.

For business document routing, transformation, and tracking, existing SAP-XML/EDI technology road map needs XML service engine. This will allow development of complex set of mappings from and to SAP to meet internal and external XML/EDI technology and business strategy. Microsoft BizTalk Server is the best choice to handle the data interchange and mapping requirements. BizTalk Server has the most comprehensive development and management support among business-to-business platforms. Microsoft BizTalk Server and BizTalk XML Framework version 2.0 with Simple Object Access Protocol (SOAP) version 1.1 provide precisely the kind of messaging solution that is needed to facilitate integration with cost effective manner.


Document Flow

Friends, now let’s look at the actual flow of document from Source System to Customer Target System using BizTalk Server. When a document is created, it is sent to a TCP/IP-based Application Linking and Enabling (ALE) port—a BizTalk-based receive function that is used for XML conversion. Then the document passes the XML to a processing script (VBScript) that is running as a BizTalk Application Integration Component (AIC). The following figure shows how BizTalk Server acts as a hub between applications that reside in two different organizations:

The data is serialized to the customer/vendor XML format using the Extensible Stylesheet Language Transformations (XSLT) generated from the BizTalk Mapper using a BizTalk channel. The XML document is sent using synchronous Hypertext Transfer Protocol Secure (HTTPS) or another requested transport protocol such as the Simple Mail Transfer Protocol (SMTP), as specified by the customer.

The following figure shows steps for XML document transformation:

The total serialized XML result is passed back to the processing script that is running as a BizTalk AIC. An XML “receipt” document then is created and submitted to another BizTalk channel that serializes the XML status document into a SAP IDOC status message. Finally, a Remote Function Call (RFC) is triggered to the SAP instance/client using a compiled C++/VB program to update the SAP IDOC status record. A complete loop of document reconciliation is achieved. If the status is not successful, an e-mail message is created and sent to one of the Support Teams that own the customer/vendor business XML/EDI transactions so that the conflict can be resolved. All of this happens instantaneously in a completely event-driven infrastructure between SAP and BizTalk.

Integration Steps

Let’s talk about a very popular Order Entry and tracking scenario while discussing integration hereafter. The following sections describe the high-level steps required to transmit order information from Order Processing pipeline Component into the SAP/R3 application, and to receive order status update information from the SAP/R3 application.

The integration of AFS purchase order reception with SAP is achieved using the BizTalk Adapter for SAP (BTS-SAP). The IDOC handler is used by the BizTalk Adapter to provide the transactional support for bridging tRFC (Transactional Remote Function Calls) to MSMQ DTC (Distributed Transaction Coordinator). The IDOC handler is a COM object that processes IDOC documents sent from SAP through the Com4ABAP service, and ensures their successful arrival at the appropriate MSMQ destination. The handler supports the methods defined by the SAP tRFC protocol. When integrating purchase order reception with the SAP/R3 application, BizTalk Server (BTS) provides the transformation and messaging functionality, and the BizTalk Adapter for SAP provides the transport and routing functionality.

The following two sequential steps indicate how the whole integration takes place:

  • Purchase order reception integration
  • Order Status Update Integration

Purchase Order Reception Integration

  1. Suppose a new pipeline component is added to the Order Processing pipeline. This component creates an XML document that is equivalent to the OrderForm object that is passed through the pipeline. This XML purchase order is in Commerce Server Order XML v1.0 format, and once created, is sent to a special Microsoft Message Queue (MSMQ) queue created specifically for this purpose.Writing the order from the pipeline to MSMQ:>

    The first step in sending order data to the SAP/R3 application involves building a new pipeline component to run within the Order Processing pipeline. This component must perform the following two tasks:

    A] Make an XML-formatted copy of the OrderForm object that is passing through the order processing pipeline. The GenerateXMLForDictionaryUsingSchema method of the DictionaryXMLTransforms object is used to create the copy.

    Private Function IPipelineComponent_Execute(ByVal objOrderForm As Object, _
        ByVal objContext As Object, ByVal lFlags As Long) As Long
    
    On Error GoTo ERROR_Execute
    
    Dim oXMLTransforms As Object
    Dim oXMLSchema As Object
    Dim oOrderFormXML As Object
    
    ' Return 1 for Success.
    IPipelineComponent_Execute = 1
    
    ' Create a DictionaryXMLTransforms object.
    Set oXMLTransforms = CreateObject("Commerce.DictionaryXMLTransforms")
    
    ' Create a PO schema object.
    Set oXMLSchema = oXMLTransforms.GetXMLFromFile(sSchemaLocation)
    
    ' Create an XML version of the order form.
    Set oOrderFormXML = oXMLTransforms.GenerateXMLForDictionaryUsingSchema_
        (objOrderForm, oXMLSchema)
    
    WritePO2MSMQ sQueueName, oOrderFormXML.xml, PO_TO_ERP_QUEUE_LABEL, _
        sBTSServerName, AFS_PO_MAXTIMETOREACHQUEUE
    
    Exit Function
    
    ERROR_Execute:
    App.LogEvent "QueuePO.CQueuePO -> Execute Error: " & _
    vbCrLf & Err.Description, vbLogEventTypeError
    
    ' Set warning level.
    IPipelineComponent_Execute = 2
    Resume Next
    
    End Function

    B] Send the newly created XML order document to the MSMQ queue defined for this purpose.

    Option Explicit
    
    ' MSMQ constants.
    
    ' Access modes.
    Const MQ_RECEIVE_ACCESS = 1
    Const MQ_SEND_ACCESS = 2
    Const MQ_PEEK_ACCESS = 32
    
    ' Sharing modes. Const MQ_DENY_NONE = 0
    Const MQ_DENY_RECEIVE_SHARE = 1
    
    ' Transaction options. Const MQ_NO_TRANSACTION = 0
    Const MQ_MTS_TRANSACTION = 1
    Const MQ_XA_TRANSACTION = 2
    Const MQ_SINGLE_MESSAGE = 3
    
    ' Error messages.
    Const MQ_ERROR_QUEUE_NOT_EXIST = -1072824317
    
    ' MQ Message ACKNOWLEDGEMENT.
    Const MQMSG_ACKNOWLEDGMENT_FULL_REACH_QUEUE = 5
    Const MQMSG_ACKNOWLEDGMENT_FULL_RECEIVE = 14
    Const DEFAULT_MAX_TIME_TO_REACH_QUEUE = 20
    ' MQ Message ACKNOWLEDGEMENT.
    Const MQMSG_ACKNOWLEDGMENT_FULL_REACH_QUEUE = 5
    Const MQMSG_ACKNOWLEDGMENT_FULL_RECEIVE = 14
    
    Function WritePO2MSMQ(sQueueName As String, sMsgBody As String, _
        sMsgLabel As String, sServerName As String, _
        Optional MaxTimeToReachQueue As Variant) As Long
    
    Dim lMaxTime As Long
    
    If IsMissing(MaxTimeToReachQueue) Then
    lMaxTime = DEFAULT_MAX_TIME_TO_REACH_QUEUE
    Else
    lMaxTime = MaxTimeToReachQueue
    End If
    
    Dim objQueueInfo As MSMQ.MSMQQueueInfo
    Dim objQueue As MSMQ.MSMQQueue, objAdminQueue As MSMQ.MSMQQueue
    Dim objQueueMsg As MSMQ.MSMQMessage
    
    On Error GoTo MSMQ_Error
    
    Set objQueueInfo = New MSMQ.MSMQQueueInfo
    objQueueInfo.FormatName = "DIRECT=OS:" & sServerName & "\PRIVATE$\" & sQueueName
    
    Set objQueue = objQueueInfo.Open(MQ_SEND_ACCESS, MQ_DENY_NONE)
    
    Set objQueueMsg = New MSMQ.MSMQMessage
    
    objQueueMsg.Label = sMsgLabel ' Set the message label property
    objQueueMsg.Body = sMsgBody ' Set the message body property
    objQueueMsg.Ack = MQMSG_ACKNOWLEDGMENT_FULL_REACH_QUEUE
    objQueueMsg.MaxTimeToReachQueue = lMaxTime
    
    objQueueMsg.send objQueue, MQ_SINGLE_MESSAGE
    
    objQueue.Close
    
    On Error Resume Next
    Set objQueueMsg = Nothing
    Set objQueue = Nothing
    Set objQueueInfo = Nothing
    
    Exit Function
    
    MSMQ_Error:
    App.LogEvent "Error in WritePO2MSMQ: " & Error
    Resume Next
    
    End Function
    
  2. A BTS MSMQ receive function picks up the document from the MSMQ queue and sends it to a BTS channel that has been configured for this purpose. Receiving the XML order from MSMQ: The second step in sending order data to the SAP/R3 application involves BTS receiving the order data from the MSMQ queue into which it was placed at the end of the first step. You must configure a BTS MSMQ receive function to monitor the MSMQ queue to which the XML order was sent in the previous step. This receive function forwards the XML message to the configured BTS channel for transformation.
  3. The third step in sending order data to the SAP/R3 application involves BTS transforming the order data from Commerce Server Order XML v1.0 format into ORDERS01 IDOC format. A BTS channel must be configured to perform this transformation. After the transformation is complete, the BTS channel sends the resulting ORDERS01 IDOC message to the corresponding BTS messaging port. The BTS messaging port is configured to send the transformed message to an MSMQ queue called the 840 Queue. Once the message is placed in this queue, the BizTalk Adapter for SAP is responsible for further processing. 
  4. BizTalk Adapter for SAP sends the ORDERS01document to the DCOM Connector (Get more information on DCOM Connector from www.sap.com/bapi), which writes the order to the SAP/R3 application. The DCOM Connector is an SAP software product that provides a mechanism to send data to, and receive data from, an SAP system. When an IDOC message is placed in the 840 Queue, the DOM Connector retrieves the message and sends it to SAP for processing. Although this processing is in the domain of the BizTalk Adapter for SAP, the steps involved are reviewed here as background information:
    • Determine the version of the IDOC schema in use and generate a BizTalk Server document specification.
    • Create a routing key from the contents of the Control Record of the IDOC schema.
    • Request a SAP Destination from the Manager Data Store given the constructed routing key.
    • Submit the IDOC message to the SAP System using the DCOM Connector 4.6D Submit functionality.

Order Status Update Integration

Order status update integration can be achieved by providing a mechanism for sending information about updates made within the SAP/R3 application back to the Commerce Server order system.

The following sequence of steps describes such a mechanism:

  1. BizTalk Adapter for SAP processing:
    After a user has updated a purchase order using the SAP client, and the IDOC has been submitted to the appropriate tRFC port, the BizTalk Adapter for SAP uses the DCOM connector to send the resulting information to the 840 Queue, packaged as an ORDERS01 IDOC message. The 840 Queue is an MSMQ queue into which the BizTalk Adapter for SAP places IDOC messages so that they can be retrieved and processed by interested parties. This process is within the domain of the BizTalk Adapter for SAP, and is used by this solution to achieve the order update integration.
  2. Receiving the ORDERS01 IDOC message from MSMQ:
    The second step in updating order status from the SAP/R3 application involves BTS receiving ORDERS01 IDOC message from the MSMQ queue (840 Queue) into which it was placed at the end of the first step. You must configure a BTS MSMQ receive function to monitor the 840 Queue into which the XML order status message was placed. This receive function must be configured to forward the XML message to the configured BTS channel for transformation.
  3. Transforming the order update from IDOC format:
    Using a BTS MSMQ receive function, the document is retrieved and passed to a BTS transformation channel. The BTS channel transforms the ORDERS01 IDOC message into Commerce Server Order XML v1.0 format, and then forwards it to the corresponding BTS messaging port. You must configure a BTS channel to perform this transformation.The following BizTalk Server (BTS) map demonstrates in the prototyping of this solution for transforming an SAP ORDERS01 IDOC message into an XML document in Commerce Server Order XML v1.0 format. It allows a change to an order in the SAP/R3 application to be reflected in the Commerce Server orders database.

    This map used in the prototype only maps the order ID, demonstrating how the order in the SAP/R3 application can be synchronized with the order in the Commerce Server orders database. The mapping of other fields is specific to a particular implementation, and was not done for the prototype.

< xsl:stylesheet xmlns:xsl='http://www.w3.org/1999/XSL/Transform' 
xmlns:msxsl='urn:schemas-microsoft-com:xslt' xmlns:var='urn:var' 
xmlns:user='urn:user' exclude-result-prefixes='msxsl var user' 
version='1.0'>
< xsl:output method='xml' omit-xml-declaration='yes' />
< xsl:template match='/'>
< xsl:apply-templates select='ORDERS01'/>
< /xsl:template>
< xsl:template match='ORDERS01'>
< orderform>

'Connection from source node "BELNR" to destination node "OrderID"

< xsl:if test='E2EDK02/@BELNR'>
< xsl:attribute name='OrderID'>
; < xsl:value-of select='E2EDK02/@BELNR'/>
< /xsl:attribute>
< /xsl:if>
< /orderform>
< /xsl:template>
< /xsl:stylesheet>

The BTS message port posts the transformed order update document to the configured ASP page for further processing. The configured ASP page retrieves the message posted to it and uses the Commerce Server OrderGroupManager and OrderGroup objects to update the order status information in the Commerce Server orders database.

  • Updating the Commerce Server order system:
    The fourth step in updating order status from the SAP/R3 application involves updating the Commerce Server order system to reflect the change in status. This is accomplished by adding the page _OrderStatusUpdate.asp to the AFS Solution Site and configuring the BTS messaging port to post the transformed XML document to that page. The update is performed using the Commerce Server OrderGroupManager and OrderGroup objects.
  •  

    The routine ProcessOrderStatus is the primary routine in the page. It uses the DOM and XPath to extract enough information to find the appropriate order using the OrderGroupManager object. Once the correct order is located, it is loaded into an OrderGroup object so that any of the entries in the OrderGroup object can be updated as needed.

    The following code implements page _OrderStatusUpdate.asp:

    < %@ Language="VBScript" %>
    
    < % 
    const TEMPORARY_FOLDER = 2
    
    call Main()
    
    Sub Main()
    call ProcessOrderStatus( ParseRequestForm() )
    End Sub
    
    Sub ProcessOrderStatus(sDocument)
    
    Dim oOrderGroupMgr 
    Dim oOrderGroup 
    Dim rs
    Dim sPONum
    Dim oAttr 
    Dim vResult
    Dim vTracking 
    Dim oXML
    Dim dictConfig
    Dim oElement
    
    Set oOrderGroupMgr = Server.CreateObject("CS_Req.OrderGroupManager")
    Set oOrderGroup = Server.CreateObject("CS_Req.OrderGroup")
    
    Set oXML = Server.CreateObject("MSXML.DOMDocument")
    oXML.async = False
    
    If oXML.loadXML (sDocument) Then
    
    ' Get the orderform element.
    Set oElement = oXML.selectSingleNode("/orderform")
    
    ' Get the poNum.
    sPONum = oElement.getAttribute("OrderID")
    
    Set dictConfig = Application("MSCSAppConfig").GetOptionsDictionary("")
    
    ' Use ordergroupmgr to find the order by OrderID.
    oOrderGroupMgr.Initialize (dictConfig.s_CatalogConnectionString)
    Set rs = oOrderGroupMgr.Find(Array("order_requisition_number='" sPONum & "'"), _
        Array(""), Array(""))
    
    If rs.EOF And rs.BOF Then
    'Create a new one. - Not implemented in this version.
    Else
    ' Edit the current one.
    oOrderGroup.Initialize dictConfig.s_CatalogConnectionString, rs("User_ID")
    
    ' Load the found order.
    oOrderGroup.LoadOrder rs("ordergroup_id")
    
    ' For the purposes of prototype, we only update the status
    oOrderGroup.Value.order_status_code = 2 ' 2 = Saved order
    
    ' Save it
    vResult = oOrderGroup.SaveAsOrder(vTracking)
    
    End If
    Else
    WriteError "Unable to load received XML into DOM."
    End If
    
    End Sub Function ParseRequestForm()
    
    Dim PostedDocument
    Dim ContentType
    Dim CharSet
    Dim EntityBody
    Dim Stream
    Dim StartPos
    Dim EndPos
    
    ContentType = Request.ServerVariables( "CONTENT_TYPE" )
    
    ' Determine request entity body character set (default to us-ascii).
    CharSet = "us-ascii"
    StartPos = InStr( 1, ContentType, "CharSet=""", 1)
    If (StartPos > 0 ) then
    StartPos = StartPos + Len("CharSet=""")
    EndPos = InStr( StartPos, ContentType, """",1 )
    CharSet = Mid (ContentType, StartPos, EndPos - StartPos )
    End If
    
    ' Check for multipart MIME message.
    PostedDocument = ""
    
    if ( ContentType = "" or Request.TotalBytes = 0) then
    
    ' Content-Type is required as well as an entity body.
    Response.Status = "406 Not Acceptable"
    Response.Write "Content-type or Entity body is missing" & VbCrlf
    Response.Write "Message headers follow below:" & VbCrlf
    Response.Write Request.ServerVariables("ALL_RAW") & VbCrlf
    Response.End
    Else
    If ( InStr( 1,ContentType,"multipart/" ) >

    .NET Support

    This Multi-Tier Application Environment can be implemented successfully with the help of Web portal which utilizes the Microsoft .NET Enterprise Server model. The Microsoft BizTalk Server Toolkit for Microsoft .NET provides the ability to leverage the power of XML Web services and Visual Studio .NET to build dynamic, transaction-based, fault-tolerant systems with full access to existing applications.

    Summary

    Microsoft BizTalk Server can help organizations quickly establish and manage Internet relationships with other organizations. It makes it possible for them to automate document interchange with any other organization, regardless of the conversion requirements and data formats used. This provides a cost-effective approach for integrating business processes across large Enterprises Resource Planning Systems. Integration process designed to facilitate collaborative e-commerce business processes. The process includes a document interchange engine, a business process execution engine, and a set of business document and server management tools. In addition, a business document editor and mapper tools are provided for managing trading partner relationships, administering server clusters, and tracking transactions.

    References

    All my Web Parts and Apps are now making use of Knockout.JS !! Template also available at very low price!!

    After completing the development of my latest Web Part, the “List Search” Web Part I decided to update all my Web Parts and Apps to using Knockout.JS, starting with the “List Search” Web Part.

    This topic came up when we I looked at some of my older products that includes generic list and library web parts, that would display few common fields like ID, Title, Description, File Url etc. Prior to this request we solved similar issues with OOB list and library web parts with custom XSLT, by creating Visual Studio web part for branding purposes only, or by using Imtech content query web part( which is XSLT solution by design).

    At the end, clients hated XSLT solutions and I hated to create new web part for every new list or library. That’s where Knockout popped. Why don’t we use Knockout for templates instead XSLT.

    I’ll assume that whoever reads this article knows about creating a web part for SharePoint, SharePoint module, java script and html and I will not go into details.

    Background

    A bit about Knockout

    From Knockout web site: “Knockout is a JavaScript library that helps you to create rich, responsive display and editor user interfaces with a clean underlying data model. “

    From Wikipedia:

    Knockout is a standalone JavaScript implementation of the Model-View-ViewModel pattern with templates. The underlying principles are therefore:

    • a clear separation between domain data, view components and data to be displayed
    • the presence of a clearly defined layer of specialized code to manage the relationships between the view components

    Knockout includes the following features:

    • Declarative bindings
    • Automatic UI refresh (when the data model’s state changes, the UI updates automatically)
    • Dependency tracking
    • Templating (using a native template engine although other templating engines can be used, such as jquery.tmpl)

    So what’s the deal?

    First you have your view model:

     var myViewModel = {
         personName: 'Bob',
         personAge: 123
    };

    Then you have a view:

    The name is <span data-bind="text:personName"></span>

    At the end just bind your view to model

     ko.applyBindings(myViewModel);

    We’ll talk about model later.

    Using the code

    Proof of concept

    I’ve created an html mock of our web part. This is useful, because we can prepare java scripts, css files, models and views in advance and test it without SharePoint and visual studio.

    You can download proof of concept as separate download from the link above.

    References

    There would be only two file references.

    One is knockout library itself

    <script type='text/javascript' src="http://knockoutjs.com/downloads/knockout-3.0.0.js"></script>

    and the other is css file I’ve added to this project

    <link href="css/controls.css" rel="stylesheet" type="text/css" />

    Model 

    I’ve designed model as Item class. Here it is:

    // Item class definition
    var Item = function (id, title, datecreated,url,description,thumbnail) {
       this.id = id;
       this.title = title;
       this.datecreated = datecreated;
       this.url=url;
       this.description=description;
       this.thumbnail=thumbnail;
    }

    It’s called item and it has 6 properties:

    1. id – ID of the item
    2. title – Title of the item
    3. datecreated – Creation date of the item
    4. url – Url of the item
    5. description – Description of the item
    6. thumbnail – Thumbnail of the item


    View model

    Here is the view model

    function viewModel1 (){
        var self = this;
        self.items =  [  
         new Item(2, 'News1 title','21.10.2013','javascript:OpenDialog(2);'
                   ,'Description News 1','img/pic1.jpg'), 
        new Item(1, 'News 2 title','21.02.2013','javascript:OpenDialog(1);',
                   'Description News 2','img/pic2.jpg')
    }

    View model has property items, which in fact is collection of Item objects. For mocking purposes we’ve added two Item objects in this collection (News 1 and News 2);


    View

    Here is the view:

    <div class="glwp glwp-central" id="k1">
      <div class="glwpLine"></div>
      <h5><img src="PublishingImages/siteIcon.png" 
              width="28" height="28" align="absmiddle" />
          News</h5>
      <div class="glwpLineGrey"></div>
        <ul data-bind="foreach:items">
          <li>
           <div class="glwpDate"><span data-bind="text: datecreated" ></span>
           <img class="glwpImage" data-bind="attr: { src: thumbnail }" />         
           </div>
           <div class="glwpText glwpText-central" >
            <a data-bind="attr: { href: url, title: title }" style="min-height:70px;">
             <span class="glwpTextTTL" data-bind="text:title"></span><br />
             <span data-bind="text: description"></span>
            </a>
           </div>
           <div class="glwpSep"></div>
          </li>
        </ul>
    </div>

    What we have here:

    It’s pretty simple. We haveunordered list bound to our model. One

    • element would be created for every item of our items collection (data-bind=”foreach: items”).


    Property binding: 

    •  datecreated">< /span> – This is the simplest data binding. It would write datecreated property of Item object to text of span element (like: <span>11/11/2013</span>)
    • <img class="glwpImage" data-bind="attr: { src: thumbnail }" />. This is a bit more complicated binding. It would take thumbnail property of item object and write it to src attribute of img element.
    • 70px;">. It would take url property and write it as href attribute of the a element, and title property as title attribute.
    • <span class="glwpTextTTL" data-bind="text:title"></span>. Title property would be written as text of span element
    • <span data-bind="text: description"></span>. Description property would be written as text of span element

    So anyone with little knowledge of html and css can customize this template anyway (s)he likes, as long as (s)he provides required properties.


    Binding

    ko.applyBindings(viewModel1,document.getElementById('k1'));

    Note second parameter in applyBindings method. It says document.getElementById('k1'). Same id is on the first div in our view (k1″>). This is helpful if you want to have more than one view model in one page. It tells knockout to bind this specific model (viewModel1) to specific template on our page (k1).


    What we have from this? We are going to create web part from this code and one of the web part features is that you can put same web part several times on the same page. So it would be possible to put one web part in SharePoint page to display news and one web part to display projects or documents. And they will coexist together.

    If you look at the source you will notice that we have 2 view models (viewModel1 and viewModel2) and two templates (k1 and k2), and two bindings of course. One binding is for news (with images and description) and one binding is for files (no images, and no descriptions). Templates are slightly different.

    Final result

    Here is the final result

    SharePoint Part

    As I said I will assume that you have some experience with SharePoint development so I will not explain how to create the project and add project items. Project type is standard Visual Studio 2010 SharePoint Empty Project template.

    SharePoint part consists of following items:

    • Web part item – KnockoutWp. Standard SharePoint Visual Web part project Item
    • Assets module. SharePoint module project item. We are going to use it for deploying of images and css files (0.png – empty container for images and controls.css – css file for our projects).
    • Layouts mapped folder. We’ll put here editor page for template.

    And here is the solution explorer for project:

    Assets

    We are going to deploy 2 files:

    • 0.png – 1×1 pixel transparent image aka placeholder
    • Controls.css – css file for our template

    Both of these items are going to be deployed to Style Library of the SharePoint site collection, so content editors may change it later without need of solution redeployment.

    Here is the elements.xml file:

    So our assets will end to http://oursitecollectionurl/Style Library/wp folder.

    KnockoutWp

    This is Visual Studio 2010 Visual Web part.

    It is consisted of 4 items:

    • KnockoutWp.cs – web part class
    • KnockoutWpUserControl – User control of our web part
    • KnockoutWp.webpart – web part xml file
    • Elements.xml – manifest file

    Properties

    Web part has following properties:

    • ListUrl (string, required) – url of the list we are displaying.
    • TitleField (string, optional) – display name of the field that would be displayed as Title. If it’s blank Title field would be used.
    • DateField (string, optional) – display name of the field that would be displayed as date. If it’s blank Created field would be used.
    • DescriptionField (string, optional) – display name of the field that would be displayed as Description. If it’s blank it would be omitted.
    • ImageField (string, optional) – display name of the field that would be displayed as Thumbnail picture. If it’s blank it would be omitted.
    • NoOfItems (int) – how many items from the list would be displayed
    • ItemTemplate (string) – html template of the web part. Defines the look of our web part.
    • WpPosition (enum) – Used for a three column layouts. Web part has styles for three zones: right, central and left. Difference is in width, padding and margin. Everything is set in css so you can accommodate it to your environment.

    On picture below you can see mapping between Field properties of web part and list item fields.


    EditorPart

    I’ve added one more thing to this web part it’s EditorPart class GenericListPartEditorPart. I’m not going into deep with editor parts, but here is quick info. When you create public property for a web part it is automatically displayed in web part edit panel.

    And it is great concept when you need simple properties as strings, numbers and short lists. If you want more complicated scenario (as we want here for our web part) it’s not enough.

    What I wanted here is template editor. It could be reasonably large so idea was to have a button in web part edit panel that would open large dialog window with editor. User would work with our template, click Apply and change ItemTemplate web part property.

    Template editor KnockoutWpUserControl

    This is user control created by Visual Studio, when we added Visual web part project item to the project. It consists of markup ascx file and code behind .ascx.cs file. We will put our markup and our c# code here.

    Markup

    Here is the complete markup:

    <script type='text/javascript' src="http://knockoutjs.com/downloads/knockout-3.0.0.js">
    </script>
    <style type="text/css">  @import url("/Style
    Library/wp/controls.css");  </style>  
    <div class="glwp glwp-<%=PositionClass %>" id="k<%=WpId %>">
      <div class="glwpLine"></div>      
      <h5><img src="<%=Icon %>" width="28" 
        height="28" align="absmiddle"><%=Title %></h5>
        <div class="glwpLineGrey"></div>      
      <asp:Literal ID="LitLayout" runat="server"></asp:Literal>
    </div>  
    
    <script type="text/javascript">    
      function OpenDialog(Url) {
        var options = SP.UI.$create_DialogOptions();        
        options.resizable = 1;        
        options.scroll = 1;        
        options.url = Url;
        SP.UI.ModalDialog.showModalDialog(options);    
    }         
    // Item class         
      var Item = function (id, title, datecreated,url,description,thumbnail) {            
         this.id = id;            
         this.title = title;
         this.datecreated = datecreated;
         this.url=url;
         this.description=description;
         this.thumbnail=thumbnail;
      }         
     //ViewModel goes here (It's created on server)        
     runat="server" ID="LitItems"></asp:Literal>
     
    //Function that opens Template editor. Used only in edit mode of web part       
     function portal_openTemplateEditor(wpid) {       
      var val="";              
      var options = SP.UI.$create_DialogOptions();              
      options.width = 600;             
      options.height = 500;                
      options.url = "/_layouts/KnockoutTemplate/TemplateEditor.aspx?c="+wpid;//"";
      options.dialogReturnValueCallback =
               Function.createDelegate(null,portal_openTemplateEditorClosedCallback);
      SP.UI.ModalDialog.showModalDialog(options);
    }
    </script>

    First Section, of the markup (picture below) has script (knockout, on the remote server) and style references (controls.css in local Document library). Below is html markup that defines the container of the web part (top and bottom borders, width, icon and title). Markup is not the cleanest because I was little lazy and left some public properties in it. Note< %=PositionClass%>, <%=WpId%> and so on.

    There are all public properties of the user control and they are used for presentation:

    • PositionClass – depending on WpPosition web part property (right, central or left) adds appropriate css class to markup and that way defines width, padding and margin of web part WpId is guid of the web part. It is used to uniquely identify the web part, because we can put several web parts of the same type and everything would crush without this identificator.
    • Icon – is a url to icon that would be displayed on web part. Web part property Title Icon Image URL is used here (this is OOB property)
    • Title –title text of the web part. Text that was entered in the title area of the web part. Web part property Title is used here (this is OOB property)

    Last interesting thing here is Literal control LitLayout. This control would hold our ItemTemplate property (html template of our web part).

    Second section, is a java script function that opens list item in a dialog window. It is used when underlying list is not document library.

    Third section consists of knockout view model (java script). Item class definition is self-explanatory (defines 6 properties only). The rest of the model is created on the server side so now there is only LitItems Literal control there.

    Fourth section is just a java script function that is used when editing web part properties. This function opens template editor in dialog window.

    Code

    Properties:

    • Properties from web part
      • Icon – url to the icon
      • Title – title of the web part
      • ListUrl – url to the list
      • TitleField – Title field in the list
      • DateField – Date field in the list
      • ImageField – Image field in the list
      • DescriptionField – Description field in the list
      • NoOfItems – number of items to return
      • Position – position of the web part (right, left or central)
      • ItemTemplate – html template of the web part
      • WpId – guid id of the web part ·
    • UC’s properties
      • PositionClass – css class based on position
      • ColumnMap – dictionary that holds internal names of the list item fields.

    Methods: File has only one method Page_Load. Code is executing with elevated privileges.

    In that method we:

    1. Resolve list by the supplied URL (ListUrl property) SPList annList = annWeb.GetList(ListUrl);
    2. Get internal names of the list columns by their Display names SpHelper.GetFieldsInternals(annWeb, annList.Title, TitleField, DateField, DescriptionField, ImageField, columnMap );
    3. Create CAML Query SpHelper.GetGenericQuery(annList, q, NoOfItems);
    4. Execute it
    5. Iterate over SPListItemCollection (coll) and create required JavaScript
    Helper class

    SPHelper is helper class and you can find it in Helpers directory.

    It has 3 responsibilities:

    1. To retrieve List Columns Internal names based on supplied List Columns display names (WP properties – TitleField – Title field, DateField, ImageField , DescriptionField ) – GetFieldsInternals method
    2. To create Caml query for retrieving list items – GetGenericQuery method
    3. To retrieve values from SharePoint columns based on their types – GetFieldValue method


    SAP Weekend : Part 1 – ERPConnect Services for SharePoint 2010 (ECS)

    This weekend was spent completing my new “List Search Web Part” and also 2 Free Web Parts that is included in the “List Web Part Pack” – More about this in my future blog.

    erp256-bc0e84ce

    In between the “SAP Bug” bit me again and I decided to write a  blog post series on the various adapters I have used in SharePoint and SAP Integration Projects and to give you a basic “run down” of how and with which technologies each adapter connects the 2 systems with.

    ERPConnect was 1st on the list. ….


    Yes, I can hear the grumblings of those of us who have worked with SAP and SharePoint  Integration and the ERPConnect adapter before 🙂

    For starters, you need to have a SAP Developer Key to be allowed to use the SAP web service wizard, and also have the required SAP authorizations. In other cases it may not be allowed by IT operations to make any modification to the SAP environment, even if it’s limited to the full-automatic generation and activation of the BAPI webservice(s).

    Another reason from a system architecture viewpoint, is that the single BAPI and/or RFC calls may be of too low granularity. You actually want to perform a ‘business transaction’, consisting of multiple method invocations which must be treated as a Logical Unit of Work (LUW). SAP has introduced the concept of SAP Enterprise Services for this, and has delivered a first set of them. This is by far not complete yet, and SAP will augment it the coming years.

    SharePoint 2010 provides developer with the capability to integrate external data sources like SAP business data via the Business Connectivity Services (BCS) into the SharePoint system. The concept of BCS is based on entities and associated stereotyped operations. This perfectly suits for flat and simple structured data sets like SAP tables.

    Another and way more flexible option to use SAP data in SharePoint are the ERPConnect Services for SharePoint 2010 (ECS). The product suite consists of three product components: ERPConnect Services runtime, the BCS Connector application and the Xtract PPS for PerformancePoint Services.

    The runtime is providing a Service Application that integrates itself with the new service architecture of SharePoint 2010. The runtime offers a secure middle-tier layer to integrate different kind of SAP objects in your SharePoint applications, like tables and function modules.

    The BCS Connector application allows developers to create BDC models for the BCS Services, without programming knowledge. You may export the BDC models created by the BCS Connector to Visual Studio 2010 for further customizing.


    The Xtract PPS component offers a SAP data source provider for the PerformancePoint Services of SharePoint 2010. T

    his article gives you an overview of the ERPConnect Services runtime and shows how you can create and incorporate business data from SAP in different SharePoint application types, like Web Parts, Application Pages or Silverlight modules.

    This article does not introduce the other components.

    Background

    This section will give you a short explanation and background of SAP objects that can be used in ERPConnect Services. The most important objects are SAP tables and function modules. A function module is basically similar to a normal procedure in conventional programming languages. Function modules are written in ABAP, the SAP programming language, and are accessible from any other programs within a SAP system. They accept import and export parameters as well as other kind of special parameters.


    In addition, BAPIs (Business-API) are special function modules that are organized within the SAP Business Object Repository. In order to use function modules with the runtime they must be marked as Remote (RFC). SAP table data can also be retrieved. Tables in SAP are basically relational database tables. Others SAP objects like BW Cubes or SAP Queries can be accessed via the XtractQL query language (see below).


    Installation & Configuration

    Installing ERPConnect Services on a SharePoint 2010 server is done by an installer and is straight forward. The SharePoint Administration Service must run on the local server (see Windows Services).

    For more information see product documentation. After the installation has been successfully processed navigate to the Service Applications screen within the central administration (CA) of SharePoint:


    Before creating your first Service Application a Secure Store must be created, where ERPConnect Services will save SAP user credentials. In the settings page for the “Secure Store Service” create a new Target Application and name the application “ERPConnect Services”. Click on the button “Next” to define the store fields as follows:


    Finish the creation process by clicking on “Next” and define application administrators. Then, mark the application, click “Set Credentials” and enter the SAP user credentials:


    Let’s go on and create a new ERPConnect Service Application!

    Click the “ERPConnect Service Application” link in the “New” menu of the Service Applications page (see also first screenshot above). This opens a dialog to define the name of the service application, the SAP connection data and the IIS application pool:


    Click “Create” after entering all data and you will see the following entries in the Service Applications screen:


    That’s it! You are now done setting up your first ERPConnect Service Application.

    Development

    The runtime functionality covers different programming demands such as generically retrievable interface functions. The service applications are managed by the Central Administration of SharePoint. The following service and function areas are provided:

    1. Executing and retrieving data directly from SAP tables
    2. Executing SAP function modules / BAPIs
    3. Executing XtractQL query statements

    The next sections shows how to use these service and function areas and access different SAP objects from within your custom SharePoint applications using the ERPConnect Services. The runtime can be used in applications within the SharePoint context like Web Parts or Application Pages.

    In order to do so, you need to reference the assembly i in the project. Before you can access data from the SAP system you must create an instance of the ERPConnectServiceClient class. This is the gate to all SAP objects and the generic API of the runtime in overall. In the SharePoint context there are two options to create a client object instance:

    // Option #1
    ERPConnectServiceClient client = new ERPConnectServiceClient();
    
    // Option #2
    ERPConnectServiceApplicationProxy proxy = SPServiceContext.Current.GetDefaultProxy(
       typeof(ERPConnectServiceApplicationProxy)) as ERPConnectServiceApplicationProxy;
    ERPConnectServiceClient client = proxy.GetClient();

    For more details on using ECS in Silverlight or desktop applications see the specific sections below.

    Querying Tables

    Querying and retrieving table data is a common task for developers. The runtime allows retrieving data directly from SAP tables. The ERPConnectServiceClient class provides a method called ExecuteTableQuery with two overrides which query SAP tables in a simple way.

    The method also supports a way to pass miscellaneous parameters like row count and skip, custom function, where clause definition and a returning field list. These parameters can be defined by using the ExecuteTableQuerySettings class instance.

    DataTable dt = client.ExecuteTableQuery("T001");
    
    …
        
    ExecuteTableQuerySettings settings = new ExecuteTableQuerySettings {
      RowCount = 100,
      WhereClause = "ORT01 = 'Paris' AND LAND1 = 'FR'",
      Fields = new ERPCollection<string> { "BUKRS", "BUTXT", "ORT01", "LAND1" }
    };
    
    DataTable dt = client.ExecuteTableQuery("T001", settings);
    
    …
    
    // Sample 2
    DataTable dt = client.ExecuteTableQuery("MAKT",
                new ExecuteTableQuerySettings {
                    RowCount = 10,
                    WhereClause = "MATNR = '60-100C'",
                    OrderClause = "SPRAS DESC"
                });

    The first query reads all records from the SAP table T001 where the fields ORT01 equals Paris and LAND1 equals FR (France). The query returns the top 100 records and the result set contains only the fields BUKRS, BUTXT, ORT01 and LAND1.

    The second query returns the top ten records of the SAP table MAKT, where the field MATNR equals the material number 60-100C. The result set is ordered by the field SPRAS.

    Executing Function Modules

    In addition to query SAP tables the runtime API executes SAP function modules (BAPIs). Function modules must be marked as remote-enabled modules (RFC) within SAP.

    The ERPConnectServiceClient class provides a method called CreateFunction to create a structure of metadata for the function module. The method returns an instance of the data structure ERPFunction. This object instance contains all parameters types (import, export, changing and tables) that can be used with function modules.

    In the sample below we call the function SD_RFC_CUSTOMER_GET and pass a name pattern (T*) for the export parameter with name NAME1. Then we call the Execute method on the ERPFunction instance. Once the method has been executed the data structure is updated. The function returns all customers in the table CUSTOMER_T.

    ERPFunction function = client.CreateFunction("SD_RFC_CUSTOMER_GET");
    function.Exports["NAME1"].ParamValue = "T*";
    function.Execute();
    
    foreach(ERPStructure row in function.Tables["CUSTOMER_T"])
      Console.WriteLine(row["NAME1"] + ", " + row["ORT01"]);

    The following code shows an additional sample. Before we can execute this function module we need to define a table with HR data as input parameter.

    The parameters you need and what values the function module is returning dependents on the implementation of the function module

    ERPFunction function = client.CreateFunction("BAPI_CATIMESHEETMGR_INSERT");
    function.Exports["PROFILE"].ParamValue = "TEST";
    function.Exports["TESTRUN"].ParamValue = "X";
    
    ERPTable records = function.Tables["CATSRECORDS_IN"];
    ERPStructure r1 = records.AddRow();
    r1["EMPLOYEENUMBER"] = "100096";
    r1["WORKDATE"] = "20110704";
    r1["ABS_ATT_TYPE"] = "0001";
    r1["CATSHOURS"] = (decimal)8.0;
    r1["UNIT"] = "H";
    
    function.Execute();
    
    ERPTable ret = function.Tables["RETURN"]; 
    
    foreach(var i in ret)
      Console.WriteLine("{0} - {1}", i["TYPE"], i["MESSAGE"]);

    Executing XtractQL Query Statements

    The ECS runtime is offering a SAP query language called XtractQL. The XtractQL query language, also known as XQL, consists of ABAP and SQL syntax elements. XtractQL allows querying SAP tables, BW-Cubes, SAP Queries and executing function modules.

    It’s possible to return metadata for the objects and MDX statements can also be executed with XQL. All XQL queries are returning a data table object as result set. In case of the execution of function modules the caller must define the returning table (see sample below – INTO @RETVAL). XQL is very useful in situations where you need to handle dynamic statements. The following list shows a

    SELECT TOP 5 * FROM T001W WHERE FABKL = 'US'

    This query selects the top 5 records of the SAP table T001W where the field FABKL equals the value US.

    SELECT * FROM MARA WITH-OPTIONS(CUSTOMFUNCTIONNAME = 'Z_XTRACT_IS_TABLE')


    SELECT MAKTX AS [ShortDesc], MANDT, SPRAS AS Language FROM MAKT

    This query selects all records of the SAP table MAKT. The result set will contains three fields named ShortDesc, MANDT and Language.


    EXECUTE FUNCTION 'SD_RFC_CUSTOMER_GET'
       EXPORTS KUNNR='0000003340'
       TABLES CUSTOMER_T INTO @RETVAL;

    This query executes the SAP function module SD_RFC_CUSTOMER_GET and returns as result the table CUSTOMER_T (defined as @RETVAL).

    DESCRIBE FUNCTION 'SD_RFC_CUSTOMER_GET' GET EXPORTS

    This query returns metadata about the export parameters of the

    SELECT TOP 30 LIPS-LFIMG, LIPS-MATNR, TEXT_LIKP_KUNNR AS CustomerID
       FROM QUERY 'S|ZTHEO02|ZLIKP'
       WHERE SP$00002 BT '0080011000'AND '0080011999'

    This statement executes the SAP Query “S|ZTHEO02|ZLIKP” (name includes the workspace, user group and the query name). As you can see XtractQL extends the SQL syntax with ABAP or SAP specific syntax elements. This way you can define fields using the LIPS-MATNR format and SAP-like where clauses like “SP$00002 BT ‘0080011000’AND ‘0080011999’”.

    ERPConnect Services provides a little helper tool, the XtractQL Explorer (see screenshot below), to learn more about the query language and to test XQL queries. You can use this tool independent of SharePoint, but you need access to a SAP system.

    To find out more about all XtractQL language syntax see the product manual.

    Silverlight And Desktop Applications

    So far all samples are using the assembly ERPConnectServices.Server.Common.dll as project reference and all code snippets shown run within the SharePoint context, e.g. Web Part.

    ERPConnect Services also provides client libraries for Silverlight and desktop applications:

    ERPConnectServices.Client.dll for Desktop applications
    ERPConnectServices.Client.Silverlight.dll for Silverlight applications

    You need to add the references depending what project you are implementing.

    In Silverlight the implementation and design pattern is a little bit more complicated, since all web services will be called in asynchronously. It’s also not possible to use the DataTable class. It’s just not implemented for Silverlight.

    The runtime provides a similar class called ERPDataTable, which is used in this cases by the API. The ERPConnectServiceClient class for Silverlight provides the method ExecuteTableQueryAsync and an event called ExecuteTableQueryCompleted as callback delegate.

    public event EventHandler<ExecuteTableQueryCompletedEventArgs> ExecuteTableQueryCompleted;
    
    public void ExecuteTableQueryAsync(string tableName)
    public void ExecuteTableQueryAsync(string tableName, ExecuteTableQuerySettings settings)

    The following code sample shows a simple query of the SAP table T001 within a Silverlight client.

    First of all, an instance of the ERPConnectServiceClient is created using the URI of the ERPConnectService.svc, then a delegate is defined to handle the complete callback. Next, the query is executed, defined with a RowCount equal 10 to only return the top 10 records in the result set.

    Once the result is returned the data set will be attached to a DataGrid control (see screenshot below) within the callback method.


    void OnGetTableDataButtonClick(object sender, RoutedEventArgs e)
    {
      ERPConnectServiceClient client = new ERPConnectServiceClient(
        new Uri("http://<SERVERNAME>/_vti_bin/ERPConnectService.svc"));
    
      client.ExecuteTableQueryCompleted += OnExecuteTableQueryCompleted;
      client.ExecuteTableQueryAsync("T001", 
        new ExecuteTableQuerySettings { RowCount = 150 });
    }
    
    void OnExecuteTableQueryCompleted(object sender, ExecuteTableQueryCompletedEventArgs e)
    {
      if(e.Error != null)
        MessageBox.Show(e.Error.Message);
      else
      {
        e.Table.View.GroupDescriptions.Add(new PropertyGroupDescription("ORT01"));
        TableGrid.ItemsSource = e.Table.View;
      }
    }

    The screenshot below shows the XAML of the Silverlight page:

    The final result can be seen below:

    ECS Designer

    ERPConnect Services includes a Visual Studio 2010 plugin, the ECS Designer, that allows developer to visually design SAP interfaces. It’s working similar to the LINQ to SAP Designer I have written about a while ago, see article at CodeProject: LINQ to SAP.

    The ECS Designer is not automatically installed once you install the product. You need to call the installation program manually. The setup adds a new project item type to Visual Studio 2010 with the file extension .ecs and is linking it with the designer. The needed references are added automatically after adding an ECS project item.

    The designer generates source code to integrate with the ERPConnect Services runtime after the project item is saved. The generated context class contains methods and sub-classes that represent the defined SAP objects (see screenshots below).


    Before you access the SAP system for the first time you will be asked to enter the connection data. You may also load the connection data from SharePoint system. The designer GUI is shown in the screenshots below:


    The screenshot above for instance shows the tables dialog. After clicking the Add (+) button in the main designer screen and searching a SAP table in the search dialog, the designer opens the tables dialog.


    In this dialog you can change the name of the generated class, the class modifier and all needed properties (fields) the final class should contain.


    To preview your selection press the Preview button. The next screenshot shows the automatically generated classes in the file named EC1.Designer.cs:


    Using the generated code is simple. The project type we are using for this sample is a standard console application, therefore the designer is referencing the ERPConnectServices.Client.dll for desktop applications.

    Since we are not within the SharePoint context, we have to define the URI of the SharePoint system by passing this value into the constructor of the ERPConnectServicesContext class.

    The designer has generated class MAKT and an access property MAKTList for the context class of the table MAKT. The type of this property MAKTList is ERPTableQuery<MAKT>, which is a LINQ queryable data type.


    This means you can use LINQ statements to define the underlying query. Internally, the ERPTableQuery<T> type will translate your LINQ query into call of ExecuteTableQuery.


    That’s it!


    Advanced Techniques

    There are situations when you have to use the exact same SAP connection while calling a series of function modules in order to receive the correct result. Let’s take the following code:

    ERPConnectServiceClient client = new ERPConnectServiceClient();
    
    using(client.BeginConnectionScope())
    {
      ERPFunction f = client.CreateFunction("BAPI_GOODSMVT_CREATE");
    
      ERPStructure s = f.Exports["GOODSMVT_HEADER"].ToStructure();
      s["PSTNG_DATE"] = "20110609"; // Posting Date in the Document
      s["PR_UNAME"] = "BAEURLE";    // UserName
      s["HEADER_TXT"] = "XXX";      // HeaderText
      s["DOC_DATE"] = "20110609";   // Document Date in Document
    
      f.Exports["GOODSMVT_CODE"].ToStructure()["GM_CODE"] = "01";
    
      ERPStructure r = f.Tables["GOODSMVT_ITEM"].AddRow();
      r["PLANT"] = "1000";          // Plant
      r["PO_NUMBER"] = "4500017210"; // Purchase Order Number
      r["PO_ITEM"] = "010";      // Item Number of Purchasing Document 
      r["ENTRY_QNT"] = 1;          // Quantity in Unit of Entry
      r["MOVE_TYPE"] = "101";        // Movement Type
      r["MVT_IND"] = "B";            // Movement Indicator
      r["STGE_LOC"] = "0001";        // Storage Location
    
      f.Execute();
    
      string matDocument = f.Imports["MATERIALDOCUMENT"].ParamValue as string;
      string matDocumentYear = f.Imports["MATDOCUMENTYEAR"].ParamValue as string;
    
      ERPTable ret = f.Tables["RETURN"]; //.ToADOTable();
    
      foreach(var i in ret)
        Console.WriteLine("{0} - {1}", i["TYPE"], i["MESSAGE"]);
    
      ERPFunction fCommit = client.CreateFunction("BAPI_TRANSACTION_COMMIT");
      fCommit.Exports["WAIT"].ParamValue = "X";
      fCommit.Execute();
    }

    In this sample we create a goods receipt for a goods movement with BAPI_GOODSMVT_CREATE. The final call to BAPI_TRANSACTION_COMMIT will only work, if the system under the hood is using the same connection object.


    The runtime is not providing direct access to the underlying SAP connection, but the library offers a mechanism called connection scoping. You may create a new connection scope with the client library and telling ECS to use the same SAP connection until you close the connection scope. Within the connection scope every library call will use the same SAP connection.

    In order to create a new connection scope you need to call the BeginConnectionScope method of the class ERPConnectServiceClient.

    The method returns an IDisposable object, which can be used in conjunction with the using statement of C# to end the connection scope.

    Alternatively, you may call the EndConnectionScope method. It’s also possible to use function modules with nested structures as parameters.

    This is a special construct of SAP. The goods receipt sample above is using a nested structure for the export parameter GOODSMVT_CODE. For more detailed information about nested structures and tables see the product documentation.

    SharePoint 2013 – Creating a Word document with OOXML

    This solution is based on the SharePoint-hosted app template provided by Visual Studio 2012. The solution enumerates through each document library in the host website, and adds the library to a drop-down list.

    2008040211105590dad[1]


    When the user selects a library and clicks a tile, the app creates a sample Word 2013 document by using OOXML in the selected library.

    Prerequisites

    This sample requires the following:

    • Visual Studio 2012
    • Office Developer Tools for Visual Studio 2012
    • Either of the following:
      • SharePoint Server 2013 configured to host apps, and with a Developer Site collection already created; or,
      • Access to an Office 365 Developer Site configured to host apps.

    Key components of the sample

    The sample app contains the following:

    • The Default.aspx webpage, which is used to enumerate through each document library in the host website, and render tiles for each MP4 video in the app.
    • The Point8020Metro.css style sheet (in the CSS folder) which contains some simple styles for rendering tiles.
    • The AppManifest.xml file, which has been edited to specify that the app requests Full Control permissions for the hosting web.
    • References to the DocumentFormat.OpenXml assembly provided by the OpenXML SDK 2.5.

    All other files are automatically provided by the Visual Studio project template for apps for SharePoint, and they have not been modified in the development of this sample.

    Configure the sample

    Follow these steps to configure the sample.

    1. Open the SP_Autohosted_OOXML_cs.sln file using Visual Studio 2012.
    2. In the Properties window, add the full URL to your SharePoint Server 2013 Developer Site collection or Office 365 Developer Site to the Site URL property.

    No other configuration is required.

    Build the sample

    To build the sample, press CTRL+SHIFT+B.

    Run and test the sample

    To run and test the sample, do the following:

    1. Press F5 to run the app.
    2. Sign in to your SharePoint Server 2013 Developer Site collection or Office 365 Developer Site if you are prompted to do so by the browser.
    3. Trust the app when you are prompted to do so.

    The following images illustrate the app. In Figure 1 the app has been trusted and libraries added to the drop-down list.

    Figure 1. View of the app with drop-down list

    Figure 1

    In Figure 2, the user has clicked the orange tile. The document is created and the red tile provides a link to the appropriate library (Figure 3), which the user reaches by clicking on the red tile.

    Figure 2. Open XML document creator

    Figure 2

    Figure 3. Document library

    Figure 3

    Troubleshooting

    Ensure that you have SharePoint Server 2013 configured to host apps (with a Developer Site Collection already created), or that you have signed up for an Office 365 Developer Site configured to host apps.

    Change log

    First release: January 30, 2013.

    Related content

    New Web Part released – List Search Web Part now available!!

    The List Search Web Part reads the entries from a Sharepoint List or Library (located anywhere in the site collection) and displays the selected user fields in a grid with an optional interactive search filter.

    It can be used for WSS3.0, MOSS 2007, Sharepoint 2010 and Sharepoint 2013.

     Imagea

    The following parameters can be configured:

    • Sharepoint Site
    • List Columns to be displayed
    • Filtering, Grouping, Searching, Paging and Sorting of rows
    • AZ Index
    • optional Header text

    Installation Instructions:

    1. download the List Search Web Part Installation Instructions
    2. either install the web part manually or deploy the feature to your server/farm as described in the instructions. 
    3. Security Note:
      if you get the following error message: “Only an administrator may enumerate through all user profiles“, you will need to grant the application pool account(s) for the web application(s) „Manage User Profiles” permissions within the User Profile Sevice (SSP in case of MOSS2007).  
      This ensures that the application pool is able to retrieve the list of user profiles. 
      To assign this permission, access your active “User Profile Service” (SP 2010 Server ) or the “Shared Services Provider” (MOSS2007) via Central Admin. 
      From the „User Profiles and My Sites” group, click “Personalization services permissions”.  
      Add the „Manage User Profiles” permission to  your application pool account(s).
    4. Configure the following Web Part properties in the Web Part Editor “Miscellaneous” pane section as needed:
      • Site Name: Enter the name of the site that contains the List or Library:
        – leave this field empty if the List is in the current site (eg. the Web Part is placed in the same site)
        – Enter a “/” character if the List is contained in the top site
        – Enter a path if the List in in a subsite of the current site (eg. in the form of “current site/subsite”)
      • List Name: Enter the name of the desired Sharepoint List or Library
        Example: Project Documents
      • View Name: Optionally enter the desired List View of the list specified above. A List View allows you to specify specific data filtering and sorting. 
        Leave this field empty if you want to use the List default view.
      • Field Template: Enter the List columns to be displayed (separated by semicolons).
        Pictures can be attached (via File Upload) to the Sharepoint List items and displayed using the symbolic “Picture” column name.
        If you want to allow users to edit their own entries, please add the symbolic “Username” column name to the Field Template. An “Edit” symbol will then displayed to allow the user to navigate to the corresponding Edit Form:Example:
        Type;Name;Title;Modified;Modified By;Created By

        Friendly Header Names:
        If you would like to display a “friendly header name” instead of the default property name please append it to the User property, separated by the “|” pipe symbol.

        Example:
        Picture;LastName|Last Name;FirstName;Department;Email|Email Address

        Hiding individual columns:
        You can hide a column by prefixing it with a “!” character. 
        The following example hides the “Department” column: 
        LastName;FirstName;!Department;WorkEmail

        Suppress Column wrapping:
        You can suppress the wrapping of text inside a column by prefixing it with a “^” character.
        LastName;FirstName;Department;^AboutMe

        Showing the E-Mail address as plain text:
        You can opt to display the plain e-mail address (instead of the envelope icon) by appending “/plain” to the WorkEmail column:
        LastName;WorkEmail/plain;Department

      • Group By: enter an optional User property to group the rows.
      • Sort By: enter the List column(s) to define the default sort order. You can add multiple properties separated by commas. Append “/desc” to sort the column descending.
        Examples:
        Department
        Department,LastName
        Lastname
        /desc

        The columns headings can be clicked by the users to manually define the sort order.
      • AZ Index Column: enter an optional List column to display the AZ filter in the list header. 
        If an “!” character is appended to the property name, the “A” index will be forced when visiting the page.
        Example: LastName! 

         
         Image  
      • Search Box: enter one or more List columns (separated by semicolons) to allow for interactive searching.Example: LastName;FirstName

        If you want to display a search filter as a dropdown combo, please enter it with a leading “@” character:
        LastName;FirstName;Department;@Office

        Friendly Search Box Labels:
        If you would like to display a “friendly label” instead of the default property name please append it to the User property, separated by the “|” pipe symbol.
        Example:
        WorkPhone|Office Phone;Office|Office Nbr


      • Align Search Filters vertically: allows you to align the seach input boxes vertically to save horizontal space:
      • Rows per page: the Staff Directory web part supports paging and lets you specify the desired number of rows per page. 
      • Image Height: specify the image height in pixels if you include the “Picture” property. 
        Enter “0” if you want to use the default picture size.
      • Header Text: enter an optional header text. Please note that you can embed HTML tags if needed. You can additionally specify the text to be displayed if the “Show all entries” option is unchecked and the users has not performed a search yet by appending a “|” character followed by the text.
        Example:
        This is the regular header text|This text is only shown if the user has not yet performed a search
      • Detail View Page: enter an optional column name prefixed by “detailview=” to link a column to the item detail view page. Append the “/popup” option if you want to open the detail page in a Sharepoint 2010/2013 dialog popup window.
        Examples:
        detailview=LastName
        detailview/popup=Title
      • Alternating Row Color: enter the optional color of the alternating row background (leave blank to use default).
        Enter either the HTML color names (as eg. “red” etc.) or use hexadecimal RRGGBB coding (as eg. “#CCFFCC”). Enter the values without the double quotes.
        You can also change the default background color of the non-alternating rows by appending a second color value separated by a semicolon.
        Example: #ffffcc;#ffff99 

        The default Header style can be changed by adding the “AESD_Headerstyle” appSettings variable to the web.config “appSettings” section:

        <appSettings>
        <
        add key=AESD_Headerstyle value=background:green;font-size:10pt;color:white
         />
        <
        appSettings
        >


      • Show Column Headers: either show or suppress the List column header row.
      • Header Row CSS Style: enter the optionall header row CSS style(s) as needed.
        Example:
        color:blue;white-space:nowrap
      • Show Groups collapsed: either show the groups (if you specify a column in the “Group By” setting) collapsed or expanded when entering the page.
      • Enforce Security: hides the web part if user has no access to the site or the list. This avoids a login prompt if the user has not at least “View” permission on the list or site containing the list.
      • Show all entries: either show all directory entries or none when first visiting the page. 
        You can append a specific text to the “Header Text” field (see above) which is only displayed if this option is unchecked and no search has yet been performed by the user.
      • Open Links in new window: either open the links in a new window or in the same browser window.
      • Link Documents to Office365: open the Word, Excel and Powerpoint documents in the Office365 web viewer.
      • Show ‘Add New Item’ Button: either show or suppress the “Add new item button” to let users add new items to the list (this option is security-trimmed).
      • Export to CSV: Show/hide the “Export” button for Excel CSV File Export
      • CSV Separator: Enter the desired CSV field separator character (Default=Comma). Use a semicolon in countries which use the commas as a decimal separator.
      • Localization: enter the following 4 values (separated by semicolons) in your local language if you need to override the English strings corresponding to the 
        – Search button text, 
        – A..Z menu “View all” option, 
         the text displayed for Hyperlink columns 
        – the optional “Group By” name (if grouping is enabled)Default:
        Search;View all;Visit

      • License Key: enter your Product License Key (as supplied after purchase of the “Staff Directory Web Part” license key).
        Leave this field empty if you are using the free 30 day evaluation version.

     Contact me now at tomas.floyd@outlook.com for the List Search Web Part and other Free & Paid Web Parts and Apps for SharePoint 2010, 2013, Azure, Office 365, SharePoint Online

    How to Create Custom SharePoint 2010 Page Layouts using SharePoint Designer 2010

    Scenario:

    You’re working with the Enterprise Wiki Site Template and you don’t really like where the “Last modified…” information is located (above the content). You want to move that information to the bottom of the page.

    Option 1: Modify the “EnterpriseWiki.aspx” Page Layout directly.

    Option 2: Create a new Page Layout based on the original one and then modify that one.

    We’ll go ahead and go with Option 2 since we don’t want to modify the out of the box template just in case we need it later on.

    How To:

    Step 1

    Navigate to the top level site of the Site Collection > Site Actions > Site Settings > Master pages (Under the Galleries section). Then switch over to the Documents tab in the Ribbon and then click New > Page Layout.

    Step 2

    Select the Enterprise Wiki Page Content Type to associate with, give it a URL and Title. Note that there’s also a link on this page to create a new Content Type. You might be interested in doing this if you wanted to say, add more editing fields or metadata properties to the layout. For example if you wanted to add another Managed Metadata column to capture folksonomy aside from the already included “Wiki Categories” Managed Metadata column.

    Step 3

    SharePoint Designer time! Hover over your newly created Page Layout and “Edit in Microsoft SharePoint Designer.”

    Step 4

    Now you can choose to build your page manually by dragging your SharePoint Controls onto the page and laying them out as you’d like…

    … Or you can copy and paste the OOB Enterprise Wiki Page Layout. I think I’ll do that. 🙂

    Step 5

    Alright, so you’ve copied the contents of the EnterpriseWiki.aspx Page Layout and now it’s time for some customizing. I found the control I want to move, so I’ll simply do a copy or cut/paste to the new spot.

    Step 6

    Check-in, publish, and approve the new Page Layout. Side note: I like to add the Check-In/Check-Out/Discard or Undo-Checkout buttons to all of my Office Applications’ Quick Access Toolbars for convenience.

    Step 7

    Almost there! Navigate to your publishing site, in this case the Enterprise Wiki Site, then go to Site Actions > Site Settings > Page layouts and site templates (Under Look and Feel). Here you’ll be able to make the new Page Layout available for use within the site.

    Step 8

    Go back to your site and edit the page that you’d like to change the layout for. On the Page tab of the Ribbon, click on Page Layout and select your custom Page Layout.

    Et voila! You just created a custom Page Layout using SharePoint Designer 2010, re-arranged a SharePoint control and managed to plan for the future by not modifying the out of the box template. That was a really simple example but I hope it helped to give you some ideas on how else you can customize Page Layouts within SharePoint 2010!

    2132

    Power BI connectivity to SAP BusinessObjects BI

    Microsoft and SAP are jointly delivering business intelligence (BI) interoperability in Microsoft Excel, Microsoft Power BI for Office 365, and SAP BusinessObjects BI.


    Microsoft Power Query for Excel seamlessly connects to SAP BusinessObjects BI Universes enabling users to access and analyze data across the enterprise and share their data and insights through Power BI.

    This connectivity drives a single version of truth, instant productivity, and optimized business performance for your organization.

    Image

    Download Microsoft Power Query Preview for Excel

    Preview contains SAP BusinessObjects BI Universe connectivity.

    Details

    Microsoft Power Query Preview for Excel, providing SAP BusinessObjects BI Universe connectivity, is an add-in that provides a seamless experience for data discovery, data transformation and enrichment for Information Workers, BI professionals and other Excel users. This preview provides an early look into the upcoming SAP BusinessObjects BI Universe connectivity feature. As with most previews, this feature may appear differently in the final product.

    System Requirements

    Supported operating systems

    Windows 7, Windows 8, Windows 8.1, Windows Server 2008, Windows Vista

    • Windows Vista (requires .NET 3.5SP1)
    • Windows Server 2008 (requires .NET 3.5 SP1)
    • Windows 7
    • Windows 8
    • Windows 8.1

    The following Office versions are supported:

    • Microsoft Office 2010 Professional Plus with Software Assurance
    • Microsoft Office 2013 Professional Plus, Office 365 ProPlus or Excel 2013 Standalone

    Microsoft Power Query Preview for Excel requires Internet Explorer 9 or greater.

    Microsoft Power Query Preview for Excel is available for 32-bit (x86) and 64-bit (x64) platforms, your selection must match architecture of the installed version of Office.

    Installation Instructions

    Download the version of the Power Query add-in that matches the architecture (x86 or x64) of your Office installation. Run the MSI installer and follow the setup steps.

    Access and analyze your trusted enterprise data

    Learn how Microsoft and SAP deliver a combination of trusted enterprise data and familiar market leading tools.

    Single version of truth

    Deliver the latest, accurate and trusted data from across the enterprise, such as from SAP applications, directly into the hands of users in Microsoft Excel. They no longer need to constantly copy and paste or import data using a manual process leading to inaccuracy. Users can instead focus on leveraging their knowledge to analyze data from within and outside your organization. They can get answers and uncover new insights to better deal with the challenges facing your organization, eliminating costly decisions based on inaccurate data.

    Instant productivity

    Users can continue to work in their familiar Microsoft Excel environment with access to business friendly terms from SAP BusinessObjects BI Universes at their fingertips, allowing for deeper analysis on their own. Using familiar tools enables them to easily integrate data and insights into existing workflows without the need to learn new complex tools and skills. Any uncovered data and insights can be kept up to date with no hassle refreshing from on-premises and the cloud, increasing productivity.

    Optimized business performance

    Leveraging existing investments from both companies together enables your organization to unlock insights faster and react accordingly. Your organization can identify patterns, cost drivers, and opportunities for savings in an agile, accurate, and visual manner. Specific trends and goals can be measured while having visually attractive and up to date dashboards. Relying on trusted enterprise data reduces costs and increases profitability by allowing faster, better, and timelier decisions. All of this drives broader BI adoption to create an information driven culture across your organization.

    Unlocked data and insights

    Drive trusted enterprise data and insights from an SAP BusinessObjects BI Universe throughout your organization by sharing and collaborating with Power BI from anywhere. Anyone can create a collaborative BI site to share data and insights relying on the latest data from either on-premises or the cloud using scheduled refreshing. Users no longer have to struggle to think up and answer every single question in advance, instead interactively investigating data when they need it through natural language Q&A. Better yet, they can stay connected with mobile access to data and insights generating a deeper understanding of the business and communicating more effectively from anywhere.


    SharePoint Samurai