With the R2 release of Dynamics AX 2012, a new feature was quietly snuck into the product that allows you to store document attachments from Dynamics AX within SharePoint rather than within an archive location, or within the database. This opens up a whole slew of possibilities when it comes to document management within SharePoint.
In this example we will show how you can create a document management structure within SharePoint that you can use in conjunction with the Dynamics AX attachments feature, and also we will show a few tweaks that you can make that may make managing your documents within SharePoint just a little easier.
Creating a new Document Management Site
The first step that we are going to work through is the creation of a new Document Management site where we will put all of our Dynamics AX document attachments. We are just creating a site to separate out the documents from other items that you may already have stored within SharePoint.
How to do it…
To create a new Document Management Site in SharePoint, follow these steps:
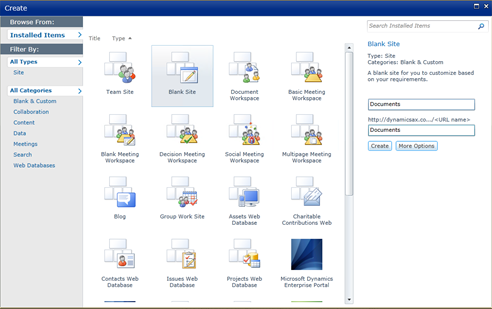
- Open up the SharePoint Workspace that you want to use to house your Document Management site and from the Site Actions menu, select the New Site option.

- When the Site Templates are displayed, select the Blank Site template. Give your site a name, and also a sub site name (probably the same as your site name). When you are done, click on the Create button for start the site creation process.
How it works…
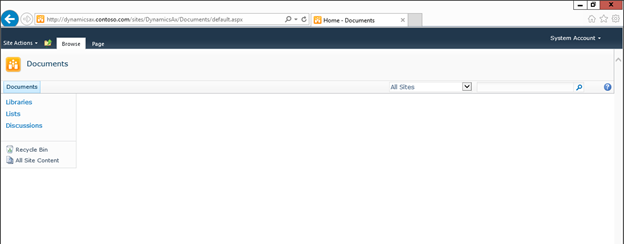
When the site is created, you should be taken to a new blank site which you will be able to use as a document repository.
Creating Document Libraries for the Business Areas
The next step in the process is to create document libraries to store all of your documents away in. You could create one big library, or a number of smaller ones, broken out into groups based on business area or function. In this example we will do the latter because it will give us more flexibility with the indexing of the documents, and also make it easier to find particular documents.
How to do it…
To create document libraries for the business areas, follow these steps:
- From within your new Document Management site, select the New Document Library option from the Site Actions menu.
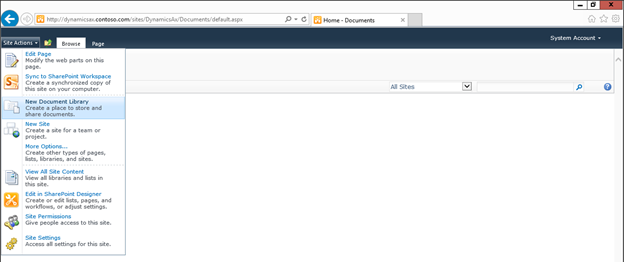
- When the Document Library Creation dialog box appears, give your library a Name, Description, and also set the Document Template to None. In this example we are creating a library for all of the AP Documents.
When you are done, click on the Create button to start the document library creation process.

How it works…
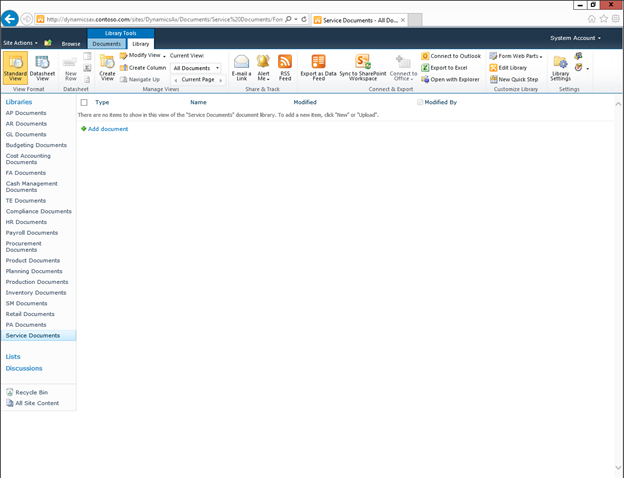
After it finishes you should have a new library for you to use. You can repeat the process for all of the other business areas that you want to manage documents for – in our example we just used the standard business areas from the Dynamics AX navigation menu.
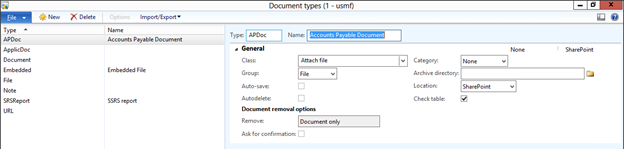
Creating Dynamics AX Document Types that Link to the Document Libraries
Once you have created your document libraries, you can connect them to Dynamics AX with the new SharePoint option so that the users are able to attach documents from the client and then store them within SharePoint for everyone to access.
How to do it…
To create a file attachment type that links to SharePoint, follow these steps:
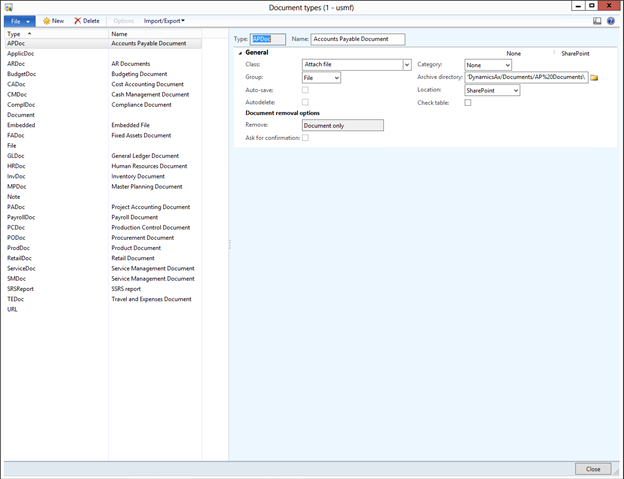
- From the Organization administration area page, select the Document types menu item from the Document management folder of the Setup group.
- When the Document types maintenance form is displayed, click on the New button in the menu bar to create a new entry.
- We will start by creating a link for all of our generic Accounts Payable documents by giving our new Document type a Name and Description. In the Group select File from the dropdown options and select SharePoint for the Location option.
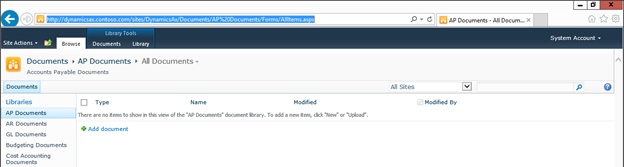
- Now return back to your document libraries within SharePoint and copy the URL for the document library.
- Paste the URL into the Archive
directory field.
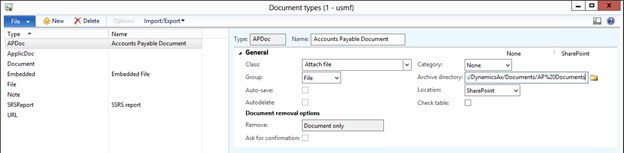
Note: Remove all of the extra parameters though so that you are just referencing the base folder location.
Also, if you click on the folder browser to the right of the Archive directory field you can test the link to SharePoint.
How it works…
Now, if you attach a document, then you will see the option for your new document type.
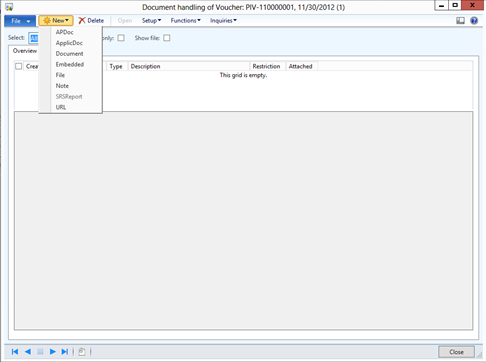
It will allow you to attach any file that you have on your desktop.

And rather than showing you the thumbnail image, it will show you a reference link to your SharePoint document library.
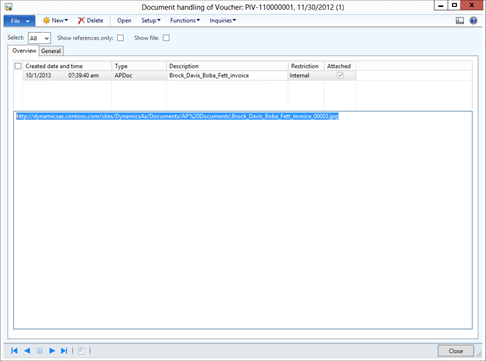
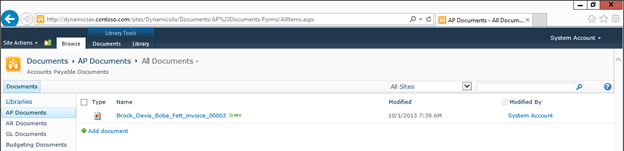
After attaching the document, if you look within SharePoint, you will see your document is saved away for you.
You can repeat this process for all of your other document libraries that were created in the previous step.
Adding Columns to your Document Libraries for Better Indexing
One of the reasons why you want to start using SharePoint is so that you can take advantage of the indexing functionality to code and classify your documents. Now that you have people storing the documents away, it’s time to add some indexes to you document libraries.
How to do it…
To create new indexes for your document libraries, follow these steps:
- Open up your document libraries within SharePoint and select the Library ribbon bar. Then click on the Create Column button within the Manage Views group.
- When the Create Column form opens, set the Column Name to be the field that you want to index, select the type of the column, and also set the columns Description.
- Note: Sometimes it’s a good idea not to have spaces in the column name, later on when we add filters, it becomes a litter easier to manage this way.
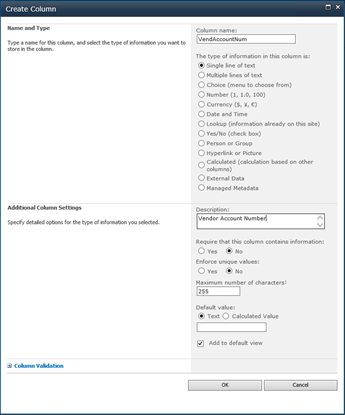
- After you have finished defining the column, click on the OK button to add the column to your library.
- When you return back to your document library, there will be a new column on the form.

- Repeat the process for all of the columns that you want to use as index fields for the library.
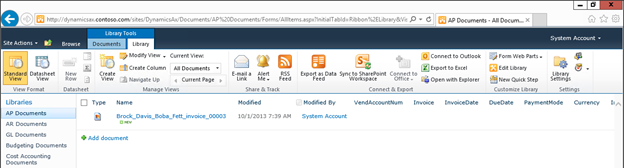
Note: All of the columns do not have to be used during the indexing process, so it’s OK to have variations of columns, like InvoiceNum, CreditNoteNum, etc.
How it works…
To edit the columns, select the options menu for the document, and choose the Edit Properties option.
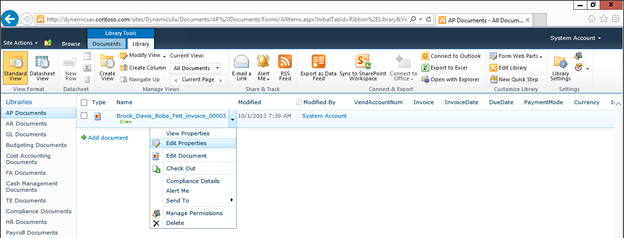
This will allow you to update the fields that Dynamics AX did not populate initially.

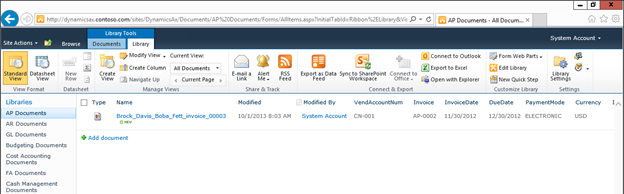
Now when you look at the document within SharePoint, you will see the additional metadata that is associated with the document.
Embedding Document Libraries into Dynamics AX Forms
Now that we are able to index documents a little more effectively within SharePoint, we can go the extra step, and link SharePoint to our forms within Dynamics AX so that we are able to access them without even leaving the application. Doing this just requires a little bit of coding, but is well worth the effort.
Getting Started…
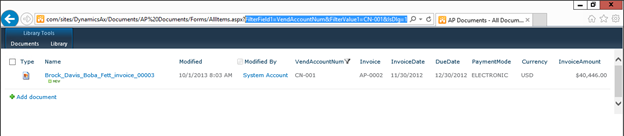
You can manipulate the information that is displayed by SharePoint, and also how it is displayed through the URL that you use.
If you filter any of the views, then you will notice that it uses two qualifiers – FilterFieldX
and FilterValueX to restrict the viewed records.
Also, if you add a IsDlg=1 qualifier, then all of the navigation areas are hidden giving you a clean list of filtered documents.
This is the perfect type of view to embed within Dynamics AX.
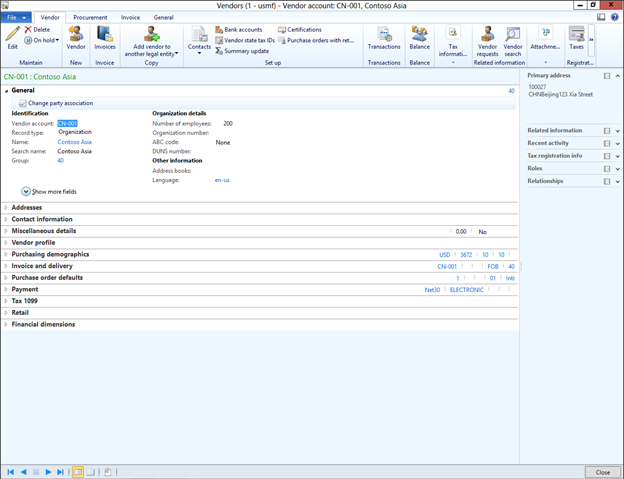
The other half of this step is to choose a form to add your document libraries to. In this case we will update the Vendors form.
How to do it…
To embed your SharePoint document libraries within Dynamics AX forms, follow these steps:
- Start the process by opening up AOT, and create a new project for this tweak.
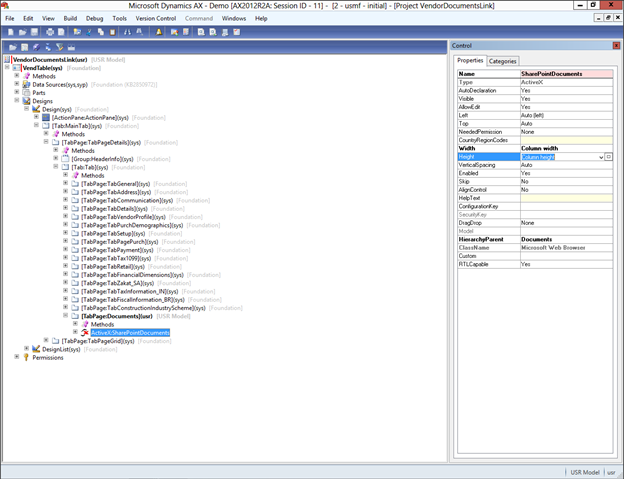
- From the Forms area in the AOT, drag over the form that you want to add the documents to – in this case it’s the VendTable form.

- Expand out the form within the project, and navigate to the group that you want to add your document library view into.
- Right-mouse-click on the parent tab, and select the TabPane option from the New Control sub-menu.
- Reorder your tabs (ALT+UpArrow/DownArrow) so that they are in the sequence that you want and then give your new Tab Control a Name and Caption in the Properties section.

- Right-mouse-click on the new tab that you added for the document library and select the ActiveX control from the New Control sub menu.
- When the list of ActiveX controls are displayed, select the Microsoft Web Browser control, and click the OK button to add it.
- Rename your ActiveX control, and set the Width to Column width
and Height to Column height.
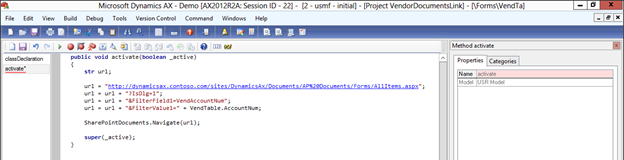
- Now we need to have Dynamics AX update the URL that is navigated to when the form is opened. To do this, right-mouse-click on the parent Methods group for the form, and select the activate method from the Override methods submenu.
- Update the activate method by building the URL that will define the specific document index that you are wanting to show. You are able to now add conditional filters that pick up the record values, and filter based on the current record – in this case the vendor number.
- Once you have finished the update, save the project.
How it works…
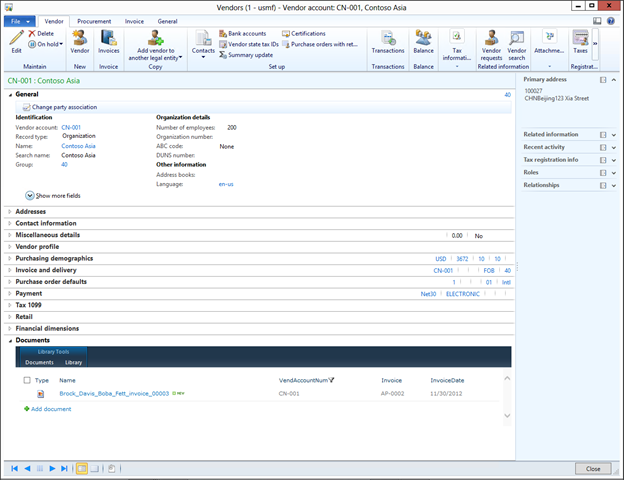
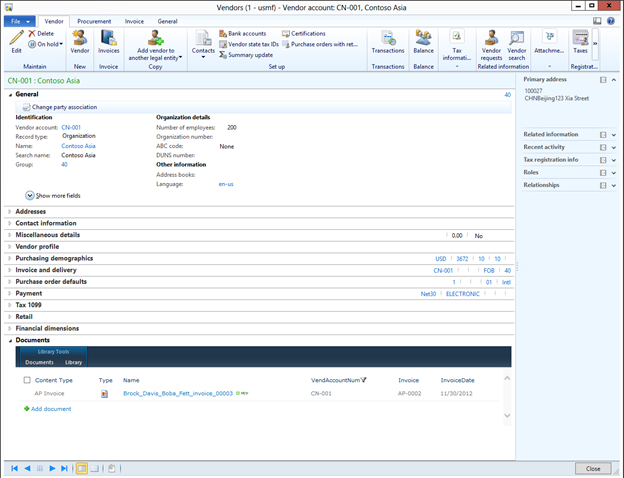
Now when you open up the Vendor form, there will be a Documents tab that shows all of the documents that are associated with the current record.

If you select a record that does not have attached documents, then you will not see anything there.
How cool is that.
Creating Custom Views for the Document Libraries
Now that all of the heavy lifting has been done, you can now start tweaking the SharePoint libraries and the way that the information is displayed. Based on the form that you are in you may want to show only particular information. You can do that by creating new custom views.
How to do it…
To create a custom view for your document libraries, follow these steps:
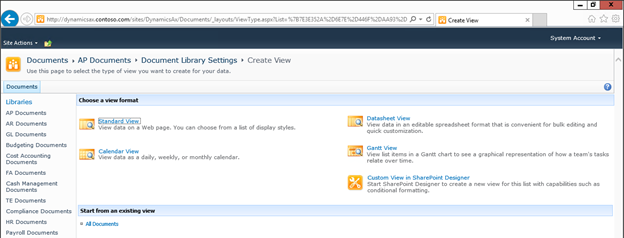
- Open up your document libraries within SharePoint and select the Library ribbon bar. Then click on the Library Settings button within the Settings group.

- When the document library settings maintenance form is displayed, scroll down to the bottom of the page, and there will be a section for Views that will show you all of the different ways that the form could be displayed. In this case there is only one, but we can fix that by clicking on the Create View link.

- Select the Standard View option from the format templates that are displayed.
- Assign your new view a Name and select the fields that you want to be displayed in the view.

- Once you have made the changes, click on the OK button to save your new view.
How it works…
When you return to the document library you will be able to see the new format of the view.

You can then change the view within the URL of your project to make it the default view for the form.

Now when you see all of the documents within your Dynamics AX form you will see just the information that you need.
Using the SharePoint Designer to Edit Document Libraries
Although you can do everything that we have shown so far within SharePoint, you can also take advantage of the SharePoint Designer application to update your SharePoint document libraries. You don’t even have to search for the install kit, because it is embedded within your SharePoint site, just waiting to be downloaded and installed.
How to do it…
To access the SharePoint Designer to manipulate your SharePoint site, follow these steps:
-
To use the
SharePoint Designer to update your SharePoint site, just select the
Edit in SharePoint Designer option from the
Site Actions menu.
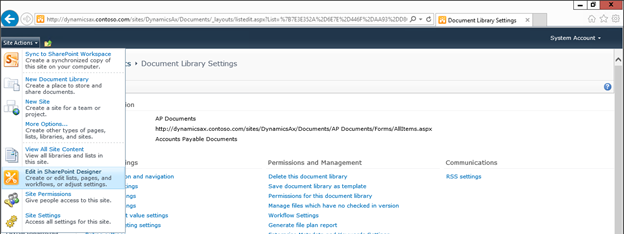
Note: If you don’t have SharePoint Designer installed then it will ask you to install it, and download the kit directly from your SharePoint installation.
How it works…
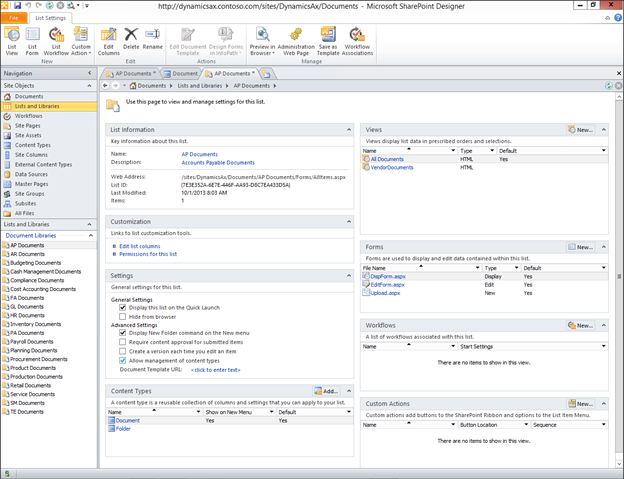
When SharePoint Designer opens up, it will be connected to your current SharePoint site, showing you all of the libraries, etc. that you have been creating.

If you select the Lists and Libraries option from the navigation pad, you will be able to see all of the document libraries that you created in the previous steps.

Drilling into the libraries you will be able to also see all of the views etc. that you configured within SharePoint.

Creating New Content Types to Manage Document Types
When we set up our document libraries we deliberately created them so that all of the documents for a particular area are within the same library. This allows us to save multiple types of documents away within the library like Invoices, Credit Notes, Vendor Certificates etc. The way that we can identify the type of document is through the creation of Content Types.
How to do it…
To create custom Content Types to help make classification easier, follow these steps:
- Open up SharePoint Designer (although you can also do this within SharePoint itself) and select the Content Types from the navigation menu and click on the Content type menu button within the New group
of the Content Types ribbon bar.

-
When the Content Type creation form is displayed, give your Content Type a
Name, and
Description, select a parent content type, and also a group that you want to show the Content Type in.

Note: For the first content type that you create, you may want to create a new Content Type Group so that it isn’t intermingled with all of the other content types.
- When you have finished creating your Content Type click on the OK button to add it to SharePoint.
- When you return to your SharePoint Designer workspace you will be able to see your new Content Type.

- Repeat the process for all of the other types of documents that you want to file away within SharePoint.

- Now we need to enable Content Types within our document libraries, and then assign them. To do this, open up your Document Library within SharePoint Designer, and within the Settings group, check the Allow management of content types check box.
- Then click on the Add button to the right of the Content Types group to open up the Content Type Picker. Find the new Content Types that you just created, and click on the OK button to assign them to your Document Library.

- Now the Content Type will show up as a valid option for the document library.
- Repeat the process for all of the other content types that you created.

How it works…
Now when you edit the properties for your documents, there will be a new indexing option for your documents that allows you to define the type of document that you are looking at.

Specifying Document Columns by Content Types to Simplify Indexing
There is an additional benefit that you get from using Content Types within SharePoint, which is the ability to specify what columns are applicable to different Content Types at the time of indexing. For example, you probably don’t want to specify a Invoice Number when indexing a Vendor Insurance Certificate, but would definitely would want to when indexing an Invoice and even a Credit Note.
How to do it…
To modify your Content Types within your Document Libraries to only require certain columns to be indexed, follow these steps:
- From within your SharePoint Document Library (or from within SharePoint Designer) click on the Library Settings button within the Settings group of the Library ribbon bar.

- Within the Library Settings you will be able to see all of your Content Types that have been assigned. Select any of them to edit their options.
- When you first create the Content Types then they will have no columns assigned to them. Click on the Add from existing site or list columns link to assign the valid columns to your Content Type.

- When the Add columns to Content Type form is displayed, you will be able to see all of the available columns within the Document Library.
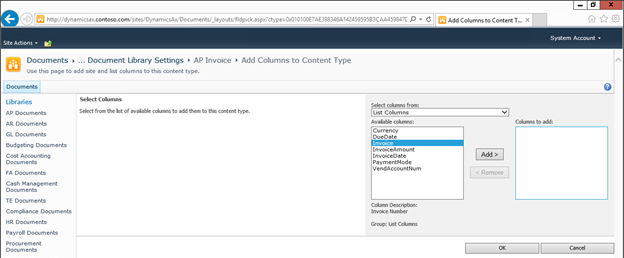
- Just select the ones that you want to use for the indexing, and then click the Add button. Once you have selected all the ones that you want to use, click on the OK button to save your changes.

How it works…
Now you will have indexing by Content Type.

Showing the Content Type in the Document View
Now that we are classifying documents by Content Type we might as well show it in the views so that we are able to differentiate different document types.
How to do it…
To add the Content Type field to our Document View, follow these steps:
- From within your SharePoint Document Library (or from within SharePoint Designer) click on the Modify View button within the Manage Views group of the Library ribbon bar.

- Now that the Content Type is enabled on our Document Library, it will show up on the list of valid columns. To add it to our view, just check the Display checkbox, and possibly change the order of the field so that it is first in the table.
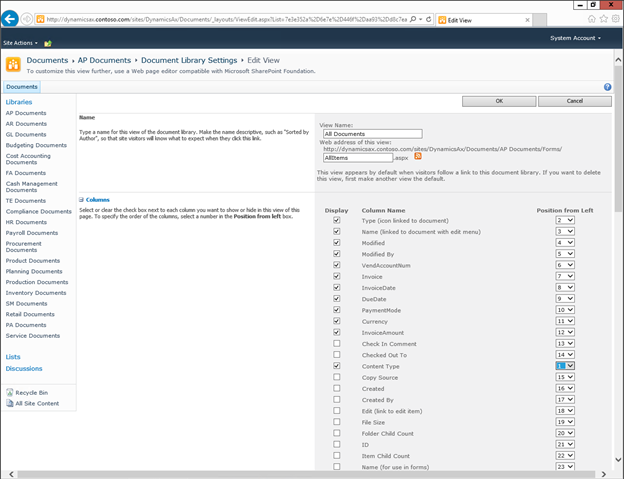
- When you’re done, click on the OK button to update the view.
How it works…
Now the Content Type is shown in the document library view.

And also will show up when we browse to the documents within Dynamics AX.
How neat is that.
Grouping Records in the Document View by Key Columns
One final tweak that we will show within SharePoint is the ability to group columns within our document library views so that common information is shown together. These groupings can be different by view, and just make it a little easier to find information if we don’t’ initially filter the data.
How to do it…
To group records within your document library view, follow these steps:
- From within your SharePoint Document Library (or from within SharePoint Designer) click on the Modify View button within the Manage Views group of the Library ribbon bar.

- Scroll down your view definition until you see the Group By configuration options. Here you will be able to change the Group By fields.

How it works…
Now when you look at your documents, they will be classified by key fields.

Summary
In this walkthrough we have shown how you can:
- Create a simple document management repository within SharePoint
- Link the document attachments function within Dynamics AX to SharePoint to make the acquisition of the documents easier
- Index your documents more effectively by defining custom columns
- Embed SharePoint back into Dynamics AX and also
- Tweak your views within SharePoint to make it easier to find and view documents
This is really just a starting point, and once you have mastered the basics, you can start investigating:
- Assigning workflows to documents for approvals and updates
- Enabling version control for your documents
- Acquire documents into SharePoint through scanning technologies
- Link the index column fields to Dynamics AX for validation of key information
- And much more.
SharePoint is a great document management tool, and can usually handle all of your document indexing needs. Especially now that it is connected with Dynamics AX natively.

![BI-infographic1[1]](https://sharepointsamurai.files.wordpress.com/2014/08/bi-infographic11.jpg?w=300&h=184)
![5810.image-1[1]](https://sharepointsamurai.files.wordpress.com/2014/06/5810-image-11.png)
 +
+ ![microsoft_crm_wallpaper_02[1]](https://sharepointsamurai.files.wordpress.com/2014/06/microsoft_crm_wallpaper_021.jpg?w=167&h=125)


![dynamicsCRMfeatures[1]](https://sharepointsamurai.files.wordpress.com/2014/03/dynamicscrmfeatures1.jpg)


