Category Archives: SharePoint App

How To : Add a Promoted Links Web Part to SharePoint 2013 App Default page

This article helps you to add Promoted links web part to your default app page as the following figure:


To do this follow the following steps:
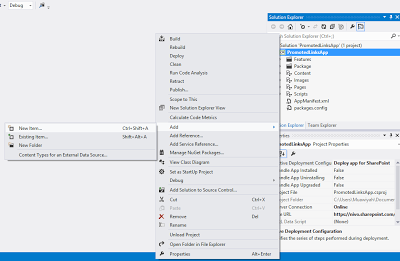
Open the shortcut menu for the project, and then choose Add, New Item
Add Picture Textbox, and two buttons to infopath form


In the Templates pane, choose the List template, and then choose the Add button :

Enter list name and choose the Create a non-customizable list based on an existing list type of option button, and then, in its list, choose Promoted links, and then choose the Finish button

Binding the CAPTCHA image
In Solution Explorer, under the list instance node, open the Elements.xml file.
Add the promoted links items as the following:
<?versionencodingutf-8?>
Elementsxmlnshttp://schemas.microsoft.com/sharepoint/
ListInstanceTitleMyPromotedLinks
OnQuickLaunch
TemplateType
FeatureId192efa95-e50c-475e-87ab-361cede5dd7f
Lists/MyPromotedLinks
DescriptionMy List Instance
FieldTitleTwitter</Field
FieldBackgroundImageLocation/PromotedLinksApp/Images/twitter.png
FieldDescriptionMuawiyah Shannak Twitter
FieldLinkLocationhttps://twitter.com/MuShannak</Field
FieldOrder</Field
</
FieldTitle</Field
FieldBackgroundImageLocation/PromotedLinksApp/Images/blogger.png
FieldDescriptionMuawiyah Shannak Blog
FieldLinkLocationhttp://mushannak.blogspot.com</Field
FieldOrder</Field
</
FieldTitleLinkedin</Field
FieldBackgroundImageLocation/PromotedLinksApp/Images/linkedin.png
FieldDescriptionMuawiyah Shannak Linkedin
FieldLinkLocationhttp://ae.linkedin.com/in/shannak</Field
FieldOrder</Field
</
</
</
<!–ListInstance
</Elements
In Solution Explorer, under the Pages node, open the Default.aspx file. Add following tags inside the PlaceHolderMain Place Holder:
WebPartPagesWebPartZone=”WebPartZone”runat=”server”FrameType=”None”>
WebPartPagesXsltListViewWebPart=”XsltListViewAppPromotedList”
runat=”server”ListUrl=”Lists/MyPromotedLinks”IsIncluded=”True”
NoDefaultStyle=”TRUE”Title=”Images used in switcher”
PageType=”PAGE_NORMALVIEW”Default=”False”
ViewContentTypeId=”0x”>
</WebPartPagesXsltListViewWebPart
</WebPartPagesWebPartZone

Deploy a solution and you will find nice promoted links web part in the app default page!

Free Code to Create Cross-site Publishing Apps for SharePoint Online

Cross-site publishing is one of the powerful new capabilities in SharePoint 2013.  It enables the separation of data entry from display and breaks down the container barriers that have traditionally existed in SharePoint (ex: rolling up information across site collections). 

 IC648720[1]

Cross-site publishing is delivered through search and a number of new features, including list/library catalogs, catalog connections, and the content search web part.  Unfortunately, SharePoint Online/Office 365 doesn’t currently support these features.  Until they are added to the service (possibly in a quarterly update), customers will be looking for alternatives to close the gap.  In this post, I will outline several alternatives for delivering cross-site and search-driven content in SharePoint Online and how to template these views for reuse

I’m a huge proponent of SharePoint Online.  After visiting several Microsoft data centers, I feel confident that Microsoft is better positioned to run SharePoint infrastructure than almost any organization in the world.  SharePoint Online has very close feature parity to SharePoint on-premise, with the primary gaps existing in cross-site publishing and advanced business intelligence.  Although these capabilities have acceptable alternatives in the cloud (as will be outlined in this post), organizations looking to maximize the cloud might consider SharePoint running in IaaS for immediate access to these features.


Apps for SharePoint

The new SharePoint app model is fully supported in SharePoint Online and can be used to deliver customizations to SharePoint using any web technology.  New SharePoint APIs can be used with the app model to deliver an experience similar to cross-site publishing.  In fact, the content search web part could be re-written for delivery through the app model as an “App Part” for SharePoint Online. 
Although the app model provides great flexibility and reuse, it does come with some drawbacks.  Because an app part is delivered through a glorified IFRAME, it would be challenging to navigate to a new page from within the app part.  A link within the app would only navigate within the IFRAME (not the parent of the IFRAME).  Secondly, there isn’t a great mechanism for templating a site to automatically leverage an app part on its page(s).  Apps do not work with site templates, so a site that contains an app cannot be saved as a template.  Apps can be “stapled” to sites, but the app installed event (which would be needed to add the app part to a page) only fires when the app is installed into the app catalog.

REST APIs and Script Editor

The script editor web part is a powerful new tool that can help deliver flexible customization into SharePoint Online.  The script editor web part allows a block of client-side script to be added to any wiki or web part page in a site.  Combined with the new SharePoint REST APIs, the script editor web part can deliver mash-ups very similar to cross-site publishing and the content search web part.  Unlike apps for SharePoint, the script editor isn’t constrained by IFRAME containers, app permissions, or templating limitations.  In fact, a well-configured script editor web part could be exported and re-imported into the web part gallery for reuse.

Cross-site publishing leverages “catalogs” for precise querying of specific content.  Any List/Library can be designated as a catalog.  By making this designation, SharePoint will automatically create managed properties for columns of the List/Library and ultimately generate a search result source in sites that consume the catalog.  Although SharePoint Online doesn’t support catalogs, it support the building blocks such as managed properties and result sources.  These can be manually configured to provide the same precise querying in SharePoint Online and exploited in the script editor web part for display.

Calling Search REST APIs

<div id=”divContentContainer”></div>
<script type=”text/javascript”>
    $(document).ready(function ($) {
        var basePath = “https://tenant.sharepoint.com/sites/somesite/_api/&#8221;;
        $.ajax({
            url: basePath + “search/query?Querytext=’ContentType:News'”,
            type: “GET”,
            headers: { “Accept”: “application/json;odata=verbose” },
            success: function (data) {
                //script to build UI HERE
            },
            error: function (data) {
                //output error HERE
            }
        });
    });
</script>


An easier approach might be to directly reference a list/library in the REST call of our client-side script.  This wouldn’t require manual search configuration and would provide real-time publishing (no waiting for new items to get indexed).  You could think of this approach similar to a content by query web part across site collections (possibly even farms) and the REST API makes it all possible!

List REST APIs

<div id=”divContentContainer”></div>
<script type=”text/javascript”>
    $(document).ready(function ($) {
        var basePath = “https://tenant.sharepoint.com/sites/somesite/_api/&#8221;;
        $.ajax({
            url: basePath + “web/lists/GetByTitle(‘News’)/items/?$select=Title&$filter=Feature eq 0”,
            type: “GET”,
            headers: { “Accept”: “application/json;odata=verbose” },
            success: function (data) {
                //script to build UI HERE
            },
            error: function (data) {
                //output error HERE
            }
        });
    });
</script>


The content search web part uses display templates to render search results in different arrangements (ex: list with images, image carousel, etc).  There are two types of display templates the content search web part leverages…the control template, which renders the container around the items, and the item template, which renders each individual item in the search results.  This is very similar to the way a Repeater control works in ASP.NET.  Display templates are authored using HTML, but are converted to client-side script automatically by SharePoint for rendering.  I mention this because our approach is very similar…we will leverage a container and then loop through and render items in script.  In fact, all the examples in this post were converted from display templates in a public site I’m working on. 

Item display template for content search web part

<!–#_
var encodedId = $htmlEncode(ctx.ClientControl.get_nextUniqueId() + “_ImageTitle_”);
var rem = index % 3;
var even = true;
if (rem == 1)
    even = false;

var pictureURL = $getItemValue(ctx, “Picture URL”);
var pictureId = encodedId + “picture”;
var pictureMarkup = Srch.ContentBySearch.getPictureMarkup(pictureURL, 140, 90, ctx.CurrentItem, “mtcImg140”, line1, pictureId);
var pictureLinkId = encodedId + “pictureLink”;
var pictureContainerId = encodedId + “pictureContainer”;
var dataContainerId = encodedId + “dataContainer”;
var dataContainerOverlayId = encodedId + “dataContainerOverlay”;
var line1LinkId = encodedId + “line1Link”;
var line1Id = encodedId + “line1”;
 _#–>
<div style=”width: 320px; float: left; display: table; margin-bottom: 10px; margin-top: 5px;”>
   <a href=”_#= linkURL =#_”>
      <div style=”float: left; width: 140px; padding-right: 10px;”>
         <img src=”_#= pictureURL =#_” class=”mtcImg140″ style=”width: 140px;” />
      </div>
      <div style=”float: left; width: 170px”>
         <div class=”mtcProfileHeader mtcProfileHeaderP”>_#= line1 =#_</div>
      </div>
   </a>
</div>


Script equivalent

<div id=”divUnfeaturedNews”></div>
<script type=”text/javascript”>
    $(document).ready(function ($) {
        var basePath = “https://richdizzcom.sharepoint.com/sites/dallasmtcauth/_api/&#8221;;
        $.ajax({
            url: basePath + “web/lists/GetByTitle(‘News’)/items/?$select=Title&$filter=Feature eq 0”,
            type: “GET”,
            headers: { “Accept”: “application/json;odata=verbose” },
            success: function (data) {
                //get the details for each item
                var listData = data.d.results;
                var itemCount = listData.length;
                var processedCount = 0;
                var ul = $(“<ul style=’list-style-type: none; padding-left: 0px;’ class=’cbs-List’>”);
                for (i = 0; i < listData.length; i++) {
                    $.ajax({
                        url: listData[i].__metadata[“uri”] + “/FieldValuesAsHtml”,
                        type: “GET”,
                        headers: { “Accept”: “application/json;odata=verbose” },
                        success: function (data) {
                            processedCount++;
                            var htmlStr = “<li style=’display: inline;’><div style=’width: 320px; float: left; display: table; margin-bottom: 10px; margin-top: 5px;’>”;
                            htmlStr += “<a href=’#’>”;
                            htmlStr += “<div style=’float: left; width: 140px; padding-right: 10px;’>”;
                            htmlStr += setImageWidth(data.d.PublishingRollupImage, ‘140’);
                            htmlStr += “</div>”;
                            htmlStr += “<div style=’float: left; width: 170px’>”;
                            htmlStr += “<div class=’mtcProfileHeader mtcProfileHeaderP’>” + data.d.Title + “</div>”;
                            htmlStr += “</div></a></div></li>”;
                            ul.append($(htmlStr))
                            if (processedCount == itemCount) {
                                $(“#divUnfeaturedNews”).append(ul);
                            }
                        },
                        error: function (data) {
                            alert(data.statusText);
                        }
                    });
                }
            },
            error: function (data) {
                alert(data.statusText);
            }
        });
    });

    function setImageWidth(imgString, width) {
        var img = $(imgString);
        img.css(‘width’, width);
        return img[0].outerHTML;
    }
</script>


Even one of the more complex carousel views from my site took less than 30min to convert to the script editor approach.

Advanced carousel script

<div id=”divFeaturedNews”>
    <div class=”mtc-Slideshow” id=”divSlideShow” style=”width: 610px;”>
        <div style=”width: 100%; float: left;”>
            <div id=”divSlideShowSection”>
                <div style=”width: 100%;”>
                    <div class=”mtc-SlideshowItems” id=”divSlideShowSectionContainer” style=”width: 610px; height: 275px; float: left; border-style: none; overflow: hidden; position: relative;”>
                        <div id=”divFeaturedNewsItemContainer”>
                        </div>
                    </div>
                </div>
            </div>
        </div>
    </div>
</div>
<script type=”text/javascript”>
    $(document).ready(function ($) {
        var basePath = “https://richdizzcom.sharepoint.com/sites/dallasmtcauth/_api/&#8221;;
        $.ajax({
            url: basePath + “web/lists/GetByTitle(‘News’)/items/?$select=Title&$filter=Feature eq 1&$top=4”,
            type: “GET”,
            headers: { “Accept”: “application/json;odata=verbose” },
            success: function (data) {
                var listData = data.d.results;
                for (i = 0; i < listData.length; i++) {
                    getItemDetails(listData, i, listData.length);
                }
            },
            error: function (data) {
                alert(data.statusText);
            }
        });
    });
    var processCount = 0;
    function getItemDetails(listData, i, count) {
        $.ajax({
            url: listData[i].__metadata[“uri”] + “/FieldValuesAsHtml”,
            type: “GET”,
            headers: { “Accept”: “application/json;odata=verbose” },
            success: function (data) {
                processCount++;
                var itemHtml = “<div class=’mtcItems’ id=’divPic_” + i + “‘ style=’width: 610px; height: 275px; float: left; position: absolute; border-bottom: 1px dotted #ababab; z-index: 1; left: 0px;’>”
                itemHtml += “<div id=’container_” + i + “‘ style=’width: 610px; height: 275px; float: left;’>”;
                itemHtml += “<a href=’#’ title='” + data.d.Caption_x005f_x0020_x005f_Title + “‘ style=’width: 610px; height: 275px;’>”;
                itemHtml += data.d.Feature_x005f_x0020_x005f_Image;
                itemHtml += “</a></div></div>”;
                itemHtml += “<div class=’titleContainerClass’ id=’divTitle_” + i + “‘ data-originalidx='” + i + “‘ data-currentidx='” + i + “‘ style=’height: 25px; z-index: 2; position: absolute; background-color: rgba(255, 255, 255, 0.8); cursor: pointer; padding-right: 10px; margin: 0px; padding-left: 10px; margin-top: 4px; color: #000; font-size: 18px;’ onclick=’changeSlide(this);’>”;
                itemHtml += data.d.Caption_x005f_x0020_x005f_Title;
                itemHtml += “<span id=’currentSpan_” + i + “‘ style=’display: none; font-size: 16px;’>” + data.d.Caption_x005f_x0020_x005f_Body + “</span></div>”;
                $(‘#divFeaturedNewsItemContainer’).append(itemHtml);

                if (processCount == count) {
                    allItemsLoaded();
                }
            },
            error: function (data) {
                alert(data.statusText);
            }
        });
    }
    window.mtc_init = function (controlDiv) {
        var slideItems = controlDiv.children;
        for (var i = 0; i < slideItems.length; i++) {
            if (i > 0) {
                slideItems[i].style.left = ‘610px’;
            }
        };
    };

    function allItemsLoaded() {
        var slideshows = document.querySelectorAll(“.mtc-SlideshowItems”);
        for (var i = 0; i < slideshows.length; i++) {
            mtc_init(slideshows[i].children[0]);
        }

        var div = $(‘#divTitle_0’);
        cssTitle(div, true);
        var top = 160;
        for (i = 1; i < 4; i++) {
            var divx = $(‘#divTitle_’ + i);
            cssTitle(divx, false);
            divx.css(‘top’, top);
            top += 35;
        }
    }

    function cssTitle(div, selected) {
        if (selected) {
            div.css(‘height’, ‘auto’);
            div.css(‘width’, ‘300px’);
            div.css(‘top’, ’10px’);
            div.css(‘left’, ‘0px’);
            div.css(‘font-size’, ’26px’);
            div.css(‘padding-top’, ‘5px’);
            div.css(‘padding-bottom’, ‘5px’);
            div.find(‘span’).css(‘display’, ‘block’);
        }
        else {
            div.css(‘height’, ’25px’);
            div.css(‘width’, ‘auto’);
            div.css(‘left’, ‘0px’);
            div.css(‘font-size’, ’18px’);
            div.css(‘padding-top’, ‘0px’);
            div.css(‘padding-bottom’, ‘0px’);
            div.find(‘span’).css(‘display’, ‘none’);
        }
    }

    window.changeSlide = function (item) {
        //get all title containers
        var listItems = document.querySelectorAll(‘.titleContainerClass’);
        var currentIndexVals = { 0: null, 1: null, 2: null, 3: null };
        var newIndexVals = { 0: null, 1: null, 2: null, 3: null };

        for (var i = 0; i < listItems.length; i++) {
            //current Index
            currentIndexVals[i] = parseInt(listItems[i].getAttribute(‘data-currentidx’));
        }

        var selectedIndex = 0; //selected Index will always be 0
        var leftOffset = ”;
        var originalSelectedIndex = ”;

        var nextSelected = ”;
        var originalNextIndex = ”;

        if (item == null) {
            var item0 = document.querySelector(‘[data-currentidx=”‘ + currentIndexVals[0] + ‘”]’);
            originalSelectedIndex = parseInt(item0.getAttribute(‘data-originalidx’));
            originalNextIndex = originalSelectedIndex + 1;
            nextSelected = currentIndexVals[0] + 1;
        }
        else {
            nextSelected = item.getAttribute(‘data-currentidx’);
            originalNextIndex = item.getAttribute(‘data-originalidx’);
        }

        if (nextSelected == 0) { return; }

        for (i = 0; i < listItems.length; i++) {
            if (currentIndexVals[i] == selectedIndex) {
                //this is the selected item, so move to bottom and animate
                var div = $(‘[data-currentidx=”0″]’);
                cssTitle(div, false);
                div.css(‘left’, ‘-400px’);
                div.css(‘top’, ‘230px’);

                newIndexVals[i] = 3;
                var item0 = document.querySelector(‘[data-currentidx=”0″]’);
                originalSelectedIndex = item0.getAttribute(‘data-originalidx’);

                //annimate
                div.delay(500).animate(
                    { left: ‘0px’ }, 500, function () {
                    });
            }
            else if (currentIndexVals[i] == nextSelected) {
                //this is the NEW selected item, so resize and slide in as selected
                var div = $(‘[data-currentidx=”‘ + nextSelected + ‘”]’);
                cssTitle(div, true);
                div.css(‘left’, ‘-610px’);

                newIndexVals[i] = 0;

                //annimate
                div.delay(500).animate(
                    { left: ‘0px’ }, 500, function () {
                    });
            }
            else {
                //move up in queue
                var curIdx = currentIndexVals[i];
                var div = $(‘[data-currentidx=”‘ + curIdx + ‘”]’);

                var topStr = div.css(‘top’);
                var topInt = parseInt(topStr.substring(0, topStr.length – 1));

                if (curIdx != 1 && nextSelected == 1 || curIdx > nextSelected) {
                    topInt = topInt – 35;
                    if (curIdx – 1 == 2) { newIndexVals[i] = 2 };
                    if (curIdx – 1 == 1) { newIndexVals[i] = 1 };
                }

                //move up
                div.animate(
                    { top: topInt }, 500, function () {
                    });
            }
        };

        if (originalNextIndex < 0)
            originalNextIndex = itemCount – 1;

        //adjust pictures
        $(‘#divPic_’ + originalNextIndex).css(‘left’, ‘610px’);
        leftOffset = ‘-610px’;

        $(‘#divPic_’ + originalSelectedIndex).animate(
            { left: leftOffset }, 500, function () {
            });

        $(‘#divPic_’ + originalNextIndex).animate(
            { left: ‘0px’ }, 500, function () {
            });

        var item0 = document.querySelector(‘[data-currentidx=”‘ + currentIndexVals[0] + ‘”]’);
        var item1 = document.querySelector(‘[data-currentidx=”‘ + currentIndexVals[1] + ‘”]’);
        var item2 = document.querySelector(‘[data-currentidx=”‘ + currentIndexVals[2] + ‘”]’);
        var item3 = document.querySelector(‘[data-currentidx=”‘ + currentIndexVals[3] + ‘”]’);
        if (newIndexVals[0] != null) { item0.setAttribute(‘data-currentidx’, newIndexVals[0]) };
        if (newIndexVals[1] != null) { item1.setAttribute(‘data-currentidx’, newIndexVals[1]) };
        if (newIndexVals[2] != null) { item2.setAttribute(‘data-currentidx’, newIndexVals[2]) };
        if (newIndexVals[3] != null) { item3.setAttribute(‘data-currentidx’, newIndexVals[3]) };
    };
</script>


End-result of script editors in SharePoint Online

Separate authoring site collection

Final Thoughts

SharePoint 2013 and CRM 2011 integration. A customer portal approach

New “Spotlight On” Web Part Released and Available!!

The “Spotlight On..” Web Part selects a random entry from the specified Sharepoint Library and displays a picture, a title and an abstract of the selected person or item.
The Web Part can be used with Windows Sharepoint Services V3, MOSS 2007, Sharepoint 2010 and Sharepoint 2013.You can configure the following web part properties:

  • the Sharepoint Library
  • the List fields corresponding to the picture, title, abstract and detail link
  • enable or suppress the “Details..” URL.
  • show a new entry every day or on every page refresh

This allows you to display random data contained in any Sharepoint List by specifying the desired Sharepoint List name and the desired list column names.

Image

Image

 Instructions:

  1. download the Spotlight On Web Part Installation Instructions (PDF file, see above)
  2. either install the web part manually or deploy the feature to your server/farm as described in the instructions.
  3. Create a new Sharepoint Picture Library if you do not intend to use an existing Picture Library.
    If you decide to create a new Sharepoint list to store the Spotlight entries, create a new Sharepoint Picture Library anywhere in the Sharepoint site collection (the web part is able to access any picture library within the site collection).
    The list needs the following columns to hold the entries:
    – Title
    – Abstract
    – optional Detail Link URL
  1. You also can use a Sharepoint List (as opposed to a picture library). In this case please add the pictures as list attachments.
  2. Configure the following relevant Web Part properties in the Web Part Editor “Miscellaneous” pane section as needed:
    • Site Name: Enter the name of the site that contains the Spotlight Picture Library:
      – leave this field empty if the Library is in the current site (eg. the Web Part is placed in the same site)
      – Enter a “/” character if the Library is contained in the top site
      – Enter a path if the Library is in a subsite of the current site (eg. in the form of “current site/subsite”)
    • List Name: Enter the desired Sharepoint Picture Library
    • View Name: Optionally enter the desired List View of the list specified above. A List View allows you to specify specific data filtering and sorting.
      Leave this field empty if you want to use the List default view.
    • Title Field Name: Enter the desired Library Column name that contains the titles (Default=”Title”)
    • Abstract Field Name: Enter the desired Library Column name that contains the abstracts (Default=”Abstract”)

    Image

You can alternatively specify a “Field Template” by entering the desired Library fields (surrounded by curly braces). You can specify HTML tags and CSS styles to freely format the text.
Example:

<strong>{JobTitle}</strong>
<br>{Description}

5px; margin-top:5px; background-color:orange”>

<strong>Schools:</strong><br>
{Bio}
</div>

Image
  • The above example assumes that the Sharepoint Library includes a “JobTitle”, a “Description” and a “Bio” column.
  • Details URL Field Name: (optional) Enter the desired Library Column name that contains the Detail page links (Default=”DetailURL”). Leave this field empty if you don’t want to provide a detail link.
    If you want to automatically link to the corresponding Sharepoint List Detail View page, enter the keyword “DetailView” into this field.
    If you want to automatically link to the corresponding user’s “MySite” page, enter the keyword “MySite” into this field.
  • Open Details Link in new window: opens the link in a new browser window.
  • Details Caption: allows to localize the “Details..” link displayed in the lower right part of the web part (if a “Details” link is specified).
  • Text Layout: specify the placing of the Text with respect to the Image:
    – Right
    – Wrap
    – Bottom
    – Left
    – WrapLeft
  • Image Height: specify the image height in pixels. Enter “0” if you want to use the default picture size.
  • Default User Image: (optional) specify a default user picture (if there is no user picture available) by entering a relative URL to the image
  • Example:
    /yoursite/yourPictureLibrary/yourDefaultUser.jpg
  • Title CSS Style: enter optional CSS styles to format the Title (default: bold)
  • Text CSS Style:  enter optional CSS styles to format the Body Text (default: none)
  • Background Color (optional):  To set the desired Web Part Background color, enter either a HTML color name (as eg. “yellow”) or a hexadecimal RGB color value (as eg. “#ffcc33”). Leave this field empty if you don’t want to use a specific background color.
  • Show new Entry: shows a new entry depending on the below setting:
    – always (a new entry is displayed on every page refresh)
    – every Day
    – every Week
    – every Month
    – top Entry (the most recently added entry unless a View is used with a specific custom sorting order)
  • Show specific Entry: optionally enter the List ID of the List Item to be displayed.
  • Nbr. of Items to show: optionally enter two ore more items to be displayed side by side:
  • Center Web Part: horizontally centers the Web Part within the available space.
  • License Key: enter your Product License Key (as supplied after purchase of the “Spotlight On Web Part” license key).
    Leave this field empty if you are using the free 30 day evaluation version. You can check the evaluation period via the web part configuration pane.

Image

Contact me now on tomas.floyd@outlook.com to get o trial/copy of this Web Part (Also available as an Apo)

http://gravatar.com/sharepointsamurai

My Resume – Senior C#, SharePoint Developer with 9 years experience – In the job market

Enhanced by Zemanta

New “Focus On…” Web Part Released!!

The “Focus On…” Web Part selects a random entry from the specified Sharepoint Library and displays a picture, a title and an         abstract of the selected person or item.

The Web Part can be used with Windows Sharepoint Services V3, MOSS 2007, Sharepoint 2010 and Sharepoint 2013.

Feauture of the day 2
You can configure the following web part properties:

  • the Sharepoint Library
  • the List fields corresponding to the picture, title, abstract and detail link
  • enable or suppress the “Details..” URL.
  • show a new entry every day or on every page refresh

This allows you to display random data contained in any Sharepoint List by specifying the desired Sharepoint List name and the desired list column names.

How to use :

Create a new Sharepoint Picture Library if you do not intend to use an existing Picture Library.
If you decide to create a new Sharepoint list to store the Spotlight entries, create a new Sharepoint Picture Library anywhere in the Sharepoint site collection (the web part is able to access any picture library within the site collection).
The list needs the following columns to hold the entries:
– Title
– Abstract
– optional Detail Link URL

Focus on 2

Configure the following relevant Web Part properties in the Web Part Editor “Miscellaneous” pane section as needed:

  • Site Name: Enter the name of the site that contains the Spotlight Picture Library:
    – leave this field empty if the Library is in the current site (eg. the Web Part is placed in the same site)
    – Enter a “/” character if the Library is contained in the top site
    – Enter a path if the Library is in a subsite of the current site (eg. in the form of “current site/subsite”)
  • List Name: Enter the desired Sharepoint Picture Library
  • View Name: Optionally enter the desired List View of the list specified above. A List View allows you to specify specific data filtering and sorting.
    Leave this field empty if you want to use the List default view.
  • Title Field Name: Enter the desired Library Column name that contains the titles (Default=”Title”)
  • Abstract Field Name: Enter the desired Library Column name that contains the abstracts (Default=”Abstract”)You can alternatively specify a “Field Template” by entering the desired Library fields (surrounded by curly braces). You can specify HTML tags and CSS styles to freely format the text.

Focus on 4

  • Example:
    <strong>{JobTitle}</strong>
    <br>{Description}

    5px; margin-top:5px; background-color:orange”>


    <strong>Schools:</strong><br>
    {Bio}
    </div>

    The above example assumes that the Sharepoint Library includes a “JobTitle”, a “Description” and a “Bio” column.

  • Details URL Field Name: (optional) Enter the desired Library Column name that contains the Detail page links (Default=”DetailURL”). Leave this field empty if you don’t want to provide a detail link.
    If you want to automatically link to the corresponding Sharepoint List Detail View page, enter the keyword “DetailView” into this field.
    If you want to automatically link to the corresponding user’s “MySite” page, enter the keyword “MySite” into this field.
  • Open Details Link in new window: opens the link in a new browser window.
  • Details Caption: allows to localize the “Details..” link displayed in the lower right part of the web part (if a “Details” link is specified).
  • Text Layout: specify the placing of the Text with respect to the Image:
    – Right
    – Wrap
    – Bottom
    – Left
    – WrapLeft
  • Image Height: specify the image height in pixels. Enter “0” if you want to use the default picture size.
  • Default User Image: (optional) specify a default user picture (if there is no user picture available) by entering a relative URL to the imageExample:
    /yoursite/yourPictureLibrary/yourDefaultUser.jpg
  • Title CSS Style: enter optional CSS styles to format the Title (default: bold)
  • Text CSS Style:  enter optional CSS styles to format the Body Text (default: none)
  • Background Color (optional):  To set the desired Web Part Background color, enter either a HTML color name (as eg. “yellow”) or a hexadecimal RGB color value (as eg. “#ffcc33”). Leave this field empty if you don’t want to use a specific background color.
  • Show new Entry: shows a new entry depending on the below setting:
    – always (a new entry is displayed on every page refresh)
    – every Day
    – every Week
    – every Month
    – top Entry (the most recently added entry unless a View is used with a specific custom sorting order)
  • Show specific Entry: optionally enter the List ID of the List Item to be displayed.
  • Nbr. of Items to show: optionally enter two ore more items to be displayed side by side:

Focus on 6

  • Center Web Part: horizontally centers the Web Part within the available space.

Focus on 5

Contact me now for this awesome Web Part!

SharePoint 2013 App Available -Retrieves cross-domain data by using JSONP

This is a SharePoint-hosted app for SharePoint that uses JSON with Padding (JSONP) to retrieve data from a proxy page on a Windows Azure Web Site. The sample contains two solutions, one for the App and one for its use on a SharePoint page.

The App deploys the JSONPClient  App part for SharePoint.

You add the app part to a page and then enter the URL of the proxy page and the URL of a feed. The proxy page gets data from the feed that’s specified in the app part, and returns the data in JavaScript Object Notation (JSON) format.

The app part gets the feed data from the proxy page by using JSONP, and then displays the data.

Figure 1. The JSONPClient SharePoint App displays data from the specified feed on the page/s it is placed


SP15_app_JsonpAppPart (2)


Please contact me for this or any other SharePoint and Office365 Web Parts / Apps :

On-Premise and for the Cloud and Azure

Dynamics CRM, SharePoint, and Office – A Great Combo (Channel 9 Video)

Office, SharePoint and CRM

With the first release of the OBA Sample Application Kit for SAP, http://archive.msdn.microsoft.com/obasapsak, you learned the concepts around OBAs. These powerful composite applications bring Line-of-Business (LOB) data (e.g. SAP, PeopleSoft, or Dynamics) to the end-user’s fingertips within the context of the Office applications they use and know.

Version 1.0 of the Sample Application Kit for SAP was built on Microsoft Office SharePoint Server 2007 and Microsoft Office 2007. Version 2.0 is built on SharePoint 2010 and Office 2010 using Visual Studio 2010.

The sample application is a travel package booking application designed to allow users to work within their familiar Microsoft Office environment to access and update some LOB data in SAP.

The sample application is composed of an Excel 2010 add-in, and on SharePoint 2010, a Silverlight user experience is used for interacting with LOB data via Business Connectivity Services (BCS).Each part of the sample application is developed, at least partially, with Visual Studio 2010.

The SharePoint portion, of course, uses SharePoint specific tools.The OBA Sample Application Kit for SAP v. 2.0 accesses data from both SAP via Web services and from SQL Server.

These OBA resources were recommended reading for v. 1.0 and still provide an excellent conceptual foundation for v. 2.0:

  1. Six Office Business Applications (MS Press) or Programming Microsoft Office Business Applications (MS Press).
  2. Overview of an OBA: http://msdn2.microsoft.com/en-us/library/bb614538.aspx 

3. Overview of OBA Solution Patterns: http://msdn2.microsoft.com/en-us/library/bb614541.aspx 

So, with the above in hand what is this OBA Sample Application Kit for SAP v. 2.0?

In many cases, developers don’t have the knowledge on how to programmatically integrate Office applications with LOB systems.

What this kit provides is guidance on how you can integrate with Web services that have been generated from within SAP and then consume those services within a .NET and managed code environment.

The OBA Sample Application Kit for SAP v. 2.0 (one in a series of kits) includes a deep dive technical document, istallation document, demo walkthrough document of the end-user experience and source code.

The sample application kit is composed of an Excel 2010 add-in and a SharePoint 2010 site.

The Excel 2010 add-in facilitates the process of purchasing packages, maintaining packages and associated events and booking flights.

The application is also used to dynamically generate PowerPoint 2010 presentations using the Open XML SDK.

These PowerPoint 2010 presentations are shown to potential customers and display marketing information designed to entice customers to purchase packages.

The SharePoint 2010 site is a web site that enables the browsing of packages, events, flights and customer data.

The goal of the kit is to provide developers with information on how they can learn to programmatically integrate SAP with Office and SharePoint using Visual Studio 2010.

So click on the Downloads tab where you’ll find links to the documents and source code.

Please note that the download items are unsupported and are intended only for instructional use.

Additional Office and SharePoint Resources:

1. Office Developer Training Course on MSDN: http://msdn.microsoft.com/en-us/Office2010DeveloperTrainingCourse .

  1. SharePoint DeveloperTraining Course on MSDN:http://msdn.microsoft.com/en-us/SP2010DevTrainingCourse 

3. SharePoint Sideshow for Developers on Channel 9:http://channel9.msdn.com/Shows/SharePointSideshow 

4. Video instructions for how to get and setup a turn-key VHD for Office and SharePoint development and demo: http://bit.ly/hSd8nJ .

5. Office Developer Center on MSDN: http://msdn.microsoft.com/office 

I hope you enjoy the v. 2.0 kit, and if you’re looking for something on PeopleSoft integration, the OBA Sample Application Kit for PeopleSoft v. 2.0 is here, http://bit.ly/obapsftsak20 .

SHAREPOINT INTEGRATION TO YAMMER

Microsoft is making good on its commitment to add more e-mail and SharePoint integration to its Yammer enterprise social-networking product.

Maximize the power of SharePoint with Yammer and turn business collaboration into a social, mobile, and engaging experience. Whether it’s My Sites or Team Sites, Yammer deeply integrates with SharePoint 2010 to add a real-time social layer to core SharePoint capabilities. Engage in team and company-wide conversations, collaborate around files and projects, and become more productive by using SharePoint and Yammer together. And when you’re on the go, stay connected to conversations happening inside SharePoint with Yammer mobile applications.
Features
Primary Yammer Web Part
» Embed virtually any Yammer feed (including My Feed and Group Feeds) into SharePoint sites to facilitate team and company-wide conversations.
» Send private messages directly to one or more coworkers at a time and keep track of these conversations in a separate Private Messages tab.
» Manage new messages, @mentions, replies and more in a separate Notifications tab.
Single Sign-On Leverage SharePoint authentication credentials to simultaneously log into Yammer through a single entry point.
Admin Configurations Manage the Primary Yammer Web Part using SharePoint’s built-in Web Part controls and templates. Choose to configure read-only Yammer feeds so that users without Yammer accounts can also view conversations.
Light Embeddable Feeds Embed a lightweight Yammer mini feed anywhere in SharePoint to view and keep track of relevant discussions without disrupting your workflow. Click-back to the Primary Yammer Web Part to get involved in the conversation.
Document Integration Send links to documents from SharePoint to Yammer feeds for real-time collaboration.
Federated Search Find the information you need fast with relevant Yammer messages displayed side by your SharePoint search results.
yammer
System Requirements
» SharePoint Server 2010 (Standard or Enterprise Edition)
» SharePoint Server 2010 Service Pack 1
»SharePoint Server 2010 Cumulative Update Refresh Package: Aug 30, 2011

Benefits

  • Comprehensive collaboration. The network unites response agents in the field with claims processors at headquarters, who can tap in on any device.
  • A more effective social intranet. Yammer integrates with Nationwide’s key applications, including SharePoint.
  • Improved productivity. Better information sharing and the crowdsourcing of ideas means faster responses to business and customer demands.
  • A stronger corporate culture. The network helped transform a widespread employee base into a more tightly knit workforce focused on customer satisfaction