Category Archives: My CV

NEW MS TEST MANAGER TOOL AVAILABLE!!

MTM_2010

Copy and Cloning Test Suites and Tests  OVER Team Collections

MTM Copy  can copy and cloning Test Suites and Tests over Team Projects and Team Collections.

Since 2012 Microsoft Introduce Clone feature from Microsoft Test Manager 2012, but you can only clone in the SAME Team Project ONLY . http://msdn.microsoft.com/en-us/library/hh543843.aspx

  1. Empty Team Project

1.png

  1. Open MTM Copy Tool, specify the Source and Target Team Projects, can be on Different Collections.
  2. On the mapping panel select the desire Test Plans, Test Suites and Test Cases you wish to Clone.

2.png

  1. Create Test Plan on Target Project, or select an existing Test Plan.

3.png
5.png

  1. Click “Start Migration”, and you’re done!

6.png

  1. Each Test Case that were copy is saved in Completed Items Mapping, this will prevent copy that save Test Case twice to prevent duplication’s.


How to: Create a provider-hosted app for SharePoint to access SAP data via SAP Gateway for Microsoft

You can create an app for SharePoint that reads and writes SAP data, and optionally reads and writes SharePoint data, by using SAP Gateway for Microsoft and the Azure AD Authentication Library for .NET. This article provides the procedures for how you can design the app for SharePoint to get authorized access to SAP.

hero-for-hire_basic-layout_600sap_integration_en_round[1]


The following are prerequisites to the procedures in this article:

sap_integration_en_round[2]

Code sample: SharePoint 2013: Using the SAP Gateway to Microsoft in an app for SharePoint

OAuth 2.0 in Azure AD enables applications to access multiple resources hosted by Microsoft Azure and SAP Gateway for Microsoft is one of them. With OAuth 2.0, applications, in addition to users, are security principals. Application principals require authentication and authorization to protected resources in addition to (and sometimes instead of) users. The process involves an OAuth “flow” in which the application, which can be an app for SharePoint, obtains an access token (and refresh token) that is accepted by all of the Microsoft Azure-hosted services and applications that are configured to use Azure AD as an OAuth 2.0 authorization server. The process is very similar to the way that the remote components of a provider-hosted app for SharePoint gets authorization to SharePoint as described in Creating apps for SharePoint that use low-trust authorization and its child articles. However, the ACS authorization system uses Microsoft Azure Access Control Service (ACS) as the trusted token issuer rather than Azure AD.

Tip Tip
If your app for SharePoint accesses SharePoint in addition to accessing SAP Gateway for Microsoft, then it will need to use both systems: Azure AD to get an access token to SAP Gateway for Microsoft and the ACS authorization system to get an access token to SharePoint. The tokens from the two sources are not interchangeable. For more information, see Optionally, add SharePoint access to the ASP.NET application.

For a detailed description and diagram of the OAuth flow used by OAuth 2.0 in Azure AD, see Authorization Code Grant Flow. (For a similar description, and a diagram, of the flow for accessing SharePoint, see See the steps in the Context Token flow.)

Create the Visual Studio solution

  1. Create an App for SharePoint project in Visual Studio with the following steps. (The continuing example in this article assumes you are using C#; but you can start an app for SharePoint project in the Visual Basic section of the new project templates as well.)
    1. In the New app for SharePoint wizard, name the project and click OK. For the continuing example, use SAP2SharePoint.
    2. Specify the domain URL of your Office 365 Developer Site (including a final forward slash) as the debugging site; for example, https://<O365_domain&gt;.sharepoint.com/. Specify Provider-hosted as the app type. Click Next.
    3. Choose a project type. For the continuing example, choose ASP.NET Web Forms Application. (You can also make ASP.NET MVC applications that access SAP Gateway for Microsoft.) Click Next.
    4. Choose Azure ACS as the authentication system. (Your app for SharePoint will use this system if it accesses SharePoint. It does not use this system when it accesses SAP Gateway for Microsoft.) Click Finish.
  2. After the project is created, you are prompted to login to the Office 365 account. Use the credentials of an account administrator; for example Bob@<O365_domain>.onmicrosoft.com.
  3. There are two projects in the Visual Studio solution; the app for SharePoint proper project and an ASP.NET web forms project. Add the Active Directory Authentication Library (ADAL) package to the ASP.NET project with these steps:
    1. Right-click the References folder in the ASP.NET project (named SAP2SharePointWeb in the continuing example) and select Manage NuGet Packages.
    2. In the dialog that opens, select Online on the left. Enter Microsoft.IdentityModel.Clients.ActiveDirectory in the search box.
    3. When the ADAL library appears in the search results, click the Install button beside it, and accept the license when prompted.
  4. Add the Json.net package to the ASP.NET project with these steps:
    1. Enter Json.net in the search box. If this produces too many hits, try searching on Newtonsoft.json.
    2. When Json.net appears in the search results, click the Install button beside it.
  5. Click Close.

Register your web application with Azure AD

  1. Login into the Azure Management portal with your Azure administrator account.
    Note Note
    For security purposes, we recommend against using an administrator account when developing apps.
  2. Choose Active Directory on the left side.
  3. Click on your directory.
  4. Choose APPLICATIONS (on the top navigation bar).
  5. Choose Add on the toolbar at the bottom of the screen.
  6. On the dialog that opens, choose Add an application my organization is developing.
  7. On the ADD APPLICATION dialog, give the application a name. For the continuing example, use ContosoAutomobileCollection.
  8. Choose Web Application And/Or Web API as the application type, and then click the right arrow button.
  9. On the second page of the dialog, use the SSL debugging URL from the ASP.NET project in the Visual Studio solution as the SIGN-ON URL. You can find the URL using the following steps. (You need to register the app initially with the debugging URL so that you can run the Visual Studio debugger (F5). When your app is ready for staging, you will re-register it with its staging Azure Web Site URL. Modify the app and stage it to Azure and Office 365.)
    1. Highlight the ASP.NET project in Solution Explorer.
    2. In the Properties window, copy the value of the SSL URL property. An example is https://localhost:44300/.
    3. Paste it into the SIGN-ON URL on the ADD APPLICATION dialog.
  10. For the APP ID URI, give the application a unique URI, such as the application name appended to the end of the SSL URL; for example https://localhost:44300/ContosoAutomobileCollection.
  11. Click the checkmark button. The Azure dashboard for the application opens with a success message.
  12. Choose CONFIGURE on the top of the page.
  13. Scroll to the CLIENT ID and make a copy of it. You will need it for a later procedure.
  14. In the keys section, create a key. It won’t appear initially. Click SAVE at the bottom of the page and the key will be visible. Make a copy of it. You will need it for a later procedure.
  15. Scroll to permissions to other applications and select your SAP Gateway for Microsoft service application.
  16. Open the Delegated Permissions drop down list and enable the boxes for the permissions to the SAP Gateway for Microsoft service that your app for SharePoint will need.
  17. Click SAVE at the bottom of the screen.

Configure the application to communicate with Azure AD

  1. In Visual Studio, open the web.config file in the ASP.NET project.
  2. In the <appSettings> section, the Office Developer Tools for Visual Studio have added elements for the ClientID and ClientSecret of the app for SharePoint. (These are used in the Azure ACS authorization system if the ASP.NET application accesses SharePoint. You can ignore them for the continuing example, but do not delete them. They are required in provider-hosted apps for SharePoint even if the app is not accessing SharePoint data. Their values will change each time you press F5 in Visual Studio.) Add the following two elements to the section. These are used by the application to authenticate to Azure AD. (Remember that applications, as well as users, are security principals in OAuth-based authentication and authorization systems.)
    <add key="ida:ClientID" value="" />
    <add key="ida:ClientKey" value="" />
    
  3. Insert the client ID that you saved from your Azure AD directory in the earlier procedure as the value of the ida:ClientID key. Leave the casing and punctuation exactly as you copied it and be careful not to include a space character at the beginning or end of the value. For the ida:ClientKey key use the key that you saved from the directory. Again, be careful not to introduce any space characters or change the value in any way. The <appSettings> section should now look something like the following. (The ClientId value may have a GUID or an empty string.)
    <appSettings>
      <add key="ClientId" value="" />
      <add key="ClientSecret" value="LypZu2yVajlHfPLRn5J2hBrwCk5aBOHxE4PtKCjIQkk=" />
      <add key="ida:ClientID" value="4da99afe-08b5-4bce-bc66-5356482ec2df" />
      <add key="ida:ClientKey" value="URwh/oiPay/b5jJWYHgkVdoE/x7gq3zZdtcl/cG14ss=" />
    </appSettings>
    
    NoteNote
    Your application is known to Azure AD by the “localhost” URL you used to register it. The client ID and client key are associated with that identity. When you are ready to stage your application to an Azure Web Site, you will re-register it with a new URL.
  4. Still in the appSettings section, add an Authority key and set its value to the Office 365 domain (some_domain.onmicrosoft.com) of your organizational account. In the continuing example, the organizational account is Bob@<O365_domain>.onmicrosoft.com, so the authority is <O365_domain>.onmicrosoft.com.
    <add key="Authority" value="<O365_domain>.onmicrosoft.com" />
    
  5. Still in the appSettings section, add an AppRedirectUrl key and set its value to the page that the user’s browser should be redirected to after the ASP.NET app has obtained an authorization code from Azure AD. Usually, this is the same page that the user was on when the call to Azure AD was made. In the continuing example, use the SSL URL value with “/Pages/Default.aspx” appended to it as shown below. (This is another value that you will change for staging.)
    Copy
    <add key="AppRedirectUrl" value="https://localhost:44322/Pages/Default.aspx" />
    
  6. Still in the appSettings section, add a ResourceUrl key and set its value to the APP ID URI of SAP Gateway for Microsoft (not the APP ID URI of your ASP.NET application). Obtain this value from the SAP Gateway for Microsoft administrator. The following is an example.
    <add key="ResourceUrl" value="http://<SAP_gateway_domain>.cloudapp.net/" />
    

    The <appSettings> section should now look something like this:

    <appSettings>
      <add key="ClientId" value="06af1059-8916-4851-a271-2705e8cf53c6" />
      <add key="ClientSecret" value="LypZu2yVajlHfPLRn5J2hBrwCk5aBOHxE4PtKCjIQkk=" />
      <add key="ida:ClientID" value="4da99afe-08b5-4bce-bc66-5356482ec2df" />
      <add key="ida:ClientKey" value="URwh/oiPay/b5jJWYHgkVdoE/x7gq3zZdtcl/cG14ss=" />
      <add key="Authority" value="<O365_domain>.onmicrosoft.com" />
      <add key="AppRedirectUrl" value="https://localhost:44322/Pages/Default.aspx" />
      <add key="ResourceUrl" value="http://<SAP_gateway_domain>.cloudapp.net/" />
    </appSettings>
    
  7. Save and close the web.config file.
    Tip Tip
    Do not leave the web.config file open when you run the Visual Studio debugger (F5). The Office Developer Tools for Visual Studio change the ClientId value (not the ida:ClientID) every time you press F5. This requires you to respond to a prompt to reload the web.config file, if it is open, before debugging can execute.

Add a helper class to authenticate to Azure AD

  1. Right-click the ASP.NET project and use the Visual Studio item adding process to add a new class file to the project named AADAuthHelper.cs.
  2. Add the following using statements to the file.
    using Microsoft.IdentityModel.Clients.ActiveDirectory;
    using System.Configuration;
    using System.Web.UI;
    
    
  3. Change the access keyword from public to internal and add the static keyword to the class declaration.
    internal static class AADAuthHelper
    
  4. Add the following fields to the class. These fields store information that your ASP.NET application uses to get access tokens from AAD.
    private static readonly string _authority = ConfigurationManager.AppSettings["Authority"];
    private static readonly string _appRedirectUrl = ConfigurationManager.AppSettings["AppRedirectUrl"];
    private static readonly string _resourceUrl = ConfigurationManager.AppSettings["ResourceUrl"];     
            
    private static readonly ClientCredential _clientCredential = new ClientCredential(
                               ConfigurationManager.AppSettings["ida:ClientID"],
                               ConfigurationManager.AppSettings["ida:ClientKey"]);
    
    private static readonly AuthenticationContext _authenticationContext = 
                new AuthenticationContext("https://login.windows.net/common/" + 
                                          ConfigurationManager.AppSettings["Authority"]);
    
  5. Add the following property to the class. This property holds the URL to the Azure AD login screen.
    private static string AuthorizeUrl
    {
        get
        {
            return string.Format("https://login.windows.net/{0}/oauth2/authorize?response_type=code&redirect_uri={1}&client_id={2}&state={3}",
                _authority,
                _appRedirectUrl,
                _clientCredential.OwnerId,
                Guid.NewGuid().ToString());
        }
    }
    
    
  6. Add the following properties to the class. These cache the access and refresh tokens and check their validity.
    public static Tuple<string, DateTimeOffset> AccessToken
    {
        get {
    return HttpContext.Current.Session["AccessTokenWithExpireTime-" + _resourceUrl] 
           as Tuple<string, DateTimeOffset>;
        }
    
        set { HttpContext.Current.Session["AccessTokenWithExpireTime-" + _resourceUrl] = value; }
    }
    
    private static bool IsAccessTokenValid
    {
       get 
       { 
           return AccessToken != null &&
           !string.IsNullOrEmpty(AccessToken.Item1) &&
           AccessToken.Item2 > DateTimeOffset.UtcNow;
       }
    }
    
    private static string RefreshToken
    {
        get { return HttpContext.Current.Session["RefreshToken" + _resourceUrl] as string; }
        set { HttpContext.Current.Session["RefreshToken-" + _resourceUrl] = value; }
    }
    
    private static bool IsRefreshTokenValid
    {
        get { return !string.IsNullOrEmpty(RefreshToken); }
    }
    
    
  7. Add the following methods to the class. These are used to check the validity of the authorization code and to obtain an access token from Azure AD by using either an authentication code or a refresh token.
    private static bool IsAuthorizationCodeNotNull(string authCode)
    {
        return !string.IsNullOrEmpty(authCode);
    }
    
    private static Tuple<Tuple<string,DateTimeOffset>,string> AcquireTokensUsingAuthCode(string authCode)
    {
        var authResult = _authenticationContext.AcquireTokenByAuthorizationCode(
                    authCode,
                    new Uri(_appRedirectUrl),
                    _clientCredential,
                    _resourceUrl);
    
        return new Tuple<Tuple<string, DateTimeOffset>, string>(
                    new Tuple<string, DateTimeOffset>(authResult.AccessToken, authResult.ExpiresOn), 
                    authResult.RefreshToken);
    }
    
    private static Tuple<string, DateTimeOffset> RenewAccessTokenUsingRefreshToken()
    {
        var authResult = _authenticationContext.AcquireTokenByRefreshToken(
                             RefreshToken,
                             _clientCredential.OwnerId,
                             _clientCredential,
                             _resourceUrl);
    
        return new Tuple<string, DateTimeOffset>(authResult.AccessToken, authResult.ExpiresOn);
    }
    
    
  8. Add the following method to the class. It is called from the ASP.NET code behind to obtain a valid access token before a call is made to get SAP data via SAP Gateway for Microsoft.
    internal static void EnsureValidAccessToken(Page page)
    {
        if (IsAccessTokenValid) 
        {
            return;
        }
        else if (IsRefreshTokenValid) 
        {
            AccessToken = RenewAccessTokenUsingRefreshToken();
            return;
        }
        else if (IsAuthorizationCodeNotNull(page.Request.QueryString["code"]))
        {
            Tuple<Tuple<string, DateTimeOffset>, string> tokens = null;
            try
            {
                tokens = AcquireTokensUsingAuthCode(page.Request.QueryString["code"]);
            }
            catch 
            {
                page.Response.Redirect(AuthorizeUrl);
            }
            AccessToken = tokens.Item1;
            RefreshToken = tokens.Item2;
            return;
        }
        else
        {
            page.Response.Redirect(AuthorizeUrl);
        }
    }
    
Tip Tip
The AADAuthHelper class has only minimal error handling. For a robust, production quality app for SharePoint, add more error handling as described in this MSDN node: Error Handling in OAuth 2.0.

Create data model classes

  1. Create one or more classes to model the data that your app gets from SAP. In the continuing example, there is just one data model class. Right-click the ASP.NET project and use the Visual Studio item adding process to add a new class file to the project named Automobile.cs.
  2. Add the following code to the body of the class:
    public string Price;
    public string Brand;
    public string Model;
    public int Year;
    public string Engine;
    public int MaxPower;
    public string BodyStyle;
    public string Transmission;
    

Add code behind to get data from SAP via the SAP Gateway for Microsoft

  1. Open the Default.aspx.cs file and add the following using statements.
    using System.Net;
    using Newtonsoft.Json.Linq;
    
  2. Add a const declaration to the Default class whose value is the base URL of the SAP OData endpoint that the app will be accessing. The following is an example:
    private const string SAP_ODATA_URL = @"https://<SAP_gateway_domain>.cloudapp.net:8081/perf/sap/opu/odata/sap/ZCAR_POC_SRV/";
    
  3. The Office Developer Tools for Visual Studio have added a Page_PreInit method and a Page_Load method. Comment out the code inside the Page_Load method and comment out the whole Page_Init method. This code is not used in this sample. (If your app for SharePoint is going to access SharePoint, then you restore this code. See Optionally, add SharePoint access to the ASP.NET application.)
  4. Add the following line to the top of the Page_Load method. This will ease the process of debugging because your ASP.NET application is communicating with SAP Gateway for Microsoft using SSL (HTTPS); but your “localhost:port” server is not configured to trust the certificate of SAP Gateway for Microsoft. Without this line of code, you would get an invalid certificate warning before Default.aspx will open. Some browsers allow you to click past this error, but some will not let you open Default.aspx at all.
    ServicePointManager.ServerCertificateValidationCallback = (s, cert, chain, errors) => true;
    
    Important noteImportant
    Delete this line when you are ready to deploy the ASP.NET application to staging. See Modify the app and stage it to Azure and Office 365.
  5. Add the following code to the Page_Load method. The string you pass to the GetSAPData method is an OData query.
    if (!IsPostBack)
    {
        GetSAPData("DataCollection?$top=3");
    }
    
    
  6. Add the following method to the Default class. This method first ensures that the cache for the access token has a valid access token in it that has been obtained from Azure AD. It then creates an HTTP GET Request that includes the access token and sends it to the SAP OData endpoint. The result is returned as a JSON object that is converted to a .NET List object. Three properties of the items are used in an array that is bound to the DataListView.
    private void GetSAPData(string oDataQuery)
    {
        AADAuthHelper.EnsureValidAccessToken(this);
    
        using (WebClient client = new WebClient())
        {
            client.Headers[HttpRequestHeader.Accept] = "application/json";
            client.Headers[HttpRequestHeader.Authorization] = "Bearer " + AADAuthHelper.AccessToken.Item1;
            var jsonString = client.DownloadString(SAP_ODATA_URL + oDataQuery);
            var jsonValue = JObject.Parse(jsonString)["d"]["results"];
            var dataCol = jsonValue.ToObject<List<Automobile>>();
    
            var dataList = dataCol.Select((item) => {
                return item.Brand + " " + item.Model + " " + item.Price;
                }).ToArray();
    
            DataListView.DataSource = dataList;
            DataListView.DataBind();
        }
    }


Create the user interface

  1. Open the Default.aspx file and add the following markup to the form of the page:
    <div>
      <h3>Data from SAP via SAP Gateway for Microsoft</h3>
    
      <asp:ListView runat="server" ID="DataListView">
        <ItemTemplate>
          <tr runat="server">
            <td runat="server">
              <asp:Label ID="DataLabel" runat="server"
                Text="<%# Container.DataItem.ToString()%>" /><br />
            </td>
          </tr>
        </ItemTemplate>
      </asp:ListView>
    </div>
    
  2. Optionally, give the web page the “look ‘n’ feel” of a SharePoint page with the SharePoint Chrome Control and the host SharePoint website’s style sheet.

Test the app with F5 in Visual Studio

  1. Press F5 in Visual Studio.
  2. The first time that you use F5, you may be prompted to login to the Developer Site that you are using. Use the site administrator credentials. In the continuing example, it is Bob@<O365_domain>.onmicrosoft.com.
  3. The first time that you use F5, you are prompted to grant permissions to the app. Click Trust It.
  4. After a brief delay while the access token is being obtained, the Default.aspx page opens. Verify that the SAP data appears.

Optionally, add SharePoint access to the ASP.NET application


Of course, your app for SharePoint doesn’t have to expose only SAP data in a web page launched from SharePoint. It can also create, read, update, and delete (CRUD) SharePoint data. Your code behind can do this using either the SharePoint client object model (CSOM) or the REST APIs of SharePoint. The CSOM is deployed as a pair of assemblies that the Office Developer Tools for Visual Studio automatically included in the ASP.NET project and set to Copy Local in Visual Studio so that they are included in the ASP.NET application package. For information about using CSOM, start with How to: Complete basic operations using SharePoint 2013 client library code. For information about using the REST APIs, start with Understanding and Using the SharePoint 2013 REST Interface.Regardless, of whether you use CSOM or the REST APIs to access SharePoint, your ASP.NET application must get an access token to SharePoint, just as it does to SAP Gateway for Microsoft. See Understand authentication and authorization to SAP Gateway for Microsoft and SharePoint above. The procedure below provides some basic guidance about how to do this, but we recommend that you first read the following articles:

  1. Open the Default.aspx.cs file and uncomment the Page_PreInit method. Also uncomment the code that the Office Developer Tools for Visual Studio added to the Page_Load method.
  2. If your app for SharePoint is going to access SharePoint data, then you have to cache the SharePoint context token that is POSTed to the Default.aspx page when the app is launched in SharePoint. This is to ensure that the SharePoint context token is not lost when the browser is redirected following the Azure AD authentication. (You have several options for how to cache this context. See OAuth tokens.) The Office Developer Tools for Visual Studio add a SharePointContext.cs file to the ASP.NET project that does most of the work. To use the session cache, you simply add the following code inside the “if (!IsPostBack)” block before the code that calls out to SAP Gateway for Microsoft:
    if (HttpContext.Current.Session["SharePointContext"] == null) 
    {
         HttpContext.Current.Session["SharePointContext"]
            = SharePointContextProvider.Current.GetSharePointContext(Context);
    }
    
  3. The SharePointContext.cs file makes calls to another file that the Office Developer Tools for Visual Studio added to the project: TokenHelper.cs. This file provides most of the code needed to obtain and use access tokens for SharePoint. However, it does not provide any code for renewing an expired access token or an expired refresh token. Nor does it contain any token caching code. For a production quality app for SharePoint, you need to add such code. The caching logic in the preceding step is an example. Your code should also cache the access token and reuse it until it expires. When the access token is expired, your code should use the refresh token to get a new access token. We recommend that you read OAuth tokens.
  4. Add the data calls to SharePoint using either CSOM or REST. The following example is a modification of CSOM code that Office Developer Tools for Visual Studio adds to the Page_Load method. In this example, the code has been moved to a separate method and it begins by retrieving the cached context token.
    Copy
    private void GetSharePointTitle()
    {
        var spContext = HttpContext.Current.Session["SharePointContext"] as SharePointContext;
        using (var clientContext = spContext.CreateUserClientContextForSPHost())
        {
            clientContext.Load(clientContext.Web, web => web.Title);
            clientContext.ExecuteQuery();
            SharePointTitle.Text = "SharePoint web site title is: " + clientContext.Web.Title;
        }
    }
    
  5. Add UI elements to render the SharePoint data. The following shows the HTML control that is referenced in the preceding method:
    <h3>SharePoint title</h3><asp:Label ID="SharePointTitle" runat="server"></asp:Label><br />
    
Note Note
While you are debugging the app for SharePoint, the Office Developer Tools for Visual Studio re-register it with Azure ACS each time you press F5 in Visual Studio. When you stage the app for SharePoint, you have to give it a long-term registration. See the section Modify the app and stage it to Azure and Office 365.

Modify the app and stage it to Azure and Office 365


When you have finished debugging the app for SharePoint using F5 in Visual Studio, you need to deploy the ASP.NET application to an actual Azure Web Site.

Create the Azure Web Site

  1. In the Microsoft Azure portal, open WEB SITES on the left navigation bar.
  2. Click NEW at the bottom of the page and on the NEW dialog select WEB SITE | QUICK CREATE.
  3. Enter a domain name and click CREATE WEB SITE. Make a copy of the new site’s URL. It will have the form my_domain.azurewebsites.net.

Modify the code and markup in the application

  1. In Visual Studio, remove the line ServicePointManager.ServerCertificateValidationCallback = (s, cert, chain, errors) => true; from the Default.aspx.cs file.
  2. Open the web.config file of the ASP.NET project and change the domain part of the value of the AppRedirectUrl key in the appSettings section to the domain of the Azure Web Site. For example, change <add key=”AppRedirectUrl” value=”https://localhost:44322/Pages/Default.aspx&#8221; /> to <add key=”AppRedirectUrl” value=”https://my_domain.azurewebsites.net/Pages/Default.aspx&#8221; />.
  3. Right-click the AppManifest.xml file in the app for SharePoint project and select View Code.
  4. In the StartPage value, replace the string ~remoteAppUrl with the full domain of the Azure Web Site including the protocol; for example https://my_domain.azurewebsites.net. The entire StartPage value should now be: https://my_domain.azurewebsites.net/Pages/Default.aspx. (Usually, the StartPage value is exactly the same as the value of the AppRedirectUrl key in the web.config file.)

Modify the AAD registration and register the app with ACS

  1. Login into Azure Management portal with your Azure administrator account.
  2. Choose Active Directory on the left side.
  3. Click on your directory.
  4. Choose APPLICATIONS (on the top navigation bar).
  5. Open the application you created. In the continuing example, it is ContosoAutomobileCollection.
  6. For each of the following values, change the “localhost:port” part of the value to the domain of your new Azure Web Site:
    • SIGN-ON URL
    • APP ID URI
    • REPLY URL

    For example, if the APP ID URI is https://localhost:44304/ContosoAutomobileCollection, change it to https://<my_domain&gt;.azurewebsites.net/ContosoAutomobileCollection.

  7. Click SAVE at the bottom of the screen.
  8. Register the app with Azure ACS. This must be done even if the app does not access SharePoint and will not use tokens from ACS, because the same process also registers the app with the App Management Service of the Office 365 subscription, which is a requirement. You perform the registration on the AppRegNew.aspx page of any SharePoint website in the Office 365 subscription. For details, see Guidelines for registering apps for SharePoint 2013. As part of this process you will obtain a new client ID and client secret. Insert these values in the web.config for the ClientId (not ida:ClientID) and ClientSecret keys.
    Caution note Caution
    If for any reason you press F5 after making this change, the Office Developer Tools for Visual Studio will overwrite one or both of these values. For that reason, you should keep a record of the values obtained with AppRegNew.aspx and always verify that the values in the web.config are correct just before you publish the ASP.NET application.

Publish the ASP.NET application to Azure and install the app to SharePoint

  1. There are several ways to publish an ASP.NET application to an Azure Web Site. For more information, see How to Deploy an Azure Web Site.
  2. In Visual Studio, right-click the SharePoint app project and select Package. On the Publish your app page that opens, click Package the app. File explorer opens to the folder with the app package.
  3. Login to Office 365 as a global administrator, and navigate to the organization app catalog site collection. (If there isn’t one, create it. See Use the App Catalog to make custom business apps available for your SharePoint Online environment.)
  4. Upload the app package to the app catalog.
  5. Navigate to the Site Contents page of any website in the subscription and click add an app.
  6. On the Your Apps page, scroll to the Apps you can add section and click the icon for your app.
  7. After the app has installed, click it’s icon on the Site Contents page to launch the app.

For more information about installing apps for SharePoint, see Deploying and installing apps for SharePoint: methods and options.

Deploying the app to production


When you have finished all testing you can deploy the app in production. This may require some changes.

  1. If the production domain of the ASP.NET application is different from the staging domain, you will have to change AppRedirectUrl value in the web.config and the StartPage value in the AppManifest.xml file, and repackage the app for SharePoint. See the procedure Modify the code and markup in the application above.
  2. The change in domain also requires that you edit the apps registration with AAD. See the procedure Modify the AAD registration and register the app with ACS above.
  3. The change in domain also requires that you re-register the app with ACS (and the subscription’s App Management Service) as described in the same procedure. (There is no way to edit an app’s registration with ACS.) However, it is not necessary to generate a new client ID or client secret on the AppRegNew.aspx page. You can copy the original values from the ClientId (not ida:ClientID) and ClientSecret keys of the web.config into the AppRegNew form. If you do generate new ones, be sure to copy the new values to the keys in web.config.

The Hardest thing I ever had to do……..

I am sure everybody that ever saw the movie with Will Smith, The Persuit of Happiness, will remember all the heart-breaking scenes from the movie.

For Chris Gardner, the real life inspirational person Will Smith portrays, the scene where he and his son has nowhere to sleep except a bathroom was so hard, he couldn’t be on the movie set when the scene was shot.

Now I didn’t say this is going to be the hardest thing I ever wrote for nothing……  Remember that bathroom scene, now replace Will Smith just with me and my laptop – This is being written from within a McDonalds bathroom stall, where I can have Wifi access.

What I am going to reveal here will maybe shock some, give satisfaction to those who think I did them harm, will mostly be read with pity and then you move on with your life, but maybe. just maybe, there will be 1 person who reads this and extends his/her hand of help and assistance.

A few months ago I moved back to my mother’s in order to take care of her – She became addicted, and still is, to codeine and benzodiazipines (pain killers and axiety tablits).

I have a sister who is 10 years younger than me who I haven’t seen in more than a year – I don’t even know how or where to contact her, as she got a restraining order against my mother, after she and her boyfriend was both attacked by my mother in a drug induced pshycosis.

My brother, 3 years younger than me, is in the process of applying for a restraining order against my mother after the same happened to him and he was attacked (he has been forced into a life where he has no contact with anyone of us anymore).

We grew up tough. I would say tougher than most…. My father mentally, physically and emotionally abused my mother and emotionally and mentally us 3 children,

This happened as far as I can think back, so for at least from the age of 10 did I witness this abuse day in and out, the same with my brother and to a degree my sister (Thank God that they are divorced, but even he has a restraining order against my mother).

I hope this starts to paint for you the picture of where I came from……..

When I moved back home, it was to try and help my mother get off the drugs and get her back on her feet.

In this process I loaned her 50K for a new car.

This week things came to a point where I felt no longer safe to live with my mother anymore, when she attacked me with a knife (my cell phone broke in defending myself, but the scars are here for anyone to see).

I now literally have a few items of clothing and my laptop, moving from wifi hotspot to hotspot as I am trying to keep my dream alive.

I have slept next the train tracks, in storage facilities, in empty buildings, hospitals, toilets……..

BUT this is not a plea for pity, please dont get that wrong!

I am a Senior C# & SharePoint Developer with 10 years experience and a BSC degree I completed with distinction.

My mother is however refusing to pay back the money she owes me (although her old car is standing at her flat, it just needs to be sold – A red Fiat Panda)

She is also refusing me access to my cell phone and to my car – which makes it impossible for me to find a stable job.

Those of you wondering – Well, why not take what is yours? My mother had me locked up by the SAPS when I did it in the past and is threatening to do it again (She has the Sinoville police completely wrapped around her pinkie finger)

ALL I am asking of you is – Please go take a look at my web site : https://sharepointsamurai.wordpress.com/ – I am even giving away a free SharePoint Corporate Calendar roll-up App for those who are just willing to take a look at my CV and skills available to see on my web site.

ALL I am asking is – Please give me a chance. Please offer me a job. I will work for shelter and food – Development has always been my passion, not money.

I am not even thus asking for a salary, though I can easily earn 40K a month – ALL I am asking for is to have empathy and compassion and to give me a chance to get back on my feet again……

Please see my twitter feed as well – This is not some fairy tale story, this is real-life and this is survival for me

It was indeed the hardest thing I ever had to do, but I have got literally nothing on my name but I still have my dream and passion, the ONLY thing I ask for is a chance please……

(I can be contacted through my web site https://sharepointsamurai.wordpress.com/ or at tomas.floyd@outlook.com)

Thank you very much for taking the time to read this – Please head over to my web page and download a great App with all the source code and please take the time to see the talent and passion in me as you go through my code………

This is me at my most vulnerable, it isn’t easy for a man that prouds himself in everything he does to ask for help like this, but I have a dream and fire still inside, and a hope that there is that 1 person outside there


FREE Event Aggregated Corporate Calendar available for download – http://1drv.ms/1uN8omc

How To : Add a Promoted Links Web Part to SharePoint 2013 App Default page

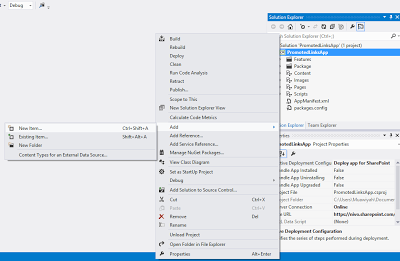
This article helps you to add Promoted links web part to your default app page as the following figure:


To do this follow the following steps:
Open the shortcut menu for the project, and then choose Add, New Item
Add Picture Textbox, and two buttons to infopath form


In the Templates pane, choose the List template, and then choose the Add button :

Enter list name and choose the Create a non-customizable list based on an existing list type of option button, and then, in its list, choose Promoted links, and then choose the Finish button

Binding the CAPTCHA image
In Solution Explorer, under the list instance node, open the Elements.xml file.
Add the promoted links items as the following:
<?versionencodingutf-8?>
Elementsxmlnshttp://schemas.microsoft.com/sharepoint/
ListInstanceTitleMyPromotedLinks
OnQuickLaunch
TemplateType
FeatureId192efa95-e50c-475e-87ab-361cede5dd7f
Lists/MyPromotedLinks
DescriptionMy List Instance
FieldTitleTwitter</Field
FieldBackgroundImageLocation/PromotedLinksApp/Images/twitter.png
FieldDescriptionMuawiyah Shannak Twitter
FieldLinkLocationhttps://twitter.com/MuShannak</Field
FieldOrder</Field
</
FieldTitle</Field
FieldBackgroundImageLocation/PromotedLinksApp/Images/blogger.png
FieldDescriptionMuawiyah Shannak Blog
FieldLinkLocationhttp://mushannak.blogspot.com</Field
FieldOrder</Field
</
FieldTitleLinkedin</Field
FieldBackgroundImageLocation/PromotedLinksApp/Images/linkedin.png
FieldDescriptionMuawiyah Shannak Linkedin
FieldLinkLocationhttp://ae.linkedin.com/in/shannak</Field
FieldOrder</Field
</
</
</
<!–ListInstance
</Elements
In Solution Explorer, under the Pages node, open the Default.aspx file. Add following tags inside the PlaceHolderMain Place Holder:
WebPartPagesWebPartZone=”WebPartZone”runat=”server”FrameType=”None”>
WebPartPagesXsltListViewWebPart=”XsltListViewAppPromotedList”
runat=”server”ListUrl=”Lists/MyPromotedLinks”IsIncluded=”True”
NoDefaultStyle=”TRUE”Title=”Images used in switcher”
PageType=”PAGE_NORMALVIEW”Default=”False”
ViewContentTypeId=”0x”>
</WebPartPagesXsltListViewWebPart
</WebPartPagesWebPartZone

Deploy a solution and you will find nice promoted links web part in the app default page!

In Depth : Top 5 DevOps Best Practices for Achieving Security, Scalability and Performance


DevOps-Cloud[1]

As Companies and Consultants like me continue its look into how best to invest DevOps related time and money, the focus is now changing in order to relate back some of the various best practices experts in the industry have suggested will help create scalable, secure and high performance deployments.

Here are five tips and best practices that have emerged from the hands on experiences of the industry’s foremost experts that I use with every DevOps Consulting project :


1. Be vigilant of overall security risk

Reuven Harrison, CTO and Co-Founder of Tufin emphasizes the growing complexities of networks. He says that increased adoption of virtualization, cloud, BYOD and emerging technologies like software defined networks (SDNs) means that networks are becoming more complex and heterogeneous, and so do the security risks.

“As SDN and network virtualization continues to mature, the only way to manage these networks with any degree of efficiency and security is to automate key management functions,” he says. “That is the premise of DevOps,.


But DevOps must include security as a key component because without it, the volume and pace of network change that technologies such as SDN and virtualization introduce will skyrocket the level of IT risk in the environment.”

4503.DevOps_2D00_Barriers_5F00_1C41B571[1]

The big challenge is that to date, security has been considered an afterthought, and security organizations are considered to be business inhibitors, telling organizations what can’t be done, instead of how to do things securely. 

It is a cultural issue that requires security, developers, and operations teams to foster a level of trust and collaboration that does not yet exist. The only way to do this is incrementally, and with vigilance.


2. Watch changes in security risk

Torsten Volk, VP Product Management, Cloud for ASG Software Solutions says that it is important to think of DevOps as a collaborative mindset and process that leads developers and IT operations to a faster and more efficient way of deploying, operating and upgrading applications.

“Each new release comes with the same set of security considerations as it did the time before DevOps,” he says. “However, when new releases are delivered at a much higher cadence, security has to also be an ongoing point of focus.”

devops[1]

DevOps tools help in this regard by proactively ensuring consistent configuration of infrastructure and software components. Even more, these tools can be used to automatically remediate security concerns by constantly validating the proper application of security best practices and taking automatic countermeasures.

While this latter scenario might sound advanced, it is the endpoint that every DevOps team should aspire to reach.


3. Pay attention to scalability

According to Aaron M. Lee, Managing Principal of DevOps at Pythian, there are two kinds of scalability that DevOps engineers tend to address: application and organization.

“An app’s scalability is really a question of how long it takes and how much it costs to build and operate a system that successfully delivers a certain level of concurrency; one that matches or exceeds user demand over some time period,” said Lee.

“Estimating answers to these questions is a critical success factor for many companies, and the ability to do so often goes unrecognized until it’s too late.”

Lee says that scalability is everyone’s problem. Business and technology folks have to agree on the right balance of functionality, time to market, cost, and risk tolerance.

You need the right measurable objectives, including how many users, and how many concurrent requests over those endpoints for a demand pattern.


4. Strive for ease of use 

– DevOps is about automation and repeatability. Dr. Andy Piper, CTO of London based Push Technology says this requires configurable virtual environments, and lots of them. “To scale, you need to automate,” he says.

Merger

“So, make sure you are using tools such as Puppet and Chef to automate the building and configuration of VMs. Similarly, make sure you have the horsepower to back this up either in-house, which is more tricky to dynamically scale, or in the cloud if your product is amenable to that.”

At the end of the day, making a product easy to install, configure and run will make the whole DevOps process much easier.

5.Manage your gateways

Susan Sparks, Director, Program Management for InfoZen’s Cloud Practice says that while the new goal is to build the best culture between development and operations teams, it is still good to keep some gates between the functions to ensure the production environments remain stable.

“Our teams are structured such that we have operations personnel included in development discussions and daily scrums so the operations teams understand what will be changing in the various future releases,” she says. “The operations team maintains responsibility for the stability of the production operation. We found that this approach has worked well for us.

We recommend using automation in both testing and operations. Our integration testing has allowed us to find issues prior to them reaching production, and our operations automation allows for cost efficiencies and better quality operations.

DevOps-Lifecycle[1]

With automation, fewer people touch the production environment, which significantly reduces human errors. This also helps with security posture, as less people have a need to touch the production environments.”

DevOps isn’t hard. What is hard is tackling the challenges that arise when an organization is not taking a DevOps approach to integration, development and deployment , and I think its very difficult to try and argue this point with me, especially in the SA ICT Industry.

By adopting a DevOps approach, and heeding these five tips, a successful DevOps environment is just an implementation or two away.


CRM Bulk Export Tool Available for CRM 4.0 and CRM Online!!

CRM 4.0 Bulk Data Export Tool

There is no facility to Bulk Export the data from Microsoft Dynamics CRM 4.0. This sample tool  allows users to connect to OnPremise or Online Microsoft CRM 4.0 organization and export data for CRM entities in form of CSV files.

Once you have installed the tool, launch CrmDataExport.exe, select CRM configuration and specify the credentials:

If you are connecting to OnPremise CRM Organization, make sure to open Internet Explorer, connect to CRM server and Save Password. This is necessary as this tool uses stored credentials to connect to the CRM server in OnPremise configuration.

Once you are connected successfully, you can select the entities for which you want to export the records, specify output directory, data and field delimiters, and duration. Note that All Records option is not available for Online configuration. Click Export button to export the records.

The tool creates CSV for each selected entities in the directory selected.

For this and other Web Parts, Templates, Apps, Toolkits,etc for MS CRM, SharePoint, Office 365, contact me at tomas.floyd@outlook.com

crmexporttool

How To : Unit Testing Dynamics CRM 2011 Pipeline Plugins using Rhino Mocks

This example aims to unit test the SDK sample Plugins, and demonstrates the following:

  • Mocking the pipeline context, target and output property bags.
    Mocking the Organisation Service.
    How to assert that exceptions are raised by a plugin
    How to assert that the correct Organisation Service method was called with the desired values.
    To build the examples, you’ll need the CRM2011 SDK example plugins and Rhino Mocks 3.6 (http://ayende.com/Blog/archive/2009/09/01/rhino-mocks-3.6.aspx).

The key principle of mocking is that we can exercise and examine the code that we need to test without executing the bits that are not being tested. By mocking we are fixing behaviour and return values of the dependant code so that we can assert if the results are what we expect.

This approach supports Test Driven Development (TDD), where the test is written first and then the desired functionality is added in order that the test passes. We can then say we are ‘Done’ when all tests pass.

So in our example, the Followup Plugin should create a task with the regarding id set to the id of the account. So by mocking the pipeline context, we can specify the account id, and check that the resulting task that is created is regarding the same account. Using Rhino Mocks allows us to create a mock Organisation Service and assert that the Create method was called passing a task with the desired attributes set.


[TestMethod]
public void FollowupPlugin_CheckFollowupCreated()
{
    RhinoMocks.Logger = new TextWriterExpectationLogger(Console.Out);
 
    // Setup Pipeline Execution Context Stub
    var serviceProvider = MockRepository.GenerateStub();
    var pipelineContext = MockRepository.GenerateStub();
    Microsoft.Xrm.Sdk.IPluginExecutionContext context = (Microsoft.Xrm.Sdk.IPluginExecutionContext)
        serviceProvider.GetService(typeof(Microsoft.Xrm.Sdk.IPluginExecutionContext));
    serviceProvider.Stub(x => x.GetService(typeof(Microsoft.Xrm.Sdk.IPluginExecutionContext))).Return(pipelineContext);
 
    // Add the target entity
    ParameterCollection inputParameters = new ParameterCollection();
    inputParameters.Add(“Target”, new Entity(“account”));
    pipelineContext.Stub(x => x.InputParameters).Return(inputParameters);
 
    // Add the output parameters
    ParameterCollection outputParameters = new ParameterCollection();
    Guid entityId= Guid.NewGuid();
 
    outputParameters.Add(“id”, entityId);
    pipelineContext.Stub(x => x.OutputParameters).Return(outputParameters);
 
    // Create mock OrganisationService
    var organizationServiceFactory = MockRepository.GenerateStub();
    serviceProvider.Stub(x => x.GetService(typeof(Microsoft.Xrm.Sdk.IOrganizationServiceFactory))).Return(organizationServiceFactory);
    var organizationService = MockRepository.GenerateMock();
    organizationServiceFactory.Stub(x => x.CreateOrganizationService(Guid.Empty)).Return(organizationService);
 
             
    // Execute Plugin
    FollowupPlugin plugin = new FollowupPlugin();
    plugin.Execute(serviceProvider);
 
    // Assert the task was created
    organizationService.AssertWasCalled(x => x.Create(Arg.Is.NotNull));
 
    organizationService.AssertWasCalled(x => x.Create(Arg.Matches(s =>
            ((EntityReference)s.Attributes[“regardingobjectid”]).Id.ToString() == entityId.ToString()
            &&
            s.Attributes[“subject”].ToString() == “Send e-mail to the new customer.”
            )));
           
}

The key thing to notice is that the only mock object here is the OrganisationService – all others are stubs. The difference between a stub and a mock is that the mock records the calls that are made so that they can be verified after the test has been run. In this case we are verifying that the Create method was called with the correct properties set on the task entity.

It’s worth noting the RhinoMocks.Logger assignment. This gives the Rhino logging output in the VS2010 test results; most helpful during debugging asserts that don’t do as you expect.

Looking at the sample Account Plugin, it throws an exception when the account number is already set – so what testing that plugin’s throw exceptions under some conditions.

Unfortunately, the standard VS2011 ExpectedExceptionAttribute doesn’t provide the functionality we need here since we can’t check exception attributes, nor can we run the tests in Debug without the Debugger breaking into the code even though the exception is marked as being expected. In order to get around this you can use this class :

using System;
using Microsoft.VisualStudio.TestTools.UnitTesting;
 
namespace Kb.Research.RhinoMocks.UnitTests.CusomAssertions
{
    ///
    /// Custom assertion class for unit testing expected exceptions. 
    /// A replacement for the ExpectedException attribute in MSTest
    ///
    public static class AssertException
    {
        #region Methods
 
        ///
        /// Validates that the supplied delegate throws an exception of the supplied type
        ///
        /// Type of exception that is expected to be thrown
        /// <param name=”actionThatThrows”>Delegate that is expected to throw an exception of type
        public static void Throws<TExpectedExceptionType>(Action actionThatThrows) where TExpectedExceptionType : Exception
        {
            try
            {
                actionThatThrows();
            }
            catch (Exception ex)
            {
                Assert.IsInstanceOfType(ex, typeof(TExpectedExceptionType), String.Format(“Expected exception of type {0} but exception of type {1} was thrown.”, typeof(TExpectedExceptionType), ex.GetType()));
                return;
            }
            Assert.Fail(String.Format(“Expected exception of type {0} but no exception was thrown.”, typeof(TExpectedExceptionType)));
        }
 
        ///
        /// Validates that the supplied delegate throws an exception of the supplied type
        ///
        /// Type of exception that is expected to be thrown
        /// <param name=”expectedMessage”>Expected message that will be included in the thrown exception
        /// <param name=”actionThatThrows”>Delegate that is expected to throw an exception of type
        public static void Throws<TExpectedExceptionType>(string expectedMessage, Action actionThatThrows) where TExpectedExceptionType : Exception
        {
            try
            {
                actionThatThrows();
            }
            catch (Exception ex)
            {
                Assert.IsInstanceOfType(ex, typeof(TExpectedExceptionType), String.Format(“Expected exception of type {0} but exception of type {1} was thrown.”, typeof(TExpectedExceptionType), ex.GetType()));
                Assert.AreEqual(expectedMessage, ex.Message, String.Format(“Expected exception with message ‘{0}’ but exception with message ‘{1}’ was thrown.”, ex.Message, expectedMessage));
                return;
            }
            Assert.Fail(String.Format(“Expected exception of type {0} but no exception was thrown.”, typeof(TExpectedExceptionType)));
        }
 
        #endregion
 
    }
}

So, we want to test that if the account number is already set on execution of the AccountNumberPlugin, then an exception is raised:

[TestMethod]
public void AccountNumberPlugin_CheckExceptionIfAccountNumberSetAllready()
{
    // Setup Pipeline Execution Context Stub
    var serviceProvider = MockRepository.GenerateStub();
    var pipelineContext = MockRepository.GenerateStub();
    Microsoft.Xrm.Sdk.IPluginExecutionContext context = (Microsoft.Xrm.Sdk.IPluginExecutionContext)
        serviceProvider.GetService(typeof(Microsoft.Xrm.Sdk.IPluginExecutionContext));
    serviceProvider.Stub(x => x.GetService(typeof(Microsoft.Xrm.Sdk.IPluginExecutionContext))).Return(pipelineContext);
 
    // Add the target entity
    ParameterCollection inputParameters = new ParameterCollection();
    inputParameters.Add(“Target”,new Entity(“account”) { Attributes = new AttributeCollection  {
            new KeyValuePair(“accountnumber”, “123”)
        }});
 
    pipelineContext.Stub(x => x.InputParameters).Return(inputParameters);
 
    // Test that an exception is thrown if the account number already exists
    AccountNumberPlugin plugin = new AccountNumberPlugin();
    AssertException.Throws < InvalidPluginExecutionException> (“The account number can only be set by the system.”,(Action) delegate {
            plugin.Execute(serviceProvider);
            });
 
}

The examples above show how to test plugins that don’t call any external services or code – where all dependencies are discovered via the execution context. Next time I’ll provide an example of how to mock an external service using inversion of control.

New Highly Customisable SharePoint CRM Template Available

A CRM/Project Management Site Template for SharePoint 2010 Enterprise or SharePoint Online tenants.
This extensive solution offers the following features:

  • User Friendly – Due to a custom User Interface & Pre-Populated InfoPath forms where possible
  • Contacts Management
  • Project Management – Associated sub tasks, documents & sales
  • Products & Services Catalog
  • Sales Register & Invoice Generation
  • Client Enquiry – Showing any items related to a client
  • Reporting
  • Integrated User Guide

To give you an idea of how SharePoint CRM looks, below is a selection of screenshots:

Home Screen

The buttons displayed are defined by a list within SharePoint CRM so can easily be modified.

Contacts

Project Management

Sales Register

Being SharePoint all aspects of the SharePoint CRM Template can be customised to meet your organisations needs:

For example, to customise the home page :

Customising your homepage

Rather than the buttons on the homepage being hardcoded, they are defined by a list within the CRM site. This means you can easily add/remove/edit buttons using just your web browser, here’s how to do so:

  1. From the Site Actions, choose View All Site Content
  2. Open the PortalMenu list

Items can then be edited in the same way as any other SharePoint 2010 list, below is a description of options available:

  • Section – Defines which section the button will be shown in on your homepage
  • Order – Defines the order of the buttons within a section
  • Button Name – The text that will be displayed within the button
  • Link – The URL that users will be taken to when the button is clicked
  • Hover – The text shown when a user hovers over a button
  • Dialog – Specifies whether the page that the button links to will open in a popup dialog box
  • New Project Form – If this option is checked the Link field will be ignored an the button will open the new project form.

Adding new Sections

New sections can be added to the homepage, but will required the use of SharePoint Designer to do so:

  1. Open the PortalMenu list as described above, the go to the List Settings page
  2. Edit the Section column, then add the name of your new section as a choice
  3. Create a new list item with your new choice set within the Section field
  4. Navigate to your homepage, and set the page to edit mode
  5. Export any sections web part, then import the web part and add it to any zone
  6. Using SharePoint Designer open the homepage (SitePages\default.aspx)
  7. Select the new web part, the update the filter to match the new choice you added to the section column

This template and other SharePoint Web Parts, Apps, Custom SharePoint Templates, Tools for SharePoint, Azure and Office365 is available by contacting me through my website at http://sharepointsamurai,wordpress.com/ 

Several new SharePoint Document Management, Upload Web Parts and Tools are available for Sale on my Web Site – https://sharepointsamurai.wordpress.com

Please contact me via my web site and blog or at tomas.floyd@outlook.com for pricing and trials


Bulk File SharePoint Upload Web Part

  • Run it anywhere. Every action is done using the Client Object Model, there is no need to install it on the server.
  • Support for Mixed authentication, both Windows and Forms
  • Import folders and files with all subfolders
  • Retain creation and modified date fields after moving to SharePoint
  • Retain author/editor fields from office documents after moving to SharePoint
  • Incompatible file names are renamed (filename too long, illegal characters)
  • Unsupported files (large filesize, blocked file extension, …) are skipped
  • Files already existing on SharePoint are skipped (no overwrite)
  • Successfully migrated files and folders can be moved to an “archive” folder
  • Detailed log (Log4Net) with info on migration issues
  • Option to skip creation of empty folders in SharePoint
  • Option to merge subfolders to a flat list in SharePoint.
  • Easy to run in batch when migrating several locations

logging2


Drag n Drop Upload Web Part

Enables Firefox & Chrome users to drag & drop files directly into their SharePoint document libraries. This makes single and multiple file upload much simplier & user friendly. SharePoint 2010 and SharePoint Online are supported.

Document set content web part is supported

Screen

Various New SharePoint Document Tools and Web Parts Available – See Blog for more details

Several new SharePoint Document Management, Upload Web Parts and Tools are available for Sale on my Web Site – https://sharepointsamurai.wordpress.com


Please contact me via my web site and blog or at tomas.floyd@outlook.com for pricing and trials


Bulk File SharePoint Upload Web Part

  • Run it anywhere. Every action is done using the Client Object Model, there is no need to install it on the server.
  • Support for Mixed authentication, both Windows and Forms
  • Import folders and files with all subfolders
  • Retain creation and modified date fields after moving to SharePoint
  • Retain author/editor fields from office documents after moving to SharePoint
  • Incompatible file names are renamed (filename too long, illegal characters)
  • Unsupported files (large filesize, blocked file extension, …) are skipped
  • Files already existing on SharePoint are skipped (no overwrite)
  • Successfully migrated files and folders can be moved to an “archive” folder
  • Detailed log (Log4Net) with info on migration issues
  • Option to skip creation of empty folders in SharePoint
  • Option to merge subfolders to a flat list in SharePoint.
  • Easy to run in batch when migrating several locations

logging2


Drag n Drop Upload Web Part

Enables Firefox & Chrome users to drag & drop files directly into their SharePoint document libraries. This makes single and multiple file upload much simplier & user friendly. SharePoint 2010 and SharePoint Online are supported.

Document set content web part is supported

Screen


A Look at : ‘Kaizan” and its Philospophy in Kanban

kaizen%20not%20kaizan[1]

Kaizen, or rapid improvement processes, often is considered to be the “building block” of all lean production methods. Kaizen focuses on eliminating waste, improving productivity, and achieving sustained continual improvement in targeted activities and processes of an organization.

Lean production is founded on the idea of kaizen – or continual improvement. This philosophy implies that small, incremental changes routinely applied and sustained over a long period result in significant improvements. The kaizen strategy aims to involve workers from multiple functions and levels in the organization in working together to address a problem or improve a process.

The team uses analytical techniques, such as value stream mapping and “the 5 whys”, to identify opportunities quickly to eliminate waste in a targeted process or production area. The team works to implement chosen improvements rapidly (often within 72 hours of initiating the kaizen event), typically focusing on solutions that do not involve large capital outlays.

Periodic follow-up events aim to ensure that the improvements from the kaizen “blitz” are sustained over time. Kaizen can be used as an analytical method for implementing several other lean methods, including conversions to cellular manufacturing and just-in-time production systems.

Top of page

Method and Implementation Approach

Rapid continual improvement processes typically require an organization to foster a culture where employees are empowered to identify and solve problems. Most organizations implementing kaizen-type improvement processes have established methods and ground rules that are well communicated in the organization and reinforced through training. The basic steps for implementing a kaizen “event” are outlined below, although organizations typically adapt and sequence these activities to work effectively in their unique circumstances.

Phase 1: Planning and Preparation. The first challenge is to identify an appropriate target area for a rapid improvement event. Such areas might include: areas with substantial work-in-progress; an administrative process or production area where significant bottlenecks or delays occur; areas where everything is a “mess” and/or quality or performance does not meet customer expectations; and/or areas that have significant market or financial impact (i.e., the most “value added” activities).

Once a suitable production process, administrative process, or area in a factory is selected, a more specific “waste elimination” problem within that area is chosen for the focus of the kaizen event ( i.e., the specific problem that needs improvement, such as lead time reduction, quality improvement, or production yield improvement). Once the problem area is chosen, managers typically assemble a cross-functional team of employees.

It is important for teams to involve workers from the targeted administrative or production process area, although individuals with “fresh perspectives” may sometimes supplement the team. Team members should all be familiar with the organization’s rapid improvement process or receive training on it prior to the “event”. Kaizen events are generally organized to last between one day and seven days, depending on the scale of the targeted process and problem. Team members are expected to shed most of their operational responsibilities during this period, so that they can focus on the kaizen event.

Phase 2: Implementation. The team first works to develop a clear understanding of the “current state” of the targeted process so that all team members have a similar understanding of the problem they are working to solve. Two techniques are commonly used to define the current state and identify manufacturing wastes:

  • Five Whys. Toyota developed the practice of asking “why” five times and answering it each time to uncover the root cause of a problem. An example is shown below.Repeating “Why” Five Times1
    1. Why did the machine stop?
      There was an overload, and the fuse blew.
    2. Why was there an overload?
      The bearing was not sufficiently lubricated.
    3. Why was it not lubricated sufficiently?
      The lubrication pump was not pumping sufficiently.
    4. Why was it not pumping sufficiently?
      The shaft of the pump was worn and rattling.
    5. Why was the shaft worn out?
      There was no strainer attached, and metal scrap got in.
  • Value Stream Mapping. This technique involves flowcharting the steps, activities, material flows, communications, and other process elements that are involved with a process or transformation (e.g., transformation of raw materials into a finished product, completion of an administrative process). Value stream mapping helps an organization identify the non-value-adding elements in a targeted process. This technique is similar to process mapping, which is frequently used to support pollution prevention planning in organizations. In some cases, value stream mapping can be used in phase 1 to identify areas for which to target kaizen events.

During the kaizen event, it is typically necessary to collect information on the targeted process, such as measurements of overall product quality; scrap rate and source of scrap; a routing of products; total product distance traveled; total square feet occupied by necessary equipment; number and frequency of changeovers; source of bottlenecks; amount of work-in-progress; and amount of staffing for specific tasks. Team members are assigned specific roles for research and analysis. As more information is gathered, team members add detail to value stream maps of the process and conduct time studies of relevant operations (e.g., takt time, lead-time).

Once data is gathered, it is analyzed and assessed to find areas for improvement. Team members identify and record all observed waste, by asking what the goal of the process is and whether each step or element adds value towards meeting this goal. Once waste, or non-value added activity, is identified and measured, team members then brainstorm improvement options. Ideas are often tested on the shopfloor or in process “mock-ups”. Ideas deemed most promising are selected and implemented. To fully realize the benefits of the kaizen event, team members should observe and record new cycle times, and calculate overall savings from eliminated waste, operator motion, part conveyance, square footage utilized, and throughput time.

Phase 3: Follow-up. A key part of a kaizen event is the follow-up activity that aims to ensure that improvements are sustained, and not just temporary. Following the kaizen event, team members routinely track key performance measures (i.e., metrics) to document the improvement gains. Metrics often include lead and cycle times, process defect rates, movement required, square footage utilized, although the metrics vary when the targeted process is an administrative process. Follow-up events are sometimes scheduled at 30 and 90-days following the initial kaizen event to assess performance and identify follow-up modifications that may be necessary to sustain the improvements. As part of this follow-up, personnel involved in the targeted process are tapped for feedback and suggestions. As discussed under the 5S method, visual feedback on process performance are often logged on scoreboards that are visible to all employees.

Top of page

Implications for Environmental Performance

Potential Benefits:
At its core, kaizen represents a process of continuous improvement that creates a sustained focus on eliminating all forms of waste from a targeted process. The resulting continual improvement culture and process is typically very similar to those sought under environmental management systems (EMS), ISO 14001, and pollution prevention programs. An advantage of kaizen is that it involves workers from multiple functions who may have a role in a given process, and strongly encourages them to participate in waste reduction activities. Workers close to a particular process often have suggestions and insights that can be tapped about ways to improve the process and reduce waste. Organizations have found, however, that it is often difficult to sustain employee involvement and commitment to continual improvement activities (e.g., P2, environmental management) that are not necessarily perceived to be directly related to core operations. In some cases, kaizen may provide a vehicle for engaging broad-based organizational participation in continual improvement activities that target, in part, physical wastes and environmental impacts.
Kaizen can be a powerful tool for uncovering hidden wastes or waste-generating activities and eliminating them.
Kaizen focuses on waste elimination activities that optimize existing processes and that can be accomplished quickly without significant capital investment. This creates a higher likelihood of quick, sustained results.
Potential Shortcomings:
Failure to involve environmental personnel in a quick kaizen event can potentially result in changes that do not satisfy applicable environmental regulatory requirements (e.g., waste handling requirements, permitting requirements). Care should be taken to consult with environmental staff regarding changes made to environmentally sensitive processes.
Failure to incorporate environmental considerations into kaizen can potentially result in solutions that do not consider inherent environmental risk associated with new processes. For example, an organization might select a change in process chemistry that addresses one improvement need (e.g., product quality, process cycle time) but that might be sub-optimal if the organization considered the material hazards or toxicity and the associated chemical and hazardous waste management obligations.
By not explicitly incorporating environmental considerations into kaizen, valuable pollution prevention and sustainability opportunities may be disregarded. For example, an evident opportunity to conserve water resources may not be explored if water use is not expensive and therefore not considered a wasteful expense that needs to be addressed. Similarly, including environmental considerations in the kaizen event goals can lead to solutions that rely less on hazardous materials or that create less hazardous wastes.

Useful Resources

Productivity Press Development Team. Kaizen for the Shopfloor (Portland, Oregon: Productivity Press, 2002).

Soltero, Conrad and Gregory Waldrip. “Using Kaizen to Reduce Waste and Prevent Pollution.” Environmental Quality Management (Spring 2002), 23-37.

Why most recruiters suck and what you can do about it

While you might think that recruiters hold the keys to your next job, in reality they cannot function without great candidates. You are seeking a partnership not a one-nighter where all is forgotten the next day with the exception of the very bad taste in your mouth. Great recruiters want the very same thing – a very long relationship where one hand washes the other. But to make it happen you have to be knowledgeable and active; you have to control the interview and not become a pawn used by a crappy recruiter with an equally crappy conscience.

So stop whining about crappy recruiters and do something about them.!!

A call to Arms to ALL South African Developers – Boycott CRAPPY recruiters!!

The Recruiting Inferno

Jason Buss posted a barn burner over on TalentHQ, “Are All Heads of HR and HR Departments Filled With Idiots?” – his facts are spot on and they should make everyone a wee bit angry. I’m a performance person when it comes to recruiting – I’m going to ask you about solving problems and I could care less if you’re pregnant, have a vacation scheduled, or are skilled at brown nosing. If you can solve the problems I’m hiring you to solve you’ll be moved on; if you can’t, you won’t.

What follows is a post I wrote anonymously for “someone else” – somewhat tongue-in-cheek but with a great deal of fact behind it (Jason – you know how the spies are going to drool over this post!) – and with some advice on how job seekers can counteract the actions of some recruiters and level the playing field. Let…

View original post 1,545 more words

How To : Use Containers effectively for your ALM , CI and DevOps methodologies

In his seminal article “Continuous Integration,” Martin Fowler defines a set of practices to improve the quality and increase the speed of the software development process. These practices include having a fast and fully automated build all the way from development to production and conformity between testing and production environments.

Since Fowler’s article was published, continuous integration has become one of the key practices of modern agile development, and many of us are in a constant battle to speed up the build process and test automation stages. The growing complexity of software and our aspiration to deliver it to the customer in a matter of days or even hours doesn’t make this battle any easier.

The recent rise of containers as a tool to ease the journey from development to production may help us address these challenges.

Containers (OS Level Virtualization)
Containers allow us to create multiple isolated and secure environments within a single instance of an operating system. As opposed to virtual machines (VMs), containers do not launch a separate OS but instead share the host kernel while maintaining the isolation of resources and processes where required.

This architectural difference leads to the drastic reduction in the overheads related to starting and running instances. As a result, the startup time can commonly be reduced from thirty plus seconds to 0.1 seconds. The number of containers running on a typical server can easily reach dozens or even hundreds while the same server would struggle to support ten to fifteen VMs.

The following article written by David Strauss provides an excellent explanation about containers: “Containers—Not Virtual Machines—Are the Future Cloud.

Deployment Pipelines
I started building deployment pipelines about a decade ago when I moved from a software development role into configuration management. 

At my first job I reduced the build time from a week to around two to three hours, including the creation of a VM image and the deployment of a full system on a hypervisor. Over 50 percent of the build time was wasted on the creation and deployment of the VM while the build and the automated system testing required less than an hour.

Throughout the years virtualization technology took a few leaps forward and now we can deploy a fully functional multi VM system on a private or a public cloud in just few minutes. Although this represents a huge amount of progress, it still creates enormous difficulties when trying to create a real continuous deployment pipeline. Having a fast build means keeping the continuous integration build under ten minutes as suggested by Martin Fowler. Achieving this speed normally means confining the testing to running a suite of unit tests; there just isn’t the time to build a full image, copy the image over the network, deploy the VMs and run a set of system tests.

But what if we could build a new image in just a few seconds, copy to the cloud only the changed pieces of the software and boot up a fully functional system in under one second?

As unimaginable as it sounds, it is already possible using containers. In addition to being able to deploy and test a full system at the continuous integration stage, containers can also help to reduce the complexity related to supporting variations in operating systems. The same container image created during a normal build can be reused in production environments to remove any potential differences between the operating systems on the developer’s laptops and those on the production servers.

The same functionality is theoretically possible using standard VMs, but in practice it never really works. The overhead of maintaining huge VM images, distributing them and re-deploying them multiple times per day has prevented this way of working from becoming popular.


Test Automation
The more efficient usage of resources and almost instant startup times provided by containers is hugely important for super-fast continuous integration builds, but there are even bigger benefits for large test execution scenarios.

Today, the redeployment of a full operating system for the each test automation suite is out of the question, therefore the same system is used to execute hundreds or even thousands of test cases in a quick succession. This requires very sophisticated teardown procedures between the execution of the test suites, which is often a source of errors. Such errors may cause a butterfly effect, leading to an unexpected failure in an unrelated part of the test execution. In addition, teardown procedures are expensive to write and maintain and may take significant time to execute.

With containers, we can eliminate teardown procedures entirely. Every single test automation suite can run in a separate disposable container, which can simply be thrown away after execution. A notable side effect of this is that we can now run all the tests in fully isolated containers in parallel and on any hosting environment that supports containers. This can potentially reduce test automation time from hours to minutes or even seconds depending on the resources at your disposal.

DevOps and Continuous Delivery
The DevOps movement is increasingly popular and aims to bridge the communication gap between development and operations. I see the creation of a common technical language as one of the biggest challenges for DevOps, since these two departments have typically been trying to solve different problems. Although containers will not fix or resolve this challenge, they may significantly simplify the situation for both parties and create an environment, which is easily accessible for both programmers and IT operators.

The standardization of tooling in both departments will allow software to move faster through the pipeline and reduce the complexity required at each stage. By doing that we can take another step towards faster feedback loops with continuous delivery.

In Conclusion
Modern software development relies on the extensive reuse and integration of existing software components. This makes setting up development and production environments especially challenging.

Containers have been here for a while, but only recently have they become reliable and usable enough for daily operations. They will very soon allow us to remove the burden of running thousands of unneeded operating system instances and focus on the real services we provide to our customers.

Containers are making continuous deployment look like an achievable goal.


A Look at : eDiscovery in SharePoint On-Premise and Online

One of the great features that came in SharePoint 2010 is the tool for eDiscovery.  

What is eDiscovery?  

The process of collecting and analyzing content related to some litigation or an official request.  It’s a big deal and this post discusses preparations you need to make in SharePoint to be ready.

IC630180[1]

eDiscovery 2013

If you’re an IT manager or a developer and someone comes to you and says, “We need eDiscovery in SharePoint,” run for the hills!  

This is something that cannot be done alone.  eDiscovery requires specific input from lawyers and records managers.


Who should care about eDiscovery?

Every company needs to have some conversation about eDiscovery because, let’s face it, litigation happens.  You have no choice on the matter if you are a public company or in a regulated industry.


Even if you are not public or regulated, you should consider eDiscovery for the very simple reason that IF litigation happens, it will cost you exponentially more to deal with a lawsuit than to implement an eDiscovery policy. Luckily, the discovery process is easy with SharePoint 2010.


eDiscovery in SharePoint is basically Search+.  Search + records management and hold tools.  A “hold” is what happens when you run eDiscovery on a particular topic.  When you “hold” content associated with that topic, you are locking down all related documents.  “Hold in-place” will hold a document in the library it was found so users will see it, but will be unable to edit.  “Hold and move” (recommended) is when a document is moved from it’s original location to a holding location.


Remember!  SharePoint is a platform not a magical problem solver.  You MUST first have an eDiscovery policy.  For example, your policy can state that the eDiscovery process is to first issue a memo, do the hold, and then notify when the hold has expired…or something along those lines.


You MUST consult with your lawyer on how to manage a “hold”.  For some companies it is deemed unacceptable to have a document permanently locked.  The policy must also include WHO can run eDiscovery.  In most companies, a records manager or a lawyer are the only people with the rights to run eDiscovery.  


But, there is a caveat.  eDiscovery requires site collection administrator access at minimum and this can’t be given to just anyone. There is a work around to this, but it’s a bit of a trick.  There is a hidden list that manages who has access to eDiscovery features, and you can add individuals, such as a records manager, to that list without giving them administrator access.


Despite the ambiguity and these loopholes, eDiscovery is useful. Lawyers now in the face of litigation are using the eDiscovery strategy to validate the system of record, in this case SharePoint, and by proving the system, processes, policy, and content that come from that system.


What does all of this mean?  SharePoint has great features for eDiscovery, but it’s just a tool to help with one part of the process.  You must plan.  As with all things SharePoint, projects do not fail because of technology but instead they fail because of people and lack of planning.  


This is the same with eDiscovery.  A plan is the most important step.  An eDiscovery policy should be a part of the information architecture and security plan in all SharePoint deployment companies, small or large.


In the next post, we will be looking at how to setup eDiscovery in SharePoint Online


hero-for-hire_basic-layout_600

My CV is downloadable from this blog – I am currently in the job market.

Have a great week!!


SharePoint Samurai

tomas.floyd@outlook.com

How To : Understand and Edit the Onet.xml File

Site-Definition-03.png_2D00_700x0[1]

When Microsoft SharePoint Foundation is installed, several Onet.xml files are installed—one in %ProgramFiles%\Common Files\Microsoft Shared\web server extensions\14\TEMPLATE\GLOBAL\XML that applies globally to the deployment, and several in different folders within %ProgramFiles%\Common Files\Microsoft Shared\web server extensions\14\TEMPLATE\SiteTemplates. Each file in the latter group corresponds to a site definition that is included with SharePoint Foundation. They include, for example, Blog sites, the Central Administration site, Meeting Workspace sites, and team SharePoint sites. Only the last two of these families contain more than one site definition configuration.

The global Onet.xml file defines list templates for hidden lists, list base types, a default definition configuration, and modules that apply globally to the deployment. Each Onet.xml file in a subdirectory of the %ProgramFiles%\Common Files\Microsoft Shared\web server extensions\14\TEMPLATE\SiteTemplates directory can define navigational areas, list templates, document templates, configurations, modules, components, and server email footers that are used in the site definition to which it corresponds.

Note Note
An Onet.xml is also part of a web template. Some Collaborative Application Markup Language (CAML) elements that are possible in the Onet.xml files of site definitions cannot be in the Onet.xml files that are part of web templates—for example, the DocumentTemplates element.
Depending on where an Onet.xml file is located and whether it is part of a site definition or a web template, the markup in the file does some or all of the following:

  • Specifies the web-scoped and site collection-scoped Features that are built-in to websites that are created from the site definition or web template.
  • Specifies the list types, pages, files, and Web Parts that are built-in to websites that are created from the site definition or web template.
  • Defines the top and side navigation areas that appear on the home page and in list views for a site definition.
  • Specifies the list definitions that are used in each site definition and whether they are available for creating lists in the user interface (UI).
  • Specifies document templates that are available in the site definition for creating document library lists in the UI, and specifies the files that are used in the document templates.
  • Defines the base list types from which default SharePoint Foundation lists are derived. (Only the global Onet.xml file serves this function. You cannot define new base list types.)
  • Specifies SharePoint Foundation components.
  • Defines the footer section used in server email.


You can perform the following kinds of tasks in a custom Onet.xml file that is used for either a custom site definition or a custom web template:

  • Specify an alternative cascading style sheet (CSS) file, JavaScript file, or ASPX header file for a site definition.
  • Modify navigation areas for the home page and list pages.
  • Add a new list definition as an option in the UI.
  • Define one configuration for the site definition or web template, specifying the lists, modules, files, and Web Parts that are included when the configuration is instantiated.
  • Specify Features to be included automatically with websites that are created from the site definition or web template.

You can perform the following kinds of tasks in a custom Onet.xml file that is used for a custom site definition, but not in one that is used for a custom web template:

  1. Add a document template for creating document libraries.
  2. Define more than one configuration for a site definition, specifying the lists, modules, files, and Web Parts that are included when the configuration is instantiated.
  3. Define a custom footer for email messages that are sent from websites that are based on the site definition.
  4. Define custom components, such as a file dialog box post processor, for websites that are based on the site definition.
Caution note Caution
You cannot create new base list types in either a site definition or a web template. The base types that are defined in the global Onet.xml file are the only base types that are supported.
Caution note Caution
We do not support making changes to an originally installed Onet.xml file. Changing this file can break existing sites. Also, when you install updates or service packs for SharePoint Foundation, or when you upgrade an installation to the next product version, there may be a new version of the Microsoft-supplied file, and installation cannot merge your changes with the new version. If you want a site type that is similar to a built-in site type, and you cannot use a web template, create a new site definition with its own Onet.xml file; do not modify the original file. For more information, see How to: Create a Custom Site Definition and Configuration. For more information about when you cannot use a web template, see Deciding Between Custom Web Templates and Custom Site Definitions.
The following sections define the various elements of the Onet.xml file.

Project Element

The top-level Project element specifies a default name for sites that are created through any of the site configurations in the site definition. It also specifies the directory that contains subfolders in which the files for each list definition reside.

Note Note
Unless indicated otherwise, excerpts used in the following examples are taken from the Onet.xml file for the STS site definition.
<Project 
  Title="$Resources:core,onet_TeamWebSite;" 
  Revision="2" 
  ListDir="$Resources:core,lists_Folder;" 
  xmlns:ows="Microsoft SharePoint" 
  UIVersion="4">

NoteNote
In all the examples in this topic, the strings that begin with “$Resources” are constants that are defined in a .resx file. For example, “$Resources:onet_TeamWebSite” is defined in the core.resx file as “Team Site”. When you create a custom Onet.xml file, you can use literal strings.

This element can also have several other attributes. For more information, see Project Element (Site).

The Project element does not contain any attribute that identifies the site definition that it defines. Each Onet.xml file is associated with a site definition by virtue of the directory path in where it resides, which (except for the global Onet.xml) is %ProgramFiles%\Common Files\Microsoft Shared\web server extensions\14\TEMPLATE\SiteTemplates\site_type\XML\, where site_type is the name of the site definition, such as STS or MPS. The Onet.xml file for a web template is associated with the template by virtue of being in the .wsp package for the web template.


NavBars Element

The NavBars element contains definitions for the top navigation area that is displayed on the home page or in list views, and definitions for the side navigation area that is displayed on the home page.

Note Note
A NavBar is not necessarily a toolbar. For example, it can be a tree of links.
<NavBars>
  <NavBar 
    Name="$Resources:core,category_Top;" 
    Separator="&amp;nbsp;&amp;nbsp;&amp;nbsp;" 
    Body="&lt;a ID='onettopnavbar#LABEL_ID#' href='#URL#' accesskey='J'&gt;#LABEL#&lt;/a&gt;" 
    ID="1002" />
  <NavBar 
    Name="$Resources:core,category_Documents;" 
    Prefix="&lt;table border='0' cellpadding='4' cellspacing='0'&gt;" 
    Body="&lt;tr&gt;&lt;td&gt;&lt;table border='0' cellpadding='0' cellspacing='0'&gt;&lt;tr&gt;&lt;td&gt;&lt;img src='/_layouts/images/blank.gif' id='100' alt='' border='0'&gt;&amp;nbsp;&lt;/td&gt;&lt;td valign='top'&gt;&lt;a id='onetleftnavbar#LABEL_ID#' href='#URL#'&gt;#LABEL#&lt;/td&gt;&lt;/tr&gt;&lt;/table&gt;&lt;/td&gt;&lt;/tr&gt;" 
    Suffix="&lt;/table&gt;" 
    ID="1004" />
    ...
</NavBars>

A NavBarLink element defines links for the top or side navigational area, and an entire NavBar section groups new links in the side area. Each NavBar element specifies a display name and a unique ID for the navigation bar, and it defines how to display the navigation bar.

For information about customizing the navigation areas on SharePoint Foundation pages, see Website Navigation.

ListTemplates Element

The ListTemplates section specifies the list definitions that are part of a site definition. This markup is still supported only for backward compatibility. New custom list types should be defined as Features. The following example is taken from the Onet.xml file for the Meetings Workspace site definition.

<ListTemplates>
  <ListTemplate 
    Name="meetings" 
    DisplayName="$Resources:xml_onet_mwsidmeetingDisp;" 
    Type="200" 
    BaseType="0" 
    Unique="TRUE" 
    Hidden="TRUE" 
    HiddenList="TRUE" 
    DontSaveInTemplate="TRUE" 
    SecurityBits="11" 
    Description="$Resources:xml_onet_mwsidmeetingDesc;"
    Image="/_layouts/images/itevent.gif">
  </ListTemplate>
  <ListTemplate 
    Name="agenda" 
    DisplayName="$Resources:xml_onet_mwsidagendaDisp;" 
    Type="201" 
    BaseType="0" 
    FolderCreation="FALSE" 
    DisallowContentTypes="TRUE" 
    SecurityBits="11" 
    Description="$Resources:xml_onet_mwsidagendaDesc" 
    Image="/_layouts/images/itagnda.gif">
  </ListTemplate>
    ...
</ListTemplates>

Each ListTemplate element specifies an internal name that identifies the list definition. The ListTemplate element also specifies a display name for the list definition and whether the option to add a link on the Quick Launch bar appears selected by default in the list-creation UI. In addition, this element specifies the description of the list definition and the path to the image that represents the list definition, both of which are displayed in the list-creation UI. If Hidden=”TRUE” is specified, the list definition does not appear as an option in the list-creation UI.

The ListTemplate element has two attributes for type: Type and BaseType. The Type attribute specifies a unique identifier for the list definition, and the BaseType attribute identifies the base list type for the list definition and corresponds to the Type value that is specified for one of the base list types that are defined in the global Onet.xml file.

For more information about creating new list types, see How to: Create a Custom List Definition.

DocumentTemplates Element

The DocumentTemplates section defines the document templates that are listed in the UI for creating a document library. This markup is still supported only for backward compatibility. You should define new document types as content types. For more information, see the Content Types section of this SDK.

<DocumentTemplates>
  ...
  <DocumentTemplate 
    Path="STS" 
    DisplayName="$Resources:core,doctemp_Word;" 
    Type="121" 
    Default="TRUE" 
    Description="$Resources:core,doctemp_Word_Desc;">
    <DocumentTemplateFiles>
      <DocumentTemplateFile 
        Name="doctemp\word\wdtmpl.dotx" 
        TargetName="Forms/template.dotx" 
        Default="TRUE" />
    </DocumentTemplateFiles>
  </DocumentTemplate>
  ...
</DocumentTemplates>

Each DocumentTemplate element specifies a display name, a unique identifier, and a description for the document template. If Default is set to TRUE, the template is the default template selected for document libraries that are created in sites based one of the configurations in the site definition. Despite its singular name, a DocumentTemplate element actually can contain a collection of DocumentTemplateFile elements. The Name attribute of each DocumentTemplateFile element specifies the relative path to a local file that serves as the template. The TargetName attribute specifies the destination URL of the template file when a document library is created. The Default attribute specifies whether the file is the default template file.

NoteNote
An Onet.xml file in a web template cannot have a DocumentTemplate element.

For a development task that involves document templates, see How to: Add a Document Template, File Type, and Editing Application to a Site Definition.

BaseTypes Element

The BaseTypes element of the global Onet.xml file is used during site or list creation to define the basic list types on which all list definitions in SharePoint Foundation are based. Each list template that is specified in the list templates section is identified with one of the base types: Generic List, Document Library, Discussion Forum, Vote or Survey, or Issues List.

Note Note
In SharePoint Foundation the BaseTypes section is implemented only in the global Onet.xml file, from which the following example is taken.
<BaseTypes>
  <BaseType 
    Title="Generic List" 
    Image="/_layouts/images/itgen.gif" 
    Type="0">
      <MetaData>
        <Fields>
          <Field 
            ID="{1d22ea11-1e32-424e-89ab-9fedbadb6ce1}" 
            ColName="tp_ID" 
            RowOrdinal="0" 
            ReadOnly="TRUE" 
            Type="Counter" 
            Name="ID" 
            PrimaryKey="TRUE" 
            DisplayName="$Resources:core,ID" 
            SourceID="http://schemas.microsoft.com/sharepoint/v3" 
            StaticName="ID">
          </Field>
          <Field 
            ID="{03e45e84-1992-4d42-9116-26f756012634}" 
            RowOrdinal="0" 
            Type="ContentTypeId" 
            Sealed="TRUE" 
            ReadOnly="TRUE" 
            Hidden="TRUE" 
            DisplayName="$Resources:core,Content_Type_ID;"
            Name="ContentTypeId" 
            DisplaceOnUpgrade="TRUE"
            SourceID="http://schemas.microsoft.com/sharepoint/v3" 
            StaticName="ContentTypeId" 
            ColName="tp_ContentTypeId">
          </Field>
          ...
      </Fields>
    </MetaData>
  </BaseType>
  ...
</BaseTypes>

Each BaseType element specifies the fields used in lists that are derived from the base type. The Type attribute of each Field element identifies the field with a field type that is defined in FldTypes.xml.

Caution noteCaution
Do not modify the contents of the global Onet.xml; doing so can break the installation. Base list types cannot be added. For information about how to add a list definition, see How to: Create a Custom List Definition.

Configurations Element

Each Configuration element in the Configurations section specifies the lists, modules, and Features that are created by default when the site definition configuration or web template is instantiated.

<Configurations>
  ...
  <Configuration 
    ID="0" 
    Name="Default">
    <Lists>
      <List 
        FeatureId="00BFEA71-E717-4E80-AA17-D0C71B360101" 
        Type="101" 
        Title="$Resources:core,shareddocuments_Title;" 
        Url="$Resources:core,shareddocuments_Folder;" 
        QuickLaunchUrl="$Resources:core,shareddocuments_Folder;/Forms/AllItems.aspx" />
      ...
    </Lists>
    <Modules>
      <Module 
        Name="Default" />
    </Modules>
    <SiteFeatures>
      <Feature 
        ID="00BFEA71-1C5E-4A24-B310-BA51C3EB7A57" />
      <Feature 
        ID="FDE5D850-671E-4143-950A-87B473922DC7" />
    </SiteFeatures>
    <WebFeatures>
      <Feature 
        ID="00BFEA71-4EA5-48D4-A4AD-7EA5C011ABE5" />
      <Feature 
        ID="F41CC668-37E5-4743-B4A8-74D1DB3FD8A4" />
    </WebFeatures>
  </Configuration>
  ...
</Configurations>

The ID attribute identifies the configuration (uniquely, relative to the other configurations, if any, within the Configurations element). If the Onet.xml file is part of a site definition, the ID value corresponds to the ID attribute of a Configuration element in a WebTemp*.xml file. (Web templates do not have WebTemp*.xml files.)

Each List element specifies the title of the list definition and the URL for where to create the list. You can use the QuickLaunchUrl attribute to set the URL of the view page to use when adding a link in the Quick Launch to a list that is created from the list definition. The value of the Type attribute corresponds to the Type attribute of a template in the list templates section. Each Module element specifies the name of a module that is defined in the modules section.

The SiteFeatures element and the WebFeatures element contain references to site collection and site-scoped Features to include in the site definition.

For post-processing capabilities, use an ExecuteUrl element within a Configuration element to specify the URL that is called following instantiation of the site.

For more information about definition configurations, see How to: Create a Custom Site Definition and Configuration.

Modules Element

The Modules collection specifies a pool of modules. Any module in the pool can be referenced by a configuration if the module should be included in websites that are created from the configuration. Each Module element in turn specifies one or more files to include, often for Web Parts, which are cached in memory on the front-end web server along with the schema files. You can use the Url attribute of the Module element to provision a folder as part of the site definition. This markup is supported only for backward compatibility. New modules should be incorporated into Features.

<Modules>
  <Modules>
    <Module 
      Name="Default" 
      Url="" 
      Path="">
      <File 
        Url="default.aspx" 
        NavBarHome="True">
        <View 
          List="$Resources:core,lists_Folder;
          /$Resources:core,announce_Folder;" 
          BaseViewID="0" 
          WebPartZoneID="Left" />
        <View 
          List="$Resources:core,lists_Folder;
          /$Resources:core,calendar_Folder;" 
          BaseViewID="0" 
          RecurrenceRowset="TRUE" 
          WebPartZoneID="Left" 
          WebPartOrder="2" />
        <AllUsersWebPart 
          WebPartZoneID="Right" 
          WebPartOrder="1"><![CDATA[<WebPart 
            xmlns="http://schemas.microsoft.com/WebPart/v2"
            xmlns:iwp="http://schemas.microsoft.com
            /WebPart/v2/Image">
            <Assembly>Microsoft.SharePoint, Version=12.0.0.0, 
              Culture=neutral, 
              PublicKeyToken=71e9bce111e9429c</Assembly>
            <TypeName>Microsoft.SharePoint.WebPartPages.ImageWebPart
            </TypeName>
            <FrameType>None</FrameType>
            <Title>$Resources:wp_SiteImage;</Title>
            <iwp:ImageLink>/_layouts/images/homepage.gif
            </iwp:ImageLink>
            <iwp:AlternativeText>$Resources:core,sitelogo_wss;
            </iwp:AlternativeText>
            </WebPart>]]>
        </AllUsersWebPart>
        <View 
          List="$Resources:core,lists_Folder;
          /$Resources:core,links_Folder;" 
          BaseViewID="0" 
          WebPartZoneID="Right" 
          WebPartOrder="2" />
          <NavBarPage 
            Name="$Resources:core,nav_Home;" 
            ID="1002" 
            Position="Start" />
          <NavBarPage 
            Name="$Resources:core,nav_Home;" 
            ID="0" 
            Position="Start" />
      </File>
    </Module>
  ...
</Modules>

The Module element specifies a name for the module, which corresponds to a module name that is specified within a configuration in Onet.xml.

The Url attribute of each File element in a module specifies the name of a file to create when a site is created. When the module includes a single file, such as default.aspx, NavBarHome=”TRUE” specifies that the file will serve as the destination page for the Home link in navigation bars. The File element for default.aspx also specifies the Web Parts to include on the home page and information about the home page for other pages that link to it.

A Module element can only be in an Onet.xml file that is part of a site definition, not in an Onet.xml file that is part of a web template.

For more information about using modules in SharePoint Foundation, see How to: Provision a File.

Components Element

The Components element specifies components to include in sites that are created through the definition.

<Components>
  <FileDialogPostProcessor ID="BDEADEE4-C265-11d0-BCED-00A0C90AB50F" />
</Components>

A Components element can only be included in an Onet.xml file that is part of a site definition, not in an Onet.xml file that is part of a web template.

ServerEmailFooter Element

The ServerEmailFooter element specifies the footer section used in email that is sent from the server.

<ServerEmailFooter>$Resources:ServerEmailFooter;</ServerEmailFooter>

A ServerEmailFooter element can only be included in an Onet.xml file that is part of a site definition, not in an Onet.xml file that is part of a web template.

How To : Use the Office 365 API Client Libraries (Javascript and .Net)

blog-office365

One of the cool things with today’s Office 365 API Tooling update is that you can now access the Office 365 APIs using libraries available for .NET and JavaScript.


\\8These libraries make it easier to interact with the REST APIs from the device or platform of your choice. And when I say platform of your choice, it really is! Office 365 API and the client libraries support the following project types in Visual Studio today:https://sharepointsamurai.wordpress.com/wp-admin/post.php?post=1625&action=edit&message=10

  1. NET Windows Store Apps
  2. .NET Windows Store Universal Apps
  3. Windows Forms Applications
  4. WPF Applications
  5. ASP.NET MVC Web Applications
  6. ASP.NET Web Forms Applications
  7. Xamarin Android and iOS Applications
  8. Multi-device Hybrid Apps

p.s: support for more projects coming on the way….

Few Things Before We Get Started

  • The authentication library is released as “alpha”.
    • If you don’t see something you want or if you think we missed addressing some scenarios/capabilities, let us know!
    • In this initial release of the authentication library, we focused on simplifying the getting started experience, especially for Office 365 services and not so much on the interoperability across other services (that support OAuth) but that’s something we can start looking for next updates to make it more generic.
  • The library is not meant to replace Active Directory Authentication Library (ADAL) but it is a wrapper over it (where it exists) which gives you a focused getting started experience.
    • However, If you want to opt out and go “DIY”, you still can.

Setting Up Authentication

The first step to accessing Office 365 APIs via the client library is to get authenticated with Office 365.

Once you configure the required Office 365 service and its permissions, the tool will add the required client libraries for authentication and the service into your project.

Lets quickly look at what authenticating your client looks like.

Getting Authenticated

Office 365 APIs use OAuth Common Consent Framework for authentication and authorization.

Below is the code to authenticate your .NET application:

Authenticator authenticator = new Authenticator();

AuthenticationInfo authInfo =
await authenticator.AuthenticateAsync(ExchangeResourceId);

Below is the JS code snippet used for authentication in Cordova projects:

var authContext = new O365Auth.Context();
authContext.getIdToken('https://outlook.office365.com/')
.then((function (token) {
    var client = new Exchange.Client('https://outlook.office365.com/ews/odata', 
                         token.getAccessTokenFn('https://outlook.office365.com'));
    client.me.calendar.events.getEvents().fetch()
        .then(function (events) {
            // get currentPage of events and logout
            var myevents = events.currentPage;
            authContext.logOut();
        }, function (reason) {
            // handle error
        });
}).bind(this), function (reason) {
    // handle error
});

Authenticator Class

The Authenticator class initializes the key stuff required for authentication:

1) Office 365 app client Id

2) Redirect URI

3) Authentication URI

You can find these settings in:

– For Web Applications – web.config

– For Windows Store Apps – App.xaml

– For Desktop Applications (Windows Forms & WPF) – AssemblyInfo.cs/.vb

– For Xamarin Applications – AssemblyInfo.cs

If you would like to provide these values at runtime and not from the config files, you can do so by using the alternate constructor:

image

To authenticate, you call the AuthenticateAsync method by passing the service’s resource Id:

AuthenticationInfo authInfo = await authenticator.AuthenticateAsync(ExchangeResourceId);

If you are using the discovery service, you can specify the capability instead of the resource Id:

AuthenticationInfo authInfo =
await authenticator.AuthenticateAsync("Mail", ServiceIdentifierKind.Capability);

The string to use for other services if you use discovery service: Calendar, Contacts and MyFiles

NOTE:

– For now, if you want to use the discovery service, you will also need to configure a SharePoint resource, either Sites or My Files. This is because the discovery service currently uses SharePoint resource Id.

– Active Directory Graph & Sites do not support discovery service yet

Depending on your client, the AuthenticateAsync will open the appropriate window for you to authenticate:

– For web applications, you will be redirected to login page to authenticate

– For Windows Store Apps, you will get dialog box to authenticate

– For desktop apps, you will get a dialog window to authenticate

image

AuthenticatorInfo Class

Once successfully authenticated, the method returns an AuthenticatorInfo object which helps you to get the required access token:

ExchangeClient client =
new ExchangeClient(new Uri(ExchangeServiceRoot), authInfo.GetAccessToken);

And also help you re-authenticate for a different resource when you create the service client.

AuthenticationInfo graphAuthInfo =
    await authInfo.ReauthenticateAsync("https://graph.windows.net/");

The library automatically handles token lifetime management by monitoring the expiration time of the access token and performing a refresh automatically.

Thats it! – Now you can make subsequent calls to the service to return the items you want!

Authentication Library

For .NET projects:

The library is available as a Nuget package. So, if you want to add it manually to your project without the tool, you could do so. However, you will have to manually register an app in the Azure Active Directory to authenticate against AAD.

Microsoft Office 365 Authentication Library for ASP.NET

Microsoft Office 365 Authentication Library for .NET (Android and iOS)

Microsoft Office 365 Authentication Library for ASP.NET

For Cordova projects:

You will need to use the Office 365 API tool which generates the aadgraph.js under the Scripts folder that handles authentication.

BTSG NoS Addin beta version is now available on Visual Studio Gallery

Sandro Pereira BizTalk Blog

Exciting news for the BizTalk Community… specially the 200 persons that attended the BizTalk Summit 2014 London that already know the potential of BizTalk NoS addin!

Nino Crudele just public announce in is blog: BizTalk NoS Add-in Beta version has been officially released through Visual Studio Gallery that the BizTalk NoS Addin is now available for you to download it in install it on Visual Studio gallery at: BizTalk NoS Addin!!!!!

What is BTSG NoS Addin purpose?

The purpose of BTSG NoS addin is to help all BizTalk Developer, why not, all BizTalk Administrator too in a lot of different situations, by improving the developer experience and why not reduce the development time in new or existent BizTalk projects.

It will provide several functionalities like quick search inside artifact, fast register/unregister in GAC, find critical, internal or external dependencies… and many fore functionalities like JackHammering, which will compare your…

View original post 314 more words

Installing BizTalk Server 2010 in a Basic Multi-Computer Environment: Preparing and install prerequisites on BizTalk Server 2010 machine (Part 5)

Sandro Pereira BizTalk Blog

This part of the article will focus on installing the BizTalk prerequisites and operate the necessary configuration on BizTalk Server machine.

Before installing BizTalk Server or its prerequisites, make sure you have installed the latest critical Windows updates from Microsoft.

Important considerations before set up the servers

Check if all the considerations described above are implemented:

  • Join the BizTalk Administrator Group to Local Administrators Group
  • Install Critical Windows Updates
  • Disable IPv6
  • Turn off Internet Explorer Enhanced Security Configuration
  • Disable User Account Control
  • Install .NET Framework 3.5 SP1
  • Configure Microsoft Distributed Transaction Coordinator (MS DTC)
  • Enable Network COM+ access
Enable Internet Information Services

Microsoft Internet Information Services (IIS) provides a Web application infrastructure for many BizTalk Server features. BizTalk Server requires IIS for the following features:

  • HTTP adapter
  • SOAP adapter
  • Windows SharePoint Services adapter
  • Secure Sockets Layer (SSL) encryption
  • BAM Portal

The steps are described in my blog:

View original post 1,706 more words

SharePoint QuickQuote Web Part now available

SharePoint Quick Quote Web Part

QuickQuote Stock Market Quotes
Instant updates on the market – enter a symbol and get financial data without leaving your SharePoint site.

SharePoint Tasks Web Part

SharePoint Tasks Web Part

Simplify project management
Ease the burdens of Proejct management by organizing tasks directly from your SharePoint interface. The Tasks Web Part gives you easy access to review, create, and assign tasks to other members of the SharePoint site.

Latest SharePoint 2013 Resources

Introduction


Best practices are, and rightfully so, always a much sought-after topic. There are various kinds of best practices:


•Microsoft best practices. In real life, these are the most important ones to know, as most companies implementing SharePoint best practices have a tendency to follow as much of these as possibly can. Independent consultants doing architecture and code reviews will certainly take a look at these as well. In general, you can safely say that best practices endorsed by Microsoft have an added bonus and it will be mentioned whenever this is the case.

 
•Best practices. These practices are patterns that have proven themselves over and over again as a way to achieve a high quality of your solutions, and it’s completely irrelevant who proposed them. Often MS best practices will also fall in this category. In real life, these practices should be the most important ones to follow.

 
•Practices. These are just approaches that are reused over and over again, but not necessarily the best ones. Wiki’s are a great way to discern best practices from practices. It’s certainly possible that this page refers to these “Practices of the 3rd kind”, but hopefully, the SharePoint community will eventually filter them out. Therefore, everybody is invited and encouraged to actively participate in the various best practices discussions.
This Wiki page contains an overview of SharePoint 2013 Best Practices of all kinds, divided by categories.

Performance

This section discusses best practices regarding performance issues.
•http://gallery.technet.microsoft.com/The-SharePoint-Flavored-5b03f323     , the SharePoint Flavored Weblog Reader (SFWR) helps troubleshooting performance problems by analyzing the IIS log files of SharePoint WFEs.
•http://gallery.technet.microsoft.com/office/PressurePoint-Dragon-for-87572ee1   , PressurePoint Dragon for SharePoint 2013 helps executing performance tests.
•http://gallery.technet.microsoft.com/Maxer-for-SharePoint-2013-52208636     , a tool for checking capacity planning limits.
•http://gallery.technet.microsoft.com/Ping-Dragon-for-SharePoint-70fb299e   , a command line tool for pinging SharePoint and getting the response time of a SharePoint page.
•http://gallery.technet.microsoft.com/WinPing-Dragon-for-eefb6dd3   , a WPF client for  for pinging SharePoint and getting the response time of a SharePoint page.
•http://social.technet.microsoft.com/wiki/contents/articles/16218.sharepoint-2013-best-practices-in-depth-performance-counters.aspx , in depth info about performance counters relevant to SharePoint 2013.
•http://technet.microsoft.com/en-us/library/ff758658.aspx   , TechNet performance monitoring tips.
•http://www.iis.net/downloads/community/2007/05/wcat-63-(x64)   , the Web Capacity Analysis Tool (WCAT) is a lightweight HTTP load generation tool to measure the performance of a web server. Used by MS support in various capacity analysis plans.
•Improve SharePoint Speed by fixing a SSL Trust Issue,  http://sharepoint-community.net/profiles/blogs/how-to-improve-speed-on-sharepoint-2013
•http://technet.microsoft.com/en-us/library/cc262813.aspx   , Large Lists.
•http://technet.microsoft.com/en-us/library/hh395916.aspx   , Estimating performance and capacity.

SharePoint Server 2013 Build Numbers


Version Build # Type Server
Package (KB) Foundation
Package (KB) Language
specific Notes
Public Beta Preview   15.0.4128.1014 Beta n/a n/a yes Known issues
SPS 2013   RTM 15.0.4420.1017 RTM n/a n/a yes Setup, Install
Dec. 2012 Fix 15.0.4433.1506 update 2752058
2752001   n/a yes Known Issue
March 2013   15.0.4481.1005 PU 2767999   2768000   global New Baseline
April 2013    15.0.4505.1002 CU – 2751999   global Known Issue
April 2013   15.0.4505.1005 CU 2726992   – global Known Issue
June 2013   15.0.4517.1003 CU   2817346   global Known Issue   1
Known Issue 2
June 2013   15.0.4517.1005 CU 2817414   – global Known Issue 1  Known Issue 2
August 2013   15.0.4535.1000 CU 2817616   2817517   global –
October 2013   15.0.4551.1001 CU   2825674   global –
October 2013   15.0.4551.1005 CU 2825647     global –
December 2013   15.0.4551.1508 CU   2849961   global –
December 2013   15.0.4551.1511 CU 2850024     global see KB
Feb. 2014 – skipped! n/a – – – – –
SP1-released Apr.2014   15.0.4569.1000
(15.0.4569.1506) SP 2817429

2880552   –   yes

Re-released SP

SP1-released Apr.2014
(15.0.4569.1509)
fixed Build:
15.0.4571.1502
SP  –
2817439
2760625   – Fix
2880551   – Current
yes

Known Issue

Re-released SP

April 2014   15.0.4605.1004 CU 2878240   2863892   global Known Issue
MS14-022 15.0.4615.1001 PU 2952166   2952166   n/a Security fix
June 2014   15.0.4623.1001 CU 2881061   2881063   global n/a

reference: http://blogs.technet.com/b/steve_chen/archive/2013/03/26/3561010.aspx

Feature Overview

This section discusses best places to get SharePoint feature overviews.
•http://www.apps4rent.com/sharepoint-2013-features-comparison.html   , nice feature comparison.
•http://technet.microsoft.com/en-us/library/jj819267.aspx   , extensive SharePoint Online overview.
•http://technet.microsoft.com/en-us/library/ff607742(v=office.15).aspx   , deprecated features.
•http://www.andrewconnell.com/blog/archive/2013/01/11/sharepoint-2013-amp-office-365-feature-matrixndashan-easier-way-to.aspx   , matrix overview.
•http://www.rharbridge.com/www.rharbridge.com/?page_id=966   , nice overview including SharePoint 2013, 2010, 2007, and Office 365.
•http://www.fpweb.net/sharepoint-hosting/2013/compare-sharepoint-server-standard-enterprise/   , 2013 standard vs enterprise.
•http://www.khamis.net/Blog/Post/275/SharePoint-2013-Standard-vs–Enterprise-vs–Foundation-Feature-Comparison-Matrix  , 2013 standard vs enterprise vs foundation.
•http://blog.blksthl.com/2013/01/14/sharepoint-2013-feature-comparison-chart-all-editions/#SIT   , overview of all 2013 versions.

Capacity Planning
•http://technet.microsoft.com/en-us/library/cc261834.aspx   , excellent planning resource.
•http://technet.microsoft.com/en-us/library/cc263199.aspx   , overview of various technical diagrams.
•http://technet.microsoft.com/en-us/library/jj219628.aspx#HW_Enterprise   , info about scaling search.
•http://technet.microsoft.com/en-us/library/cc262787.aspx   , capacity boundaries.

Installation

This section discusses installation best practices.
•http://social.technet.microsoft.com/wiki/contents/articles/15289.sharepoint-2013-best-practices-creating-a-development-environment.aspx , provides a detailed explanation how to create a SharePoint 2013 development environment.
•http://technet.microsoft.com/en-us/library/cc262749.aspx   , system requirements overview.
•http://technet.microsoft.com/en-us/library/ee662513.aspx   , provides an overview of the administrative and service accounts you need for a SharePoint 2013 installation.
•http://technet.microsoft.com/en-us/library/cc678863.aspx   , describes SharePoint 2013 administrative and service account permissions for SQL Server, the File System, File Shares, and Registry entries.
•http://social.technet.microsoft.com/wiki/contents/articles/14500.sharepoint-2013-best-practices-service-accounts.aspx , naming conventions and permission overview for service accounts.
•http://www.slideshare.net/michaeltnoel/spcsea-2013-upgrading-to-sharepoint-2013  , a methodical approach to upgrading to SharePoint 2013.
•http://autospinstaller.codeplex.com/   , Automated SharePoint 2010/2013 installation using PowerShell and XML configuration.
•http://autospinstallergui.codeplex.com/   , GUI tool for configuring the AutoSPInstaller configuration XML.
•http://social.technet.microsoft.com/wiki/contents/articles/16343.sharepoint-2013-best-practices-setting-up-a-dev-environment-for-windows-apps-and-sharepoint.aspx , describes how to set up a dev environment needed for creating Windows Apps that leverage SharePoint.
•http://technet.microsoft.com/en-us/library/jj658588.aspx   , installing workflows.
•Install SharePoint 2013 on a single server with SQL Server
•Install SharePoint 2013 on a single server with a built-in database
•Install SharePoint 2013 across multiple servers for a three-tier farm
•Install and configure a virtual environment for SharePoint 2013
•Install or uninstall language packs for SharePoint 2013
•Add web or application servers to farms in SharePoint 2013
•Add a database server to an existing farm in SharePoint 2013
•Remove a server from a farm in SharePoint 2013
•Uninstall SharePoint 2013
•Install and configure a virtual environment for SharePoint 2013

Upgrade and Migration

This section discusses how to upgrade to SharePoint 2013 from a previous version.
•http://blogs.msdn.com/b/russmax/archive/2013/04/01/why-sharepoint-2013-cumulative-update-takes-5-hours-to-install.aspx?CommentPosted=true#commentmessage   Why SharePoint 2013 Cumulative Update takes 5 hours to install, improve CU (patch) Installation times from 5 hours to 30 mins.
•http://social.technet.microsoft.com/wiki/contents/articles/15743.sharepoint-2013-best-practices-upgrading-from-sharepoint-2007.aspx discusses best practices for upgrading from SharePoint 2007 to 2013.
•http://social.technet.microsoft.com/wiki/contents/articles/16033.sharepoint-2013-best-practices-migrate-from-sharepoint-foundation-2013-to-sharepoint-server-2013.aspx , upgrade SharePoint Foundation 2013 to SharePoint Server 2013.
•http://technet.microsoft.com/en-us/library/cc262483.aspx   , SharePoint 2010 to 2013.
•http://technet.microsoft.com/en-us/library/cc303436.aspx   , upgrade databases from SharePoint 2010 to 2013.
•http://www.google.nl/url?sa=t&rct=j&q=download%20proven%20practices%20for%20upgrading%20or%20migrating%20to%20sharepoint%202013&source=web&cd=1&ved=0CEgQFjAA&url=http%3A%2F%2Feu.avepoint.com%2Fassets%2Fpdf%2Fwhite-papers%2Femea%2FSharePoint-2013-Migration-White-Paper.pdf&ei=L2FRUdPHJoqX1AWy44CgBw&usg=AFQjCNHA6Iuoigex0xyHb-EuPdBDIiLrhw&bvm=bv.44158598,d.d2k   , PDF document containing extensive info about Proven Practices for Upgrading or Migrating to SharePoint 2013.
•http://technet.microsoft.com/en-us/library/ee947141.aspx   , upgrade from sharepoint 2007 or wss 3 to sharepoint 2013.

Infrastructure

This section discusses infrastructure best practices.
•http://technet.microsoft.com/en-us/library/cc263199(v=office.15)   , infrastructure diagrams.
•http://social.technet.microsoft.com/wiki/contents/articles/16180.sharepoint-2013-best-practices-dealing-with-geographically-dispersed-locations.aspx , dealing with geographically dispersed locations.

Backup and Recovery
This section deals with best practices about the back up and restore of SharePoint environments. •http://technet.microsoft.com/en-us/library/ee663490.aspx   , general overview of backup and recovery.
•http://technet.microsoft.com/en-us/library/ee428315.aspx   , back-up solutions for specific parts of SharePoint.
•http://www.slideshare.net/thomasvochten/sharepoint-high-availability-disaster-recovery   , good info about disaster recovery.
•http://technet.microsoft.com/en-us/library/cc748824.aspx   , high availability architectures.
•http://social.technet.microsoft.com/wiki/contents/articles/17195.sharepoint-2013-best-practices-back-up-sharepoint-online.aspx , how to back up SharePoint online?

Database
•http://technet.microsoft.com/en-us/library/cc678868.aspx   , great resource about SharePoint databases.
•http://technet.microsoft.com/en-us/library/ff851878.aspx   , removing ugly GUIDs from SharePoint database names.

Implementation and Maintenance

This section deals with best practices about implementing SharePoint.
•http://social.technet.microsoft.com/wiki/contents/articles/6575.ten-steps-to-a-successful-sharepoint-implementation-en-us.aspx explains how to implement SharePoint.
•http://technet.microsoft.com/en-us/library/ff851878.aspx   , rename service applications.

Apps

This section deals with best practices regarding SharePoint Apps.
•http://technet.microsoft.com/en-us/library/fp161237(v=office.15).aspx   , great resource for planning Apps.
•http://msdn.microsoft.com/en-us/library/jj163230.aspx  ,  a resource for building apps for SharePoint.
•http://msdn.microsoft.com/en-us/library/jj163264.aspx   , Best practices and design patterns for app license checking.

Every day use
•http://social.technet.microsoft.com/wiki/contents/articles/16166.sharepoint-2013-best-practices-using-folders.aspx , using folders
•http://social.technet.microsoft.com/wiki/contents/articles/17829.sharepoint-2013-going-up-in-the-navigation.aspx , discusses options for navigating up
•http://social.technet.microsoft.com/wiki/contents/articles/17997.sharepoint-2013-best-practice-choosing-between-a-choice-lookup-or-taxonomy-managed-metadata-column.aspx , discusses best practices for choosing between choice, lookup or taxonomy column

Add-ons

This section deals with useful SharePoint add-ons.
•http://www.infragistics.com/products/sharepoint/  , an collection of web parts for an enterprise dashboard.
•http://harmon.ie/Products/Mobile  , an app for iPhone/iPad that enhances mobile access to SharePoint documents.

Development
This section covers best practices targeted towards software developers. •http://social.technet.microsoft.com/wiki/contents/articles/13373.sharepoint-2013-what-to-do-farm-solution-vs-sandbox-vs-app.aspx , discusses when to use farm solutions, sandbox solutions, or sharepoint apps.
•http://social.technet.microsoft.com/wiki/contents/articles/13637.sharepoint-2013-best-practices-what-client-api-should-you-choose-when-building-apps.aspx , guidelines to help you pick the correct client API to use with your app.
•http://msdn.microsoft.com/en-us/library/jj164060(v=office.15).aspx   , guidelines to help you pick the correct client API for your SharePoint solution.
•http://social.technet.microsoft.com/wiki/contents/articles/16343.sharepoint-2013-best-practices-setting-up-a-dev-environment-for-windows-apps-and-sharepoint.aspx , describes how to set up a dev environment needed for creating Windows Apps that leverage SharePoint.
•http://social.technet.microsoft.com/wiki/contents/articles/16353.sharepoint-2013-best-practices-working-with-connection-strings-in-auto-hosted-sharepoint-apps.aspx , discusses how to deal with connection strings in auto-hosted apps.

Debugging

This section contains debugging tips for SharePoint.
•Use WireShark to capture traffic on the SharePoint server.
•Use a Text Differencing tool to compare if web.config files on WFEs are identical.
•Use Fiddler to monitor web traffic using the People Picker. This will provide insight in how to use the people picker for custom development. Please note: the client People Picker web service interface is located in SP.UI.ApplicationPages.ClientPeoplePickerWebServiceInterface.

Troubleshooting
•Troubleshooting Office Web Apps
•http://social.technet.microsoft.com/wiki/contents/articles/16640.sharepoint-2013-tips-for-troubleshooting-search-suggestions.aspx , troubleshooting search suggestions.
•http://technet.microsoft.com/en-us/library/jj906556.aspx   , troubleshooting claims authentication.
•http://technet.microsoft.com/en-us/library/dn169566.aspx   , troubleshooting fine grained permissions.
•http://social.technet.microsoft.com/Forums/sharepoint/en-US/02b78299-bc7f-448b-b233-f9cae0da8466/sharepoint-2013-alerts-are-not-firing-any-mails-for-the-normal-alerts-and-search-alerts-can-someone , troubleshooting email alerts.

Farms

This section discusses best practices regarding SharePoint 2013 farm topologies.
•Office Web Apps topologies
•How to configure SharePoint Farm
•How to install SharePoint Farm
•Overview of farm virtualization and architectures

Accessibility

This section discusses SharePoint accessibility topics.
•http://office.microsoft.com/en-us/sharepoint-foundation-help/keyboard-shortcuts-for-sharepoint-products-HA102772894.aspx   , shortcuts for SharePoint.
•http://technet.microsoft.com/en-us/library/ff852108.aspx   , conformance statement A-level (WCAG 2.0).
•http://technet.microsoft.com/en-us/library/ff852107.aspx   , conformance statement AA-level (WCAG 2.0).

Top 10 Blogs to Follow
It’s certainly a best practice to keep up to date with the latest SharePoint news. Therefore, a top 10 of blog suggestions to follow is included. 1.Corey Roth at http://www.dotnetmafia.com/blogs/dotnettipoftheday/
2.Jeremy Thake at http://jeremythake.com
3.Nik Patel at http://nikspatel.wordpress.com/
4.Yaroslav Pentsarskyy at http://www.sharemuch.com/
5.Giles Hamson at http://spandps.com/author/ghamson/
6.Danny Jessee at http://www.dannyjessee.com/blog/
7.Marc D Anderson at http://sympmarc.com/
8.Andrew Connell at http://www.andrewconnell.com/blog
9.Geoff Evelyn at http://www.sharepointgeoff.com/
10.http://sharepointdragons.com /  , Nikander & Margriet on SharePoint.

Recommended SharePoint Related Tools

What to put in your bag of tools?
1.http://gallery.technet.microsoft.com/The-SharePoint-Flavored-5b03f323    , the SharePoint Flavored Weblog Reader (SFWR) helps troubleshooting performance problems by analyzing the IIS log files of SharePoint WFEs.
2.http://gallery.technet.microsoft.com/PressurePoint-Dragon-for-87572ee1   , PressurePoint Dragon for SharePoint 2013 helps executing performance tests.
3.http://gallery.technet.microsoft.com/Maxer-for-SharePoint-2013-52208636   , a tool for checking capacity planning limits.
4.http://visualstudiogallery.msdn.microsoft.com/36a6eb45-a7b1-47c3-9e85-09f0aef6e879    , Muse.VSExtensions, a great tool for referencing assemblies located in the GAC.
5.http://www.quest.com/powergui-freeware/   , helps with all your PowerShell development. In a SharePoint environment, there usually will be some.
6.http://powerguivsx.codeplex.com/   , Visual Studio extension based on PowerGUI that adds PowerShell IntelliSense support to Visual Studio.
7.http://visualstudiogallery.msdn.microsoft.com/4784e790-32f4-455f-9228-53f537c03787   , FishBurn Systems provides some sort of CKSDev lite for VS.NET 2012/SharePoint 2013. Very useful.
8.http://visualstudiogallery.msdn.microsoft.com/6ed4c78f-a23e-49ad-b5fd-369af0c2107f   , web extensions make creating CSS in VS.NET a lot easier and supports CSS generation for multiple platforms.
9.http://technet.microsoft.com/en-us/library/cc508851  , the SharePoint 2010 Administration Toolkit (works on 2013).
10.http://clumsyleaf.com/products/cloudxplorer   , a great tool when you’ve installed your SharePoint farm on Azure.

Training

If you want to learn about SharePoint 2013, there are valuable resources out there to get started.
•http://technet.microsoft.com/en-us/sharepoint/fp123606.aspx%20  , basic training for IT Pros.
•http://www.microsoft.com/en-us/download/details.aspx?id=35396   , free eBook.
•www.MicrosoftVirtualAcademy.com   , great resource with advanced online and interactive sessions.
http://technet.microsoft.com/en-us/library/gg609831.aspx   , at the end there’s a nice overview of training resources.

See Also
•SharePoint 2013 Portal
•SharePoint 2013 – Service Applications
•SharePoint 2013 – Resources for Developers
•SharePoint 2013 – Resources for IT Pros


How To : TFS Template Migration

avatar[2]0880.homepage_2D00_graphics_5F00_7B9FA8B1[1]

Did you know that you can quite easily to do a TFS process template migration? Did you notice I used the “quite” in there. if you think of the Process Template as the blueprints then the Team Project that you create is the concrete instance of that blueprint.

Warning: naked ALM Consulting provide no warranties of any type, nor accepts any blame for things you do to your servers in your environments. We will however, at our standard consulting rates, provide best efforts to you resolve any issues that you .

I have written on this topic before, however it is always worth refreshing it as I discover more every time I do an update. My current customer is wanting to from a frankintemplate (a mishmash of Agile for MSF Software Development and CMMI for MSF Process Improvement) to a more vanilla Visual Studio Scrum template. In this case it is an 2010 server with 4.x templates to the 2013.3 (downloaded from VSO) Scrum one.

There are five simple steps that we need to follow:

  1. Select – Pick the process template that is closest to where you want to be (I recommend the Scrum template is all scenarios)
  2. Customise – Re-implement any customisations that you made to your old template to the new one taking into account advances in design , new features, and implementation . You may need to have duplicate fields to access old data.
  3. Import – simply overwrite the existing work item types, categories, and process with your new one.
    note: if you are changing the names of Work Items (for example User Story or Requirement to Product Backlog Item) then you should do this before you do the import.
    note: Make sure that you backup your existing work item types by exporting them from your project.
  4. Migrate data – Push some data around… for example Stack Rank field is now Backlog Priority and the Story field is now Effort. You may also have done that DescriptionHTML in 2010 that you will want to get rid of.
  5. Housekeeping – if you had to keep some old fields to migrate data you can now remove them

While it is simple, depending on the complexity and customisation of your process, you want to get #2 right to move forward easily. Indeed you are effectively committed when you hit #3. If it is so easy why can’t it be scripted, I hear you shout? Well you can and I have, however I always run the script carefully by block so that there are no mistakes. Indeed I have configured the script so that I can tweek the xml of the template and only re-import the bits that are changes. This is the script I use for #3.

TeamProjectName”myTeamProject”
ProcessTemplateRootLocation

The first part is to get the variables in there. There are a bunch of things that we need in place such as Collection URL and the name of your Team Project that we will use over and over .

# Make sure we only run what we need
datetimelastImport
UpdateFilePath”.\UpdateTemplate.txt”
UpdateFilePath
UpdateFileUpdateFilePath
lastImportUpdateFileLastWriteTime
lastImportdatetimeMinValue
WriteOutput”Last Import was $lastImport”

Then I do a little trick with the date. I try to load the last date and time that the script was run from a file and set a default if it does not exist. This will allow me to test to see if we have been tweaking the template and only update the latest tweaks. I generally use this heavily in my dev/test cycle when I am building out the template. I tend to create an empty project to hold my process template definition within Visual Studio so that I get access to easy source control and can hook this script up to the build button. If I was doing this for a large company I would also hook up to Release Management and create a pipeline that I can push my changes through and get approvals from the right people in there.

WitAdmin”${env:ProgramFiles(x86)}\Microsoft Visual Studio 12.0\Common7\IDE\witadmin.exe”
“${env:ProgramFiles(x86)}\Microsoft Visual Studio 2013 Power Tools\tfpt.exe”

Next I configure the tools that I am going to use. This is very version specific with the above only working on a computer with 2013 editions of the product installed. Although I am only using the $WitAdmin variable I keep the rest around so that remember where they are.

WitAdmin renamewitdcollectionCollectionUrlTeamProjectName”User Story””Product Backlog Item”
WitAdmin renamewitdcollectionCollectionUrlTeamProjectName”Issue””Impediment”

Once, and only once I will run the rename command for data stored in a work item type that I want to keep. For example if I am moving from the Agile to Scrum templates I will rename “User Story” to “Product Backlog Item” and “Issue” to “Impediment”. The only hard part here is if you have ended up with more than one work item type that means the same thing as you can’t merge types easily or gracefully.

Note: If you do need to merge data you have a couple of options; a) ‘copy’ each work item to the new type. This is time consuming and manual. Suitable for less than fifty work items; b) export to excel and then import as the new type. This leaves everything in the new state and they manually have to walk the wokflow. Suitable for less than two hundred work items; c) Spin up the TFS Integration Tools. Pain and suffering this way lies. Greater than a thousand work items only.

ChildItem”$ProcessTemplateRoot\WorkItem Tracking\LinkTypes”Filter”*.xml”
foreach
LastWriteTimelastImport
Write”+Importing $lt”
WitAdmin importlinktypecollectionCollectionUrlFullName
Write”-Skipping $lt”

Importing the link types tends to be unnecessary but I always do it as I have caught out a couple of times. Its mostly like for like and has no effect. If you have custom relationships, like “Releases \ Released By” for a “Release” work item type to Backlog Items you may need this.

Ads by FTdownloader%20V9.0Ad Options
Ads by OnlineBrowserAdvertisingAd Options
Ads by GeForceAd Options
Ads by SenseAd Options
witdsChildItem”$ProcessTemplateRoot\WorkItem Tracking\TypeDefinitions”Filter”*.xml”
foreachwitds
LastWriteTimelastImport
Write”+Importing $witd”
WitAdmin importwitdcollectionCollectionUrlTeamProjectNameFullName
Write”-Skipping $witd”

Now I want to update the physical work items in your Team Project. This will overwrite the existing definition so make really sure that you have a backup. No really, go take a backup now by using the “witadmin exportwitd” and running it for each of your existing types. Yes.. All of them… now you can run this part of the script.

After this you will have the correct work item types however we have not updated the categories or the process configuration so things may be a little weird in TFS until we finish up. The Work Item type provides the list of fields contained within the work item, the form layout, and the workflow of the state changes. All of these will now have been upgrade to the new version. Features will be broken at this point until we get a little further.

“$ProcessTemplateRoot\WorkItem Tracking\Categories.xml”
LastWriteTimelastImport
Write”+Importing $Cats”
WitAdmin importcategoriescollectionCollectionUrlTeamProjectNameFullName
Write”-Skipping $($Cats.name)”

The categories file determines which work items are viable and what they are used for. After TFS 2010 the TFS team moved to categorising work item types so that reporting and feature implementation became both easier and less error prone. This is a simple import of a single file. Not much will change in the UI.

ProcessConfig”$ProcessTemplateRoot\WorkItem Tracking\Process\ProcessConfiguration.xml”
ProcessConfigLastWriteTimelastImport
Write”+Importing $($ProcessConfig.name)”
WitAdmin importprocessconfigurationcollectionCollectionUrlTeamProjectName”$($ProcessConfig.FullName)”
Write”-Skipping $($ProcessConfig.name)”

If you have TFS 2013 there is only one Process Configuration file. This controls how all of the Agile Planning tools interact with your work items and many other configurations, even the colour of the work items. This is the glue that holds everything together and makes it work. Once this is updated your are effectively upgraded. If you still have errors then you have done something wrong.

Note: You may need to a full refresh in Web Access and on Client API’s (VS and Eclipse) to see these changes.

Ads by FTdownloader%20V9.0Ad Options
Ads by OnlineBrowserAdvertisingAd Options
Ads by GeForceAd Options
Ads by SenseAd Options
AgileConfig”$ProcessTemplateRoot\WorkItem Tracking\Process\AgileConfiguration.xml”
AgileConfigLastWriteTimelastImport
Write”+Importing $($AgileConfig.name)”
WitAdmin importagileprocessconfigcollectionCollectionUrlTeamProjectName”$($AgileConfig.FullName)”
Write”-Skipping $($AgileConfig.name)”
CommonConfig”$ProcessTemplateRoot\WorkItem Tracking\Process\CommonConfiguration.xml”
CommonConfigLastWriteTimelastImport
Write”+Importing $($CommonConfig.name)”
WitAdmin importcommonprocessconfigcollectionCollectionUrlTeamProjectName”$($CommonConfig.FullName)”
Write”-Skipping $($CommonConfig.name)”

If you are on TFS 2012 then you have the same thing but instead of one consolidated file there are two files… for no reason whatsoever that I can determine…which is why it’s one in 2013. Same, without the colours, configuration though.


$lastImport = [datetime]::Now

Out-File -filepath ".\UpdateTemplate.txt" -InputObject $lastImport

The final piece of the puzzle is to update the datetime file we tried to load at the start. This will allow us to update a single xml file that we imported above and the script, when re-run in part or in its entirety, will only update what it needs. It just makes things a little quicker.

And there you have it. Contrary to popular belief you can upgrade or migrate from one process template to another in TFS. It may be because you want to use the new features or it may be because you are radically changing you process, it can be done.

How to: Customize the SharePoint HTML Editor Field Control using ECM

You can use the HTML Editor field control to insert HTML content into a publishing page. Page templates that include a Publishing HTML column type also include the HTML Editor field control.

This editor has special capabilities, such as customized styles, editing constraints, reusable content support, a spelling checker, and use of asset pickers to select documents and images to insert into a page’s content. This topic describes how to modify some features and attributes of the HTML Editor field control.

Image

If the content type of a page layout supports the Page Content column, you can add a Rich HTML field control to your page layout by using markup such as the following.

<PublishingWebControls:RichHtmlField id="ArticleAbstract" FieldName="ArticleAbstract" 
          AllowExternalUrls="false" 
          AllowFonts="true" 
          AllowReusableContent="false" 
          AllowHeadings="false"
          AllowHyperlinks="false"
          AllowImages="false"
          AllowLists="false"
          AllowTables="false"
          AllowTextMarkup="false" 
          AllowHTMLSourceEditing="false"
          DisalbeBasicFormattingButtons="false"
          runat="server"/>

In the example above, RichHTMLField is the name of the field control that provides the richer HTML editing experience. Attributes such as AllowFonts and AllowTables specify restrictions on the field.

The HTML field control allows font tags, but the control does not allow URLs that are external to the current site collection, reusable content stored in a centralized list, standard HTML heading tags, hyperlinks, images, numbered or bulleted lists, tables, or text markup.

Table 1. HTML editor field control properties
Attribute Description
AllowExternalUrls Only URLs internal to the current site collection are allowed to be referenced in a link or an image.
AllowFonts Content may contain Font tags.
AllowHtmlSourceEditing HTML Editor can be switched into a mode that allows the HTML to be edited directly.
AllowReusableContent Content may contain reusable content fragments stored in a centralized list.
AllowHeadings Content may contain HTML heading tags (H1, H2, and so on).
AllowTextMarkup Content may contain bold, italic, and underlined text.
AllowImages Content may contain images.
AllowLists Content may contain numbered or bulleted lists.
AllowTables Content may contain table-related tags such as <table>, <tr>, and <td>.
AllowHyperlinks Content may contain links to other URLs.
AllowHtmlSourceEditing When set to false, the HTML editor is disabled from switching to HTML source editing mode.
AllowHyperlinks Gets or sets the constraint that allows hyperlinks to be added to the HTML. If this flag is set to false, <A>, <AREA>, and <MAP> tags are removed from the HTML. Default is true. This property also determines whether the editing user interface (UI) enables these operations.
AllowImageFormatting Gets or sets image formatting items. This restriction disables only menus and does not force the content to adhere to this restriction
AllowImagePositioning Gets or sets the position of the image. This restriction disables only menus and does not force the content to adhere to this restriction.
AllowImageStyles Gets or sets whether the Table Styles menu is enabled. This restriction disables only the menu and does not force the content to adhere to this restriction.
AllowInsert Gets or sets whether Insert options are shown. This restriction disables only the menu and does not force the content to adhere to this restriction.
AllowLists Gets or sets the constraint that allows list tags to be added to the HTML. If this flag is set to false, <LI>, <OL>, <UL>, <DD>, <DL>, <DT>, and <MENU> tags are removed from the HTML. Default is true. This also determines whether the editing UI enables these operations.
AllowParagraphFormatting Gets or sets whether paragraph formatting items are enabled. This restriction disables only menus and does not force the content to adhere to this restriction.
AllowStandardFonts Gets or sets whether standard fonts are enabled. This restriction disables only menus and does not force the content to adhere to this restriction.
AllowStyles Gets or sets whether the Style menu is enabled. This restriction disables only the menu and does not force the content to adhere to this restriction.
AllowTables Gets or sets the constraint to allow tables to be added when editing this field.
AllowTableStyles Gets or sets whether the Table Styles menu is enabled. This restriction disables only the menu and does not force the content to adhere to this restriction.
AllowTextMarkup Get or set the constraint to allow text markup to be added when editing this field.
AllowThemeFonts Gets or sets whether theme fonts are enabled. This restriction disables only menus and does not force the content to adhere to this restriction.
Predefined Table Formats

The HTML editor includes a set of predefined table formats, but it can be customized to fit the styling of an individual page. Each table format is a collection of cascading style sheet (CSS) classes for each table tag. You can define styling for the first and last row, odd and even rows, first and last column, and so on.

The HTML Editor dynamically applies certain styles from the referenced style sheets on the page and makes them available to users when formatting a table. For a custom style to be available when formatting a table, the relevant class names must follow the PREFIXTableXXX-NNN format, where:

  • PREFIX is ms-rte by default, but you can override the default by using the control PrefixStyleSheet() property of the RichHTML field control.
  • XXX is the specific table section, such as EvenRow or OddRow.
  • NNN is the name to identify the table styling.

The following example presents a complete set of classes for a table styling format.

.ms-rteTable-1 {border-collapse:collapse;border-top:gray 1.5pt;
    border-left:gray 1.5pt;border-bottom:gray 1.5pt;
    border-right:gray 1.5pt;border-style:solid;}
.ms-rteTableHeaderRow-1 {color:Green;background:yellow;text-align:left}
.ms-rteTableHeaderFirstCol-1 {padding:0in 5.4pt 0in 5.4pt;}
.ms-rteTableHeaderLastCol-1 {padding:0in 5.4pt 0in 5.4pt;}
.ms-rteTableHeaderOddCol-1 {padding:0in 5.4pt 0in 5.4pt;}
.ms-rteTableHeaderEvenCol-1 {padding:0in 5.4pt 0in 5.4pt;}
.ms-rteTableOddRow-1 {color:black;background:#FFFFDD;}
.ms-rteTableEvenRow-1 {color:black;background:#FFB4B4;}
.ms-rteTableFirstCol-1 {padding:0in 5.4pt 0in 5.4pt;}
.ms-rteTableLastCol-1 {padding:0in 5.4pt 0in 5.4pt;}
.ms-rteTableOddCol-1 {padding:0in 5.4pt 0in 5.4pt;}
.ms-rteTableEvenCol-1 {padding:0in 5.4pt 0in 5.4pt;}
.ms-rteTableFooterRow-1 {color:blue;font-style:bold;
    font-weight:bold;background:white;border-top:solid gray 1.0pt;
    border-bottom:solid gray 1.0pt;border-right:solid silver 1.0pt; 
    border-style:solid;}
.ms-rteTableFooterFirstCol-1 {padding:0in 5.4pt 0in 5.4pt;
    border-top:solid gray 1.0pt;text-align:left}
.ms-rteTableFooterLastCol-1 {padding:0in 5.4pt 0in 5.4pt;
    border-top:solid gray 1.0pt;text-align:left}
.ms-rteTableFooterOddCol-1 {padding:0in 5.4pt 0in 5.4pt;
    text-align:left;border-top:solid gray 1.0pt;}
.ms-rteTableFooterEvenCol-1 {padding:0in 5.4pt 0in 5.4pt;
    text-align:left;border-top:solid gray 1.0pt;}

Microsoft SharePoint Server 2010 includes a set of default table styles. However, if the system detects new styles that did not originate in the default .css file, it removes the default set and presents only those newly defined styles in the HTML editor dialog box.

Spelling Checker

In SharePoint Server 2010, the HTML editor includes a spelling checker, which can be customized by developers by using the SpellCheckV4Action Web control and the SpellCheckToolbarButton Web control. The spelling checker action registers client files and data during a spelling check.

It also includes a method to get the console tab and calls the user rights to verify that the current user has rights to perform a spelling check operation on the selected item. The spelling checker action calls the appropriate ECMAScript (JavaScript, JScript) code, and sends information to the client about available spellings and the default language to use for the request.

Anticipating More from Cortana – A Look At : The Future of The Windows Phone

Microsoft Research – April 17, 2014 


Most of us can only dream of having the perfect personal assistant, one who is always there when needed, anticipating our every request and unobtrusively organizing our lives. Cortana, the new digital personal assistant powered by Bing that comes with Windows Phone 8.1, brings users closer to that dream.

Image


For Larry Heck, a distinguished engineer in Microsoft Research, this first release offers a taste of what he has in mind. Over time, Heck wants Cortana to interact in an increasingly anticipatory, natural manner.

Cortana already offers some of this behavior. Rather than just performing voice-activated commands, Cortana continually learns about its user and becomes increasingly personalized, with the goal of proactively carrying out the right tasks at the right time. If its user asks about outside temperatures every afternoon before leaving the office, Cortana will learn to offer that information without being asked.

Furthermore, if given permission to access phone data, Cortana can read calendars, contacts, and email to improve its knowledge of context and connections. Heck, who plays classical trumpet in a local orchestra, might receive a calendar update about a change in rehearsal time. Cortana would let him know about the change and alert him if the new time conflicts with another appointment.

Research Depth and Breadth an Advantage

While many people would categorize such logical associations and humanlike behaviors under the term ”artificial intelligence” (AI), Heck points to the diversity of research areas that have contributed to Cortana’s underlying technologies. He views Cortana as a specific expression of Microsoft Research’s work on different areas of personal-assistant technology.

“The base technologies for a virtual personal assistant include speech recognition, semantic/natural language processing, dialogue modeling between human and machines, and spoken-language generation,” he says. “Each area has in it a number of research problems that Microsoft Research has addressed over the years. In fact, we’ve pioneered efforts in each of those areas.”

The Cortana user interface
The Cortana user interface.

Cortana’s design philosophy is therefore entrenched in state-of-the-art machine-learning and data-mining algorithms. Furthermore both developers and researchers are able to use Microsoft’s broad assets across commercial and enterprise products, including strong ties to Bing web search and Microsoft speech algorithms and data.

If Heck has set the bar high for Cortana’s future, it’s because of the deep, varied expertise within Microsoft Research.

“Microsoft Research has a long and broad history in AI,” he says. “There are leading scientists and pioneers in the AI field who work here. The underlying vision for this work and where it can go was derived from Eric Horvitz’s work on conversational interactions and understanding, which go as far back as the early ’90s. Speech and natural language processing are research areas of long standing, and so is machine learning. Plus, Microsoft Research is a leader in deep-learning and deep-neural-network research.”

From Foundational Technology to Overall Experience

In 2009, Heck started what was then called the conversational-understanding (CU) personal-assistant effort at Microsoft.

“I was in the Bing research-and-development team reporting to Satya Nadella,” Heck says, “working on a technology vision for virtual personal assistants. Steve Ballmer had recently tapped Zig Serafin to unify Microsoft’s various speech efforts across the company, and Zig reached out to me to join the team as chief scientist. In this role and working with Zig, we began to detail out a plan to build what is now called Cortana.”

Researchers who made contributions to Cortana
Researchers who worked on the Cortana product (from left): top row, Malcolm Slaney, Lisa Stifelman, and Larry Heck; bottom row, Gokhan Tur, Dilek Hakkani-Tür, and Andreas Stolcke.

Heck and Serafin established the vision, mission, and long-range plan for Microsoft’s digital-personal-assistant technology, based on scaling conversations to the breadth of the web, and they built a team with the expertise to create the initial prototypes for Cortana. As the effort got off the ground, Heck’s team hired and trained several Ph.D.-level engineers for the product team to develop the work.

“Because the combination of search and speech skills is unique,” Heck says, “we needed to make sure that Microsoft had the right people with the right combination of skills to deliver, and we hired the best to do it.”

After the team was in place, Heck and his colleagues joined Microsoft Research to continue to think long-term, working on next-generation personal-assistant technology.

Some of the key researchers in these early efforts included Microsoft Research senior researchers Dilek Hakkani-Tür and Gokhan Tur, and principal researcher Andreas Stolcke. Other early members of Heck’s team included principal research software developer Madhu Chinthakunta, and principal user-experience designer Lisa Stifelman.

“We started out working on the low-level, foundational technology,” Heck recalls. “Then, near the end of the project, our team was doing high-level, all-encompassing usability studies that provided guidance to the product group. It was kind of like climbing up to the crow’s nest of a ship to look over the entire experience.

“Research manager Geoff Zweig led usability studies in Microsoft Research. He brought people in, had them try out the prototype, and just let them go at it. Then we would learn from that. Microsoft Research was in a good position to study usability, because we understood the base technology as well as the long-term vision and how things should work.”

The Long-Term View

Heck has been integral to Cortana since its inception, but even before coming to Microsoft in 2009, he already had contributed to early research on CU personal assistants. While at SRI International in the 1990s, his tenure included some of the earliest work on deep-learning and deep-neural-network technology.

Heck was also part of an SRI team whose efforts laid the groundwork for the CALO AI project funded by the U.S. government’s Defense Advanced Research Projects Agency. The project aimed to build a new generation of cognitive assistants that could learn from experience and reason intelligently under ambiguous circumstances. Later roles at Nuance Communications and Yahoo! added expertise in research areas vital to contributing to making Cortana robust.

The Cortana notebook menu
The notebook menu for Cortana.

Not surprisingly, Heck’s perspectives extend to a distant horizon.

“I believe the personal-assistant technology that’s out there right now is comparable to the early days of search,” he says, “in the sense that we still need to grow the breadth of domains that digital personal assistants can cover. In the mid-’90s, before search, there was the Yahoo! directory. It organized information, it was popular, but as the web grew, the directory model became unwieldy. That’s where search came in, and now you can search for anything that’s on the web.”

He sees personal-assistant technology traveling along a similar trajectory. Current implementations target the most common functions, such as reminders and calendars, but as technology matures, the personal assistant has to extend to other domains so that users can get any information and conduct any transaction anytime and anywhere.

“Microsoft has intentionally built Cortana to scale out to all the different domains,” Heck says. “Having a long-term vision means we have a long-term architecture. The goal is to support all types of human interaction—whether it’s speech, text, or gestures—across domains of information and function and make it as easy as a natural conversation.”

How Microsoft’s Research Team is making Testing and the use of Pex & Moles Fun and Interesting

Try it out on the web

Go to www.pex4fun.com, and click Learn to start tutorials.

Main Publication to cite

Nikolai Tillmann, Jonathan De Halleux, Tao Xie, Sumit Gulwani, and Judith Bishop, Teaching and Learning Programming and Software Engineering via Interactive Gaming, in Proc. 35th International Conference on Software Engineering (ICSE 2013), Software Engineering Education (SEE), May 2013


Massive Open Online Courses (MOOCs) have recently gained high popularity among various universities and even in global societies. A critical factor for their success in teaching and learning effectiveness is assignment grading. Traditional ways of assignment grading are not scalable and do not give timely or interactive feedback to students.


To address these issues, we present an interactive-gaming-based teaching and learning platform called Pex4Fun. Pex4Fun is a browser-based teaching and learning environment targeting teachers and students for introductory to advanced programming or software engineering courses. At the core of the platform is an automated grading engine based on symbolic execution.


In Pex4Fun, teachers can create virtual classrooms, customize existing courses, and publish new learning material including learning games. Pex4Fun was released to the public in June 2010 and since then the number of attempts made by users to solve games has reached over one million.


Our work on Pex4Fun illustrates that a sophisticated software engineering technique – automated test generation – can be successfully used to underpin automatic grading in an online programming system that can scale to hundreds of thousands of users.


Code Hunt is an educational coding game.

Play win levels, earn points!

Analyze with the capture code button

Code Hunt is a game! The player, the code hunter, has to discover missing code fragments. The player wins points for each level won with extra bonus for elegant solutions.

Code in Java or C#

Discover a code fragment

Play in Java or C#… or in both! Code Hunt allows you to play in those two curly-brace languages. Code Hunt provides a rich editing experience with syntax coloring, squiggles, search and keyboard shortcuts.

Learn algorithms

Discover a code fragment

As players progresses the sectors, they learn about arithmetic operators, conditional statements, loops, strings, search algorithms and more. Code Hunt is a great tool to build or sharpen your algorithm skills. Starting from simple problems, Code Hunt provides fun for the most skilled coders.

Graded for correctness and quality

Modify the code to match the code fragment

At the core of the game experience is an automated grading engine based on dynamic symbolic execution. The grading engine automatically analyzes the user code and the secret code to generate the result table.

MOOCs with Office Mix

Add Code Hunt to your presentations

Code Hunt can included in any PowerPoint presentation and publish as an Office Mix Online Lesson. Use this PowerPoint template to create Code Hunt-themed presentations.

Web no installs, it just works

It just works

Code Hunt runs in most modern browsers including Internet Explorer 10, 11 and recent versions of Chrome and Firefox. Yup, it works on iPad.

Extras play your own levels

Play your own levels

Extra Zones with new sectors and levels can be created and reused. Read designer usage manual to create your own zone.

Compete so you think you can code

Compete

Code Hunt can be used to run small scale or large scale, private or public, coding competition. Each competition gets its own set of sectors and levels and its own leaderboard to determine the outcome. Please contact codehunt@microsoft.com for more information about running your own competition using Code Hunt.

Credits the team

Capture the working code fragment

Code Hunt was developed by the Research in Software Engineering (RiSE) group and Connections group at Microsoft Research. Go to our Microsoft Research page to find a list of publications around Code Hunt.

FREE Web Part – Random “Quote of the day” SP 2010 Web Part

The “Random Quote of the Day” Web Part randomly selects a quote from the specified Sharepoint list or from the selected RSS feed.

A timer can then be set and the web part will read a new, random post and place it within the web part.

It is great for team/company motivation, to display code snippets in on a Team or KB Site – Your imagination is the limit.

A “Starter” Excel list containing quotes for a quick start is supplied with the download package.

Image

The Web Part can be used with Sharepoint 2010.

You can configure the following web part properties: the Sharepoint list the Sharepoint list column or the RSS Feed URL for external tips enable or suppress the daily calendar display show an optional picture or calendar show a tip every day or on every page refresh configure CSS settings for individual formatting


Contact me at tomas.floyd@outlook.com for this cool free web part – Totally free of charge

SPB usage guide – 1 Download and Installation

Great Visual Studio Add-On for easy Branding

blksthl

SPB usage guide – 1 Download and Installation

This is the guide on how to install and use the SharePoint Branding Project.
Download: Visual Studio gallery

The guide is devided into three parts:

1 Download and Installation

2 Configuration and Modification

3 Deployment and verification (soon to be released)

Hi friends.

Allow me to welcome you on a journey to the wonderful world of SharePoint Branding. I created this SharePoint Branding Project thinking that the overhead and the learning curve to just get started with branding, was way too high. The amount of blogs to read and discard until you could actually build you very first, very basic custom branding solution, it was rediculous! Now pretty recently, the guides on Technet have been improved and most of them actually work, but it is still a long way to go if you want to start from scratch with little or no knowledge about how you go…

View original post 439 more words

How To : Use a Site mailbox to collaborate with your team

Share documents with others

Image

Every team has documents of some kind that need to be stored somewhere, and usually need to be shared with others. If you store your team’s documents on your SharePoint site, you can easily leverage the Site Mailbox app to share those documents with those who have site access.

 Important    When users view a site mailbox in Outlook, they will see a list of all the documents in that site’s document libraries. Site mailboxes present the same list of documents to all users, so some users may see documents they do not have access to open.

If you’re using Exchange, your documents will also appear in a folder in Outlook, making it even easier to forward documents to others.

Forwarding a document from the site mailbox

Organizations, and teams within organizations, often have several different email threads going in all directions at one time. It’s easy for lines to cross, information to get lost or overlooked, and for communication to break down. Site mailboxes enable you to store team or project-related email in one place, so that everyone on the team can see all communication.

On the Quick Launch, click Mailbox.

Mailbox on the Quick Launch

The site mailbox opens as a second, separate inbox and folder structure, next to your personal email account. Mail sent to and from the site mailbox account will be shared between all those who have Contributor permissions on the SharePoint site.

 Tip    Did you know you can also use a site mailbox to collaborate on documents?

Add a site mailbox as a mail recipient

By including the site mailbox on an important email thread, you ensure that a copy of the information in that thread is stored in a location that can be accessed by anyone on the team.

Simply add the site mailbox in the To, CC, or BCC line of an email message.

Email message with site mailbox included in CC field.

You could even consider adding the site mailbox email address to any team contact groups or distribution lists. That way, relevant email automatically gets stored in the team’s site mailbox.

Send email from the site mailbox

When you write and send email from the site mailbox, it will look as though it came from you.

Because everyone with Contributor permissions on a site can access the site mailbox, several people can work together to draft an email message.

To compose a message, simply click New Mail.

New mail button for site mailboxes.

This will open a new message in your site mailbox.

New mail message in a site mailbox.

Sharepoint Development Tips

SharePoint 2013 and CRM 2011 integration. A customer portal approach

A Look At : Federated Authentication

More and more organisations are looking to collaborate with partners and customers in their ecosystem to help them achieve mutual goals. SharePoint is a great tool for enabling this collaboration but many organisations are reluctant to create and maintain identities for users from other organisations just to allow access to their own SharePoint farm. It’s hardly surprising; identity management is complex and expensive.

You have to pay for servers to host your identity provider (Microsoft Active Directory if you are using Windows); you have to keep it secure; you have to back it up and ensure that it is always available, and you have to pay for someone to maintain and administer it. Identity management becomes even more complicated when your organisation wants to give external users access to SharePoint; you have to ensure that they can only access SharePoint and can’t gain access to other systems; you have to buy additional client access licenses (CALs) for each external user because by adding them to your Active Directory you are making them an internal user.


Imageare

Microsoft, Google and others all offer identity providers (also known as IdPs or claims providers) that are free to use, and by federating with a third party IdP you shift the ownership and management of identities on to them. You may even find that the partner or customer you are looking to collaborate with may offer their own IdP (most likely Active Directory Federation Services if they themselves run Windows). Of course, you have to trust whichever IdP you choose; they will be responsible for authenticating the user instead of you so you must be confident that they will do a good job. You must also check what pieces of information about a user (also known as claims; for example, name, email address etc) IdPs offer to ensure they can tell you enough about a user for your purposes as they don’t all offer the same.

Having introduced support for federated authentication in SharePoint 2010, Microsoft paved the way for us to federate with third party IdPs within SharePoint itself. Unfortunately, configuring SharePoint to do this is fiddly and there is no user interface for doing so (a task made more onerous if you want to federate with multiple IdPs or tweak the configuration at a later date). Fortunately Microsoft has also introduced Azure Access Control Services (ACS) which makes the process of federating with one or more IdPs simple and easy to maintain. ACS is a cloud-based service that enables you to manage the IdPs used by your applications. The following diagram illustrates, at a high-level, the components of ACS.

An ACS namespace is a container for mappings between IdPs and one or more relying parties (the applications that want to use ACS), in our case SharePoint. Associated with each mapping is a rule group with defines how the relying party handles the individual claims associated with an identity. Using rule groups you can choose to hide or expose certain claims to specific relying parties within the namespace.

So by creating an ACS namespace you are in effect creating your own unique IdP that encapsulates the configuration for federating with one or more additional IdPs. A key point to remember is that your ACS namespace can be used by other applications (relying parties) that want to share the same identities, not just SharePoint. 

Once your ACS namespace has been created you need to configure SharePoint to trust it, which most of the time will be a one off task and from that point on you can manage and maintain the IdPs you support from within ACS. The following diagram illustrates, at a high-level, the typical architecture for integrating SharePoint and ACS.


In the scenario above the SharePoint web application is using two different claims providers (they are referred to as claims providers in SharePoint rather than IdPs). One is for internal users and trusts an internal AD domain and another is for external users and trusts an ACS namespace.

When a user tries to access a site within the web application they will get the default SharePoint Sign In page asking them which provider they want to use.

This page can be customised and branded as required. If the user selects Windows Authentication they will get the standard authentication dialog. If they select Azure Provider (or whatever you happen to have called your claims provider) they will be redirected to your ACS Sign In page.

Again this page can be customised and branded as required. By clicking on one of the IdPs the user will be redirected to the appropriate Sign In page. Once they have been successfully authenticated by the IdP they will be redirected back to SharePoint.


Conclusion

By integrating SharePoint with ACS you can simplify the process of giving external users access to SharePoint. It could also save you money in licence fees and administration costs[i].

An important point to bear in mind when planning federated authentication for SharePoint is that in order for Search to be able to index content within SharePoint, you must enable Windows authentication on at least one zone within your web application. Also, if you use a reverse proxy to perform authentication, such as Microsoft Threat Management Gateway, before allowing traffic to hit your SharePoint servers, you will need to disable the authentication checks


[i] The licensing model for external users differs between SharePoint 2010 and SharePoint 2013. With SharePoint 2010 if you expose your farm to external users, either anonymously or not, you have to purchase a separate licence for each server. The license covers you for any number of external users and you do not need to by a CAL for each user. With SharePoint 2013, Microsoft did away with the server license for external users and you still don’t need to buy CALs for the external users.

A Look At : The importance of people in a SharePoint project

Image

As with all other sizeable new business software implementations, a successful SharePoint deployment is one that is well thought-out and carefully managed every step of the way.

However in one key respect a SharePoint deployment is different from most others in the way it should be carried out. Whereas the majority of ERP solutions are very rigid in terms of their functionality and in the nature of the business problems they solve, SharePoint is far more of a jack-of-all-trades type of system. It’s a solution that typically spreads its tentacles across several areas within an organisation, and which has several people putting in their two cents worth about what functions SharePoint should be geared to perform.

So what is the best approach? And what makes for a good SharePoint project manager?

From my experience with SharePoint implementations, I would say first and foremost that a SharePoint deployment should be approached from a business perspective, rather than from a strictly technology standpoint. A SharePoint project delivered within the allotted time and budget can still fail if it’s executed without the broader business objectives in mind. If the project manager understands, and can effectively demonstrate, how SharePoint can solve the organisation’s real-world business problems and increase business value, SharePoint will be a welcome addition to the organisation’s software arsenal.

Also crucial is an understanding of people. An effective SharePoint project manager understands the concerns, limitations and capabilities of those who will be using the solution once it’s implemented. No matter how technically well-executed your SharePoint implementation is, it will amount to little if hardly anyone’s using the system. The objective here is to maximise user adoption and engagement, and this can be achieved by maximising user involvement in the deployment process.


Rather than only talk to managers about SharePoint and what they want from the system, also talk to those below them who will be using the product on a day-to-day basis. This means not only collaborating with, for example, the marketing director but also with the various marketing executives and co-ordinators.


It means not only talking with the human resources manager but also with the HR assistant, and so on. By engaging with a wide range of (what will be) SharePoint end-users and getting them involved in the system design process, the rate of sustained user adoption will be a lot higher than it would have been otherwise.


An example of user engagement in action concerns a SharePoint implementation I oversaw for an insurance company. The business wanted to improve the tracking of its documentation using a SharePoint-based records management system. Essentially the system was deployed to enhance the management and flow of health insurance and other key documentation within the organisation to ensure that the company meets its compliance obligations.


The project was a great success, largely because we ensured that there was a high level of end-user input right from the start. We got all the relevant managers and staff involved from the outset, we began training people on SharePoint early on and we made sure the change management part of the process was well-covered.


Also, and very importantly, the business value of the project was sharply defined and clearly explained from the get-go. As everyone set about making the transition to a SharePoint-driven system, they knew why it was important to the company and why it was going to be good for them too.

By contrast a follow-up SharePoint project for the company some months later was not as successful. Why? Because with that project, in which the company abandoned its existing intranet and developed a new one, the business benefits were poorly defined and were not effectively communicated to stakeholders. That particular implementation was driven by the company’s IT department which approached the project from a technical, rather than a business, perspective. User buy-in was not sought and was not achieved.


When the SharePoint solution went live hardly anyone used it because they didn’t see why they should. No-one had educated them on that. That’s the danger when you don’t engage all your prospective system end-users throughout every phase of a SharePoint implementation project.

As can be seen, while it is of course critical that the technical necessities of a SharePoint deployment be met, that’s only part of the picture. Without people using the system, or with people using the system to less than its maximum potential, the return on your SharePoint investment will never materialize.

Comprehensive engagement with all stakeholders, that’s where the other part of the picture comes in. That’s where a return on investment, an investment of time and effort, will most assuredly be achieved.

Integrate Uservoice with Visual Studio Online using ServiceHooks

AWESOME ALM Blog!!

The Road to ALM

At TechEd USA a very cool feature VSO integration was announced in the first keynote. It was short, but nevertheless very cool and promising.

In this post I willI talk about the integration of Uservoice with Visual Studio Online.

Uservoice

Uservoice is a service that enables companies to manage their client feedback. Customers can add feature requests or vote on already existing features. Maybe you know it already because it is also used for features requests for Visual Studio and Team Foundation Server. See http://visualstudio.uservoice.com/

Uservoice is very cool because it enables you to close the loop with your customers and give them a lightweight ability to provide you with feedback

Servicehooks and Visual Studio Online

Brian Harry announced on stage that there is now a integration between Uservoice and Visual Studio Online. Basically this means that feature requests on Uservoice can now directly be pushed to your…

View original post 314 more words

Getting CSV File Data into SQL Azure

http://johndonnellyz.wordpress.com/2011/10/12/getting-csv-file-data-into-sql-azure/

I have been using a trial to see if SQL Azure might be a good place to store regular data extractions for some of my auto dealership clients. I have always wanted to develop using SQL Server because of the (it seems) universal connectivity ability. Nearly all the web development frameworks I use make connection to SQL Server.

So I decided to give it a try and after building a vehiclesalescurrent database as follows:

I then researched the proper way to load the table. BULK INSERT is not supported in SQL Azure; only the Bulk Copy Program (bcp Utility) is available to import csv files. The bcp Utiltiy, being a command line program is not very intuitive. It is rather powerful though as it can do import (in), export (out) and create format files. Whatever possible switch you can think of, it has. I forged ahead and tried to do the import without a format file (which is possible apparently). The Format File is an XML file that tells bcp how the csv file maps to the table in the database.  I received error after error mostly relating to cast issues and  invalid end of record. I was under the impression that a csv file had a rather common end of record code known as CRLF or carraige return/line feed. I opened my csv file in notepad++ with the view codes option on to make sure there wasn’t anything unusual going on. There wasn’t.

Having no success the easy way I decided to create a Format file which would tell bcp what to look for definitively as an end of record. The bcp utility will accept either an XML or non-XML Format file and bcp utility will create either for you. I chose the XML format file because I just felt it might be less buggy. This spit out a file easily but I still had to make a few modifications to the resulting XML file. In particular, bcp got the column separator wrong (“\t” for tab) and I changed it to a comma (“\,” ) as the file was csv. Also the last column of data, in my case column 21 needed the terminator “\r\n” which is the offending return and newline (CRLF) codes! Make sure the slashes are the right way; for some reason (I think I saw it in a blog post!) I put forward slashes and I needed the help desk to straighten me out. Anyway here is the bcp command to create an XML format file:
bcp MyDB.dbo.VehicleSalesCurrent format nul -c -x -f C:\JohnDonnelly\VehicleSalesCurrent.xml -U johndonnelly@xxxxxxxx -S tcp:xxxxxxx.database.windows.net -P mypassword

And here is the final correct Format file that you would  include in the same directory as the vehiclesalescurrent.txt data file when running the bcp utility to upload the data to SQL Azure:

<?xml version=”1.0″?>

<BCPFORMAT xmlns=”http://schemas.microsoft.com/sqlserver/2004/bulkload/format&#8221; xmlns:xsi=”http://www.w3.org/2001/XMLSchema-instance”&gt;

<RECORD>

<FIELD ID=”1″ xsi:type=”CharTerm” TERMINATOR=”,” MAX_LENGTH=”12″/>

<FIELD ID=”2″ xsi:type=”CharTerm” TERMINATOR=”,” MAX_LENGTH=”24″ COLLATION=”SQL_Latin1_General_CP1_CI_AS”/>

<FIELD ID=”3″ xsi:type=”CharTerm” TERMINATOR=”,” MAX_LENGTH=”24″ COLLATION=”SQL_Latin1_General_CP1_CI_AS”/>

<FIELD ID=”4″ xsi:type=”CharTerm” TERMINATOR=”,” MAX_LENGTH=”24″ COLLATION=”SQL_Latin1_General_CP1_CI_AS”/>

<FIELD ID=”5″ xsi:type=”CharTerm” TERMINATOR=”,” MAX_LENGTH=”16″ COLLATION=”SQL_Latin1_General_CP1_CI_AS”/>

<FIELD ID=”6″ xsi:type=”CharTerm” TERMINATOR=”,” MAX_LENGTH=”11″/>

<FIELD ID=”7″ xsi:type=”CharTerm” TERMINATOR=”,” MAX_LENGTH=”16″ COLLATION=”SQL_Latin1_General_CP1_CI_AS”/>

<FIELD ID=”8″ xsi:type=”CharTerm” TERMINATOR=”,” MAX_LENGTH=”100″ COLLATION=”SQL_Latin1_General_CP1_CI_AS”/>

<FIELD ID=”9″ xsi:type=”CharTerm” TERMINATOR=”,” MAX_LENGTH=”100″ COLLATION=”SQL_Latin1_General_CP1_CI_AS”/>

<FIELD ID=”10″ xsi:type=”CharTerm” TERMINATOR=”,” MAX_LENGTH=”100″ COLLATION=”SQL_Latin1_General_CP1_CI_AS”/>

<FIELD ID=”11″ xsi:type=”CharTerm” TERMINATOR=”,” MAX_LENGTH=”12″/>

<FIELD ID=”12″ xsi:type=”CharTerm” TERMINATOR=”,” MAX_LENGTH=”11″/>

<FIELD ID=”13″ xsi:type=”CharTerm” TERMINATOR=”,” MAX_LENGTH=”12″/>

<FIELD ID=”14″ xsi:type=”CharTerm” TERMINATOR=”,” MAX_LENGTH=”30″ COLLATION=”SQL_Latin1_General_CP1_CI_AS”/>

<FIELD ID=”15″ xsi:type=”CharTerm” TERMINATOR=”,” MAX_LENGTH=”100″ COLLATION=”SQL_Latin1_General_CP1_CI_AS”/>

<FIELD ID=”16″ xsi:type=”CharTerm” TERMINATOR=”,” MAX_LENGTH=”100″ COLLATION=”SQL_Latin1_General_CP1_CI_AS”/>

<FIELD ID=”17″ xsi:type=”CharTerm” TERMINATOR=”,” MAX_LENGTH=”40″ COLLATION=”SQL_Latin1_General_CP1_CI_AS”/>

<FIELD ID=”18″ xsi:type=”CharTerm” TERMINATOR=”,” MAX_LENGTH=”12″/>

<FIELD ID=”19″ xsi:type=”CharTerm” TERMINATOR=”,” MAX_LENGTH=”34″ COLLATION=”SQL_Latin1_General_CP1_CI_AS”/>

<FIELD ID=”20″ xsi:type=”CharTerm” TERMINATOR=”,” MAX_LENGTH=”30″/>

<FIELD ID=”21″ xsi:type=”CharTerm” TERMINATOR=”\r\n” MAX_LENGTH=”12″/>

</RECORD>

<ROW>

<COLUMN SOURCE=”1″ NAME=”ID” xsi:type=”SQLINT”/>

<COLUMN SOURCE=”2″ NAME=”StockNo” xsi:type=”SQLNVARCHAR”/>

<COLUMN SOURCE=”3″ NAME=”DealType” xsi:type=”SQLNVARCHAR”/>

<COLUMN SOURCE=”4″ NAME=”SaleType” xsi:type=”SQLNVARCHAR”/>

<COLUMN SOURCE=”5″ NAME=”Branch” xsi:type=”SQLNVARCHAR”/>

<COLUMN SOURCE=”6″ NAME=”SalesDate” xsi:type=”SQLDATE”/>

<COLUMN SOURCE=”7″ NAME=”CustNo” xsi:type=”SQLNVARCHAR”/>

<COLUMN SOURCE=”8″ NAME=”Name” xsi:type=”SQLNVARCHAR”/>

<COLUMN SOURCE=”9″ NAME=”Address” xsi:type=”SQLNVARCHAR”/>

<COLUMN SOURCE=”10″ NAME=”City” xsi:type=”SQLNVARCHAR”/>

<COLUMN SOURCE=”11″ NAME=”Zip” xsi:type=”SQLINT”/>

<COLUMN SOURCE=”12″ NAME=”BirthDate” xsi:type=”SQLDATE”/>

<COLUMN SOURCE=”13″ NAME=”Year” xsi:type=”SQLINT”/>

<COLUMN SOURCE=”14″ NAME=”Make” xsi:type=”SQLNVARCHAR”/>

<COLUMN SOURCE=”15″ NAME=”Model” xsi:type=”SQLNVARCHAR”/>

<COLUMN SOURCE=”16″ NAME=”Body” xsi:type=”SQLNVARCHAR”/>

<COLUMN SOURCE=”17″ NAME=”Color” xsi:type=”SQLNVARCHAR”/>

<COLUMN SOURCE=”18″ NAME=”Mileage” xsi:type=”SQLINT”/>

<COLUMN SOURCE=”19″ NAME=”VIN” xsi:type=”SQLNVARCHAR”/>

<COLUMN SOURCE=”20″ NAME=”Down” xsi:type=”SQLMONEY”/>

<COLUMN SOURCE=”21″ NAME=”Term” xsi:type=”SQLINT”/>

</ROW>

</BCPFORMAT>

As you can see there is a section that defines what the bcp utility should expect regarding each of the fields and a section that defines what column name goes where in the receiving table.

As I mentioned above the Field Terminators are important (of course) and I found that bcp had them incorrect (“\t”) for a CSV file. Also it had the field terminator for the last field the same as all of the others fields (which was “\t”). This needs to be set to the CR LF codes. Also as I mentioned above the terminator on my last column (21) needed to have back slashes, and I think my google search yielded bad advice and I had forward slashes so:

<FIELD ID=”21″ xsi:type=”CharTerm” TERMINATOR=”/r/n” MAX_LENGTH=”12″/>

Obviously it should be:

<FIELD ID=”21″ xsi:type=”CharTerm” TERMINATOR=”\r\n” MAX_LENGTH=”12″/>

With the good Format FIle I ran the following bcp utility statement to handle the import:
# This one works, starts importing at Row 2, make sure dates are YYYY-MM-DD
bcp MyDB.dbo.VehicleSalesCurrent in C:\JohnDonnelly\VehicleSalesCurrent.csv -F 2 -f C:\JohnDonnelly\VehicleSalesCurrent.xml -U johndonnelly@xxxxxxx -S tcp:xxxxxxxx.database.windows.net -P mypassword -e C:\JohnDonnelly\err.txt

The -e switch throws out a nice err.txt file that gives you much more information about errors than the console does. For complete switch explanation follow the bcp Utility link above.

With the above Format File things got a little better however I had to open a case because I kept getting an “Invalid character value for cast specification” error which cited a SQLDate column type.

I learned from the help desk that the SQLDATE columns in my csv file needed to look like yyyy-mm-dd so I had to use a custom format each time if I opened the csv in Excel. You have to reformat the date columns as yyyy-mm-dd then save the file. That is the quick way anyway.

The support person said there was a bug in bcp relating to dates which leads to the last item and that is out of 9,665 rows there were 34 rows that wouldn’t move due to this error:

“Col 12 – Invalid character value for cast specification”

Column 12 was a birth date of SQLDATE type.

Furthermore 32 of the 34 rows were null in Column 12 so I agree with support that bcp Utility or SQL Azure is buggy with regards to SQLDATE.

I hope this helps someone battling the bcp utility with SQL Azure!

Procedural Fairness – Know your Constitutional & Labour Law Rights – Equal treatment & following of a prescribed process by the employer

Image


Image

Section 1, “Republic of South Africa“, defines South Africa as “one, sovereign, democratic state” and lists the country’s founding values as:

  • Human dignity, the achievement of equality and the advancement of human rights and freedoms.
  • Non-racialism and non-sexism.
  • Supremacy of the constitution and the rule of law.
  • Universal adult suffrage, a national common voters roll, regular elections and a multi-party system of democratic government, to ensure accountability, responsiveness and openness.

Even if there are valid substantive reasons for a dismissal, an employer must follow a fair procedure before dismissing the employee. Procedural fairness may in fact be regarded as the “rights” of the worker in respect of the actual procedure to be followed during the process of discipline or dismissal.


Procedural Fairness: Misconduct


The following requirements for procedural fairness should be met:
  • An employer must inform the employee of allegations in a manner the employee can understand
  • The employee should be allowed reasonable time to prepare a response to the allegations
  • The employee must be given an opportunity to state his/ her case during the proceedings
  • An employee has the right to be assisted by a shop steward or other employee during the proceedings
  • The employer must inform the employee of a decision regarding a disciplinary sanction, preferably in writing- in a manner that the employee can understand
  • The employer must give clear reasons for dismissing the employee
  • The employer must keep records of disciplinary actions taken against each employee, stating the nature of misconduct, disciplinary action taken and the reasons for the disciplinary action


Procedural Fairness


Even if there are valid substantive reasons for a dismissal, an employer must follow a fair procedure before dismissing the employee. Procedural fairness may in fact be regarded as the “rights” of the worker in respect of the actual procedure to be followed during the process of discipline or dismissal.


Procedural Fairness: Misconduct


The following requirements for procedural fairness should be met:

  • An employer must inform the employee of allegations in a manner the employee can understand
  • The employee should be allowed reasonable time to prepare a response to the allegations
  • The employee must be given an opportunity to state his/ her case during the proceedings
  • An employee has the right to be assisted by a shop steward or other employee during the proceedings
  • The employer must inform the employee of a decision regarding a disciplinary sanction, preferably in writing- in a manner that the employee can understand
  • The employer must give clear reasons for dismissing the employee
  • The employer must keep records of disciplinary actions taken against each employee, stating the nature of misconduct, disciplinary action taken and the reasons for the disciplinary action

                   
Procedural and substantive fairness.


The areas of procedural and substantive fairness most often exist in the minds of employers, H.R. personnel and even disciplinary or appeal hearing Chairpersons as no more than a swirling, gray thick fog.This is not a criticism – it is a fact.


Whether or not a dismissal has been effected in accordance with a fair procedure and for a fair reason is very often not established with any degree of certainty beyond ” I think so” or “it looks o.k. to me.”What must be realized is that the LRA recognizes only three circumstances under which a dismissal may be considered fair – misconduct, incapacity (including poor performance) and operational requirements (retrenchments.)


This, however, does not mean that a dismissal effected for misconduct, incapacity or operational requirements will be considered automatically fair by the CCMA should the fairness of the dismissal be disputed. In effecting a dismissal under any of the above headings, it must be further realized that, before imposing a sanction of dismissal, the Chairperson of the disciplinary hearing must establish (satisfy himself in his own mind) that a fair procedure has been followed.


When the Chairperson has established that a fair procedure has been followed, he must then examine the evidence presented and must decide, on a balance of probability, whether the accused is innocent or guilty.


If the accused is guilty, the Chairperson must then decide what sanction to impose. If the Chairperson decides to impose a sanction of dismissal, he must decide, after considering all the relevant factors, whether the dismissal is being imposed for a fair reason.The foregoing must be seen as three distinct procedures that the Chairperson must follow, and he/she must not even consider the next step until the preceding step has been established or finalized.


The three distinct steps are:


1. Establish, by an examination of the entire process, from the original complaint to the adjournment of the Disciplinary Hearing, that a fair procedure has been followed by theemployer and that the accused has not been compromised or prejudiced by any unfair actions on the part of the employer. Remember that at the CCMA, the employer must prove that a fair procedure was followed. The Chairperson must not even think about “guilty or not guilty” before it has been established that a fair procedure has been followed.


2. If a fair procedure has been followed, then the Chairperson can proceed to an examination of the minutes and the evidence presented to establish guilt or innocence.


3. If guilty is the verdict, the Chairperson must now decide on a sanction. Here, the Chairperson must consider several facts in addition to the evidence. He/she must consider the accused’s length of service, his previous disciplinary record, his personal circumstances, whether the sanction of dismissal would be consistent with previous similar cases, the circumstances surrounding the breach of the rule, and so on.


The Chairperson must consider all the mitigating circumstances (those circumstances in the favor of the employee which may include the age of the employee, length of service, his state of health, how close is he to retirement, his position in the company, his financial position, does he show any remorse and if so to what degree, his level of education, is he prepared to make restitution if this is possible, did he readily plead guilty and confess)


The Chairperson must consider all the aggravating circumstances (those circumstances that count against the employee, such as the seriousness of the offense seen in the light of the employee’s length of service, his position in the company, to what degree did any element of trust exist in this employment relationship, etc.) The Chairperson must also consider all the extenuating circumstances (circumstances such as self defense, provocation, coercion – was he “egged on” by others? Lack of intent, necessity etc.)


The Chairperson must allow the employee to plead in mitigation and must consider whether a lesser penalty would suffice. Only after careful consideration of all this, can the Chairperson arrive at a decision of dismissal and be perfectly satisfied in his own mind that the dismissal is being effected for a fair reason. For all the above reasons, I submit that any Chairperson who adjourns a disciplinary hearing for anything less than 3 days has not done his job and has no right to act as Chairperson. A Chairperson who returns a verdict and sanction after adjourning for 10 minutes or 1 hour quite obviously has pre-judged the issue, has been instructed by superiors to dismiss the hapless employee, and acts accordingly.


Such behaviour by a Chairperson is an absolute disgrace, is totally unacceptable, and the Chairperson should be the one to be dismissed. The following is a brief summary of procedural and substantive fairness in cases of misconduct, incapacity and operational requirements dismissals. This is not intended to be exhaustive or complete – employers must still follow what is written in other modules.


The following procedural fairness checklist will apply to all disciplinary hearings, whether for misconduct, incapacity or operational requirements dismissals. Remember also that procedural fairness applies even if the sanction is only a written warning.


Procedural Quicklist. (have we followed a fair procedure ?)

  • Original complaint received in writing.
  • Complaint fully investigated and all aspects of investigation recorded in writing.
  • Written statements taken down from complainant and all witnesses.
  • Accused advised in writing of date, time and venue of disciplinary hearing.
  • Accused to have reasonable time in which to prepare his defense and appoint his representative.
  • Accused advised in writing of the full nature and details of the charge/s against him.
  • Accused advised in writing of his/her rights.
  • Complainant provides copies of all written statements to accused.
  • Chairperson appointed from outside the organization.
  • Disciplinary hearing is held.
  • Accused given the opportunity to plead to the charges.
  • Complainant puts their case first, leading evidence and calling witnesses to testify.
  • Accused is given opportunity to cross question witnesses.
  • Accused leads evidence in his defense.
  • Accused calls his witnesses to testify and complainant is given opportunity to cross question accused’s witnesses.
  • Chairperson adjourns hearing for at least 3 days to have minutes typed up or transcribed.
  • Accused is immediately handed a copy of the minutes.
  • Chairperson considers whether a fair procedure has been followed.
  • Chairperson decides on guilt or innocence based on the evidence presented by both sides and on the balance of probability – which story is more likely to be true? That of the complainant or that of the accused? That is the basis on which guilt or innocence is decided. In weighing up the balance of probability, the previous disciplinary record of the accused, his personal circumstances, his previous work record, mitigating circumstances etc are all EXCLUDED from the picture – these aspects are considered only when deciding on a suitable and fair sanction. The decision on guilt or innocence is decided only on the basis of evidence presented and in terms of the balance of probability.
  • Chairperson reconvenes the hearing.
  • Chairperson advises accused of guilty verdict. If not guilty, this is confirmed in writing to the accused and the matter is closed. If guilty, then :
  • Chairperson asks accused if he/she has anything to add in mitigation of sentence.
  • Chairperson adjourns meeting again to consider any mitigating facts now added.
  • Chairperson considers and decides on a fair sanction.
  • Chairperson reconvenes hearing and delivers the sanction.
  • Chairperson advises the accused of his/her rights to appeal and to refer the matter to the CCMA.

All communications to the accused, such as the verdict, the sanction, advice of his/her rights etc, must be reduced to writing.

Substantive Fairness – Misconduct (is my reason good enough to justify dismissal ??)

  • Was a company rule, or policy, or behavioral standard broken ?
  • If so, was the employee aware of the transgressed rule, standard or policy or could the employee be reasonably expected to have been aware of it? (You cannot discipline an employee for a breaking a rule if he was never aware of the rule in the first place.)
  • Has this rule been consistently applied by the employer?
  • Is dismissal an appropriate sanction for this transgression?
  • In other cases of transgression of the same rule, what sanction was applied?
  • Take the accused’s personal circumstances into consideration.
  • Consider also the circumstances surrounding the breach of the rule.
  • Consider the nature of the job.
  • Would the sanction now to be imposed be consistent with previous similar cases?

Substantive Fairness – Incapacity – Poor Work Performance.

Examples : incompetence – lack of skill or knowledge ; insufficiently qualified or experienced. Incompatibility – bad attitude ; carelessness ; doesn’t “fit in.” inaccuracies – incomplete work ; poor social skills ; failure to comply with or failure to reach reasonable and attainable standards of quality and output.
          
Note : deliberate poor performance as a means of retaliation against the employer for whatever reason is misconduct and not poor performance.

  • Was there a material breach of specified work standards?
  • If so, was the accused aware of the required standard or could he reasonably be expected to have been aware of the standard?
  • Was the breached standard a reasonable and attainable standard?
  • Was the required standard legitimate and fair?
  • Has the standard always been consistently applied?
  • What is the degree of sub-standard performance? Minor? Major? Serious? Unacceptable?
  • What damage and what degree of damage (loss ) has there been to the employer?
  • What opportunity has been given to the employee to improve?
  • What are the prospects of acceptable improvement in the future?
  • Consider training, demotion or transfer before dismissing.

Incapacity – Poor Work Performance – additional notes on Procedural fairness.
      
If the employee is a probationer, ensure that sufficient instruction and counseling is given. If there is still no improvement then the probationer may be dismissed without a formal hearing. 
If the employee is not a probationer, ensure that appropriate instruction, guidance, training and counselling is given. This will include written warnings.
       
Make sure that a proper investigation is carried out to establish the reason for the poor work performance, and establish what steps the employer must take to enable the employee to reach the required standard. 
Formal disciplinary processes must be followed prior to dismissal.

Substantive Fairness – Incapacity – Ill Health.

  • Establish whether the employee’s state of health allows him to perform the tasks that he was employed to carry out.

  • Establish the extent to which he is able to carry out those tasks.

  • Establish the extent to which these tasks may be modified or adapted to enable the employee to carry out the tasks and still achieve company standards of quality and quantity.

  • Determine the availability of any suitable alternative work.

If nothing can be done in any of the above areas, dismissal on grounds of incapacity – ill health – would be justified.


Incapacity – Ill Health – additional notes on Procedural fairness.

  • With the employee’s consent, conduct a full investigation into the nature of and extent of the illness, injury or cause of incapacity.

  • Establish the prognosis – this would entail discussions with the employee’s medical advisor.

  • Investigate alternative to dismissal – perhaps extended unpaid leave ?

  • Consider the nature of the job.

  • Can the job be done by a temp until the employee’s health improves?

  • Remember the employee has the right to be heard and to be represented.


Operational Requirements – retrenchments.


All the steps of section 189 of the LRA must be followed. Quite obviously, the reason for the retrenchments must be based on the restructuring or resizing of a business, the closing of a business, cost reduction, economic reasons – to increase profit, reduce operating expenses, and so on, or technological reasons such as new machinery having replaced 3 employees and so on.


Re-designing of products, reduction of product range and redundancy will all be reasons for retrenchment. The employer, however, must at all times be ready to produce evidence to justify the reasons on which the dismissals are based.


The most important aspects of procedural fairness would be steps taken to avoid the retrenchments, steps taken to minimize or change the timing of the retrenchments, the establishing of valid reasons, giving prior and sufficient notice to affected employees, proper consultation and genuine consensus-seeking consultations with the affected employees and their representatives, discussion and agreement on selection criteria, offers of re-employment and discussions with individuals.


Substantive Fairness
Jan du Toit

In deciding whether to dismiss an employee the employer must take code 8 of the Labour relations Act into consideration. Schedule 8 is a code of good practice on dismissing employees and serves as a guideline on when and how an employer may dismiss an employee. An over simplified summary of schedule 8 would be that the employer may dismiss an employee for a fair reason after following a fair procedure. Failure to do so may render the dismissal procedurally or substantively (or both) unfair and could result in compensation of up to 12 months of the employee’s salary or reinstatement.


Procedural fairness refers to the procedures followed in notifying the employee of the disciplinary hearing and the procedures followed at the hearing itself. Most employers do not have a problem in this regard but normally fails dismally when it comes to substantive fairness. The reason for this is that substantive fairness can be split into two elements namely;

  • establishing guilt; and
  • deciding on an appropriate sanction.


This seems straight forward but many employers justify a dismissal based solely on the fact that the employee was found guilty of an act of misconduct. This is clearly contrary to the guidelines of schedule 8: “Dismissals for misconduct”


Generally, it is not appropriate to dismiss an employee for a first offence, except if the misconduct is serious and of such gravity that it makes a continued employment relationship intolerable. Examples of serious misconduct, subject to the rule that each case should be judged on its merits, are gross dishonesty or wilful damage to the property of the employer, wilful endangering of the safety of others, physical assault on the employer, a fellow employee, client or customer and gross insubordination. Whatever the merits of the case for dismissal might be, a dismissal will not be fair if it does not meet the requirements of section 188.


When deciding whether or not to impose the penalty of dismissal, the employer should in addition to the gravity of the misconduct consider factors such as the employee’s circumstances (including length of service, previous disciplinary record and personal circumstances), the nature of the job and the circumstances of the infringement itself.”


Schedule 8 further prescribes that;

Any person who is determining whether a dismissal for misconduct is unfair should consider-

(a) whether or not the employee contravened a rule or standard regulating conduct in, or of relevance to, the workplace; and

(b) if a rule or standard was contravened, whether or not-

(i) the rule was a valid or reasonable rule or standard;

(ii) the employee was aware, or could reasonably be expected to have been aware, of the rule or standard;

(iii) the rule or standard has been consistently applied by the employer; and

(iv) dismissal was an appropriate sanction for the contravention of the rule or standard.

              
Looking at the above it is clear that substantive fairness means that the employer succeeded in proving that the employee is guilty of an offence and that the seriousness of the offence outweighed the employee’s circumstances in mitigation and that terminating the employment relationship was fair.


The disciplinary hearing will not end with a verdict of guilty, the employer will have to in addition to proving guilt, raise circumstances in aggravation for the chairman to consider a more severe sanction. The employee must be on the other hand given the opportunity to raise circumstances in mitigation for a less severe sanction.
                       
Many employers make the mistake and rely on the fact that arbitration after a dismissal will be de novo and focus their case at the ccma solely on proving that the employee is guilty of misconduct, foolishly believing that the commissioner will agree that a dismissal was fair under circumstances. The Labour Appeal Court in County Fair Foods (Pty) Ltd v CCMA & others (1999) 20 ILJ 1701 (LAC) at 1707 (paragraph 11) [also reported at [1999] JOL 5274 (LAC)], said that it was “not for the arbitrator to determine de novo what would be a fair sanction in the circumstances, but rather to determine whether the sanction imposed by the appellant (employer) was fair”. The court further explained:


“It remains part of our law that it lies in the first place within the province of the employer to set the standard of conduct to be observed by its employees and determine the sanction with which non-compliance with the standard will be visited, interference therewith is only justified in the case of unreasonableness and unfairness. However, the decision of the arbitrator as to the fairness or unfairness of the employer’s decision is not reached with reference to the evidential material that was before the employer at the time of its decision but on the basis of all the evidential material before the arbitrator. To that extent the proceedings are a hearing de novo.”


In NEHAWU obo Motsoagae / SARS (2010) 19 CCMA 7.1.6 the commissioner indicated that “the notion that it is not necessary for an employer to call as a witness the person who has taken the ultimate decision to dismiss or to lead evidence about the dismissal procedure, can therefore not be endorsed. The arbitrating commissioner clearly does not conduct a de novo hearing in the true sense of the word and he is enjoined to judge “whether what the employer did was fair.” The employer carries the onus of proving the fairness of a dismissal and it follows that it is for the employer to place evidence before the commissioner that will enable the latter to properly judge the fairness of his actions.”


In this particular case referred to above Mr. Motsoagae, a Revenue Admin Officer for SARS, destroyed confiscated cigarettes that were held in the warehouses of the State without the necessary permission. Some of these cigarettes found its way onto the black-market after he allegedly destroyed them and was subsequently charged with theft. Interestingly the commissioner agreed with the employer that the applicant in this matter, Mr. Motsoagae, was indeed guilty of the offence but still found that the dismissal was substantively unfair. The commissioner justified his decision referring to an earlier important Labour Court finding, reemphasizing the onus on the employer to prove that the trust relationship has been destroyed and that circumstances in aggravation, combined with the seriousness of the offence, outweighed the circumstances the employee may have raised in mitigation, thus justifying a sanction of dismissal.


“The respondent in casu did not bother to lead any evidence to show that dismissal had been the appropriate penalty in the circumstances and it is not known which “aggravating” or “mitigating” factors (if any) might have been taken into consideration. It is also not known whether any evidence had been led to the effect that the employment relationship between the parties had been irreparably damaged – the Labour Court in SARS v CCMA & others (2010) 31 ILJ 1238 (LC) at 1248 (paragraph 56) [also reported at [2010] 3 BLLR 332 (LC)], held that a case for irretrievable breakdown should, in fact, have been made out at the disciplinary hearing.


The respondent’s failure to lead evidence about the reason why the sanction of dismissal was imposed leaves me with no option but to find that the respondent has not discharged the onus of proving that dismissal had been the appropriate penalty and that the applicant’s dismissal had consequently been substantively unfair.

The respondent at this arbitration, in any event, also led no evidence to the effect that the employment relationship had been damaged beyond repair. The Supreme Court of Appeal in Edcon Ltd v Pillemer NO & others (2009) 30 ILJ 2642 (SCA) at 2652 (paragraph 23) [also reported at [2010] 1 BLLR 1 (SCA) – Ed], held as follows:
“In my view, Pillemer’s finding that Edcon had led no evidence showing the alleged breakdown in the trust relationship is beyond reproach. In the absence of evidence showing the damage Edcon asserts in its trust relationship with Reddy, the decision to dismiss her was correctly found to be unfair.”

Employers are advised to consider circumstances in aggravation and mitigation before deciding to recommend a dismissal as appropriate sanction. In addition to this the employer will have to prove that the trust relationship that existed between the parties deteriorated beyond repair or that the employee made continued employment intolerable. Employers should also remember that there are three areas of fairness to prove to the arbitrating commissioners; procedural fairness, substantive fairness – guilt, substantive fairness – appropriateness of sanction.


Employers are advised to make use of the services of experts in this area in order to ensure both substantive and procedural fairness.


Contact Jan Du Toit – jand@labourguide.co.za

How to add a Link to a Document external to SharePoint

Image

You can add links to external file shares or/and file server documents to your document library very easily. Why would you want to do this? Primarily so all your MetaData to all your documents are searchable in the same place.First a Farm Administrator will need to modify a core file on the front end server.  Then you must create a custom Content Type. If you use the built in content type you will not be able to link to a Folder directly.
Edit the NewLink.aspx page to allow the Document Library to accept a File:// entry.

  1. Go to the Front End Web Server \12\template\layouts directory.
  2. Open the file NewLink.aspx using NotePad. If I have to tell you to take a backup of this file first then you have no business editing this file (really).
  3. Go to the end of the script section near top of page and add:

    function HasValidUrlPrefix_UNC(url)
    {
    var urlLower=url.toLowerCase();
    if (-1==urlLower.search(”^http://”) &&
    -1==urlLower.search(”^https://”) && -1==urlLower.search(”^file://”))
    return false;
    return true;
    }

  • Use Edit Find to search for HasValidURLPrefix and replace it with HasValidURLPrefix_UNC (you should find it two times).
  • File – Save.
  • Open command prompt and enter IISreset /noforce.

Important: To link to Folders correctly you must create your own content type exactly as below and not use the built in URL or Link to Document at all.

Create custom Content Type

  1. Go to your Site Collection logged in as a Site Collection Administrator.
  2. Site actions – Site Settings – Modify All Site Settings.
  3. Content Types
  4. Create
  5. Name = URL or UNC
  6. Description = Use this content type to add a Link column that allows you to put a hyperlink or UNC path to external files, pages or folders. Format is File://\\ServerName\Folder , or http://
  7. Parent Content Type,
    1. Select parent content type from = Document Content Types
    2. Parent Content Type = Link to a Document
  8. Put this site content type into = Existing Group:  Company Custom
    1. image
  9. OK
  10. At the Site Content Type: URL or UNC page click on the URL hyperlink column and change it to Optional so that multiple documents being uploaded will not remain checked out.
  11. OK
    1. image

Add Custom Content Type to Document Library

  1. Go to a Document Library
  2. Settings – Library Settings
  3. Advanced Settings
  4. Allow Management Content Types = Yes
  5. OK
  6. Content Types – Add from existing site content types
  7. Select site content types from: Company Custom
  8. URL or UNC – Add – OK
  9. Click on URL or UNC hyperlink
  10. Click on Add from existing site
  11. Add all your Available Columns – OK
  12. Column Order – change the order to be consistant with the Document content type orders.
  13. Click on your Document Library breadcrumb to test.
  14. View – Modify your view to add the new URL or UNC column to your view next to your Name column.

Create Link to Document

  1. Go to the Document Library
  2. New – URL or UNC
  3. Document Name: This must equal the exact file or folder name less the extension.
    1. Example: My Resume 
    2. Example: Folder2
    3. Example: Doc1
  4. Document URL: This must be the UNC path to the folder or file.
    1. Example: http://LindaChapman.BlogSpot.com/Folder1/Folder2/My Resume.doc
    2. Example: http://LindaChapman.BlogSpot.com/Folder1/Folder2
    3. Example: File://\\ServerName\FolderName\FolderName2\Doc1.doc

You might see other blogs that say you can’t connect to a folder and must create a shortcut first. They are wrong. You can by the method above.

The biggest mistakes I see are:

  1. People click on the NAME field instead of the URL field. They are not the same. You MUST click on the URL field to access the Folder properly.
  2. People use the built in Link to Document content type thinking it is the same or will save them a step. It is not the same.
  3. People type the document extension in the Name field. You can not type the extension in the name field. It will see it is a UNC path and ignore the .aspx extension.
  4. People enter their slashes the wrong direction for UNC paths.

A look at – The Architecture of the Microsoft Analytics Platform System

Architecture of the Microsoft Analytics Platform System

In April 2014, Microsoft announced the Analytics Platform System (APS) as Microsoft’s “Big Data in a Box” solution for addressing this question. APS is an appliance solution with hardware and software that is purpose built and pre-integrated to address the overwhelming variety of data while providing customers the opportunity to access this vast trove of data. The primary goal of APS is to enable the loading and querying of terabytes and even petabytes of data in a performant way using a Massively Parallel Processing version of Microsoft SQL Server (SQL Server PDW) and Microsoft’s Hadoop distribution, HDInsight, which is based off of the Hortonworks Data Platform.

Basic Design

An APS solution is comprised of three basic components:

  1. The hardware – the servers, storage, networking and racks.
  2. The fabric – the base software layer for operations within the appliance.
  3. The workloads – the individual workload types offering structured and unstructured data warehousing.

The Hardware

Utilizing commodity servers, storage, drives and networking devices from our three hardware partners (Dell, HP, and Quanta), Microsoft is able to offer a high performance scale out data warehouse solution that can grow to very large data sets while providing redundancy of each component to ensure high availability. Starting with standard servers and JBOD (Just a Bunch Of Disks) storage arrays, APS can grow from a simple 2 node and storage solution to 60 nodes. At scale, that means a warehouse that houses 720 cores, 14 TB of RAM, 6PB of raw storage and ultra-high speed networking using Ethernet and InfiniBand networks while offering the lowest price per terabyte of any data warehouse appliance on the market (Value Prism Consulting).

Fabric

The fabric layer is built using technologies from the Microsoft portfolio that enable rock solid reliability, management and monitoring without having to learn anything new. Starting with Microsoft Windows Server 2012, the appliance builds a solid foundation for each workload by providing a virtual environment based on Hyper-V that also offers high availability via Failover Clustering all managed by Active Directory. Combining this base technology with Clustered Shared Volumes (CSV) and Windows Storage Spaces, the appliance is able to offer a large and expandable base fabric for each of the workloads while reducing the cost of the appliance by not requiring specialized or proprietary hardware. Each of the components offers full redundancy to ensure high-availability in failure cases.

Workloads

Building upon the fabric layer, the current release of APS offers two distinct workload types – structure data through SQL Server Parallel Data Warehouse (PDW) and unstructured data through HDInsight (Hadoop). These workloads can be mixed within a single appliance offering flexibility to customers to tailor the appliance to the needs of their business.

SQL Server Parallel Data Warehouse is a massively parallel processing, shared nothing scale-out solution for Microsoft SQL Server that eliminates the need to ‘forklift’ additional very large and very expensive hardware into your datacenter to grow as the volume of data exhaust into your warehouse increases. Instead of having to expand from a large multi-processor and connected storage system to a massive multi-processor and SAN based solution, PDW uses the commodity hardware model with distributed execution to scale out to a wide footprint. This scale wide model for execution has been proven as a very effective and economical way to grow your workload.

HDInsight is Microsoft’s offering of Hadoop for Windows based on the Hortonworks Data Platform from Hortonworks. See the HDInsight portal for details on this technology. HDInsight is now offered as a workload on APS to allow for on premise Hadoop that is optimized for data warehouse workloads. By offering HDInsight as a workload on the appliance, the pressure to define, construct and manage a Hadoop cluster has been minimized. Any by using PolyBase, Microsoft’s SQL Server to HDFS bridge technology, customers can not only manage and monitor Hadoop through tools they are familiar with but they can for the first time use Active Directory to manage security into the data stored within Hadoop – offering the same ease of use for user management offered in SQL Server.

Massively-Parallel Processing (MPP) in SQL Server

Now that we’ve laid the groundwork for APS, let’s dive into how we load and process data at such high performance and scale. The PDW region of APS is a scale-out version of SQL Server that enables parallel query execution to occur across multiple nodes simultaneously. The effect is the ability to run what appears to be a very large operation into tasks that can be managed at a smaller scale. For example, a query against 100 billion rows in a SQL Server SMP environment would require the processing of all of the data in a single execution space. With MPP, the work is spread across many nodes to break the problem into more manageable and easier ways to execute tasks. In a four node appliance (see the picture below), each node is only asked to process roughly 25 billion rows – a much quicker task.

To accomplish such a feat, APS relies on a couple of key components to manage and move data within the appliance – a table distribution model and the Data Movement Service (DMS).

The first is the table distribution model that allows for a table to be either replicated to all nodes (used for smaller tables such as language, countries, etc.) or to be distributed across the nodes (such as a large fact table for sales orders or web clicks). By replicating small tables to each node, the appliance is able to perform join operations very quickly on a single node without having to pull all of the data to the control node for processing. By distributing large tables across the appliance, each node can process and return a smaller set of data returning only the relevant data to the control node for aggregation.

To create a table in APS that is distributed across the appliance, the user simply needs to add the key to which the table is distributed on:

CREATE TABLE [dbo].[Orders]
(
  [OrderId] ...
)
WITH
(
  DISTRIBUTION = HASH([OrderId])
)

This allows the appliance to split the data and place incoming data onto the appropriate node onto the appropriate node in the appliance.

The second component is the Data Movement Service (DMS) that manages the routing of data within the appliance. DMS is used in partnership with the SQL Server query (which creates the execution plan) to distribute the execution plan to each node. DMS then aggregates the results back to the control node of the appliance which can perform any final execution before returning the results to the caller. DMS is essentially the traffic cop within APS that enables queries to be executed and data moved within the appliance across 2-60 nodes.

Performance

With the introduction of Clustered Column Indexes (CCI) in SQL Server, APS is able to take advantage of the performance gains to better process and store data within the appliance. In typical data warehouse workloads, we commonly see very wide table designs to eliminate the need to join tables at scale (to improve performance). The use of Clustered Column Indexes allows SQL Server to store data in columnar format versus row format. This approach enables queries that don’t utilize all of the columns of a table to more efficiently retrieve the data from memory or disk for processing – increasing performance.

By combining CCI tables with parallel processing and the fast processing power and storage systems of the appliance, customers are able to improve overall query performance and data compression quite significantly versus a traditional single server data warehouse. Often times, this means reductions in query execution times from many hours to a few minutes or even seconds. The net results is that companies are able to take advantage of the exhaust of structured or non-structured data at real or near real-time to empower better business decisions.

Should we replace our File Shares with SharePoint?

One of the biggest areas of confusion for our customers who are new to SharePoint through Office 365 is whether they should put their documents and files into SharePoint instead of their existing file shares on the network or clients.
Konsort_DocManagement2_Large[1]
This is not as simple as it seems and in fact requires a fairly major change in mind sets regarding document storage and management.Most organizations have become used to storing documents in the traditional file folder structure.

We all use files that are shared on the network. They are used for sharing documents and files in a central location. Security is set on

file shares, folders and files and the end user has been taug

ht how to use network drive letters for finding, opening and saving documents.  Also they are used to cascading down folder structures to find their document (assuming they are familiar with the structure.

The folder based filing system has some disadvantages though.  Administrators and end users must learn how to work with the files and make sure that the files have the correct access permissions. Linking documents together, adding customized attributes (meta data) and specifying the way the documents are presented for a subset of users is not easy.


Searching through all file shares for documents containing specific words or created by a specific user can also be quite a slow process.  There is limited document management – check out / check in, no way to apply approval processes and compliance rules are not easily achieved.  Linking documents to subjects in business processes such as linking an employee record to employee documents requires programming.

Picture
Using SharePoint for Document ManagementWith Office 365 and SharePoint, you can now have a powerful alternative to the File Share.  With SharePoint Online you can now store your files on the web and manage them with powerful document management tools.  SharePoint Online provides additional features compared to the typical Windows file share. With SharePoint Online they can be arranged in folders as usual, but also could be given tags or “metadata” to classify the documents to allow alternative multiple classifications.


Combine this with a full text search across all types of documents in all libraries and folders and the issue of finding that important document is a thing of the past.  Additionally you can link the documents to SharePoint lists to provide powerful links between business applications and documents.

For example; now you can find an agreement related to an account by going to the Account (see example here) and looking at related documents.

You can filter and sort document attributes to find all the agreements for a certain type of account.  Or if you are creating a new HR policy, you can collaborate as a team on it, with check-in check-out control, approvals, even moving it to a portal library for access by all employees in a read only mode.  These and other endless examples are powered by a list of document management features in SharePoint Online.  Here are a few.

  • Workflows, such as approval procedure, help automating simple or complex tasks – with or without user interference
  • Versioning adds the ability to see older versions of documents and controls which users can see the latest published version and who can edit the draft for the next published version of the file or document
  • Item visibility – Users do not have the ability to see information that they do not have permission to see.
  • Set Alerts for changes –  you can set different types of email notifications when changes are made to the documents
  • Sharing  – choose to share libraries, or individual documents with internal and external users
  • Link to Subject – link documents to list items through lookups in the metadata.  This allows you to view the subject (ex. Account, Contact) and reference all the documents related to them.
  • Lifecycle management that can be activated for archiving old content
  • Powerful Filtering and Search – With SharePoint Online, cascading up and down directory trees is a thing of the past.  Now you can use Meta Data to filter and find documents, as well as a powerful search capability.

Finally you can access documents from anywhere, at any time on any device!   Making it easy to review and collaborate on documents even from the road.

Mindset Mistake: Creating a File Share on SharePoint

Now I am sure you are thinking, wow this SharePoint stuff sound pretty neat!   Well it is if implemented correctly.  A major mistake many organizations make is to deploy document management just like a file share on SharePoint.  They create a single massive site for all documents, create libraries with folder structures and load documents into them.  This is way underutilizing SharePoint!  It like driving a 6 speed car and never getting out of second gear.

Because SharePoint can do much more than just document management, you may want to think through where you put libraries.  With SharePoint you can create team sites for departments or teams where they can collaborate, track tasks, and manage documents.  So create an HR team site with document libraries and put the HR related documents there.  Add metadata to the document items in the library which identifies what employee the document is for, so you can attach it to their record (see example here).  Put sales documents in a sales team site.  Create a folder for proposal templates, and link documents to accounts through metadata also.   Create a Project Site and link project documents to specific projects.  Now you are using SharePoint as a real collaboration engine!

When to use SharePoint for Document Storage and When not to.

Some might ask themselves if they should move all their existing file shares to SharePoint Online to take advantage of the features.

The real answer is no not all. It depends on which kind of data you have and how you want to use or present it”.   SharePoint is excellent for “active” files.  Files that are used as part of the business.   It does have storage limits so you want to be careful how much storage you use.  Here is some guidelines:

Windows file share

  • Large file size
  • Do not change much
  • Archives, backups. Etc.

Typical files for placement on Windows file shares are old archives, backup files and installation files for operating systems.

SharePoint document library

  • Small and midsized in size
  • Changes regularly
  • Files used by teams on projects
  • Files and folders that need custom attributes and links/filters to these
  • Files that need to be indexed and searched for

Documents, spreadsheets and presentations that would benefit from the SharePoint features.

Keep in mind that the user experience can differ very much and you may have to educate your users to use a new place to store files. If they are used to using network drives they may see a web interface as a challenge.

Features from SharePoint 2010 Integration with SAP BusinessObjects BI 4.0

ImageOne of the core concepts of Business Connectivity Services (BCS) for SharePoint 2010 are the external content types. They are reusable metadata descriptions of connectivity information and behaviours (stereotyped operations) applied to external data. SharePoint offers developers several ways to create external content types and integrate them into the platform.


The SharePoint Designer 2010, for instance, allows you to create and manage external content types that are stored in supported external systems. Such an external system could be SQL Server, WCF Data Service, or a .NET Assembly Connector.

This article shows you how to create an external content type for SharePoint named Customer based on given SAP customer data. The definition of the content type will be provided as a .NET assembly, and the data are displayed in an external list in SharePoint.

The SAP customer data are retrieved from the function module SD_RFC_CUSTOMER_GET. In general, function modules in a SAP R/3 system are comparable with public and static C# class methods, and can be accessed from outside of SAP via RFC (Remote Function Call). Fortunately, we do not need to program RFC calls manually. We will use the very handy ERPConnect library from Theobald Software. The library includes a LINQ to SAP provider and designer that makes our lives easier.

.NET Assembly Connector for SAP

The first step in providing a custom connector for SAP is to create a SharePoint project with the SharePoint 2010 Developer Tools for Visual Studio 2010. Those tools are part of Visual Studio 2010. We will use the Business Data Connectivity Model project template to create our project:

After defining the Visual Studio solution name and clicking the OK button, the project wizard will ask what kind of SharePoint 2010 solution you want to create. The solution must be deployed as a farm solution, not as a sandboxed solution. Visual Studio is now creating a new SharePoint project with a default BDC model (BdcModel1). You can also create an empty SharePoint project and add a Business Data Connectivity Model project item manually afterwards. This will also generate a new node to the Visual Studio Solution Explorer called BdcModel1. The node contains a couple of project files: The BDC model file (file extension bdcm), and the Entity1.cs and EntityService.cs class files.

Next, we add a LINQ to SAP file to handle the SAP data access logic by selecting the LINQ to ERP item from the Add New Item dialog in Visual Studio. This will add a file called LINQtoERP1.erp to our project. The LINQ to SAP provider is internally called LINQ to ERP. Double click LINQtoERP1.erp to open the designer. Now, drag the Function object from the designer toolbox onto the design surface. This will open the SAP connection dialog since no connection data has been defined so far:

Enter the SAP connection data and your credentials. Click the Test Connection button to test the connectivity. If you could successfully connect to your SAP system, click the OK button to open the function module search dialog. Now search for SD_RFC_CUSTOMER_GET, then select the found item, and click OK to open the RFC Function Module /BAPI dialog:

SP2010SAPToBCS/BCS12.png

The dialog provides you the option to define the method name and parameters you want to use in your SAP context class. The context class is automatically generated by the LINQ to SAP designer including all SAP objects defined. Those objects are either C# (or VB.NET) class methods and/or additional object classes used by the methods.

For our project, we need to select the export parameters KUNNR and NAME1 by clicking the checkboxes in the Pass column. These two parameters become our input parameters in the generated context class method named SD_RFC_CUSTOMER_GET. We also need to return the customer list for the given input selection. Therefore, we select the table parameter CUSTOMER_T on the Tables tab and change the structure name to Customer. Then, click the OK button on the dialog, and the new objects get added to the designer surface.

IMPORTANT: The flag “Create Objects Outside Of Context Class” must be set to TRUE in the property editor of the LINQ designer, otherwise LINQ to SAP generates the Customer class as nested class of the SAP context class. This feature and flag is only available in LINQ to SAP for Visual Studio 2010.

The LINQ designer has also automatically generated a class called Customer within the LINQtoERP1.Designer.cs file. This class will become our BDC model entity or external content type. But first, we need to adjust and rename our BDC model that was created by default from Visual Studio. Currently, the BDC model looks like this:

Rename the BdcModel1 node and file into CustomerModel. Since we already have an entity class (Customer), delete the file Entity1.cs and rename the EntityService.cs file to CustomerService.cs. Next, open the CustomerModel file and rename the designer object Entity1. Then, change the entity identifier name from Identifier1 to KUNNR. You can also use the BDC Explorer for renaming. The final adjustment result should look as follows:

SP2010SAPToBCS/BCS4.png

The last step we need to do in our Visual Studio project is to change the code in the CustomerService class. The BDC model methods ReadItem and ReadList must be implemented using the automatically generated LINQ to SAP code. First of all, take a look at the code:

SP2010SAPToBCS/BCS6.png

As you can see, we basically have just a few lines of code. All of the SAP data access logic is encapsulated within the SAP context class (see the LINQtoERP1.Designer.cs file). The CustomerService class just implements a static constructor to set the ERPConnect license key and to initialize the static variable _sc with the SAP credentials as well as the two BDC model methods.

The ReadItem method, BCS stereotyped operation SpecificFinder, is called by BCS to fetch a specific item defined by the identifier KUNNR. In this case, we just call the SD_RFC_CUSTOMER_GET context method with the passed identifier (variable id) and return the first customer object we get from SAP.

The ReadList method, BCS stereotyped operation Finder, is called by BCS to return all entities. In this case, we just return all customer objects the SD_RFC_CUSTOMER_GET context method returns. The returned result is already of type IEnumerable<Customer>.

The final step is to deploy the SharePoint solution. Right-click on the project node in Visual Studio Solution Explorer and select Deploy. This will install and deploy the SharePoint solution on the server. You can also debug your code by just setting a breakpoint in the CustomerService class and executing the project with F5.

That’s all we have to do!

Now, start the SharePoint Central Administration panel and follow the link “Manage Service Applications”, or navigate directly to the URL http://<SERVERNAME>/_admin/ServiceApplications.aspx. Click on Business Data Connectivity Service to show all the available external content types:

On this page, we find our deployed BDC model including the Customer entity. You can click on the name to retrieve more details about the entity. Right now, there is just one issue open. We need to set permissions!

Mark the checkbox for our entity and click on Set Object Permissions in the Ribbon menu bar. Now, define the permissions for the users you want to allow to access the entity, and click the OK button. In the screen shown above, the user administrator has all the permissions possible.

In the next and final step, we will create an external list based on our entity. To do this, we open SharePoint Designer 2010 and connect us with the SharePoint website.

Click on External Content Types in the Site Objects panel to display all the content types (see above). Double click on the Customer entity to open the details. The SharePoint Designer is reading all the information available by BCS.

In order to create an external list for our entity, click on Create Lists & Form on the Ribbon menu bar (see screenshot below) and enter CustomerList as the name for the external list.

OK, now we are done!

Open the list, and you should get the following result:

The external list shows all the defined fields for our entity, even though our Customer class, automatically generated by the LINQ to SAP, has more than those four fields. This means you can only display a subset of the information for your entity.

Another option is to just select those fields required within the LINQ to SAP designer. With the LINQ designer, you can access not just the SAP function modules. You can integrate other SAP objects, like tables, BW cubes, SAP Query, or IDOCs. A demo version of the ERPConnect library can be downloaded from the Theobald Software homepage.

If you click the associated link of one of the customer numbers in the column KUNNR (see screenshot above), SharePoint will open the details view:

SP2010SAPToBCS/BCS10.png


How To : A library to create .mht files (available at request)

There are a number of ways to do this, including hosting Word or Excel on the Web Server and dealing with COM Interop issues, or purchasing third – party MIME encoding libraries, some of which sell for $250.00 or more. But, there is no native .NET solution. So, being the curious soul that I am, I decided to investigate a bit and see what I could come up with. Internet Explorer offers a File / Save As option to save a web page as “Web Archive, single file (*.mht)”.

Image

What this does is create an RFC – compliant Multipart MIME Message. Resources such as images are serialized to their Base64 inline encoding representations and each resource is demarcated with the standard multipart MIME header – breaks. Internet Explorer, Word, Excel and most newsreader programs all understand this format. The format, if saved with the file extension “.eml”, will come up as a web page inside Outlook Express; if saved with “.mht”, it will come up in Internet Explorer when the file is double-clicked out of Windows Explorer, and — what many do not know — if saved with a “*.doc” extension, it will load in MS Word, each with all the images intact, and in the case of the EML and MHT formats, with all of the hyperlinks fully-functioning. The primary advantage of the format is, of course, that all the resources can be consolidated into a single file,. making distribution and archiving much easier — including database storage in an NVarchar or NText type field.


System.Web.Mail, which .NET provides as a convenient wrapper around the CDO for Windows COM library, offers only a subset of the functionality exposed by the CDO library, and multipart MIME encoding is not a part of that functionality. However, through the wonders of COM Interop, we can create our own COM reference to CDO in the Visual Studio IDE, allowing it to generate a Runtime Callable Wrapper, and help ourselves to the entire rich set of functionality of CDO as we see fit.


One method in the CDO library that immediately came to my notice was the CreateMHTMLBody method. That’s MHTMLBody, meaning “Multipurpose Internet Mail Extension HTML (MHTML) Body”. Well!– when I saw that, my eyes lit up like the LED’s on a 32 – way Unisys box! This is a method on the CDO Message class; the method accepts a URI to the requested resource, along with some enumerations, and creates a MultiPart MIME – encoded email message out of the requested URI responses — including images, css and script — in one fell swoop.


“Ah”, you say, “How convenient”! Yes, and not only that, but we also get a free “multipart COM Interop Baggage” reference to the ADODB.Stream object – and by simply calling the GetStream method on the Message Class, and then using the Stream’s SaveToFile method, we can grab any resource including images, javascript, css and everything else (except video) and save it to a single MHT Web Archive file just as if we chose the “Save As” option out of Internet Explorer.


If we choose not to save the file, but instead want to get back the stream contents, no problem. We just call Stream.ReadText(Stream.Size) and it returns a string containing the entire MHT encoded content. At that point we can do whatever we want with it – set a content – header and Response .Write the content to the browser, for instance — or whatever.


For example, when we get back our “MHT” string, we can write the following code:

Response.ContentType=”application/msword”;
Response.AddHeader( “Content-Disposition”, “attachment;filename=NAME.doc”);
Response.Write(myDataString);


— and the browser will dutifully offer to save the file as a Word Document. It will still be Multipart MIME encoded, but the .doc extension on the filename allows Word to load it, and Word is smart enough to be able to parse and render the file very nicely. “Ah”, you are saying, “this is nice, and so is the price!”. Yup!

And, if you are serving this MIME-encoded file from out of your database, for example, and you would like it to be able to be displayed in the browser, just change the “NAME.doc” to “NAME.MHT”, and don’t set a content-type header. Internet Explorer will prompt the user to either save or open the file. If they choose “open”, it will be saved to the IE Temporary files and open up in the browser just as if they had loaded it from their local file system.


So, to answer a couple of questions that came up recently, yes — you can use this method to MHTML – encode any web page – even one that is dynamically generated as with a report — provided it has a URL, and save the MIME-encoded content as a string in either an NVarchar or NText column in your database. You can then bring this string back out and send it to the browser, images,css, javascript and all.

Now here is the code for a small, very basic “Converter” class I’ve written to take advantage of the two scenarios specified above. Bear in mind, there is much more available in CDO, but I leave this wondrous trail of ecstatic discovery to your whims of fancy:

using System;
using System.Web;
using CDO;
using ADODB;
using System.Text;
namespace PAB.Web.Utils
{
 public class MIMEConverter
 {
  //private ctor as our methods are all static here
  private MIMEConverter()
  {
   
  }   
  public static bool SaveWebPageToMHTFile( string url, string filePath)
  {
   bool result=false;
   CDO.Message  msg = new CDO.MessageClass(); 
   ADODB.Stream  stm=null ;
   try
   {
    msg.MimeFormatted =true;   
    msg.CreateMHTMLBody(url,CDO.CdoMHTMLFlags.cdoSuppressNone, "" ,"" );
stm = msg.GetStream(); stm.SaveToFile(filePath,ADODB.SaveOptionsEnum.adSaveCreateOverWrite); msg=null; stm.Close(); result=true; } catch {throw;} finally { //cleanup here } return result; } public static string ConvertWebPageToMHTString( string url ) { string data = String.Empty; CDO.Message msg = new CDO.MessageClass(); ADODB.Stream stm=null; try { msg.MimeFormatted =true; msg.CreateMHTMLBody(url,CDO.CdoMHTMLFlags.cdoSuppressNone,
"", "" );
stm = msg.GetStream(); data= stm.ReadText(stm.Size); } catch { throw; } finally { //cleanup here } return data; } } }


NOTE: When using this type of COM Interop from an ASP.NET web page, it is important to remember that you must set the AspCompat=”true” directive in the Page declaration or you will be very disappointed at the results! This forces the ASP.NET page to run in STA threading model which permits “classic ASP” style COM calls. There is, of course, a significant performance penalty incurred, but realistically, this type of operation would only be performed upon user request and not on every page request.

<

p align=”left”>The downloadable zip file below contains the entire class library and a web solution that will exercise both methods when you fill in a valid URI with protocol, and a valid file path and filename for saving on the server. Unzip this to a folder that you have named “ConvertToMHT” and then mark the folder as an IIS Application so that your request such as “http://localhost/ConvertToMHT/WebForm1.aspx&#8221; will function correctly. You can then load the Solution file and it should work “out of the box”. And, don’t forget – if you have an ASP.NET web application that wants to write a file to the file system on the server, it must be running under an identity that has been granted this permission.

How To : Use JSON and SAP NetWeaver together

Background

Imagesap2[1]
In this example, SAP is used as the backend data source and the NWGW (Netweaver Gateway) adapter to consumable from .NET client as OData format.

Since the NWGW component is hosted on premise and our .NET client is hosted in Azure, we are consuming this data from Azure through the Service Bus relay. While transferring data from on premise to Azure over SB relay, we are facing performance issues for single user for large volumes of data as well as in relatively small data for concurrent users. So I did some POC for improving performance by consuming the OData service in JSON format.

What I Did?

I’ve created a simple WCF Data Service which has no underlying data source connectivity. In this service when the context is initializing, a list of text messages is generated and exposed as OData.

Here is that simple service code:

[Serializable]
public class Message
{
public int ID { get; set; }
public string MessageText { get; set; }
}
public class MessageService
{
List<Message> _messages = new List<Message>();
public MessageService()
{
for (int i = 0; i < 100; i++)
{
Message msg = new Message
{
ID = i,
MessageText = string.Format(“My Message No. {0}”, i)
};
_messages.Add(msg);

}
}
public IQueryable<Message> Messages
{
get
{
return _messages.AsQueryable<Message>();
}
}
}
[ServiceBehavior(IncludeExceptionDetailInFaults = true)]
public class WcfDataService1 : DataService
{
// This method is called only once to initialize service-wide policies.
public static void InitializeService(DataServiceConfiguration config)
{
// TODO: set rules to indicate which entity sets
// and service operations are visible, updatable, etc.
// Examples:
config.SetEntitySetAccessRule(“Messages”, EntitySetRights.AllRead);
config.SetServiceOperationAccessRule(“*”, ServiceOperationRights.All);
config.DataServiceBehavior.MaxProtocolVersion = DataServiceProtocolVersion.V3;
}
}
Exposing one endpoint to Azure SB so that client can consume this service through SB endpoint. After hosting the service, I’m able to fetch data by simple OData query from browser.

I’m also able to fetch the data in JSON format.

After that, I create a console client application and consume the service from there.

Sample Client Code

class Program
{
static void Main(string[] args)
{
List lst = new List();

for (int i = 0; i < 100; i++)
{
Thread person = new Thread(new ThreadStart(MyClass.JsonInvokation));
person.Name = string.Format(“person{0}”, i);
lst.Add(person);
Console.WriteLine(“before start of {0}”, person.Name);
person.Start();
//Console.WriteLine(“{0} started”, person.Name);
}
Console.ReadKey();
foreach (var item in lst)
{
item.Abort();
}
}
}

public class MyClass
{
public static void JsonInvokation()
{
string personName = Thread.CurrentThread.Name;
Stopwatch watch = new Stopwatch();
watch.Start();
try
{
SimpleService.MessageService svcJson =
new SimpleService.MessageService(new Uri
(“https://abc.servicebus.windows.net/SimpleService /WcfDataService1”));
svcJson.SendingRequest += svc_SendingRequest;
svcJson.Format.UseJson();
var jdata = svcJson.Messages.ToList();

watch.Stop();
Console.WriteLine(“Person: {0} – JsonTime First Call time: {1}”,
personName, watch.ElapsedMilliseconds);

for (int i = 1; i <= 10; i++)
{
watch.Reset(); watch.Start();
jdata = svcJson.Messages.ToList();
watch.Stop();
Console.WriteLine(“Person: {0} – Json Call {1} time:
{2}”, personName, 1 + i, watch.ElapsedMilliseconds);
}

Console.WriteLine(jdata.Count);
}
catch (Exception ex)
{
Console.WriteLine(personName + “: ” + ex.Message);
}
Thread.Sleep(100);
}

public static void AtomInvokation()
{
string personName = Thread.CurrentThread.Name;

try
{
Stopwatch watch = new Stopwatch();
watch.Start();
SimpleService.MessageService svc =
new SimpleService.MessageService(new Uri
(“https://abc.servicebus.windows.net/SimpleService/WcfDataService1&#8221;));
svc.SendingRequest += svc_SendingRequest;
var data = svc.Messages.ToList();

watch.Stop();
Console.WriteLine(“Person: {0} – XmlTime First Call time: {1}”,
personName, watch.ElapsedMilliseconds);

for (int i = 1; i <= 10; i++)
{
watch.Reset(); watch.Start();
data = svc.Messages.ToList();
watch.Stop();
Console.WriteLine(“Person: {0} – Xml Call {1} time:
{2}”, personName, 1 + i, watch.ElapsedMilliseconds);
}

Console.WriteLine(data.Count);
}
catch (Exception ex)
{
Console.WriteLine(personName + “: ” + ex.Message);
}
Thread.Sleep(100);
}
}9pt;”>


What I Test After That
I tested two separate scenarios:

Scenario I: Single user with small and large volume of data
Measuring the data transfer time periodically in XML format and then JSON format. You might notice that first call I’ve printed separately in each screen shot as it is taking additional time to connect to SB endpoint. In the first call, the secret key authentication is happening.

Small data set (array size 10): consume in XML format.


Consume in JSON format:


For small set of data, Json and XML response time over service bus relay is almost same.

Consuming Large volume of data (Array Size 100)


Here the XML message size is around 51 KB. Now I’m going to consume the same list of data (Array size 100) in JSON format.


So from the above test scenario, it is very clear that JSON response time is much faster than XML response time and the reason for that is message size. In this test, when I’m getting the list of 100 records in XML format message size is 51.2 KB but JSON message size is 4.4 KB.

Scenario II: 100 Concurrent user with large volume of data (array size 100)
In this concurrent user load test, I’ve done any service throttling or max concurrent connection configuration.


In the above screen shot, you will find some time out error that I’m getting in XML response. And it is happening due to high response time over relay. But when I execute the same test with JSON response, I found the response time is quite stable and faster than XML response and I’m not getting any time out.


How Easy to Use UseJson()
If you are using WCF Data Service 5.3 and above and VS2012 update 3, then to consume the JSON structure from the client, I have to instantiate the proxy / context with .Format.UseJson().

Here you don’t need to load the Edmx structure separately by writing any custom code. .NET CodeGen will generate that code when you add the service reference.


But if that code is not generated from your environment, then you have to write a few lines of code to load the edmx and use it as .Format.UseJson(LoadEdmx());

Sample Code for Loading Edmx

public static IEdmModel LoadEdmx(string srvName)
{
string executionPath = Directory.GetCurrentDirectory();
DirectoryInfo di = new DirectoryInfo(executionPath).Parent;
var parent1 = di.Parent;
var srv = parent1.GetDirectories(“Service References\\” +
srvName)[0].GetFiles(“service.edmx”)[0].FullName;

XmlDocument doc = new XmlDocument();
doc.Load(srv);
var xmlreader = XmlReader.Create(new StringReader(doc.DocumentElement.OuterXml));

IEdmModel edmModel = EdmxReader.Parse(xmlreader);
return edmModel;
}

Microsoft releases .Net 4.5.2 Framework and Developer Pack

You can download the releases now,

Image

We incorporated feedback we received for the .NET Framework 4.5.1 from different feedback sources to provide a faster release cadence. In this blog post we will talk about some of the new features we are delivering in the .NET Framework 4.5.2.

ASP.NET improvements

  • New HostingEnvironment.QueueBackgroundWorkItem method that lets you schedule small background work items. ASP.NET tracks these items and prevents IIS from abruptly terminating the worker process until all background work items have completed. These will enable ASP.NET applications to reliably schedule Async work items.
  • New HttpResponse.AddOnSendingHeaders and HttpResponseBase.AddOnSendingHeaders methods are more reliable and efficient than HttpApplication.PreSendRequestContent and HttpApplication.PreSendRequestHeaders. These APIs let you inspect and modify response headers and status codes as the HTTP response is being flushed to the client application. These reliability improvements minimize deadlocks and crashes between IIS and ASP.NET.
  • New HttpResponse.HeadersWritten and HttpResponseBase.HeadersWritten properties that return Boolean values to indicate whether the response headers have been written. You can use these properties to make sure that calls to APIs such as HttpResponse.StatusCode succeeds. This enables shared hosting scenarios for ASP.NET applications.

High DPI Improvements is an opt-in feature toenable resizing according to the system DPI settings for several glyphs or icons for the following Windows Forms controls: DataGridView, ComboBox, ToolStripComboBox, ToolStripMenuItem and Cursor. Here are examples of before and after views once this change is opted into.

.NET 4.5.1 Controls with High DPI setting .NET 4.5.2 Controls with High DPI setting
The red error glyph barely shows up and will eventually disappear with high scaling The red error glyph scales correctly.
The ToolStripMenu drop down arrow is barely visible, eventually won’t be usable with high scaling The drop down arrow in the ToolStripMenu scales correctly

Distributed transactions enhancement enables promotion of local transactions to Microsoft Distributed Transaction Coordinator (MSDTC) transactions without the use of another application domain or unmanaged code. This has a significant positive impact on the performance of distributed transactions.

More robust profiling with new profiling APIs that require dependent assemblies that are injected by the profiler to be loadable immediately, instead of being loaded after the app is fully initialized. This change does not affect users of the existing ICorProfiler APIs. Before this feature, diagnostics tools that do IL instrumentation via profiling API could cause unhandled exceptions to be thrown, unexpectedly terminating the process.

Improved activity tracing support in runtime and framework – The .NET Framework 4.5.2 enables out-of-process, Event Tracing for Windows (ETW)-based activity tracing for a larger surface area. This enables Application Performance Management vendors to provide lightweight tools that accurately track the costs of individual requests and activities that cross threads. These events are raised only when ETW controllers enable them.

For more information on usage of these features please refer to “What’s New in the .NET Framework 4.5.2”. Besides these features, there are many reliability and performance improvements across different areas of the .NET Framework.

Here are additional installers – pick package(s) most suitable for your needs based on your deployment scenario:

  • .NET Framework 4.5.2 Web Installer – A Bootstrapper that pulls in components based on the target OS/platform specs on which the .NET Framework is being deployed. Internet access is required.
  • .NET Framework 4.5.2 Offline Installer – The Full Package for offline deployments. Internet access is not required.
  • .NET Framework 4.5.2 Language Packs – Language specific support. You need to install the .NET Framework (language neutral) package before installing one or more language packs.
  • .NET Framework 4.5.2 Developer Pack – This will install .NET Framework Multi-targeting pack for building apps targeting .NET Framework 4.5.2 and also .NET Framework 4.5.2 runtime. Useful for build machines that need both the runtime and the multi-targeting pack


DRY Architecture, Layered Architecture, Domain Driven Design and a Framework to build great Single Web Pages – BiolerPlate Part 1

DRY – Don’t Repeat Yourself! is one of the main ideas of a good developer while developing a software. We’re trying to implement it from simple methods to classes and modules. What about developing a new web based application? We, software developers, have similar needs when developing enterprise web applications.

Enterprise web applications need login pages, user/role management infrastructure, user/application setting management, localization and so on. Also, a high quality and large scale software implements best practices such as Layered Architecture, Domain Driven Design (DDD), Dependency Injection (DI). Also, we use tools for Object-Releational Mapping (ORM), Database Migrations, Logging… etc. When it comes to the User Interface (UI), it’s not much different.

Starting a new enterprise web application is a hard work. Since all applications need some common tasks, we’re repeating ourselves. Many companies are developing their own Application Frameworks or Libraries for such common tasks to do not re-develop same things. Others are copying some parts of existing applications and preparing a start point for their new application. First approach is pretty good if your company is big enough and has time to develop such a framework.

As a software architect, I also developed such a framework im my company. But, there is some point it feels me bad: Many company repeats same tasks. What if we can share more, repeat less? What if DRY principle is implemented universally instead of per project or per company? It sounds utopian, but I think there may be a starting point for that!

What is ASP.NET Boilerplate?

http://www.aspnetboilerplate.com/

ASP.NET Boilerplate [1] is a starting point for new modern web applications using best practices and most popular tools. It’s aimed to be a solid model, a general-purpose application framework and a project template. What it does?

  • Server side
    • Based on latest ASP.NET MVC and Web API.
    • Implements Domain Driven Design (Entities, Repositories, Domain Services, Application Services, DTOs, Unif Of Work… and so on)
    • Implements Layered Architecture (Domain, Application, Presentation and Infrastructure Layers).
    • Provides an infrastructure to develop reusable and composable modules for large projects.
    • Uses most popular frameworks/libraries as (probably) you’re already using.
    • Provides an infrastructure and make it easy to use Dependency Injection (uses Castle Windsor as DI container).
    • Provides a strict model and base classes to use Object-Releational Mapping easily (uses NHibernate, can work with many DBMS).
    • Implements database migrations (uses FluentMigrator).
    • Includes a simple and flexible localization system.
    • Includes an EventBus for server-side global domain events.
    • Manages exception handling and validation.
    • Creates dynamic Web API layer for application services.
    • Provides base and helper classes to implement some common tasks.
    • Uses convention over configuration principle.
  • Client side
    • Provides two project templates. One for Single-Page Applications using Durandaljs, other one is a Multi-Page Application. Both templates uses Twitter Bootstrap.
    • Most used libraries are included by default: Knockout.js, Require.js, jQuery and some useful plug-ins.
    • Creates dynamic javascript proxies to call application services (using dynamic Web API layer) easily.
    • Includes unique APIs for some sommon tasks: showing alerts & notifications, blocking UI, making AJAX requests.

Beside these common infrastructure, the “Core Module” is being developed. It will provide a role and permission based authorization system (implementing ASP.NET Identity Framework), a setting systems and so on.

What ASP.NET Boilerplate is not?

ASP.NET Boilerplate provides an application development model with best practices. It has base classes, interfaces and tools that makes easy to build maintainable large-scale applications. But..

  • It’s not one of RAD (Rapid Application Development) tools those provide infrastructure for building applications without coding. Instead, it provides an infrastructure to code in best practices.
  • It’s not a code generation tool. While it has several features those build dynamic code in run-time, it does not generate codes.
  • It’s not a all-in-one framework. Instead, it uses well known tools/libraries for specific tasks (like NHibernate for O/RM, Log4Net for logging, Castle Windsor as DI container).

Getting started

In this article, I’ll show how to deleveop a Single-Page and Responsive Web Application using ASP.NET Boilerplate (I’ll call it as ABP from now). This sample application is named as “Simple Task System” and it consists of two pages: one for list of tasks, other one is to add new tasks. A Task can be related to a person, can be completed. The application is localized in two languages. Screenshot of Task List in the application is shown below:

A screenshot of 'Simple Task System'

Creating empty web application from template

ABP provides two templates to start a new project (Even if you can manually create your project and get ABP packages from nuget, template way is much more easy). Go to www.aspnetboilerplate.com/Templates to create your application from one of twotemplates (one for SPA (Single-Page Application), one for MPA (classic, Multi-Page Application) projects):

Creating template from ABP web site

I named my project as SimpleTaskSystem and created a SPA project. It downloaded project as a zip file. When I open the zip file, I see a solution is ready that contains assemblies (projects) for each layer of Domain Driven Design:

Project files

Created project’s runtime is .NET Framework 4.5.1, I advice to open with Visual Studio 2013. The only prerequise to be able to run the project is to create a database. SPA template assumes that you’re using SQL Server 2008 or later. But you can change it easily to another DBMS.

See the connection string in web.config file of the web project:

<add name="MainDb" connectionString="Server=localhost; Database=SimpleTaskSystemDb; Trusted_Connection=True;" />

You can change connection string here. I don’t change the database name, so I’m creating an empty database, named SimpleTaskSystemDb, in SQL Server:

Empty database

That’s it, your project is ready to run! Open it in VS2013 and press F5:

First run

Template consists of two pages: One for Home page, other is About page. It’s localized in English and Turkish. And it’s Single-Page Application! Try to navigate between pages, you’ll see that only the contents are changing, navigation menu is fixed, all scripts and styles are loaded only once. And it’s responsive. Try to change size of the browser.

Now, I’ll show how to change the application to a Simple Task System application layer by layer in the coming part 2

Microsoft BI and the new PowerQuery for Excel – How we empower users

Introduction to Microsoft Power Query for Excel

Microsoft Power Query for Excel enhances self-service business intelligence (BI) for Excel with an intuitive and consistent experience for discovering, combining, and refining data across a wide variety of sources including relational, structured and semi-structured, OData, Web, Hadoop, Azure Marketplace, and more. Power Query also provides you with the ability to search for public data from sources such as Wikipedia.

With Power Query 2.10, you can share and manage queries as well as search data within your organization. Users in the enterprise can find and use these shared queries (if it is shared with them) to use the underlying data in the queries for their data analysis and reporting. For more information about how to share queries, see Share Queries.

With Power Query, you can

  • Find and connect data across a wide variety of sources.
  • Merge and shape data sources to match your data analysis requirements or prepare it for further analysis and modeling by tools such as Power Pivot and Power View.
  • Create custom views over data.
  • Use the JSON parser to create data visualizations over Big Data and Azure HDInsight.
  • Perform data cleansing operations.
  • Import data from multiple log files.
  • Perform Online Search for data from a large collection of public data sources including Wikipedia tables, a subset of Microsoft Azure Marketplace, and a subset of Data.gov.
  • Create a query from your Facebook likes that render an Excel chart.
  • Pull data into Power Pivot from new data sources, such as XML, Facebook, and File Folders as refreshable connections.
  • With Power Query 2.10, you can share and manage queries as well as search data within your organization.

New updates for Power Query

The Power Query team has been busy adding a number of exciting new features to Power Query. You can download the update from this page.

New features for Power Query include the following, please read the rest of this blog post for specific details for each.

  • New Data Sources
    • Updated “Preview” functionality of the SAP BusinessObjects BI Universe connectivity
    • Access tables and named ranges in a workbook
  • Improvements to Query Load Settings
    • Customizable Defaults for Load Settings in the Options dialog
    • Automatic suggestion to load a query to the Data Model when it goes beyond the worksheet limit
    • Preserve data in the Data Model when you modify the Load to Worksheet setting of a query that is loaded to the Data Model
  • Improvements to Query Refresh behaviors in Excel
    • Preserve Custom Columns, Conditional Formatting and other customizations of worksheet tables
    • Preserve results from a previous query refresh when a new refresh attempt fails
  • New Transformations available in the Query Editor
    • Remove bottom rows
    • Fill up
    • New statistic operations in the Insert tab
  • Other Usability Improvements
    • Ability to reorder queries in the Workbook Queries pane
    • More discoverable way to cancel a preview refresh in the Query Editor
    • Keyboard support for navigation and rename in the Steps pane
    • Ability to view and copy errors in the Filter Column dropdown menu
    • Remove items directly from the Selection Well in the Navigator
    • Send a Frown for Service errors

Connect to SAP BusinessObjects BI Universe (Preview)

This connectivity has been a separate Preview feature for the last month or so. In this release, we are incorporating the SAP BusinessObjects BI Universe connector Preview capabilities as part of the main Power Query download for ease of access. With Microsoft Power Query for Excel, you can easily connect to an SAP BusinessObjects BI Universe to explore and analyze data across your enterprise.

Access tables and named ranges in an Excel workbook

With From Excel Workbook, you can now connect to tables and named ranges in your external workbook sheets. This simplifies the process of selecting useful data from an external workbook, which used to be limited to sheets and users had to “manually” scrape the data (using Query transform operations).


Customizable Defaults for Load Settings in the Options dialog

You can override the Power Query default Load Settings in the Options dialog. This will set the default Load Settings behavior for new queries in areas where Load Settings are not exposed directly to the user, such as in Online Search results and the Navigator task pane in single-table import mode. In addition, this will set the default state for Load Settings where these settings are available including the Query Editor, and Navigator in multi-table import mode.


Preserve Custom Columns, Conditional Formatting and other customizations of worksheet tables

With this Power Query Update, Custom Columns, conditional formatting in Excel, and other customizations of worksheet tables are preserved after you refresh a query. Power Query will preserve worksheet customizations such as Data Bars, Color Scales, Icon Sets or other value-based rules across refresh operations and after query edits.

Preserve results from a previous query refresh when a new refresh attempt fails

After a refresh fails, Power Query will now preserve the previous query results. This allows you to work with slightly older data in the worksheet or Data Model and lets you refresh the query results after fixing the cause of errors.

Automatic suggestion to load a query to the Data Model when it goes beyond the worksheet limits

When you are working with large volumes of data in your workbook, you could reach the limits of Excel’s worksheet size. When this occurs, Power Query will automatically recommend to load your query results to the Data Model. The Data Model can store very large data sets.

Preserve data in the Data Model when modifying the Load to Worksheet setting of a query that is loaded to the Data Model

With Power Query, data and annotations on the Data Model are preserved when modifying the Load to Worksheet setting of a query. Previously, Power Query would reset the query results in both the worksheet and the Data Model when modifying either one of the two load settings.      

Remove Bottom Rows

A very common scenario, especially when importing data from the Web and other semi-structured sources, is having to remove the last few rows of data because the contents do not belong to the data set. For instance, it’s common to remove links to previous/next pages or comments. Previously, this was possible only by using a composition of custom formulas in Power Query. This transformation is now much easier by adding a library function called Table.RemoveLastN(), and a button for this transformation in the Home tab of the Query Editor ribbon.


Fill Up

Power Query already supports the ability to fill down values in a column to neighboring empty cells. Starting with this update, you can now fill values up within a column as well. This new transformation is available as a new library function called Table.FillUp(), and a button on the Home tab of the Query Editor ribbon.

New Statistics operations in the Insert tab

The Insert tab provides various ways to insert new columns in queries, based on custom formulas or by deriving values based on other columns. You can now apply Statistics operations based on values from different columns, row by row, in their table.


Ability to reorder queries in the Workbook Queries pane

With the latest Power Query update, you can move queries up or down in the Workbook Queries pane. You can right-click on a query and select Move Up or Move Down to reorder queries.

More discoverable way of cancelling refresh of a preview in the Query Editor

The Cancel option is now much more discoverable inside the Query Editor dialog. In addition to the Refresh dropdown menu in the ribbon, this option can now be found in the status bar at the bottom right corner of the Query Editor, next to the download status information.


Keyboard support for navigation and rename in the Steps pane

You can now use the Up/Down Arrow keys to navigate between steps in your query. Also, press the F2 key to rename the current step.

Ability to view and copy errors in the Filter Column dropdown menu

You can easily view and copy error details inside the Filter Column menu. This is very useful to troubleshoot errors while retrieving filter values.

Remove items directly from the Selection Well in the Navigator

You can remove items directly from the Selection Well instead of having to find the original item in the Navigator tree to deselect it.


Send a Frown for Service errors

We try as hard as possible to improve the quality of Power Query and all of its features. Even then, there are cases in which errors can happen. You can now send a frown directly from experiences where a service error happened, for instance, an error retrieving a Search result preview or downloading a query from the Data Catalog. This will give us enough information about the service request that failed and the client state to troubleshoot the issue.

That’s all for this update! We hope that you enjoy these new Power Query features. Please don’t hesitate to contact us via the Power Query Forum or send us a smile/frown with any questions or feedback that you may have.

You can also follow these links to access more resources about Power Query and Power BI:

Great Agile Develipment Tool – Agile Planner

Great Agile Development project – /http://agileplanner.codeplex.com/

Project Description

This project is to develop an interation planning tool for agile project management.

What’s new?

Release: 1.0.0, run in Visual Studio integrated mode. See how to use for details.

What is Agile Planner?

This tool is for agile project teams, who currently are using sticky notes on the wall. With this tool stories, backlog and iterations are managed in a graphic designer, saved as files within visual studio projects and can be exported to images, reports and etc.

Main features are

  • Stories can be drag and dropped between backlog and iterations
  • Iteration’s capacity calculated automatically base on stories within it
  • Stories are rendered base on customizable status or priority color schema
  • Diagram can be exported to PNG image for printing, documentation and sharing

Here are examples.

Stories rendered based on status
agile-stories-on-status-s.png

Stories rendered base on priority
agile-stories-on-priority-s.png


How to use Agile Planner

1. Install
To install Agile Planner,

  • Download the runtime binary zip file from the latest releases
  • Extract all files from the runtime binary zip file
  • Run the windows installer AgilePlanner.msi (requires elevated command prompt under Vista and administrator on XP/2003).

2. Get Started
To start use Agile Planner in Visual Studio 2008 project

  • Start Visual Studio 2008, create new project or load existing project
  • Right click the project name and select menu “Add | New Item …”

add-new-item.PNG

  • Select AgilePlanner
  • Dismiss the security warning if it shows up

You will be presented a designing environment like below.

designer.PNG

  1. Graphical designer for iterations and stories
  2. Toolbox for iterations and stories
  3. Treeview Explorer for iterations and stories
  4. Property window for iterations and stories

3. Plan your project’s iterations

  • Create iterations by dragging iteration tool from toolbox to the graphical designer
  • Create Stories by dragging story tool from toolbox to the backlog and iterations
  • Edit stories’ properties such as name, capacity, priority and status the property window

add-stories.PNG

Notice: the capacity of iteration updated automatically after dragged stories between iterations and after updated the stories’ capacity property, so that you can balance the work load between iterations.

4. Render the diagram
The stories can be colored based on either their status or priority. To switch between these two options, right click the diagram and select menu “Color on Status” or “Color on Priority”. The color schema are customizable as the property of the project.

render-in-priority.PNG

5. Export
The rendered diagram can be exported to png file by right clicking on the diagram and select menu “Export to image”.

exported.png

How to use it?

See how to use

Introduction to Cloud Automation


Provision Azure Environment Resources


This is where we can see proof of evolution.

As you saw in the bulleted list of chronological blog posts (above), my first venture into Automating the Public Cloud leveraged Orchestrator + The Integration Pack for Windows Azure. My second releaseleveraged PowerShell and PowerShell Workflow + Windows Azure Cmdlets.

Let’s get down to the goods. And actually, for the first time in a long time, my published example came out a couple days before the blog post / teaser!


Script Center Contribution and Download

The download is the example: New-AzureEnvironmentResources.ps1

Here is a brief description:

This runbook creates a number of Azure Environment Resources (in sequence): Azure Affinity Group, Azure Cloud Service, Azure Storage Account, Azure Storage Container, Azure VM Image, and Azure VM. It also requires the Upload of a VHD to a specified storage container mid-process.

A detained Description, full set of Requirements, and the actual Runbook Contents are available within the Script Center Contribution (not to mention, the actual download).

Download the Provision Azure Environment Resources Example Runbook from Script Center here:

BC-DLButtonDark


A bit more about the Requirements…

Runbook Parameters

  • Azure Connection Name

    REQUIRED. Name of the Azure connection setting that was created in the Automation service.
        This connection setting contains the subscription id and the name of the certificate setting that
        holds the management certificate. It will be passed to the required and nested Connect-Azure runbook.

  • Project Name

    REQUIRED. Name of the Project for the deployment of Azure Environment Resources. This name is leveraged
        throughout the runbook to derive the names of the Azure Environment Resources created.

  • VM Name

    REQUIRED. Name of the Virtual Machine to be created as part of the Project.

  • VM Instance Size

    REQUIRED. Specifies the size of the instance. Supported values are as below with their (cores, memory)
        “ExtraSmall” (shared core, 768 MB),
        “Small”      (1 core, 1.75 GB),
        “Medium”     (2 cores, 3.5 GB),
        “Large”      (4 cores, 7 GB),
        “ExtraLarge” (8 cores, 14GB),
        “A5”         (2 cores, 14GB)
        “A6”         (4 cores, 28GB)
        “A7”         (8 cores, 56 GB)

  • Storage Account Name

    OPTIONAL. This parameter should only be set if the runbook is being re-executed after an existing
    and unique Storage Account Name has already been created, or if a new and unique Storage Account Name
    is desired. If left blank, a new and unique Storage Account Name will be created for the Project. The
    format of the derived Storage Account Names is:
        $ProjectName (lowercase) + [Random lowercase letters and numbers] up to a total Length of 23


Other Requirements

  • An existing connection to an Azure subscription

  • The Upload of a VHD to a specified storage container mid-process. At this point in the process, the runbook will intentionally suspend and notify the user; after the upload, the user simply resumes the runbook and the rest of the creation process continues.

  • Six (6) Automation Assets (to be configured in the Assets tab). These are suggested, but not necessarily required. Replacing the “Get-AutomationVariable” calls within this runbook with static or parameter variables is an alternative method. For this example though, the following dependencies exist:
        VARIABLES SET WITH AUTOMATION ASSETS:
             $AGLocation = Get-AutomationVariable -Name ‘AGLocation’
             $GenericStorageContainerName = Get-AutomationVariable -Name ‘GenericStorageContainer’
             $SourceDiskFileExt = Get-AutomationVariable -Name ‘SourceDiskFileExt’
             $VMImageOS = Get-AutomationVariable -Name ‘VMImageOS’
             $AdminUsername = Get-AutomationVariable -Name ‘AdminUsername’
             $Password = Get-AutomationVariable -Name ‘Password’

Note     The entire runbook is heavily checkpointed and can be run multiple times without resource recreation.


Upload of a VHD

Waaaaait a minute! That seems like a pretty big step, how am I going to accomplish that?

I am so glad you asked.

To make this easier (for all of us), I created a separate PowerShell Workflow Script to take care of this step. In fact, it is the same one I used during the creation and testing of New-AzureEnvironmentResources.ps1.

Here it is (the contents of a file I called Upload-LocalVHDtoAzure.ps1):

001
002
003
004
005
006
007
008
009
010
011
012
013
014
015
016
017
018
019
020
021
022
023
024
025
026
027
028
029
030
031
032
033
034
035
036
037
038
039
040
041
042
043
044
045
046
047
048
049
050
051
052
053
param
(
    [Parameter(Mandatory=$true)]
    [string]$AzureSubscriptionName,
    [Parameter(Mandatory=$true)]
    [string]$ProjectName,
    [Parameter(Mandatory=$true)]
    [string]$StorageAccountName
)

workflow Upload-LocalVHDtoAzure { 

    param 
    ( 
        [string]$StorageContainerName, 
        [string]$VHDName, 
        [string]$SourceVHDPath, 
        [string]$DestinationBlobURI, 
        [bool]$OverWrite 
    ) 
    
    $AzureSubscriptionForWorkflow = Get-AzureSubscription 

    $AzureBlob = Get-AzureStorageBlob -Container $StorageContainerName -Blob $VHDName -ErrorAction SilentlyContinue 
    
    if(!$AzureBlob -or $OverWrite) { 

        $AzureBlob = Add-AzureVhd -LocalFilePath $SourceVHDPath -Destination $DestinationBlobURI -OverWrite:$OverWrite 
    } 

    Return $AzureBlob 

}

$GenericStorageContainerName = “vhds”

$SourceDiskName = “toWindowsAzure” 
$SourceDiskFileExt = “vhd” 
$SourceDiskPath = “D:\Drop\Azure\toAzure” 
$SourceVHDName = “{0}.{1}” -f $SourceDiskName,$SourceDiskFileExt 
$SourceVHDPath = “{0}\{1}” -f $SourceDiskPath,$SourceVHDName 

$DesitnationVHDName = “{0}.{1}” -f $ProjectName,$SourceDiskFileExt 
$DestinationVHDPath = https://{0}.blob.core.windows.net/{1}” -f $StorageAccountName,$GenericStorageContainerName 
$DestinationBlobURI = “{0}/{1}” -f $DestinationVHDPath,$DesitnationVHDName 
$OverWrite = $false 

Select-AzureSubscription -SubscriptionName $AzureSubscriptionName
Set-AzureSubscription -SubscriptionName $AzureSubscriptionName -CurrentStorageAccount $StorageAccountName

$AzureBlobUploadJob = Upload-LocalVHDtoAzure -StorageContainerName $GenericStorageContainerName -VHDName $DesitnationVHDName `
    -SourceVHDPath $SourceVHDPath -DestinationBlobURI $DestinationBlobURI -OverWrite $OverWrite -AsJob 
Receive-Job -Job $AzureBlobUploadJob -AutoRemoveJob -Wait -WriteEvents -WriteJobInResults

Note     This is just one method of uploading a VHD to Azure for a specified Storage Account. I have parameterized the entire script so it could be run from the command line as a PS1 file. Obviously you can do with this as you please.


Testing and Proof of Execution

I figured you might want to see the results of my testing during my development of the Provision Azure Environment Resources example…so here are some screen captures from the Azure Automation interface:

Dashboard

image

Runbooks

image

Assets

image

Azure All Items View

You know, to prove that I created something with these scripts…

image

How To : Use Powershell and TFS together

The absolute basics

Where does a newbie to Windows PowerShell start—particularly in regards to TFS? There are a few obvious places. I’m hardly the first person to trip across the natural peanut-butter-and-chocolate nature of TFS and Windows PowerShell together. In fact, the TFS Power Tools contain a set of cmdlets for version control and a few other functions.

Image

There is one issue when downloading them, however. The “typical” installation of the Power Tools leaves out the Windows PowerShell cmdlets! So make sure you choose “custom” and select those Windows PowerShell cmdlets manually.

After they’re installed, you also might need to manually add them to Windows PowerShell before you can start using them. If you try Get-Help for one of the cmdlets and see nothing but an error message, you know you’ll need to do so (and not simply use Update-Help, as the error message implies).

Fortunately, that’s simple. Using the following command will fix the issue:

add-pssnapin Microsoft.TeamFoundation.PowerShell

See the before and after:

Image of command output

A better way to review what’s in the Power Tools and to get the full list of cmdlets installed by the TFS Power Tools is to use:

Get-Command -module Microsoft.TeamFoundation.PowerShell

This method doesn’t depend on the developers including “TFS” in all the cmdlet names. But as it happens, they did follow the Cmdlet Development Guidelines, so both commands return the same results.

Something else I realized when working with the TFS PowerShell cmdlets: for administrative tasks, like those I’m most interested in, you’ll want to launch Windows PowerShell as an administrator. And as long-time Windows PowerShell users already know, if you want to enable the execution of remote scripts, make sure that you set your script execution policy to RemoteSigned. For more information, see How Can I Write and Run a Windows PowerShell Script?.

Of all the cmdlets provided with the TFS Power Tools, one of my personal favorites is Get-TfsServer, which lets me get the instance ID of my server, among other useful things.  My least favorite thing about the cmdlets in the Power Tools? There is little to no useful information for TFS cmdlets in Get-Help. Awkward! (There’s a community bug about this if you want to add your comments or vote on it.)

A different favorite: Get-TFSItemHistory. His following example not only demonstrates the power of the cmdlets, but also some of their limitations:

Get-TfsItemHistory -HistoryItem . -Recurse -Stopafter 5 |

    ForEach-Object { Get-TfsChangeset -ChangesetNumber $_.ChangesetId } |

    Select-Object -ExpandProperty Changes |

    Select-Object -ExpandProperty Item

This snippet gets the last five changesets in or under the current directory, and then it gets the list of files that were changed in those changesets. Sadly, this example also highlights one of the shortcomings of the Power Tools cmdlets: Get-TfsItemHistory cannot be directly piped to Get-TfsChangeset because the former outputs objects with ChangesetId properties, and the latter expects a ChangesetNumber parameter.

One of the nice things is that raw TFS API objects are being returned, and the snap-ins define custom Windows PowerShell formatting rules for these objects. In the previous example, the objects are instances of VersionControl.Client.Item, but the formatting approximates that seen with Get-ChildItem.

So the cmdlets included in the TFS Power Tools are a good place to start if you’re just getting started with TFS and Windows PowerShell, but they’re somewhat limited in scope. Most of them are simply piping results of the tf.exe commands that are already available in TFS. You’ll probably find yourself wanting to do more than just work with these.


SharePoint Samurai