Category Archives: Custom Library

New Azure To TFS Deploy Tool Available

Deploy Windows Azure project directly from TFS 2010 Build Server


Build Definition Template
DeployToAzure allows automating deployment of Windows Azure project and making it a part of TFS 2010 build process without using PowerShell and Azure Management CmdLets.

Solution includes:

  • A set of custom workflow actions wrapping Azure Management API operations such as GetDeployment, GetOperationStatus, NewDeployment, RemoveDeployment and SetDeploymentStatus;
  • Helper actions such as FindPackageAndConfigurationFiles, LoadCertificate and WaitForOperationToComplete;
  • Designer activity DeployToAzure implementing deployment logic ;
  • Reusable build definition template.

How it works :

Create build definition

Open New Build Definition dialog. Select Process tab. Click New button in Build process template section. Choose Select an existing XAML file option and specify path to DefaultTemplateWithDeploymentToAzure.xaml in your source control.

processtemplate

Deployment to Azure section will appear in Build process parameters. Click Refresh button if you don’t see it.

d2asection

Now define build properties. First ,open 1. Required / Items to build dialog and select your solution and specify configuration to build.

Open Deployment to Azure section and provide following parameters:

  • API Certificate store location – store location of your management certificate. Select LocalMachine if certificate was created by command above.
  • API Certificate Thumbprint – thumbprint of management certificate.
  • API Certificate store – store where management certificate is located. Select Root if certificate was created by command above.
  • Cloud Project – cloud project to be packaged and deployed.  It will be built with the same configuration as the one specified for solution building.
  • Deployment label – label of deployment. Label can contain same set of macros as Build Label.
  • Hosted Service Name – DNS Prefix of Hosted service. You can find it on Windows Azure portal.
  • Service configuration – service configuration to be used for deployment, for example Cloud. Keep this field empty to use default configuration.
  • Slot – select Staging or Production.
  • Storage Service Name – DNS Prefix of storage service which will be used to upload deployment package.
  • Subscription Id – Azure subscription ID.
  • Wait for roles to start – set to true if build should wait for all instances to start.
  • Initialization Timeout – if above is true, specify timeout for build to wait before generate timeout exception.

Contact me at floyd_tomas@yahoo.com for this and other Azure, SharePoint, Office365,  TFS and Agile Tools

hero-for-hire_basic-layout_600micorosftazurelogo[1]

How To : SAP Integration with .Net 4.0 (SAP Connection Manager) & SharePoint

This is a simple, C# class library project to connect .NET applications with SAP.

ppt_img[1]


This component internally implements SAP .NET Connector 3.0. The SAP .NET Connector is a development environment that enables communication between the Microsoft .NET platform and SAP systems.

This connector supports RFCs and Web services, and allows you to write different applications such as Web form, Windows form, or console applications in the Microsoft Visual Studio .NET.

With the SAP .NET Connector, you can use all common programming languages, such as Visual Basic. NET, C#, or Managed C++.

Features
Using the SAP .NET Connector you can:

Write .NET Windows and Web form applications that have access to SAP business objects (BAPIs).

Develop client applications for the SAP Server.

Write RFC server applications that run in a .NET environment and can be installed starting from the SAP system.

Following are the steps to configure this utility on your project

Download and extract the attached file and place it on your machine. This package contains 3 libraries:

SAPConnectionManager.dll
sapnco.dll
sapnco_utils.dll

Now go to your project and add the reference of all these four libraries. Sapnco.dll and sapnco_utils.dll are inbuilt libraries used by SAP .NET Connector. SAPConnectionManager.dll is the main component which provides the connection between .NET and SAP.

Once the above steps are complete, you need to make certain entries related to SAP server on your configuration file. Here are the sample entries that you have to maintain on your own project. You need to change only the values which are marked in Bold. Rest remains unchanged.

<appSettings>
<add key=”ServerHost” value=”127.0.0.1″/>
<add key=”SystemNumber” value=”00″/>
<add key=”User” value=”sample”/>
<add key=”Password” value=”pass”/>
<add key=”Client” value=”50″/>
<add key=”Language” value=”EN”/>
<add key=”PoolSize” value=”5″/>
<add key=”PeakConnectionsLimit” value=”10″/>
<add key=”IdleTimeout” value=”600″/>
</appSettings>

To test this component, create one windows application. Add the reference of sapnco.dll, sapnco_utils.dll, andSAPConnectionManager.dll on your project.

Paste the below code on your Form lode event

SAPSystemConnect sapCfg = new SAPSystemConnect();
RfcDestinationManager.RegisterDestinationConfiguration(sapCfg);
RfcDestination rfcDest = null;
rfcDest = RfcDestinationManager.GetDestination(“Dev”);

sap_integration_en_round[1]
That’s it. Now you are successfully connected with your SAP Server. Next you need to call SAP business objects (BAPIs) and extract the data and stored it in DataSet or list.

Demo Code available on request!!

How To : SharePoint Cross-site Publishing and Free code for Web Part

Cross-site publishing is one of the powerful new capabilities in SharePoint 2013.  It enables the separation of data entry from display and breaks down the container barriers that have traditionally existed in SharePoint (ex: rolling up information across site collections). 

 cross-site-publishing

Cross-site publishing is delivered through search and a number of new features, including list/library catalogs, catalog connections, and the content search web part.  Unfortunately, SharePoint Online/Office 365 doesn’t currently support these features.  Until they are added to the service (possibly in a quarterly update), customers will be looking for alternatives to close the gap.  In this post, I will outline several alternatives for delivering cross-site and search-driven content in SharePoint Online and how to template these views for reuse

I’m a huge proponent of SharePoint Online.  After visiting several Microsoft data centers, I feel confident that Microsoft is better positioned to run SharePoint infrastructure than almost any organization in the world.  SharePoint Online has very close feature parity to SharePoint on-premise, with the primary gaps existing in cross-site publishing and advanced business intelligence.  Although these capabilities have acceptable alternatives in the cloud (as will be outlined in this post), organizations looking to maximize the cloud might consider SharePoint running in IaaS for immediate access to these features.


Apps for SharePoint

The new SharePoint app model is fully supported in SharePoint Online and can be used to deliver customizations to SharePoint using any web technology.  New SharePoint APIs can be used with the app model to deliver an experience similar to cross-site publishing.  In fact, the content search web part could be re-written for delivery through the app model as an “App Part” for SharePoint Online. 
Although the app model provides great flexibility and reuse, it does come with some drawbacks.  Because an app part is delivered through a glorified IFRAME, it would be challenging to navigate to a new page from within the app part.  A link within the app would only navigate within the IFRAME (not the parent of the IFRAME).  Secondly, there isn’t a great mechanism for templating a site to automatically leverage an app part on its page(s).  Apps do not work with site templates, so a site that contains an app cannot be saved as a template.  Apps can be “stapled” to sites, but the app installed event (which would be needed to add the app part to a page) only fires when the app is installed into the app catalog.

REST APIs and Script Editor

The script editor web part is a powerful new tool that can help deliver flexible customization into SharePoint Online.  The script editor web part allows a block of client-side script to be added to any wiki or web part page in a site.  Combined with the new SharePoint REST APIs, the script editor web part can deliver mash-ups very similar to cross-site publishing and the content search web part.  Unlike apps for SharePoint, the script editor isn’t constrained by IFRAME containers, app permissions, or templating limitations.  In fact, a well-configured script editor web part could be exported and re-imported into the web part gallery for reuse.

Cross-site publishing leverages “catalogs” for precise querying of specific content.  Any List/Library can be designated as a catalog.  By making this designation, SharePoint will automatically create managed properties for columns of the List/Library and ultimately generate a search result source in sites that consume the catalog.  Although SharePoint Online doesn’t support catalogs, it support the building blocks such as managed properties and result sources.  These can be manually configured to provide the same precise querying in SharePoint Online and exploited in the script editor web part for display.

Calling Search REST APIs

<div id=”divContentContainer”></div>
<script type=”text/javascript”>
    $(document).ready(function ($) {
        var basePath = “https://tenant.sharepoint.com/sites/somesite/_api/&#8221;;
        $.ajax({
            url: basePath + “search/query?Querytext=’ContentType:News'”,
            type: “GET”,
            headers: { “Accept”: “application/json;odata=verbose” },
            success: function (data) {
                //script to build UI HERE
            },
            error: function (data) {
                //output error HERE
            }
        });
    });
</script>


An easier approach might be to directly reference a list/library in the REST call of our client-side script.  This wouldn’t require manual search configuration and would provide real-time publishing (no waiting for new items to get indexed).  You could think of this approach similar to a content by query web part across site collections (possibly even farms) and the REST API makes it all possible!

List REST APIs

<div id=”divContentContainer”></div>
<script type=”text/javascript”>
    $(document).ready(function ($) {
        var basePath = “https://tenant.sharepoint.com/sites/somesite/_api/&#8221;;
        $.ajax({
            url: basePath + “web/lists/GetByTitle(‘News’)/items/?$select=Title&$filter=Feature eq 0”,
            type: “GET”,
            headers: { “Accept”: “application/json;odata=verbose” },
            success: function (data) {
                //script to build UI HERE
            },
            error: function (data) {
                //output error HERE
            }
        });
    });
</script>


The content search web part uses display templates to render search results in different arrangements (ex: list with images, image carousel, etc).  There are two types of display templates the content search web part leverages…the control template, which renders the container around the items, and the item template, which renders each individual item in the search results.  This is very similar to the way a Repeater control works in ASP.NET.  Display templates are authored using HTML, but are converted to client-side script automatically by SharePoint for rendering.  I mention this because our approach is very similar…we will leverage a container and then loop through and render items in script.  In fact, all the examples in this post were converted from display templates in a public site I’m working on. 

Item display template for content search web part

<!–#_
var encodedId = $htmlEncode(ctx.ClientControl.get_nextUniqueId() + “_ImageTitle_”);
var rem = index % 3;
var even = true;
if (rem == 1)
    even = false;

var pictureURL = $getItemValue(ctx, “Picture URL”);
var pictureId = encodedId + “picture”;
var pictureMarkup = Srch.ContentBySearch.getPictureMarkup(pictureURL, 140, 90, ctx.CurrentItem, “mtcImg140”, line1, pictureId);
var pictureLinkId = encodedId + “pictureLink”;
var pictureContainerId = encodedId + “pictureContainer”;
var dataContainerId = encodedId + “dataContainer”;
var dataContainerOverlayId = encodedId + “dataContainerOverlay”;
var line1LinkId = encodedId + “line1Link”;
var line1Id = encodedId + “line1”;
 _#–>
<div style=”width: 320px; float: left; display: table; margin-bottom: 10px; margin-top: 5px;”>
   <a href=”_#= linkURL =#_”>
      <div style=”float: left; width: 140px; padding-right: 10px;”>
         <img src=”_#= pictureURL =#_” class=”mtcImg140″ style=”width: 140px;” />
      </div>
      <div style=”float: left; width: 170px”>
         <div class=”mtcProfileHeader mtcProfileHeaderP”>_#= line1 =#_</div>
      </div>
   </a>
</div>


Script equivalent

<div id=”divUnfeaturedNews”></div>
<script type=”text/javascript”>
    $(document).ready(function ($) {
        var basePath = “https://richdizzcom.sharepoint.com/sites/dallasmtcauth/_api/&#8221;;
        $.ajax({
            url: basePath + “web/lists/GetByTitle(‘News’)/items/?$select=Title&$filter=Feature eq 0”,
            type: “GET”,
            headers: { “Accept”: “application/json;odata=verbose” },
            success: function (data) {
                //get the details for each item
                var listData = data.d.results;
                var itemCount = listData.length;
                var processedCount = 0;
                var ul = $(“<ul style=’list-style-type: none; padding-left: 0px;’ class=’cbs-List’>”);
                for (i = 0; i < listData.length; i++) {
                    $.ajax({
                        url: listData[i].__metadata[“uri”] + “/FieldValuesAsHtml”,
                        type: “GET”,
                        headers: { “Accept”: “application/json;odata=verbose” },
                        success: function (data) {
                            processedCount++;
                            var htmlStr = “<li style=’display: inline;’><div style=’width: 320px; float: left; display: table; margin-bottom: 10px; margin-top: 5px;’>”;
                            htmlStr += “<a href=’#’>”;
                            htmlStr += “<div style=’float: left; width: 140px; padding-right: 10px;’>”;
                            htmlStr += setImageWidth(data.d.PublishingRollupImage, ‘140’);
                            htmlStr += “</div>”;
                            htmlStr += “<div style=’float: left; width: 170px’>”;
                            htmlStr += “<div class=’mtcProfileHeader mtcProfileHeaderP’>” + data.d.Title + “</div>”;
                            htmlStr += “</div></a></div></li>”;
                            ul.append($(htmlStr))
                            if (processedCount == itemCount) {
                                $(“#divUnfeaturedNews”).append(ul);
                            }
                        },
                        error: function (data) {
                            alert(data.statusText);
                        }
                    });
                }
            },
            error: function (data) {
                alert(data.statusText);
            }
        });
    });

    function setImageWidth(imgString, width) {
        var img = $(imgString);
        img.css(‘width’, width);
        return img[0].outerHTML;
    }
</script>


Even one of the more complex carousel views from my site took less than 30min to convert to the script editor approach.

Advanced carousel script

<div id=”divFeaturedNews”>
    <div class=”mtc-Slideshow” id=”divSlideShow” style=”width: 610px;”>
        <div style=”width: 100%; float: left;”>
            <div id=”divSlideShowSection”>
                <div style=”width: 100%;”>
                    <div class=”mtc-SlideshowItems” id=”divSlideShowSectionContainer” style=”width: 610px; height: 275px; float: left; border-style: none; overflow: hidden; position: relative;”>
                        <div id=”divFeaturedNewsItemContainer”>
                        </div>
                    </div>
                </div>
            </div>
        </div>
    </div>
</div>
<script type=”text/javascript”>
    $(document).ready(function ($) {
        var basePath = “https://richdizzcom.sharepoint.com/sites/dallasmtcauth/_api/&#8221;;
        $.ajax({
            url: basePath + “web/lists/GetByTitle(‘News’)/items/?$select=Title&$filter=Feature eq 1&$top=4”,
            type: “GET”,
            headers: { “Accept”: “application/json;odata=verbose” },
            success: function (data) {
                var listData = data.d.results;
                for (i = 0; i < listData.length; i++) {
                    getItemDetails(listData, i, listData.length);
                }
            },
            error: function (data) {
                alert(data.statusText);
            }
        });
    });
    var processCount = 0;
    function getItemDetails(listData, i, count) {
        $.ajax({
            url: listData[i].__metadata[“uri”] + “/FieldValuesAsHtml”,
            type: “GET”,
            headers: { “Accept”: “application/json;odata=verbose” },
            success: function (data) {
                processCount++;
                var itemHtml = “<div class=’mtcItems’ id=’divPic_” + i + “‘ style=’width: 610px; height: 275px; float: left; position: absolute; border-bottom: 1px dotted #ababab; z-index: 1; left: 0px;’>”
                itemHtml += “<div id=’container_” + i + “‘ style=’width: 610px; height: 275px; float: left;’>”;
                itemHtml += “<a href=’#’ title='” + data.d.Caption_x005f_x0020_x005f_Title + “‘ style=’width: 610px; height: 275px;’>”;
                itemHtml += data.d.Feature_x005f_x0020_x005f_Image;
                itemHtml += “</a></div></div>”;
                itemHtml += “<div class=’titleContainerClass’ id=’divTitle_” + i + “‘ data-originalidx='” + i + “‘ data-currentidx='” + i + “‘ style=’height: 25px; z-index: 2; position: absolute; background-color: rgba(255, 255, 255, 0.8); cursor: pointer; padding-right: 10px; margin: 0px; padding-left: 10px; margin-top: 4px; color: #000; font-size: 18px;’ onclick=’changeSlide(this);’>”;
                itemHtml += data.d.Caption_x005f_x0020_x005f_Title;
                itemHtml += “<span id=’currentSpan_” + i + “‘ style=’display: none; font-size: 16px;’>” + data.d.Caption_x005f_x0020_x005f_Body + “</span></div>”;
                $(‘#divFeaturedNewsItemContainer’).append(itemHtml);

                if (processCount == count) {
                    allItemsLoaded();
                }
            },
            error: function (data) {
                alert(data.statusText);
            }
        });
    }
    window.mtc_init = function (controlDiv) {
        var slideItems = controlDiv.children;
        for (var i = 0; i < slideItems.length; i++) {
            if (i > 0) {
                slideItems[i].style.left = ‘610px’;
            }
        };
    };

    function allItemsLoaded() {
        var slideshows = document.querySelectorAll(“.mtc-SlideshowItems”);
        for (var i = 0; i < slideshows.length; i++) {
            mtc_init(slideshows[i].children[0]);
        }

        var div = $(‘#divTitle_0’);
        cssTitle(div, true);
        var top = 160;
        for (i = 1; i < 4; i++) {
            var divx = $(‘#divTitle_’ + i);
            cssTitle(divx, false);
            divx.css(‘top’, top);
            top += 35;
        }
    }


bottlenecks[1]


    function cssTitle(div, selected) {
        if (selected) {
            div.css(‘height’, ‘auto’);
            div.css(‘width’, ‘300px’);
            div.css(‘top’, ’10px’);
            div.css(‘left’, ‘0px’);
            div.css(‘font-size’, ’26px’);
            div.css(‘padding-top’, ‘5px’);
            div.css(‘padding-bottom’, ‘5px’);
            div.find(‘span’).css(‘display’, ‘block’);
        }
        else {
            div.css(‘height’, ’25px’);
            div.css(‘width’, ‘auto’);
            div.css(‘left’, ‘0px’);
            div.css(‘font-size’, ’18px’);
            div.css(‘padding-top’, ‘0px’);
            div.css(‘padding-bottom’, ‘0px’);
            div.find(‘span’).css(‘display’, ‘none’);
        }
    }

    window.changeSlide = function (item) {
        //get all title containers
        var listItems = document.querySelectorAll(‘.titleContainerClass’);
        var currentIndexVals = { 0: null, 1: null, 2: null, 3: null };
        var newIndexVals = { 0: null, 1: null, 2: null, 3: null };

        for (var i = 0; i < listItems.length; i++) {
            //current Index
            currentIndexVals[i] = parseInt(listItems[i].getAttribute(‘data-currentidx’));
        }

        var selectedIndex = 0; //selected Index will always be 0
        var leftOffset = ”;
        var originalSelectedIndex = ”;

        var nextSelected = ”;
        var originalNextIndex = ”;

        if (item == null) {
            var item0 = document.querySelector(‘[data-currentidx=”‘ + currentIndexVals[0] + ‘”]’);
            originalSelectedIndex = parseInt(item0.getAttribute(‘data-originalidx’));
            originalNextIndex = originalSelectedIndex + 1;
            nextSelected = currentIndexVals[0] + 1;
        }
        else {
            nextSelected = item.getAttribute(‘data-currentidx’);
            originalNextIndex = item.getAttribute(‘data-originalidx’);
        }

        if (nextSelected == 0) { return; }

        for (i = 0; i < listItems.length; i++) {
            if (currentIndexVals[i] == selectedIndex) {
                //this is the selected item, so move to bottom and animate
                var div = $(‘[data-currentidx=”0″]’);
                cssTitle(div, false);
                div.css(‘left’, ‘-400px’);
                div.css(‘top’, ‘230px’);

                newIndexVals[i] = 3;
                var item0 = document.querySelector(‘[data-currentidx=”0″]’);
                originalSelectedIndex = item0.getAttribute(‘data-originalidx’);

                //annimate
                div.delay(500).animate(
                    { left: ‘0px’ }, 500, function () {
                    });
            }
            else if (currentIndexVals[i] == nextSelected) {
                //this is the NEW selected item, so resize and slide in as selected
                var div = $(‘[data-currentidx=”‘ + nextSelected + ‘”]’);
                cssTitle(div, true);
                div.css(‘left’, ‘-610px’);

                newIndexVals[i] = 0;

                //annimate
                div.delay(500).animate(
                    { left: ‘0px’ }, 500, function () {
                    });
            }
            else {
                //move up in queue
                var curIdx = currentIndexVals[i];
                var div = $(‘[data-currentidx=”‘ + curIdx + ‘”]’);

                var topStr = div.css(‘top’);
                var topInt = parseInt(topStr.substring(0, topStr.length – 1));

                if (curIdx != 1 && nextSelected == 1 || curIdx > nextSelected) {
                    topInt = topInt – 35;
                    if (curIdx – 1 == 2) { newIndexVals[i] = 2 };
                    if (curIdx – 1 == 1) { newIndexVals[i] = 1 };
                }

                //move up
                div.animate(
                    { top: topInt }, 500, function () {
                    });
            }
        };

        if (originalNextIndex < 0)
            originalNextIndex = itemCount – 1;

        //adjust pictures
        $(‘#divPic_’ + originalNextIndex).css(‘left’, ‘610px’);
        leftOffset = ‘-610px’;

        $(‘#divPic_’ + originalSelectedIndex).animate(
            { left: leftOffset }, 500, function () {
            });

        $(‘#divPic_’ + originalNextIndex).animate(
            { left: ‘0px’ }, 500, function () {
            });

        var item0 = document.querySelector(‘[data-currentidx=”‘ + currentIndexVals[0] + ‘”]’);
        var item1 = document.querySelector(‘[data-currentidx=”‘ + currentIndexVals[1] + ‘”]’);
        var item2 = document.querySelector(‘[data-currentidx=”‘ + currentIndexVals[2] + ‘”]’);
        var item3 = document.querySelector(‘[data-currentidx=”‘ + currentIndexVals[3] + ‘”]’);
        if (newIndexVals[0] != null) { item0.setAttribute(‘data-currentidx’, newIndexVals[0]) };
        if (newIndexVals[1] != null) { item1.setAttribute(‘data-currentidx’, newIndexVals[1]) };
        if (newIndexVals[2] != null) { item2.setAttribute(‘data-currentidx’, newIndexVals[2]) };
        if (newIndexVals[3] != null) { item3.setAttribute(‘data-currentidx’, newIndexVals[3]) };
    };
</script>


End-result of script editors in SharePoint Online

Separate authoring site collection

Final Thoughts

How to connect a SharePoint 2013 Document Library to Outlook 2013


How to connect a SharePoint 2013 Document Library to Outlook 2013One of the key methods of gaining User Adoption of SharePoint is ensuring and pushing the integration it has with Microsoft Office to information workers. After all, information workers generally use Outlook as their ‘mother-ship’. Getting those users to switch immediately to SharePoint or, asking them to visit a document library in a SharePoint site which they will need to access could take time, especially since it means opening a browser, navigating to the site, covering their beloved Outlook client in the process.


The following describes how to connect a typical SharePoint 2013 document library to Outlook 2013 client.

  1. Access your SharePoint site; go into the relevant Documents library. In the below example, I clicked on the default Team Site Documents repository link in the Quick Launch bar, which has around 140 documents.


  1. Ok, that’s the Document library displayed, now to get to the Library Tab on the Ribbon bar; the option we are looking for is within the Library options available there.

  1. When the Library ribbon is displayed, click the Connect To Outlook button in the Connect & Export section. Note. If Connect to Outlook is greyed out ensure that Outlook 2013 is fully operational. I’ve come across examples where Outlook is installed, but no email account has been enabled in Outlook – if that’s the case this button will be greyed out.

  1. Once the Connect To Outlook button is clicked, you may receive a warning message informing you that you allow SharePoint to connect with Outlook – Click ALLOW.

  1. Outlook 2013 will be displayed. A dialog will also then be displayed that asks you to confirm that you wish to connect the Document Library to Outlook. The below dialog shows the Site Name and Document Library title, along with the URL of the document library being connected. Below, and to the right is a button that shows more information about the connection (ADVANCED button). The following screenshot shows the information displayed if the Advanced Button is clicked. There is not much you can do on that screen, for now, click YES to confirm the connection.

Here’s an example of the Advanced dialog associated. The most interesting aspect is the Permissions line. For Document Library connection to Outlook, this will be set as READ. This is by design, and for good reason. Things like classified metadata are not exposed to be writeable from Outlook including other document library settings like CheckIn/Out etc. However, this does not prevent you from modifying a file in the resultant list. If the document needs to be updated, simply double-click on the document which will open it in the local application, click the edit offline option, make your changes, click save, click close, and then a prompt should appear to allow you to update to the server.

Once completed, the documents will be listed in Outlook. The following screenshot shows the result of a Shared Document Library from a SharePoint 2013 site connected to Outlook 2013. Note the following features which in my view are awesome for User Adoption particularly from those whose centre of the universe happens to be the Outlook client; without going into jargon try to explain the following features:

  • That users are able to switch from connected library to connected library using the navigation options, each connected library shows the number of unread items (un-previewed or un-opened documents).
  • That each document (if the previewer is available) when clicked on will display a preview of the document; meaning that you can read a Word Document, for example, without having to open it in the client application.
  • That information concerning the state of the document is displayed, showing the last modifier, whether the document is checked out, when it was last modified and the document size.


Note. There is a problem I have noticed in the preview section when highlighting any file whilst working with SharePoint 2013, Office 2013 on a sandbox; the message:

‘This file cannot be previewed because of an error with the following previewer: Microsoft xxxxx previewer – To open this file in its own program, double-click it;’.

There is an article that seems to describe the issue (but does not directly mention when it’s likely to occur); and is known to Microsoft. A description of the alternatives whilst a fix is being provided here: http://support.microsoft.com/kb/983097. I will further investigate this and update this article.

How to: Customize the SharePoint HTML Editor Field Control using ECM

You can use the HTML Editor field control to insert HTML content into a publishing page. Page templates that include a Publishing HTML column type also include the HTML Editor field control.

This editor has special capabilities, such as customized styles, editing constraints, reusable content support, a spelling checker, and use of asset pickers to select documents and images to insert into a page’s content. This topic describes how to modify some features and attributes of the HTML Editor field control.

Image

If the content type of a page layout supports the Page Content column, you can add a Rich HTML field control to your page layout by using markup such as the following.

<PublishingWebControls:RichHtmlField id="ArticleAbstract" FieldName="ArticleAbstract" 
          AllowExternalUrls="false" 
          AllowFonts="true" 
          AllowReusableContent="false" 
          AllowHeadings="false"
          AllowHyperlinks="false"
          AllowImages="false"
          AllowLists="false"
          AllowTables="false"
          AllowTextMarkup="false" 
          AllowHTMLSourceEditing="false"
          DisalbeBasicFormattingButtons="false"
          runat="server"/>

In the example above, RichHTMLField is the name of the field control that provides the richer HTML editing experience. Attributes such as AllowFonts and AllowTables specify restrictions on the field.

The HTML field control allows font tags, but the control does not allow URLs that are external to the current site collection, reusable content stored in a centralized list, standard HTML heading tags, hyperlinks, images, numbered or bulleted lists, tables, or text markup.

Table 1. HTML editor field control properties
Attribute Description
AllowExternalUrls Only URLs internal to the current site collection are allowed to be referenced in a link or an image.
AllowFonts Content may contain Font tags.
AllowHtmlSourceEditing HTML Editor can be switched into a mode that allows the HTML to be edited directly.
AllowReusableContent Content may contain reusable content fragments stored in a centralized list.
AllowHeadings Content may contain HTML heading tags (H1, H2, and so on).
AllowTextMarkup Content may contain bold, italic, and underlined text.
AllowImages Content may contain images.
AllowLists Content may contain numbered or bulleted lists.
AllowTables Content may contain table-related tags such as <table>, <tr>, and <td>.
AllowHyperlinks Content may contain links to other URLs.
AllowHtmlSourceEditing When set to false, the HTML editor is disabled from switching to HTML source editing mode.
AllowHyperlinks Gets or sets the constraint that allows hyperlinks to be added to the HTML. If this flag is set to false, <A>, <AREA>, and <MAP> tags are removed from the HTML. Default is true. This property also determines whether the editing user interface (UI) enables these operations.
AllowImageFormatting Gets or sets image formatting items. This restriction disables only menus and does not force the content to adhere to this restriction
AllowImagePositioning Gets or sets the position of the image. This restriction disables only menus and does not force the content to adhere to this restriction.
AllowImageStyles Gets or sets whether the Table Styles menu is enabled. This restriction disables only the menu and does not force the content to adhere to this restriction.
AllowInsert Gets or sets whether Insert options are shown. This restriction disables only the menu and does not force the content to adhere to this restriction.
AllowLists Gets or sets the constraint that allows list tags to be added to the HTML. If this flag is set to false, <LI>, <OL>, <UL>, <DD>, <DL>, <DT>, and <MENU> tags are removed from the HTML. Default is true. This also determines whether the editing UI enables these operations.
AllowParagraphFormatting Gets or sets whether paragraph formatting items are enabled. This restriction disables only menus and does not force the content to adhere to this restriction.
AllowStandardFonts Gets or sets whether standard fonts are enabled. This restriction disables only menus and does not force the content to adhere to this restriction.
AllowStyles Gets or sets whether the Style menu is enabled. This restriction disables only the menu and does not force the content to adhere to this restriction.
AllowTables Gets or sets the constraint to allow tables to be added when editing this field.
AllowTableStyles Gets or sets whether the Table Styles menu is enabled. This restriction disables only the menu and does not force the content to adhere to this restriction.
AllowTextMarkup Get or set the constraint to allow text markup to be added when editing this field.
AllowThemeFonts Gets or sets whether theme fonts are enabled. This restriction disables only menus and does not force the content to adhere to this restriction.
Predefined Table Formats

The HTML editor includes a set of predefined table formats, but it can be customized to fit the styling of an individual page. Each table format is a collection of cascading style sheet (CSS) classes for each table tag. You can define styling for the first and last row, odd and even rows, first and last column, and so on.

The HTML Editor dynamically applies certain styles from the referenced style sheets on the page and makes them available to users when formatting a table. For a custom style to be available when formatting a table, the relevant class names must follow the PREFIXTableXXX-NNN format, where:

  • PREFIX is ms-rte by default, but you can override the default by using the control PrefixStyleSheet() property of the RichHTML field control.
  • XXX is the specific table section, such as EvenRow or OddRow.
  • NNN is the name to identify the table styling.

The following example presents a complete set of classes for a table styling format.

.ms-rteTable-1 {border-collapse:collapse;border-top:gray 1.5pt;
    border-left:gray 1.5pt;border-bottom:gray 1.5pt;
    border-right:gray 1.5pt;border-style:solid;}
.ms-rteTableHeaderRow-1 {color:Green;background:yellow;text-align:left}
.ms-rteTableHeaderFirstCol-1 {padding:0in 5.4pt 0in 5.4pt;}
.ms-rteTableHeaderLastCol-1 {padding:0in 5.4pt 0in 5.4pt;}
.ms-rteTableHeaderOddCol-1 {padding:0in 5.4pt 0in 5.4pt;}
.ms-rteTableHeaderEvenCol-1 {padding:0in 5.4pt 0in 5.4pt;}
.ms-rteTableOddRow-1 {color:black;background:#FFFFDD;}
.ms-rteTableEvenRow-1 {color:black;background:#FFB4B4;}
.ms-rteTableFirstCol-1 {padding:0in 5.4pt 0in 5.4pt;}
.ms-rteTableLastCol-1 {padding:0in 5.4pt 0in 5.4pt;}
.ms-rteTableOddCol-1 {padding:0in 5.4pt 0in 5.4pt;}
.ms-rteTableEvenCol-1 {padding:0in 5.4pt 0in 5.4pt;}
.ms-rteTableFooterRow-1 {color:blue;font-style:bold;
    font-weight:bold;background:white;border-top:solid gray 1.0pt;
    border-bottom:solid gray 1.0pt;border-right:solid silver 1.0pt; 
    border-style:solid;}
.ms-rteTableFooterFirstCol-1 {padding:0in 5.4pt 0in 5.4pt;
    border-top:solid gray 1.0pt;text-align:left}
.ms-rteTableFooterLastCol-1 {padding:0in 5.4pt 0in 5.4pt;
    border-top:solid gray 1.0pt;text-align:left}
.ms-rteTableFooterOddCol-1 {padding:0in 5.4pt 0in 5.4pt;
    text-align:left;border-top:solid gray 1.0pt;}
.ms-rteTableFooterEvenCol-1 {padding:0in 5.4pt 0in 5.4pt;
    text-align:left;border-top:solid gray 1.0pt;}

Microsoft SharePoint Server 2010 includes a set of default table styles. However, if the system detects new styles that did not originate in the default .css file, it removes the default set and presents only those newly defined styles in the HTML editor dialog box.

Spelling Checker

In SharePoint Server 2010, the HTML editor includes a spelling checker, which can be customized by developers by using the SpellCheckV4Action Web control and the SpellCheckToolbarButton Web control. The spelling checker action registers client files and data during a spelling check.

It also includes a method to get the console tab and calls the user rights to verify that the current user has rights to perform a spelling check operation on the selected item. The spelling checker action calls the appropriate ECMAScript (JavaScript, JScript) code, and sends information to the client about available spellings and the default language to use for the request.

Creating Your Own Document Management System With SharePoint and Dynamix

Image

With the R2 release of Dynamics AX 2012, a new feature was quietly snuck into the product that allows you to store document attachments from Dynamics AX within SharePoint rather than within an archive location, or within the database. This opens up a whole slew of possibilities when it comes to document management within SharePoint.

In this example we will show how you can create a document management structure within SharePoint that you can use in conjunction with the Dynamics AX attachments feature, and also we will show a few tweaks that you can make that may make managing your documents within SharePoint just a little easier.

Creating a new Document Management Site

The first step that we are going to work through is the creation of a new Document Management site where we will put all of our Dynamics AX document attachments. We are just creating a site to separate out the documents from other items that you may already have stored within SharePoint.

How to do it…

To create a new Document Management Site in SharePoint, follow these steps:

  1. Open up the SharePoint Workspace that you want to use to house your Document Management site and from the Site Actions menu, select the New Site option.
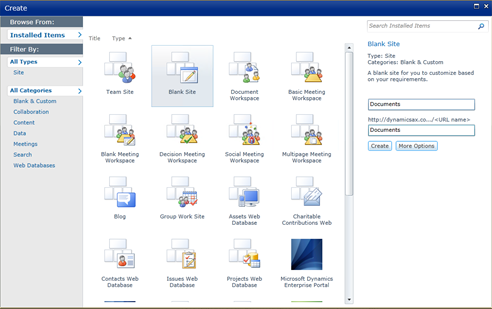
  2. When the Site Templates are displayed, select the Blank Site template. Give your site a name, and also a sub site name (probably the same as your site name). When you are done, click on the Create button for start the site creation process.
How it works…

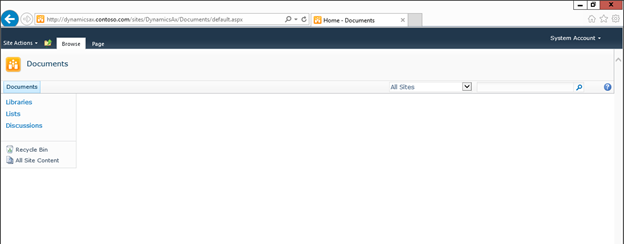
When the site is created, you should be taken to a new blank site which you will be able to use as a document repository.
Creating Document Libraries for the Business Areas

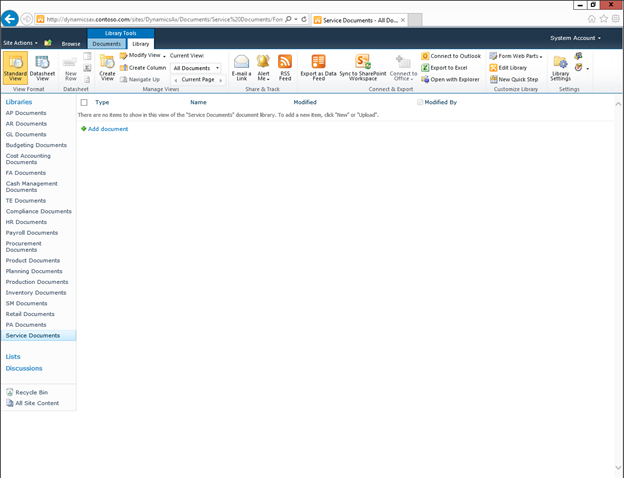
The next step in the process is to create document libraries to store all of your documents away in. You could create one big library, or a number of smaller ones, broken out into groups based on business area or function. In this example we will do the latter because it will give us more flexibility with the indexing of the documents, and also make it easier to find particular documents.

How to do it…

To create document libraries for the business areas, follow these steps:

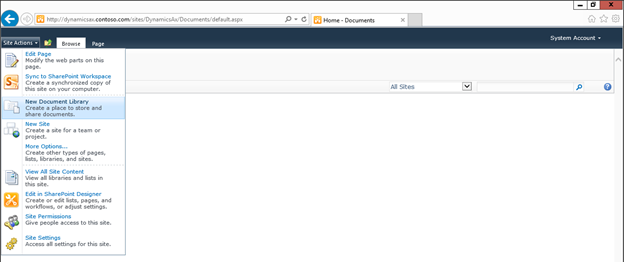
  1. From within your new Document Management site, select the New Document Library option from the Site Actions menu.
  2. When the Document Library Creation dialog box appears, give your library a Name, Description, and also set the Document Template to None. In this example we are creating a library for all of the AP Documents.
    When you are done, click on the Create button to start the document library creation process.

How it works…

After it finishes you should have a new library for you to use. You can repeat the process for all of the other business areas that you want to manage documents for – in our example we just used the standard business areas from the Dynamics AX navigation menu.
Creating Dynamics AX Document Types that Link to the Document Libraries

Once you have created your document libraries, you can connect them to Dynamics AX with the new SharePoint option so that the users are able to attach documents from the client and then store them within SharePoint for everyone to access.

How to do it…

To create a file attachment type that links to SharePoint, follow these steps:

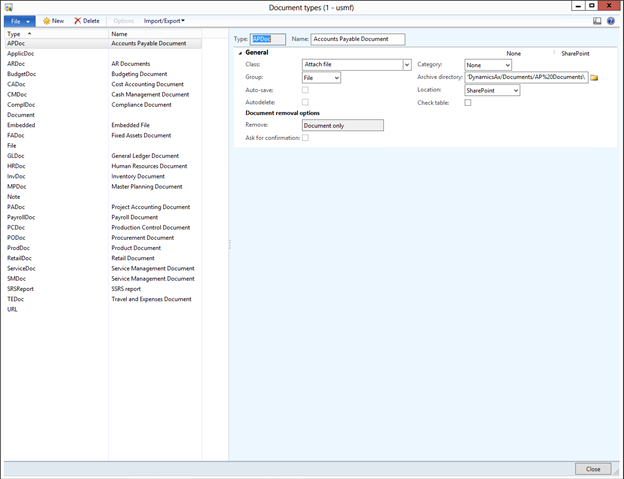
  1. From the Organization administration area page, select the Document types menu item from the Document management folder of the Setup group.
  2. When the Document types maintenance form is displayed, click on the New button in the menu bar to create a new entry.
  3. We will start by creating a link for all of our generic Accounts Payable documents by giving our new Document type a Name and Description. In the Group select File from the dropdown options and select SharePoint for the Location option.
  4. Now return back to your document libraries within SharePoint and copy the URL for the document library.
  5. Paste the URL into the Archive
    directory field.

    Note: Remove all of the extra parameters though so that you are just referencing the base folder location.
    Also, if you click on the folder browser to the right of the Archive directory field you can test the link to SharePoint.

How it works…

Now, if you attach a document, then you will see the option for your new document type.
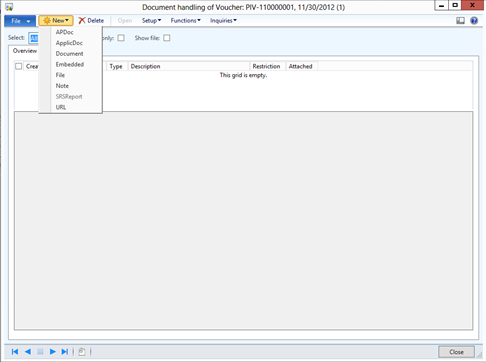
It will allow you to attach any file that you have on your desktop.

And rather than showing you the thumbnail image, it will show you a reference link to your SharePoint document library.
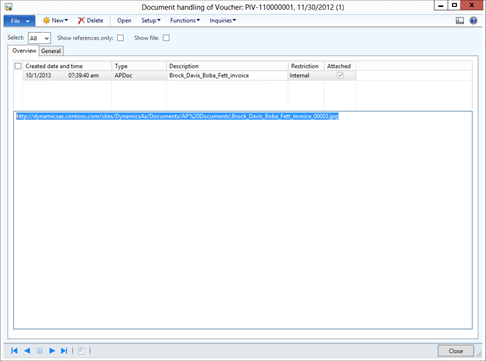
After attaching the document, if you look within SharePoint, you will see your document is saved away for you.

You can repeat this process for all of your other document libraries that were created in the previous step.
Adding Columns to your Document Libraries for Better Indexing

One of the reasons why you want to start using SharePoint is so that you can take advantage of the indexing functionality to code and classify your documents. Now that you have people storing the documents away, it’s time to add some indexes to you document libraries.

How to do it…

To create new indexes for your document libraries, follow these steps:

  1. Open up your document libraries within SharePoint and select the Library ribbon bar. Then click on the Create Column button within the Manage Views group.
  2. When the Create Column form opens, set the Column Name to be the field that you want to index, select the type of the column, and also set the columns Description.
  3. Note: Sometimes it’s a good idea not to have spaces in the column name, later on when we add filters, it becomes a litter easier to manage this way.
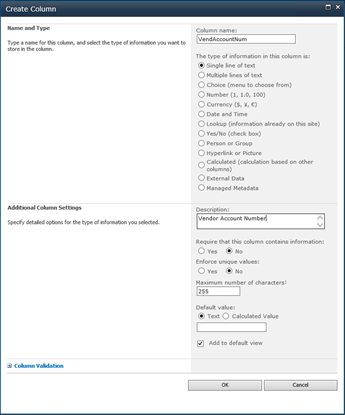
  4. After you have finished defining the column, click on the OK button to add the column to your library.
  5. When you return back to your document library, there will be a new column on the form.
  6. Repeat the process for all of the columns that you want to use as index fields for the library.

    Note: All of the columns do not have to be used during the indexing process, so it’s OK to have variations of columns, like InvoiceNum, CreditNoteNum, etc.

How it works…

To edit the columns, select the options menu for the document, and choose the Edit Properties option.
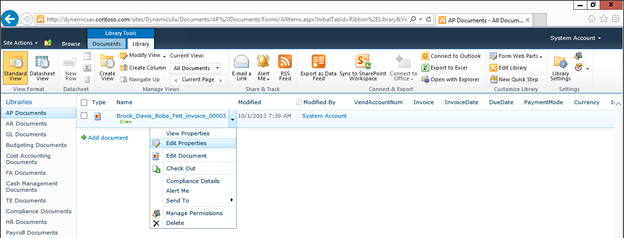
This will allow you to update the fields that Dynamics AX did not populate initially.

Now when you look at the document within SharePoint, you will see the additional metadata that is associated with the document.

Embedding Document Libraries into Dynamics AX Forms

Now that we are able to index documents a little more effectively within SharePoint, we can go the extra step, and link SharePoint to our forms within Dynamics AX so that we are able to access them without even leaving the application. Doing this just requires a little bit of coding, but is well worth the effort.

Getting Started…

You can manipulate the information that is displayed by SharePoint, and also how it is displayed through the URL that you use.

If you filter any of the views, then you will notice that it uses two qualifiers – FilterFieldX
and FilterValueX to restrict the viewed records.

Also, if you add a IsDlg=1 qualifier, then all of the navigation areas are hidden giving you a clean list of filtered documents.

This is the perfect type of view to embed within Dynamics AX.

The other half of this step is to choose a form to add your document libraries to. In this case we will update the Vendors form.
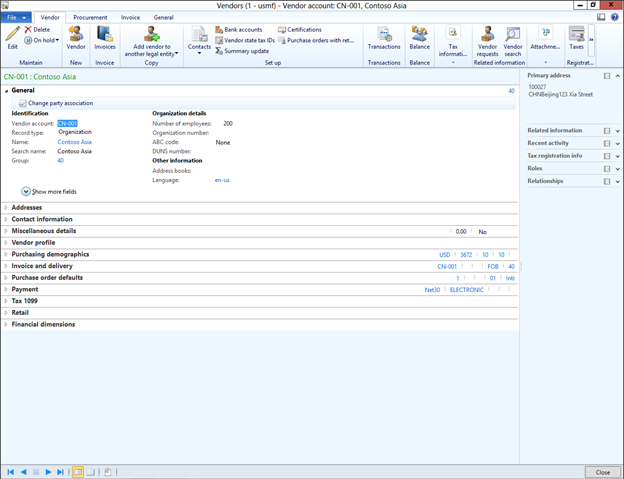
How to do it…

To embed your SharePoint document libraries within Dynamics AX forms, follow these steps:

  1. Start the process by opening up AOT, and create a new project for this tweak.
  2. From the Forms area in the AOT, drag over the form that you want to add the documents to – in this case it’s the VendTable form.
  3. Expand out the form within the project, and navigate to the group that you want to add your document library view into.
  4. Right-mouse-click on the parent tab, and select the TabPane option from the New Control sub-menu.
  5. Reorder your tabs (ALT+UpArrow/DownArrow) so that they are in the sequence that you want and then give your new Tab Control a Name and Caption in the Properties section.
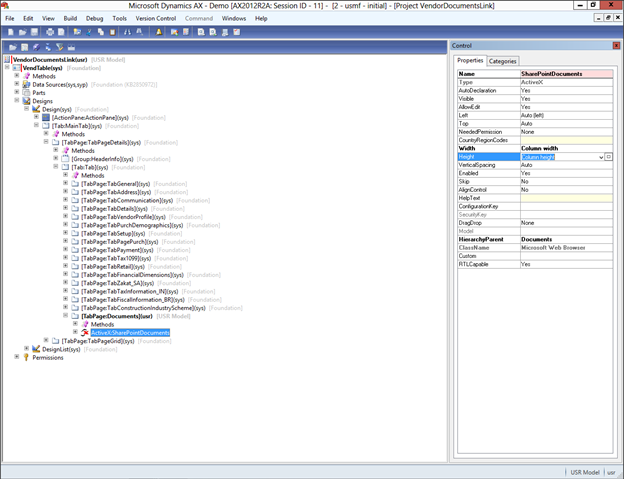
  6. Right-mouse-click on the new tab that you added for the document library and select the ActiveX control from the New Control sub menu.
  7. When the list of ActiveX controls are displayed, select the Microsoft Web Browser control, and click the OK button to add it.
  8. Rename your ActiveX control, and set the Width to Column width
    and Height to Column height.
  9. Now we need to have Dynamics AX update the URL that is navigated to when the form is opened. To do this, right-mouse-click on the parent Methods group for the form, and select the activate method from the Override methods submenu.
  10. Update the activate method by building the URL that will define the specific document index that you are wanting to show. You are able to now add conditional filters that pick up the record values, and filter based on the current record – in this case the vendor number.
  11. Once you have finished the update, save the project.

How it works…

Now when you open up the Vendor form, there will be a Documents tab that shows all of the documents that are associated with the current record.

If you select a record that does not have attached documents, then you will not see anything there.

How cool is that.

Creating Custom Views for the Document Libraries

Now that all of the heavy lifting has been done, you can now start tweaking the SharePoint libraries and the way that the information is displayed. Based on the form that you are in you may want to show only particular information. You can do that by creating new custom views.

How to do it…

To create a custom view for your document libraries, follow these steps:

  1. Open up your document libraries within SharePoint and select the Library ribbon bar. Then click on the Library Settings button within the Settings group.
  2. When the document library settings maintenance form is displayed, scroll down to the bottom of the page, and there will be a section for Views that will show you all of the different ways that the form could be displayed. In this case there is only one, but we can fix that by clicking on the Create View link.
  3. Select the Standard View option from the format templates that are displayed.
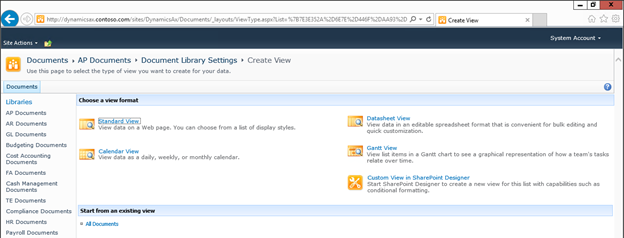
  4. Assign your new view a Name and select the fields that you want to be displayed in the view.
  5. Once you have made the changes, click on the OK button to save your new view.

How it works…

When you return to the document library you will be able to see the new format of the view.

You can then change the view within the URL of your project to make it the default view for the form.

Now when you see all of the documents within your Dynamics AX form you will see just the information that you need.
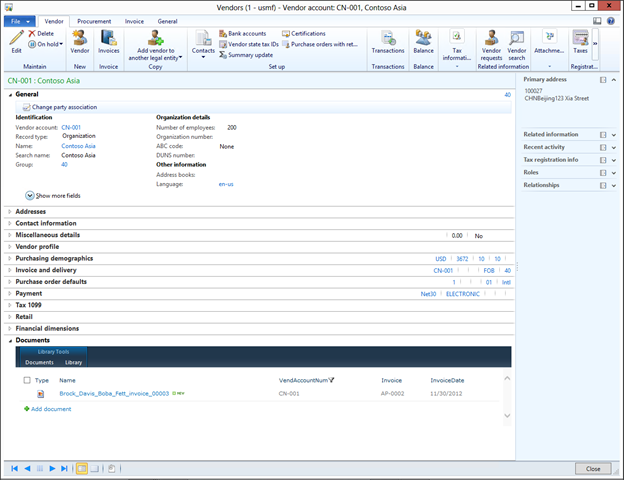
Using the SharePoint Designer to Edit Document Libraries

Although you can do everything that we have shown so far within SharePoint, you can also take advantage of the SharePoint Designer application to update your SharePoint document libraries. You don’t even have to search for the install kit, because it is embedded within your SharePoint site, just waiting to be downloaded and installed.

How to do it…

To access the SharePoint Designer to manipulate your SharePoint site, follow these steps:

  1. To use the SharePoint Designer to update your SharePoint site, just select the Edit in SharePoint Designer option from the Site Actions menu.
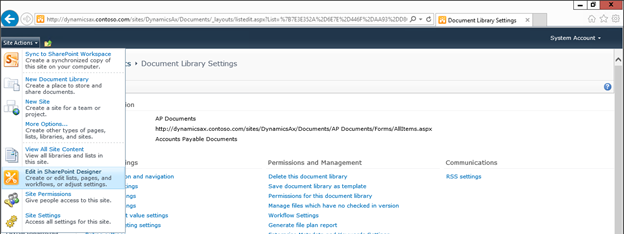
    Note: If you don’t have SharePoint Designer installed then it will ask you to install it, and download the kit directly from your SharePoint installation.

How it works…

When SharePoint Designer opens up, it will be connected to your current SharePoint site, showing you all of the libraries, etc. that you have been creating.

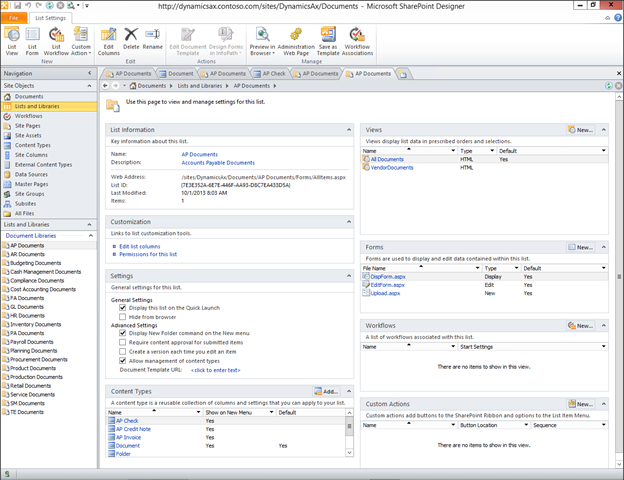
If you select the Lists and Libraries option from the navigation pad, you will be able to see all of the document libraries that you created in the previous steps.

Drilling into the libraries you will be able to also see all of the views etc. that you configured within SharePoint.

Creating New Content Types to Manage Document Types

When we set up our document libraries we deliberately created them so that all of the documents for a particular area are within the same library. This allows us to save multiple types of documents away within the library like Invoices, Credit Notes, Vendor Certificates etc. The way that we can identify the type of document is through the creation of Content Types.

How to do it…

To create custom Content Types to help make classification easier, follow these steps:

  1. Open up SharePoint Designer (although you can also do this within SharePoint itself) and select the Content Types from the navigation menu and click on the Content type menu button within the New group
    of the Content Types ribbon bar.
  2. When the Content Type creation form is displayed, give your Content Type a Name, and Description, select a parent content type, and also a group that you want to show the Content Type in.

    Note: For the first content type that you create, you may want to create a new Content Type Group so that it isn’t intermingled with all of the other content types.

  3. When you have finished creating your Content Type click on the OK button to add it to SharePoint.
  4. When you return to your SharePoint Designer workspace you will be able to see your new Content Type.
  5. Repeat the process for all of the other types of documents that you want to file away within SharePoint.
  6. Now we need to enable Content Types within our document libraries, and then assign them. To do this, open up your Document Library within SharePoint Designer, and within the Settings group, check the Allow management of content types check box.
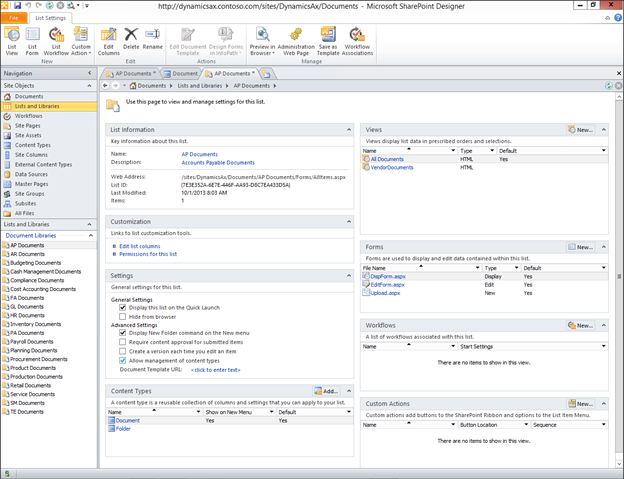
  7. Then click on the Add button to the right of the Content Types group to open up the Content Type Picker. Find the new Content Types that you just created, and click on the OK button to assign them to your Document Library.
  8. Now the Content Type will show up as a valid option for the document library.
  9. Repeat the process for all of the other content types that you created.
How it works…

Now when you edit the properties for your documents, there will be a new indexing option for your documents that allows you to define the type of document that you are looking at.

Specifying Document Columns by Content Types to Simplify Indexing

There is an additional benefit that you get from using Content Types within SharePoint, which is the ability to specify what columns are applicable to different Content Types at the time of indexing. For example, you probably don’t want to specify a Invoice Number when indexing a Vendor Insurance Certificate, but would definitely would want to when indexing an Invoice and even a Credit Note.

How to do it…

To modify your Content Types within your Document Libraries to only require certain columns to be indexed, follow these steps:

  1. From within your SharePoint Document Library (or from within SharePoint Designer) click on the Library Settings button within the Settings group of the Library ribbon bar.
  2. Within the Library Settings you will be able to see all of your Content Types that have been assigned. Select any of them to edit their options.
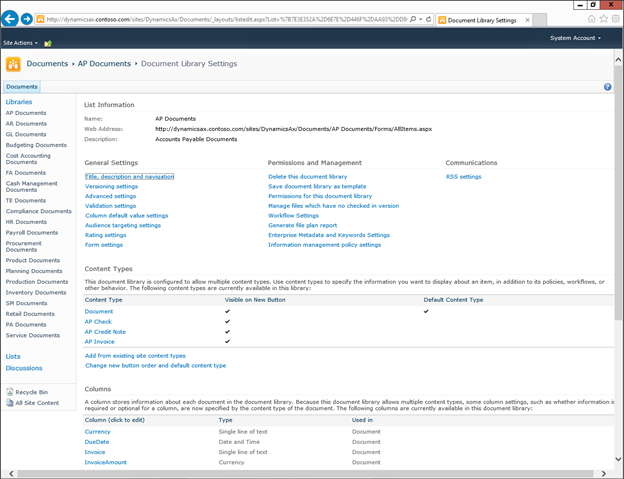
  3. When you first create the Content Types then they will have no columns assigned to them. Click on the Add from existing site or list columns link to assign the valid columns to your Content Type.
  4. When the Add columns to Content Type form is displayed, you will be able to see all of the available columns within the Document Library.
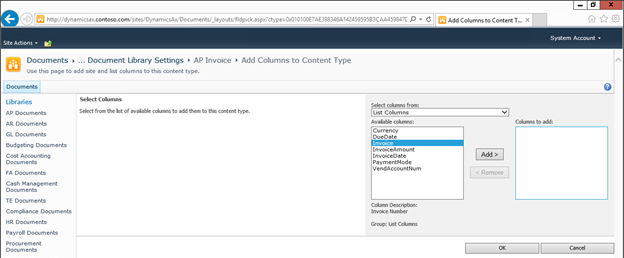
  5. Just select the ones that you want to use for the indexing, and then click the Add button. Once you have selected all the ones that you want to use, click on the OK button to save your changes.

How it works…

Now you will have indexing by Content Type.

Showing the Content Type in the Document View

Now that we are classifying documents by Content Type we might as well show it in the views so that we are able to differentiate different document types.

How to do it…

To add the Content Type field to our Document View, follow these steps:

  1. From within your SharePoint Document Library (or from within SharePoint Designer) click on the Modify View button within the Manage Views group of the Library ribbon bar.
  2. Now that the Content Type is enabled on our Document Library, it will show up on the list of valid columns. To add it to our view, just check the Display checkbox, and possibly change the order of the field so that it is first in the table.
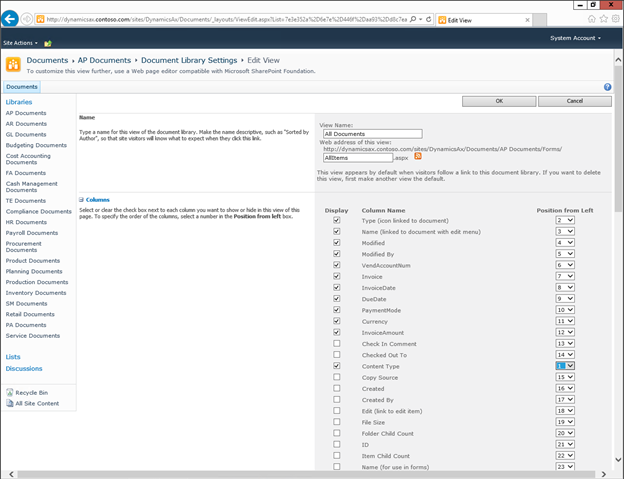
  3. When you’re done, click on the OK button to update the view.

How it works…

Now the Content Type is shown in the document library view.

And also will show up when we browse to the documents within Dynamics AX.
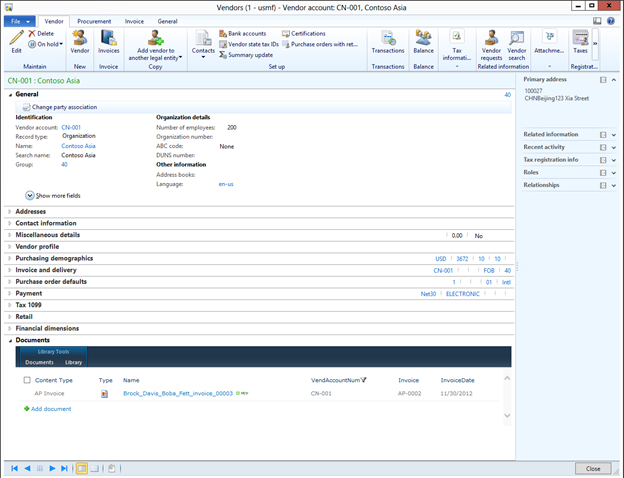
How neat is that.

Grouping Records in the Document View by Key Columns

One final tweak that we will show within SharePoint is the ability to group columns within our document library views so that common information is shown together. These groupings can be different by view, and just make it a little easier to find information if we don’t’ initially filter the data.

How to do it…

To group records within your document library view, follow these steps:

  1. From within your SharePoint Document Library (or from within SharePoint Designer) click on the Modify View button within the Manage Views group of the Library ribbon bar.
  2. Scroll down your view definition until you see the Group By configuration options. Here you will be able to change the Group By fields.

How it works…

Now when you look at your documents, they will be classified by key fields.

Summary

In this walkthrough we have shown how you can:

  • Create a simple document management repository within SharePoint
  • Link the document attachments function within Dynamics AX to SharePoint to make the acquisition of the documents easier
  • Index your documents more effectively by defining custom columns
  • Embed SharePoint back into Dynamics AX and also
  • Tweak your views within SharePoint to make it easier to find and view documents

This is really just a starting point, and once you have mastered the basics, you can start investigating:

  • Assigning workflows to documents for approvals and updates
  • Enabling version control for your documents
  • Acquire documents into SharePoint through scanning technologies
  • Link the index column fields to Dynamics AX for validation of key information
  • And much more.

SharePoint is a great document management tool, and can usually handle all of your document indexing needs. Especially now that it is connected with Dynamics AX natively.

How to add a Link to a Document external to SharePoint

Image

You can add links to external file shares or/and file server documents to your document library very easily. Why would you want to do this? Primarily so all your MetaData to all your documents are searchable in the same place.First a Farm Administrator will need to modify a core file on the front end server.  Then you must create a custom Content Type. If you use the built in content type you will not be able to link to a Folder directly.
Edit the NewLink.aspx page to allow the Document Library to accept a File:// entry.

  1. Go to the Front End Web Server \12\template\layouts directory.
  2. Open the file NewLink.aspx using NotePad. If I have to tell you to take a backup of this file first then you have no business editing this file (really).
  3. Go to the end of the script section near top of page and add:

    function HasValidUrlPrefix_UNC(url)
    {
    var urlLower=url.toLowerCase();
    if (-1==urlLower.search(”^http://”) &&
    -1==urlLower.search(”^https://”) && -1==urlLower.search(”^file://”))
    return false;
    return true;
    }

  • Use Edit Find to search for HasValidURLPrefix and replace it with HasValidURLPrefix_UNC (you should find it two times).
  • File – Save.
  • Open command prompt and enter IISreset /noforce.

Important: To link to Folders correctly you must create your own content type exactly as below and not use the built in URL or Link to Document at all.

Create custom Content Type

  1. Go to your Site Collection logged in as a Site Collection Administrator.
  2. Site actions – Site Settings – Modify All Site Settings.
  3. Content Types
  4. Create
  5. Name = URL or UNC
  6. Description = Use this content type to add a Link column that allows you to put a hyperlink or UNC path to external files, pages or folders. Format is File://\\ServerName\Folder , or http://
  7. Parent Content Type,
    1. Select parent content type from = Document Content Types
    2. Parent Content Type = Link to a Document
  8. Put this site content type into = Existing Group:  Company Custom
    1. image
  9. OK
  10. At the Site Content Type: URL or UNC page click on the URL hyperlink column and change it to Optional so that multiple documents being uploaded will not remain checked out.
  11. OK
    1. image

Add Custom Content Type to Document Library

  1. Go to a Document Library
  2. Settings – Library Settings
  3. Advanced Settings
  4. Allow Management Content Types = Yes
  5. OK
  6. Content Types – Add from existing site content types
  7. Select site content types from: Company Custom
  8. URL or UNC – Add – OK
  9. Click on URL or UNC hyperlink
  10. Click on Add from existing site
  11. Add all your Available Columns – OK
  12. Column Order – change the order to be consistant with the Document content type orders.
  13. Click on your Document Library breadcrumb to test.
  14. View – Modify your view to add the new URL or UNC column to your view next to your Name column.

Create Link to Document

  1. Go to the Document Library
  2. New – URL or UNC
  3. Document Name: This must equal the exact file or folder name less the extension.
    1. Example: My Resume 
    2. Example: Folder2
    3. Example: Doc1
  4. Document URL: This must be the UNC path to the folder or file.
    1. Example: http://LindaChapman.BlogSpot.com/Folder1/Folder2/My Resume.doc
    2. Example: http://LindaChapman.BlogSpot.com/Folder1/Folder2
    3. Example: File://\\ServerName\FolderName\FolderName2\Doc1.doc

You might see other blogs that say you can’t connect to a folder and must create a shortcut first. They are wrong. You can by the method above.

The biggest mistakes I see are:

  1. People click on the NAME field instead of the URL field. They are not the same. You MUST click on the URL field to access the Folder properly.
  2. People use the built in Link to Document content type thinking it is the same or will save them a step. It is not the same.
  3. People type the document extension in the Name field. You can not type the extension in the name field. It will see it is a UNC path and ignore the .aspx extension.
  4. People enter their slashes the wrong direction for UNC paths.

How To : A library to create .mht files (available at request)

There are a number of ways to do this, including hosting Word or Excel on the Web Server and dealing with COM Interop issues, or purchasing third – party MIME encoding libraries, some of which sell for $250.00 or more. But, there is no native .NET solution. So, being the curious soul that I am, I decided to investigate a bit and see what I could come up with. Internet Explorer offers a File / Save As option to save a web page as “Web Archive, single file (*.mht)”.

Image

What this does is create an RFC – compliant Multipart MIME Message. Resources such as images are serialized to their Base64 inline encoding representations and each resource is demarcated with the standard multipart MIME header – breaks. Internet Explorer, Word, Excel and most newsreader programs all understand this format. The format, if saved with the file extension “.eml”, will come up as a web page inside Outlook Express; if saved with “.mht”, it will come up in Internet Explorer when the file is double-clicked out of Windows Explorer, and — what many do not know — if saved with a “*.doc” extension, it will load in MS Word, each with all the images intact, and in the case of the EML and MHT formats, with all of the hyperlinks fully-functioning. The primary advantage of the format is, of course, that all the resources can be consolidated into a single file,. making distribution and archiving much easier — including database storage in an NVarchar or NText type field.


System.Web.Mail, which .NET provides as a convenient wrapper around the CDO for Windows COM library, offers only a subset of the functionality exposed by the CDO library, and multipart MIME encoding is not a part of that functionality. However, through the wonders of COM Interop, we can create our own COM reference to CDO in the Visual Studio IDE, allowing it to generate a Runtime Callable Wrapper, and help ourselves to the entire rich set of functionality of CDO as we see fit.


One method in the CDO library that immediately came to my notice was the CreateMHTMLBody method. That’s MHTMLBody, meaning “Multipurpose Internet Mail Extension HTML (MHTML) Body”. Well!– when I saw that, my eyes lit up like the LED’s on a 32 – way Unisys box! This is a method on the CDO Message class; the method accepts a URI to the requested resource, along with some enumerations, and creates a MultiPart MIME – encoded email message out of the requested URI responses — including images, css and script — in one fell swoop.


“Ah”, you say, “How convenient”! Yes, and not only that, but we also get a free “multipart COM Interop Baggage” reference to the ADODB.Stream object – and by simply calling the GetStream method on the Message Class, and then using the Stream’s SaveToFile method, we can grab any resource including images, javascript, css and everything else (except video) and save it to a single MHT Web Archive file just as if we chose the “Save As” option out of Internet Explorer.


If we choose not to save the file, but instead want to get back the stream contents, no problem. We just call Stream.ReadText(Stream.Size) and it returns a string containing the entire MHT encoded content. At that point we can do whatever we want with it – set a content – header and Response .Write the content to the browser, for instance — or whatever.


For example, when we get back our “MHT” string, we can write the following code:

Response.ContentType=”application/msword”;
Response.AddHeader( “Content-Disposition”, “attachment;filename=NAME.doc”);
Response.Write(myDataString);


— and the browser will dutifully offer to save the file as a Word Document. It will still be Multipart MIME encoded, but the .doc extension on the filename allows Word to load it, and Word is smart enough to be able to parse and render the file very nicely. “Ah”, you are saying, “this is nice, and so is the price!”. Yup!

And, if you are serving this MIME-encoded file from out of your database, for example, and you would like it to be able to be displayed in the browser, just change the “NAME.doc” to “NAME.MHT”, and don’t set a content-type header. Internet Explorer will prompt the user to either save or open the file. If they choose “open”, it will be saved to the IE Temporary files and open up in the browser just as if they had loaded it from their local file system.


So, to answer a couple of questions that came up recently, yes — you can use this method to MHTML – encode any web page – even one that is dynamically generated as with a report — provided it has a URL, and save the MIME-encoded content as a string in either an NVarchar or NText column in your database. You can then bring this string back out and send it to the browser, images,css, javascript and all.

Now here is the code for a small, very basic “Converter” class I’ve written to take advantage of the two scenarios specified above. Bear in mind, there is much more available in CDO, but I leave this wondrous trail of ecstatic discovery to your whims of fancy:

using System;
using System.Web;
using CDO;
using ADODB;
using System.Text;
namespace PAB.Web.Utils
{
 public class MIMEConverter
 {
  //private ctor as our methods are all static here
  private MIMEConverter()
  {
   
  }   
  public static bool SaveWebPageToMHTFile( string url, string filePath)
  {
   bool result=false;
   CDO.Message  msg = new CDO.MessageClass(); 
   ADODB.Stream  stm=null ;
   try
   {
    msg.MimeFormatted =true;   
    msg.CreateMHTMLBody(url,CDO.CdoMHTMLFlags.cdoSuppressNone, "" ,"" );
stm = msg.GetStream(); stm.SaveToFile(filePath,ADODB.SaveOptionsEnum.adSaveCreateOverWrite); msg=null; stm.Close(); result=true; } catch {throw;} finally { //cleanup here } return result; } public static string ConvertWebPageToMHTString( string url ) { string data = String.Empty; CDO.Message msg = new CDO.MessageClass(); ADODB.Stream stm=null; try { msg.MimeFormatted =true; msg.CreateMHTMLBody(url,CDO.CdoMHTMLFlags.cdoSuppressNone,
"", "" );
stm = msg.GetStream(); data= stm.ReadText(stm.Size); } catch { throw; } finally { //cleanup here } return data; } } }


NOTE: When using this type of COM Interop from an ASP.NET web page, it is important to remember that you must set the AspCompat=”true” directive in the Page declaration or you will be very disappointed at the results! This forces the ASP.NET page to run in STA threading model which permits “classic ASP” style COM calls. There is, of course, a significant performance penalty incurred, but realistically, this type of operation would only be performed upon user request and not on every page request.

<

p align=”left”>The downloadable zip file below contains the entire class library and a web solution that will exercise both methods when you fill in a valid URI with protocol, and a valid file path and filename for saving on the server. Unzip this to a folder that you have named “ConvertToMHT” and then mark the folder as an IIS Application so that your request such as “http://localhost/ConvertToMHT/WebForm1.aspx&#8221; will function correctly. You can then load the Solution file and it should work “out of the box”. And, don’t forget – if you have an ASP.NET web application that wants to write a file to the file system on the server, it must be running under an identity that has been granted this permission.

SharePoint Samurai