Category Archives: How To

How To : Create a Re-Usable News Page Layout using Content Type in SharePoint 2013

Introduction

In a recent project I was asked to consult in, the team needed to create sub site/s for news or events.

Developing for re-usability in SharePoint is something I find is lacking quite a bit in Development teams.

Below I outline the solution I worked out for the project, that is also now a template that the Team can use in any similiar project.

I will explain not only how to do it step by step but also continue to make this page layout as the default page layout of a publishing sub site.

After that, make a content query in the root site to preview the news articles.

Finally, I will be using variation to create a similar publishing sub site in other languages.

  1. Step by step creation of News Page Layout using Content Type in SharePoint 2013.
  2. How to Create a publishing sub site for news and using variation to creating the same site to other languages finally making the previous page layout as the default page layout of the sub site.

Firstly

  1. Open Visual Studio 2013 and a create new project of type SharePoint Solutions…”SharePoint 2013 Empty Project”.
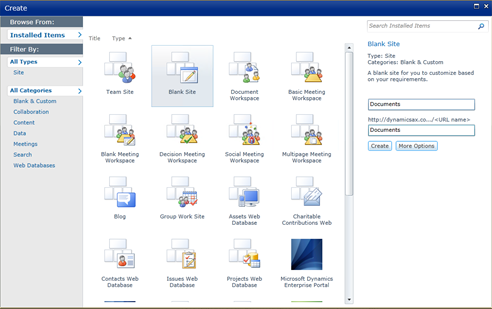
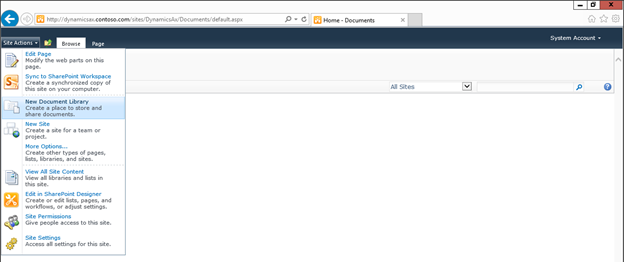
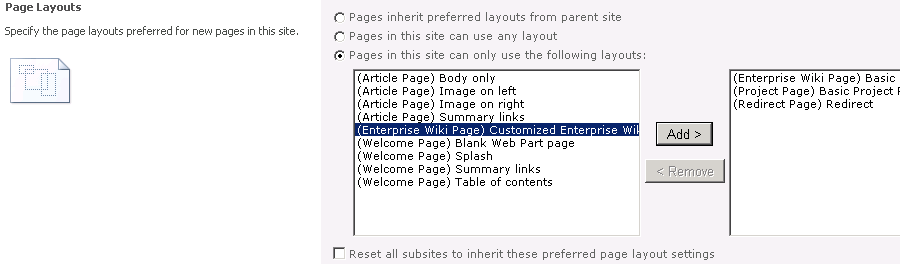
    Create new SharePoint 2013 empty project
  2. As we will deploy our solution as a farm solution in our local farm on our local machine.
    Note: Make sure that the site is a publishing site to be able to proceed.

    Deploy the SharePoint site as a farm solution
  3. Our solution will be as the picture blew and we will add three folders for “SiteColumns”, “ContentTypes” and “PageLayouts”.
    SharePoint solution items
  4. Start by adding a new item to “SiteColumns” folder.
    Adding new item to SharePoint solution
  5. After we adding a new site column and rename it, add the following columns as we need to make the news layout NewsTitle, NewsBody, NewsBrief, NewsDate and NewsImage.
    Adding new item of type site column to the solution

    Then add the below fields and you will note that I use Resources in the DisplayName and the Group.

     <Field
     ID="{9fd593c1-75d6-4c23-8ce1-4e5de0d97545}"
     Name="NewsTitle"
     DisplayName="$Resources:SPWorld_News,NewsTitle;"
     Type="Text"
     Required="TRUE"
     Group="$Resources:SPWorld_News,NewsGroup;">
     </Field>
     <Field
     ID="{fcd9f32e-e2e0-4d00-8793-cfd2abf8ef4d}"
     Name="NewsBrief"
     DisplayName="$Resources:SPWorld_News,NewsBrief;"
     Type="Note"
     Required="FALSE"
     Group="$Resources:SPWorld_News,NewsGroup;">
     </Field>
     <Field
     ID="{FF268335-35E7-4306-B60F-E3666E5DDC07}"
     Name="NewsBody"
     DisplayName="$Resources:SPWorld_News,NewsBody;"
     Type="HTML"
     Required="TRUE"
     RichText="TRUE"
     RichTextMode="FullHtml"
     Group="$Resources:SPWorld_News,NewsGroup;">
     </Field>
     <Field
     ID="{FCA0BBA0-870C-4D42-A34A-41A69749F963}"
     Name="NewsDate"
     DisplayName="$Resources:SPWorld_News,NewsDate;"
     Type="DateTime"
     Required="TRUE"
     Group="$Resources:SPWorld_News,NewsGroup;">
     </Field>
     <Field
     ID="{8218A8D9-912C-47E7-AAD2-12AA10B42BE3}"
     Name="NewsImage"
     DisplayName="$Resources:SPWorld_News,NewsImage;"
     Required="FALSE"
     Type="Image"
     RichText="TRUE"
     RichTextMode="ThemeHtml"
     Group="$Resources:SPWorld_News,NewsGroup;">
     </Field>

    After That

  6. Create Content Type, we will be adding new Content Type to the folder ContentTypes.
    Adding new item of type Content Type to SharePoint solution
  7. We must make sure to select the base of the content type “Page”.
    Specifying the base type of the content type
  8. Open the content type and add our new columns to it.
    Adding columns to the content type
  9. Open the elements file of the content type and make sure it will look like this code below.Note: We use Resources in the Name, Description and the group of the content type.
    <!-- Parent ContentType:
    Page (0x010100C568DB52D9D0A14D9B2FDCC96666E9F2007948130EC3DB064584E219954237AF39) -->
     <ContentType
     ID="0x010100C568DB52D9D0A14D9B2FDCC96666E9F2007948130EC3DB064584E219954237AF39007A5224C9C2804A46B028C4F78283A2CB"
     Name="$Resources:SPWorld_News,NewsContentType;"
     Group="$Resources:SPWorld_News,NewsGroup;"
     Description="$Resources:SPWorld_News,NewsContentTypeDesc;"
     Inherits="TRUE" Version="0">
     <FieldRefs>
     <FieldRef ID="{9fd593c1-75d6-4c23-8ce1-4e5de0d97545}"
     DisplayName="$Resources:SPWorld_News,NewsTitle;" Required="TRUE" Name="NewsTitle" />
     <FieldRef ID="{fcd9f32e-e2e0-4d00-8793-cfd2abf8ef4d}"
     DisplayName="$Resources:SPWorld_News,NewsBrief;" Required="FALSE" Name="NewsBrief" />
     <FieldRef ID="{FF268335-35E7-4306-B60F-E3666E5DDC07}"
     DisplayName="$Resources:SPWorld_News,NewsBody;" Required="TRUE" Name="NewsBody" />
     <FieldRef ID="{FCA0BBA0-870C-4D42-A34A-41A69749F963}"
     DisplayName="$Resources:SPWorld_News,NewsDate;" Required="TRUE" Name="NewsDate" />
     <FieldRef ID="{8218A8D9-912C-47E7-AAD2-12AA10B42BE3}"
     DisplayName="$Resources:SPWorld_News,NewsImage;" Required="FALSE" Name="NewsImage" />
     </FieldRefs>
     </ContentType>
  10. Add new Module to the PageLayouts folder. After that, we will find sample.txt file, then rename it “NewsPageLayout.aspx”.
    Adding new module to SharePoint solution.
  11. Add the code below to this “NewsPageLayout.aspx”.
     <%@ Page language="C#" Inherits="Microsoft.SharePoint.Publishing.PublishingLayoutPage,
    Microsoft.SharePoint.Publishing,Version=15.0.0.0,Culture=neutral,PublicKeyToken=71e9bce111e9429c" %>
     <%@ Register Tagprefix="SharePointWebControls" Namespace="Microsoft.SharePoint.WebControls"
     Assembly="Microsoft.SharePoint, Version=15.0.0.0, Culture=neutral, PublicKeyToken=71e9bce111e9429c" %>
     <%@ Register Tagprefix="WebPartPages" Namespace="Microsoft.SharePoint.WebPartPages"
     Assembly="Microsoft.SharePoint, Version=15.0.0.0, Culture=neutral, PublicKeyToken=71e9bce111e9429c" %>
     <%@ Register Tagprefix="PublishingWebControls" Namespace="Microsoft.SharePoint.Publishing.WebControls"
     Assembly="Microsoft.SharePoint.Publishing, Version=15.0.0.0, Culture=neutral, PublicKeyToken=71e9bce111e9429c" %>
     <%@ Register Tagprefix="PublishingNavigation" Namespace="Microsoft.SharePoint.Publishing.Navigation"
     Assembly="Microsoft.SharePoint.Publishing, Version=15.0.0.0, Culture=neutral, PublicKeyToken=71e9bce111e9429c" %>
    
     <asp:Content ContentPlaceholderID="PlaceHolderPageTitle" runat="server">
     <SharePointWebControls:FieldValue id="FieldValue1" FieldName="Title" runat="server"/>
     </asp:Content>
     <asp:Content ContentPlaceholderID="PlaceHolderMain" runat="server">
    
     <H1><SharePointWebControls:TextField ID="NewsTitle"
     FieldName="9fd593c1-75d6-4c23-8ce1-4e5de0d97545" runat="server">
     </SharePointWebControls:TextField></H1>
     <p><PublishingWebControls:RichHtmlField ID="NewsBody"
     FieldName="FF268335-35E7-4306-B60F-E3666E5DDC07" runat="server">
     </PublishingWebControls:RichHtmlField></p>
     <p><SharePointWebControls:NoteField ID="NewsBrief"
     FieldName="fcd9f32e-e2e0-4d00-8793-cfd2abf8ef4d" runat="server">
     </SharePointWebControls:NoteField></p>
     <p><SharePointWebControls:DateTimeField ID="NewsDate"
     FieldName="FCA0BBA0-870C-4D42-A34A-41A69749F963" runat="server">
     </SharePointWebControls:DateTimeField></p>
     <p><PublishingWebControls:RichImageField ID="NewsImage"
     FieldName="8218A8D9-912C-47E7-AAD2-12AA10B42BE3" runat="server">
     </PublishingWebControls:RichImageField></p>
    
     </asp:Content>
  12. Add the following code to the elements file of the “NewsPageLayouts” module.
     <Module Name="NewsPageLayout" 
    Url="_catalogs/masterpage" List="116" >
     <File Path="NewsPageLayout\NewsPageLayout.aspx" Url="NewsPageLayout.aspx"
     Type="GhostableInLibrary" IgnoreIfAlreadyExists="TRUE" 
     ReplaceContent="TRUE" Level="Published" >
     <Property Name="Title" Value="$Resources:SPWorld_News,NewsPageLayout;" />
     <Property Name="MasterPageDescription" Value="$Resources:SPWorld_News,NewsPageLayout;" />
     <Property Name="ContentType" Value="$Resources:cmscore,contenttype_pagelayout_name;" />
     <Property Name="PublishingPreviewImage"
     Value="~SiteCollection/_catalogs/masterpage/$Resources:core,Culture;
     /Preview Images/WelcomeSplash.png, ~SiteCollection/_catalogs/masterpage/$Resources:
     core,Culture;/Preview Images/WelcomeSplash.png" />
     <Property Name="PublishingAssociatedContentType"
     Value=";#$Resources:SPWorld_News,NewsContentType;;
     #0x010100C568DB52D9D0A14D9B2FDCC96666E9F2007948130EC3DB064584E219954237AF39007A5224C9C2804A46B028C4F78283A2CB;#">
     </Property>
     </File>
     </Module>
  13. Don’t forget to add the Resources folder, then add the resource file with the name “SPWorld_News.resx” as we used it in the previous steps and add the below keys to it.
    News                     News
    NewsBody                 News Body
    NewsBrief                News Brief
    NewsContentType          News Content Type
    NewsContentTypeDesc      News Content Type Desc.
    NewsDate                 News Date
    NewsGroup                News
    NewsImage                News Image
    NewsPageLayout           News Page Layout
    NewsTitle                News Title
  14. Finally, deploy the solution.
  15. The next steps will explain how we add the “news content type” to the page layout through SharePoint wizard. We will do these steps pragmatically in the next article.Note: We will do the steps from “A” to “D” pragmatically in the next article without the need to do it manually from SharePoint.

    1. Go to Site Contents then Pages , Library, Library SettingsOpening library setting of the page library
    2. Add the news content type to the page layout.
      Adding existing content type to the pages library
    3. Then
      Selecting the content type to add it to pages library
    4. Go to Pages Library, Files, New Document, select News Content Type.
      Adding new document of the news content type to pages library
    5. Write the page title.
      Creating new page of news content type to pages library.
    6. Open the page to edit it. Pages library contains new page of news content type.
    7. Now we can see the page Layout after we add the title, Body, Brief, date and image. Finally click Save the news.

How To : Access SAP Business Data From Silverlight 4 Clients Using WCF RIA Services And LINQ to SAP

Introduction

The introduction of Microsoft’s WCF RIA Services for Silverlight 4 simplified very much the development process of N-tier business applications using Silverlight and ASP.NET. By using this new technology, we can also easily access and integrate SAP business data in Silverlight clients.

This article shows how to provide a SAP domain service as web service that will be consumed by a Silverlight client. The sample application will allow the user to query customer data. The service uses LINQ to SAP from Theobald Software to connect to a SAP R/3 system.

Project Setup

The first step in setting up a new Silverlight 4 project with WCF RIA Services is to create a solution using the Visual Studio template Silverlight Navigation Application:

Screenshot-01.png - Click to enlarge imageVisual Studio 2010 then asks you to create an additional web application, which hosts the Silverlight application. It’s important to select the checkbox Enable WCF RIA Services (see screenshot below):

SAP2Silverlight/Screenshot-02.pngAfter clicking the Ok button, Visual Studio generates a solution with two projects, one Silverlight 4 project and one ASP.NET project. In the next section, we will create the SAP data access layer using the LINQ to SAP designer.

LINQ to SAP

The LINQ to SAP provider and its Visual Studio 2010 designer offers a very handy way to design SAP interfaces visually. The designer will generate the code for the SAP data access layer automatically, similar to LINQ to SQL. The LINQ provider is part of the .NET library ERPConnect.net from Theobald Software. The company offers a demo version for download on its homepage.

The next step is to create the needed LINQ to SAP file by opening the Add New Item dialog:

Screenshot-03.png - Click to enlarge imageLINQ to SAP is internally called LINQ to ERP.

Clicking the Add button will create a new ERP file and opens the LINQ designer. Now, drag the Function object from the toolbox and drop it onto the designer surface. If you have not entered the SAP connection data so far, you are now asked to do so:

Screenshot-04.png - Click to enlarge imageEnter the connection data for your SAP R/3 system and then click the Ok button. Next, search for and select the SAP function module named SD_RFC_CUSTOMER_GET. The function module provides a list of customer data.

The RFC Function modules dialog opens and lets you define the necessary parameters:

SAP2Silverlight/Screenshot-05.pngIn the above function dialog, change the method name to GetCustomers and mark the Pass checkbox for theNAME1 parameter in the Exports tab. Also set the variable name to namePattern. On the Tables tab, mark the Return checkbox for the table parameter CUSTOMER_T and set the table and structure name to CustomerTable andCustomerRow:

SAP2Silverlight/Screenshot-06.pngAfter clicking the Ok button and saving the ERP file, the LINQ designer will generate a SAPContext class which contains a method called GetCustomers with an input parameter named namePattern. This method executes a search for SAP customer data allowing the user to enter a wildcard pattern. The method returns a table of customer data:

SAP2Silverlight/Screenshot-07.pngOn the LINQ designer level (click on the free part of the LINQ designer surface) property, Create Object Outside Of Context Class must be set to True:

Screenshot-08.png - Click to enlarge imageNow, we finally add a Customer class which we use in our SAP domain service later on. This class and its values will be transmitted to the Silverlight client by the WCF RIA Services. It’s important to set the Key attribute on the identifier fields for WCF RIA Services, otherwise the project will not compile:

Screenshot-09.png - Click to enlarge imageThat’s it! We now have our SAP data access layer ready to use and can start adding the domain service in the next section.

SAP Domain Service

The next step is to add the SAP domain service to our web project. A domain service is a specialized WCF service and is one of the core constructs of WCF RIA Services. The service exposes operations that can be called from the client generated code. On the client side, we use the domain context to access the domain service on the server side.

Add a new Domain Service Class and name it SAPService:

Screenshot-10.png - Click to enlarge imageIn the upcoming dialog, create an empty domain service class by just clicking the Ok button:

SAP2Silverlight/Screenshot-11.pngNext, we add the service operation GetCustomers to the SAP service with a name pattern parameter. The operation then returns a list of Customer objects. The Query attribute limits the result set to 200 entries.

The operation uses the visually designed SAP data access logic to retrieve the SAP customer data. First of all, an instance of the SAPContext class will be created using a connection string (see sample in code). For more details regarding the SAP connection string, see the ERPConnect.net manual.

The LINQ to SAP context class contains the GetCustomers method which we will call using the given namePatternparameter. Next, the operation creates an instance of the Customer class for each customer record returned by SAP.

The license code for the ERPConnect.net library is set in the constructor of our domain service class.

Screenshot-12.png - Click to enlarge imageThat’s all we need on the server side.

In the next section, we will implement the Silverlight client.

Silverlight Client

The implementation of the client side is straightforward. The home view contains a DataGrid control to display the list of customer data as well as a search area with TextBox and Button controls to allow users to enter name search pattern.

The click event handler of the load button, called OnLoadButtonClick, will execute the SAP service. The boilerplate code to access the web service was generated by WCF RIA Services in the subfolder Generated_Code in the Silverlight project.

First of all, an instance of the SAPContext will be created. Then, we load the query GetCustomersQuery and execute the service operation on the server side using WCF RIA Services. If the domain service returns an error, the callback anonymous method will mark the error as handled and display the error message.

If the execution of the service operation succeeded, the result set gets displayed in the DataGrid control.

Screenshot-13.png - Click to enlarge imageThe next screenshot shows the final result:

Screenshot-14.png - Click to enlarge imageThat’s it.

Summary

This article has shown how easily SAP customer data can be integrated within Silverlight clients using tools like WCF RIA Services and LINQ to SAP. It is quite simple to extend the SAP service to integrate all kinds of operations.

How To : SAP Integration with .Net 4.0 (SAP Connection Manager) & SharePoint

This is a simple, C# class library project to connect .NET applications with SAP.

ppt_img[1]


This component internally implements SAP .NET Connector 3.0. The SAP .NET Connector is a development environment that enables communication between the Microsoft .NET platform and SAP systems.

This connector supports RFCs and Web services, and allows you to write different applications such as Web form, Windows form, or console applications in the Microsoft Visual Studio .NET.

With the SAP .NET Connector, you can use all common programming languages, such as Visual Basic. NET, C#, or Managed C++.

Features
Using the SAP .NET Connector you can:

Write .NET Windows and Web form applications that have access to SAP business objects (BAPIs).

Develop client applications for the SAP Server.

Write RFC server applications that run in a .NET environment and can be installed starting from the SAP system.

Following are the steps to configure this utility on your project

Download and extract the attached file and place it on your machine. This package contains 3 libraries:

SAPConnectionManager.dll
sapnco.dll
sapnco_utils.dll

Now go to your project and add the reference of all these four libraries. Sapnco.dll and sapnco_utils.dll are inbuilt libraries used by SAP .NET Connector. SAPConnectionManager.dll is the main component which provides the connection between .NET and SAP.

Once the above steps are complete, you need to make certain entries related to SAP server on your configuration file. Here are the sample entries that you have to maintain on your own project. You need to change only the values which are marked in Bold. Rest remains unchanged.

<appSettings>
<add key=”ServerHost” value=”127.0.0.1″/>
<add key=”SystemNumber” value=”00″/>
<add key=”User” value=”sample”/>
<add key=”Password” value=”pass”/>
<add key=”Client” value=”50″/>
<add key=”Language” value=”EN”/>
<add key=”PoolSize” value=”5″/>
<add key=”PeakConnectionsLimit” value=”10″/>
<add key=”IdleTimeout” value=”600″/>
</appSettings>

To test this component, create one windows application. Add the reference of sapnco.dll, sapnco_utils.dll, andSAPConnectionManager.dll on your project.

Paste the below code on your Form lode event

SAPSystemConnect sapCfg = new SAPSystemConnect();
RfcDestinationManager.RegisterDestinationConfiguration(sapCfg);
RfcDestination rfcDest = null;
rfcDest = RfcDestinationManager.GetDestination(“Dev”);

sap_integration_en_round[1]
That’s it. Now you are successfully connected with your SAP Server. Next you need to call SAP business objects (BAPIs) and extract the data and stored it in DataSet or list.

Demo Code available on request!!

How To : Add a Promoted Links Web Part to SharePoint 2013 App Default page

This article helps you to add Promoted links web part to your default app page as the following figure:


To do this follow the following steps:
Open the shortcut menu for the project, and then choose Add, New Item
Add Picture Textbox, and two buttons to infopath form


In the Templates pane, choose the List template, and then choose the Add button :

Enter list name and choose the Create a non-customizable list based on an existing list type of option button, and then, in its list, choose Promoted links, and then choose the Finish button

Binding the CAPTCHA image
In Solution Explorer, under the list instance node, open the Elements.xml file.
Add the promoted links items as the following:
<?versionencodingutf-8?>
Elementsxmlnshttp://schemas.microsoft.com/sharepoint/
ListInstanceTitleMyPromotedLinks
OnQuickLaunch
TemplateType
FeatureId192efa95-e50c-475e-87ab-361cede5dd7f
Lists/MyPromotedLinks
DescriptionMy List Instance
FieldTitleTwitter</Field
FieldBackgroundImageLocation/PromotedLinksApp/Images/twitter.png
FieldDescriptionMuawiyah Shannak Twitter
FieldLinkLocationhttps://twitter.com/MuShannak</Field
FieldOrder</Field
</
FieldTitle</Field
FieldBackgroundImageLocation/PromotedLinksApp/Images/blogger.png
FieldDescriptionMuawiyah Shannak Blog
FieldLinkLocationhttp://mushannak.blogspot.com</Field
FieldOrder</Field
</
FieldTitleLinkedin</Field
FieldBackgroundImageLocation/PromotedLinksApp/Images/linkedin.png
FieldDescriptionMuawiyah Shannak Linkedin
FieldLinkLocationhttp://ae.linkedin.com/in/shannak</Field
FieldOrder</Field
</
</
</
<!–ListInstance
</Elements
In Solution Explorer, under the Pages node, open the Default.aspx file. Add following tags inside the PlaceHolderMain Place Holder:
WebPartPagesWebPartZone=”WebPartZone”runat=”server”FrameType=”None”>
WebPartPagesXsltListViewWebPart=”XsltListViewAppPromotedList”
runat=”server”ListUrl=”Lists/MyPromotedLinks”IsIncluded=”True”
NoDefaultStyle=”TRUE”Title=”Images used in switcher”
PageType=”PAGE_NORMALVIEW”Default=”False”
ViewContentTypeId=”0x”>
</WebPartPagesXsltListViewWebPart
</WebPartPagesWebPartZone

Deploy a solution and you will find nice promoted links web part in the app default page!

How To : Manually add common consent to your Office 365 APIs Preview app

Windows_Azure_Wallpaper_p754[1]office365logoorange_web[1]


Learn how to manually add Microsoft Azure Active Directory common consent to your ASP.NET application so that it can access secured services.

Prerelease content Prerelease content
The features and APIs documented in this article are in preview and are subject to change. Do not use them in production.

In this article, you’ll learn how to build a web application hosted on an Azure website that uses the OneDrive for Business API to access secured folders and files.

You can easily set up access to the OneDrive for Business using the Office 365 API Preview Tools for Visual Studio 2013. If you’re not using the tools, you’ll need to manually set up your app in your development environment, register your app with Microsoft Azure Active Directory, write code to handle tokens, and write the code to work with the OneDrive for Business resources. All these steps are described in this article.

Note Note
This article covers OneDrive for Business apps, but the same steps apply to apps that access any other secured resource.

Before you manually add common consent to your app, make sure that you have the following:

  • An Office 365 account. If you don’t have one, you can sign up for an Office 365 developer site.
  • Visual Studio 2012 or Visual Studio 2013.
    Note Note
    The Office 365 API Preview Tools for Visual Studio 2013, which simplify development, are available for Visual Studio 2013 only.
  • A test account to use in your application.

We also recommend that you familiarize yourself with the Authorization Code Grant Flow. This will help you understand the authentication process that takes place in the background between your application, Azure AD, and the Office 365 resource so that you can better troubleshoot as you develop.

If you’ve already created an account within your Azure tenancy, you can use that account. Otherwise, you will have to create a new organizational user account to use in this sample.

To create an organizational user account

  1. Go to https://manage.windowsazure.com/.
  2. Choose the Active Directory icon on the left side in the Azure portal.
  3. Choose Add a user.
  4. Fill in the user name.
  5. Move to the next screen.
  6. Create a user profile. To do this:
    1. Enter a first and last name.
    2. Enter a display name.
    3. Set the Role to Global Administrator.
    4. After you set the role you will be asked for an alternate email address. You can enter the email address that you used to create the subscription, or a different one.
  7. Move to the next screen.
  8. Choose create.
  9. A temporary password is generated. You will use this to sign in later. You will have to change it at that time.
  10. Choose the check mark to finish creating the organizational user account.

The next step is to create the actual app that contains the UI and code needed to work with the OneDrive for Business REST APIs to list the folders and files in the user’s OneDrive.

To create the Visual Studio project

  1. Open Visual Studio 2013 and create a new ASP.NET Web Application project. Name the application Get_Stats. Choose OK.
  2. Choose the MVC template and choose the Change Authentication button. Select the Organization Accounts option. This will display additional options for authentication.
  3. Choose Cloud – Single Organization.
  4. Specify the domain of your Azure AD tenancy.
  5. Set the Access Level to Single Sign On, Read directory data.

    Under More Options, you will see the App ID URI is set automatically.

  6. Choose OK to continue. This brings up a dialog box to authenticate.
    Note Note
    If you receive an invalid domain name error, you might need to implement a workaround by substituting a real domain name, such as *.onmicrosoft.com, from another Azure subscription that you have. When you complete the Visual Studio new project dialog box, Visual Studio creates a temporary app registration entry on the domain that you specify. You can delete that entry later.

    As part of the workaround, you need to adjust the web.config settings and manually register the web app in the correct Azure AD domain.

  7. Enter the credentials of the user you created earlier.
  8. Choose OK to finish creating the new project. Visual Studio will automatically register the new web app in the Azure AD tenant you specified.
  9. Run the Visual Studio project, and sign on using the test account you created earlier. After the project is running, you can verify that single-sign on is working because the test account user name is displayed in the upper right corner of the web app.
  1. Log on with your Azure account.
  2. In the left navigation, choose Active Directory. Your directory will be listed.
  3. Choose your directory.
  4. In the top navigation, choose Applications.
  5. On the Active Directory tab, choose Applications.
  6. Add a new application in your Office 365 domain (created at Office 365 sign up) by choosing the “ADD” icon at the bottom of the portal screen. This will bring up a dialog box to tell Azure about your application.
  7. Choose Add an application my organization is developing.
  8. For the name of the application, enter Get Stats. For the Type, leave Web application and/or Web API. Then choose the arrow to move to step 2.
  9. For the Sign-On URL, enter the localhost URL from your Get_Stats Visual Studio project. To find the URL:
    1. Open your project in Visual Studio.
    2. In Solution Explorer, choose the Get_Status project.
    3. From the Properties window, copy the SSL URL value.
    4. Enter an App ID URI. Because the ID must be unique, it’s a good idea to choose a name that is similar to the app name. For example, you can use your Sign-on URL with your app name, such as https://locahost:44044/Get_Stats.
    5. Choose the checkmark to finish adding the application. You will be notified that the application was added successfully.
  1. Copy the APP ID URI to the clipboard.
  2. In your Get_Stats Visual Studio project, open the web.config file.
  3. Locate the ida:Realm key and paste the APP ID URI for the value.
  4. Locate the ida:AudienceUri key and paste the same APP ID URI for the value.
  5. Locate the audienceUris element and paste the same APP ID URI for the add element’s value.
  6. Locate the wsFederation element, and paste the same APP ID URI for the realm.
  7. In the Azure Portal, copy the federation metadata document URL to the clipboard.
  8. In the web.config file, locate the ida:FederationMetadataLocation key, and paste the URL for the value.
  9. In the Azure Portal, choose the View Endpoints icon at the bottom.
  10. Copy the WS-Federation Sign-On Endpoint to the clipboard.
  11. In the web.config file, locate the wsFederation element and paste the endpoint value for the issuer.
  12. Save your changes and run the project. You will be prompted to sign on. Sign on by using the test account you created earlier. You should see your account user name displayed in the upper right corner of the web app.

Get an application key


Next, you need to generate a key that you can use to identify your application for access tokens.

To get an application key for your app

  1. In the Azure Portal, select the Get_Stats application in the directory.
  2. Choose the Configure command and then locate the keys section.
  3. In the Select duration drop-down box, choose 1 year.
  4. Choose Save.

    The key value is displayed.

    Note Note
    This is the only time that the key is displayed.
  5. In Visual Studio, open the Get_Stats project, and open the web.config file.
  6. Locate the ida:Password element, and paste the key value for the value. Now your project will always send the correct password when it is requested.
  7. Save all files.
Configure API permissions


You need to specify which web APIs your web app needs access to, and what level of access it needs. This determines what scopes and permissions are requested on the consent form for your web app that is displayed for users and admins.

To configure API permissions

  1. In the Azure Portal, select the Get Status application in the directory.
  2. From the top navigation, choose Configure. This displays all the configuration properties.
  3. At the bottom is a web apis section. Notice that your web app has already been granted access to Azure AD.
  4. Choose Office365 SharePoint Online API.
  5. Choose Delegated Permissions and select Read items in all site collections.
    Note Note
    The options activate when you move over them.
  6. Choose Save to save these changes. Your web app will now request these permissions.

    You can also manage permissions by using a manifest. You can download your manifest file by choosing Manage Manifest.

Add the GraphHelper project to your solution


The easiest way to call graph APIs in Azure AD is to use the Graph API Helper Library. The following instructions show how to include the GraphHelper project into your Get_Stats solution.

To configure the Graph API Helper Library

  1. Download the Azure AD Graph API Helper Library.
  2. Copy the C# folder from the Graph API Helper Library to your project folder (i.e. \Projects\Get_Stats\C#.)
  3. Open the Get_Stats solution in Visual Studio.
  4. In the Solution Explorer, choose the Get-Stats solution and choose Add Existing Project.
  5. Go to the C# folder you copied, and open the WindowsAzure.AD.Graph.2013_04_05 folder.
  6. Select the Microsoft.WindowsAzure.ActiveDirectory.GraphHelper project and choose Open.
  7. If you are prompted with a security warning about adding the project, choose OK to indicate that you trust the project.
  8. Choose the Get_Stats project References folder and then choose Add Reference.
  9. In the Reference Manager dialog box, select Extensions and then select the Microsoft.Data.OData version 5.6.0.0 assembly and the Microsoft.Data.Services.Client version 5.6.0.0 assembly.
  10. In the same Reference Manager dialog box, expand the Solution menu on the left, and then select the checkbox for the Microsoft.WindowsAzure.ActiveDirectory.GraphHelper.
  11. Choose OK to add the references to your project.
  12. Add the following using directives to the top of HomeController.cs.
    using Microsoft.WindowsAzure.ActiveDirectory;
    using Microsoft.WindowsAzure.ActiveDirectory.GraphHelper;
    using System.Data.Services.Client;
    
    
  13. Save all files.

Add code to manage tokens and requests


Because your web app accesses multiple workloads, you need to write some code to obtain tokens. It’s best to place this code in some helper methods that can be called when needed.Note that the Office 365 API Preview tools will handle all this coding for you.

Your custom code handles the following scenarios:

  • Obtaining an authentication code
  • Using the authentication code to obtain an access token and a multiple resource refresh token
  • Using the multiple resource refresh token to obtain a new access token for a new workload

To create code to manage tokens and requests

  1. Open your Visual Studio project for Get_Stats.
  2. Open the HomeController.cs file.
  3. Create a new method named Stats by using the following code.
    public ActionResult Stats()
    {
        var authorizationEndpoint = "https://login.windows.net/"; // The oauth2 endpoint.
        var resource = "https://graph.windows.net"; // Request access to the AD graph resource.
        var redirectURI = ""; // The URL where the authorization code is sent on redirect.
    
        // Create a request for an authorization code.
        string authorizationUrl = string.Format("{1}common/oauth2/authorize?&response_type=code&client_id={2}&resource={3}&redirect_uri={4}",
               authorizationEndpoint,
               ClaimsPrincipal.Current.FindFirst(TenantIdClaimType).Value,
               AppPrincipalId,
               resource,
               redirectURI);
    
    
  4. The Stats method constructs a request for an authorization code and sends the request to the Oauth2 endpoint. If successful, the redirect returns to the specified CatchCode URL. Next, create a method to handle the redirect to CatchCode.
    public ActionResult CatchCode(string code)
    {}
    
    
  5. Acquire the access token by using the app credentials and the authorization code. Use your project’s correct port number in the following code.
    //  Replace the following port with the correct port number from your own project.
        var appRedirect = "https://localhost:44307/Home/CatchCode";
    
    //  Create an authentication context.
        AuthenticationContext ac = new AuthenticationContext(string.Format("https://login.windows.net/{0}",
        ClaimsPrincipal.Current.FindFirst(TenantIdClaimType).Value));
    
    //  Create a client credential based on the application ID and secret.
    ClientCredential clcred = new ClientCredential(AppPrincipalId, AppKey);
    
    //  Use the authorization code to acquire an access token.
        var arAD = ac.AcquireTokenByAuthorizationCode(code, new Uri(appRedirect), clcred);
    
    
  6. Next use the access token to call the Graph API and get the list of users for the Office 365 tenant. Paste the list into the following code.
    //  Convert token to the ADToken so you can use it in the graphhelper project.
    
        AADJWTToken token = new AADJWTToken();
        token.AccessToken = arAD.AccessToken; 
    
    //  Initialize a graphService instance by using the token acquired in the previous step.
    
        Microsoft.WindowsAzure.ActiveDirectory.DirectoryDataService graphService = new DirectoryDataService("09f9ea02-9be8-4597-86b9-32935a17723e", token);
        graphService.BaseUri = new Uri("https://graph.windows.net/09f9ea02-9be8-4597-86b9-32935a17723e");
    
    //  Get the list of all users.
    
        var users = graphService.users;
        QueryOperationResponse<Microsoft.WindowsAzure.ActiveDirectory.User> response;
        response = users.Execute() as QueryOperationResponse<Microsoft.WindowsAzure.ActiveDirectory.User>;
        List<Microsoft.WindowsAzure.ActiveDirectory.User> userList = response.ToList();
        ViewBag.userList = userList; 
    
    
  7. Now you need to call Microsoft OneDrive for Business, and this requires a new access token. Verify that the current token is a multiple resource refresh token, and then use it to obtain a new token. Paste the token into the following code.
    //  You need a new access token for new workload. Check to determine whether you have the MRRT.
    
        if (arAD.IsMultipleResourceRefreshToken)
        {
            // This is an MRRT so use it to request an access token for SharePoint.
            AuthenticationResult arSP = ac.AcquireTokenByRefreshToken(arAD.RefreshToken, AppPrincipalId, clcred, "https://imgeeky.spo.com/");
        }
    
    
  8. Finally, call Microsoft OneDrive for Business to get a list of files in the Shared with Everyone folder. Paste the list into the following code and replace any placeholders with correct values.
    //  Now make a call to get a list of all files in a folder. 
    //  Replace placeholders in the following string with correct values for your domain and user name. 
        var skyGetAllFilesCommand = "https://YourO365Domain-my.spo.com/personal/YourUserName_YourO365domain_spo_com/_api/web/GetFolderByServerRelativeUrl('/personal/YourUserName_YourO365domain_spo_com/Documents/Shared%20with%20Everyone')/Files";
    
        HttpWebRequest request = (HttpWebRequest)WebRequest.Create(skyGetAllFilesCommand);
        request.Method = "GET";
    
        WebResponse wr = request.GetResponse();
    
        ViewBag.test = wr.ToString();
    
        return View(); 
    
    
  9. Create a view for the CatchCode method. In Solution Explorer, expand the Views folder and choose Home, and then choose Add View.
  10. Enter CatchCode as the name of the new view, and choose Add.
  11. Paste the following HTML to render the users and Microsoft OneDrive for Business response from the CatchCode method.
    @{
        ViewBag.Title = "CatchCode";
    }
    <h2>Users</h2>
    <ul id="users">
    
        @foreach (var user in ViewBag.userList)
        {
            <li>@user.displayName</li>
        }
    </ul>
    <h2>OneDrive for Business Response</h2>
    <p>@ViewBag.skyResponse</p>
    
    
  12. Build and run the solution. Verify that you get a list of users, and that you get an XML response from the OneDrive for Business method call. To change the XML response, add files to the OneDrive for Business Share with Everyone folder.

How To : Automate a Test Case in Microsoft Test Manager & Setup Automated Build-Deploy-Test Workflows

To automate a test case, link it to a coded test method. You can link any unit test, coded UI test, or generic test to a test case. You’ll want to link a test method that performs the test described by the test case. Typically these are integration tests.

The results of automated and manual tests appear together. If the test cases are linked to backlog items, stories, or other requirements, you can review the test results by requirement.

You can make links one at a time, or you can generate test cases from an assembly of test classes.

  1. Using Visual Studio, create or choose a test method. It can be an ordinary test method, a coded UI test, ordered test, or a generic test method.

    Check the method into Team Foundation Server.

    Keep the solution open in Visual Studio.

  2. Open the test case in Visual Studio.
    Open Test Case Using Microsoft Visual Studio
  3. Associate the test method with your test case.
    Associate Automation With Test Case

    If you want to change or delete the association later, choose Remove Association.

We don’t recommend linking load tests or web tests to test cases.

  1. Open a Developer Command Prompt, and change directory to the output director of your Visual Studio solution.

    cd MySolution\MyProject\bin\Debug

  2. To import all the test methods from the solution:

    tcm testcase /collection: CollectionUrl /teamproject:MyProject /import /storage:MyAssembly.dll /category:”MyIntegrationTestCategory

    The category parameter is optional but recommended. You only want to create test cases from integration or system tests, which you can mark by using the [TestCategory (“category”)] attribute.

  3. In the Test hub in Team Web Access or in Microsoft Test Manager, use Add Existing to add the test cases to a test suite.
Ads by CeheuapMMeAd Options

Provide the build location so that the test method can be found.

  1. In Microsoft Test Manager, choose Testing Center, , Properties.
  2. Under Builds, set Filter for builds. You can set the build definition and quality attribute of the builds you want to choose from.
  3. Choose Modify to assign a build to the test plan. You can compare your current build with a build you plan to take. The associated items list shows the changes to work items between the builds. You can then assign the latest build to take and use for testing with this plan. For more information, see What development has been done since a previous build?.
I’m not using Team Foundation Build to build my application and tests. How can I run automated lab tests?
Create a build definition that contains just the location where your assemblies are shared. Then create a fake instance of this build from the developer command prompt:

TfsCreateBuild.exe /collection:http://tfsservername:8080/tfs/collectionname /project: projectname /builddefinition:”MyBuildDefinition” /buildnumber:”FakeBuild_1.0″

Specify the build definition in your test plan.

To run your automated tests tests using Microsoft Test Manager, you must use a lab environment. It must have roles for each of the client and server machines used in your tests. (If you’ve used lab environments for manual tests, notice that automated tests must have a machine for the client role.)

  1. Create or choose either a standard lab environment or an SCVMM lab environment.

    If you create a new environment, choose a machine for each role.

    The machines tab in the new environment wizard.

    If you’re planning to run coded UI tests, configure it on the Advanced page of the wizard. This sets the test agent to run as a user. You have to supply a user name under which the agent will run.

    We recommend that you use a different user account than the lab service account used by the test controller.

    The advanced tab in the new environment wizard.
  2. Set the test plan to use your environment for automated tests.
    Automation on test plan properties
  3. If you want to collect more than the basic diagnostic data from the test machines, create a test settings file.
    New test settings

    In the test settings wizard, choose the data you want to collect for each machine.

    Select diagnostics for each machine role

Start automated tests the same way you do manual tests.

In Microsoft Test Manager, choose Testing Center, . Then select a test suite or an individual test and choose .

If you want to run a test in a different environment or with different test settings, choose Run with Options.

If you want to run an automated test manually, choose Run with Options.

If you have multiple build configurations, the test assemblies to run the automated tests are searched for recursively from the root directory of the build drop folder. If it is important which assemblies are selected when you run your automated tests, you should use Run with options to specify the build configuration.

Ads by CeheuapMMeAd Options
  1. In Microsoft Test Manager, choose Testing Center, , Analyze Test Runs.
  2. Double-click a test run to open it and view the details. You can:
    • Update the title of the test run to reflect the outcome.
    • Choose Resolution to indicate a reason, if the test failed.
    • Add comments.
    • View the details of an individual test.
    • Create a bug.
Q: Can I generate the test method from a manual run of the test case?
Yes. Verifying Code by Using UI Automation (Various Blog Post can be found on my Blog about Coded UI Test Automation)

Q: I want my automated test to repeat with different data. Do I use the same test parameters that the manual version of the test case uses?
To make the automated test iterate over different data, write that into the code of the test method.

Test parameters are only used with the manual version of the test. They aren’t visible to the automated test code.

Automated build-deploy-test workflows

You can use a build-deploy-test on Team Foundation Server to deploy and test your application when you run a build. This lets you schedule and run the build, deployment, and testing of your application with one build process. Build-deploy-test work with Lab Management to deploy your applications to a lab environment and run tests on them as part of the build process.

If your lab environment is an SCVMM environment, you can also use workflows to create and restore snapshots that automatically create a clean environment before you run tests, and to the state of your environment when a test fails. This ensures that each test isn’t influenced by changes to the lab environment from previous test runs. In addition, it ensures that testers can accurately reproduce that state of a lab environment when they reproduce bugs.

Requirements

  • Visual Studio Ultimate, Visual Studio Premium, Visual Studio Test Professional

You can use a build-deploy-test in the following scenarios:

Tip Tip
Build, or Build and Test: If you are building your application in a drop folder without deploying it to a lab environment, then you can use the default build process template. For more information, see Use the Default Template for your build process. If you also want to test your application without deploying it, see Run tests in your build process
  • Build, Deploy, and Test − Build your application, then deploy it and run tests on it in a lab environment. This workflow enables you to run a series of tests from a test plan, on a deployed application, as part of your build process. This scenario is common when running build verification tests.
  • Deploy and Test − This scenario is similar to the “build, deploy, and test” scenario, except a new build isn’t created during the workflow. Instead, the workflow uses an existing build from a drop folder.
  • Deploy Only – Deploy an existing build from a drop folder to a lab environment without running automated tests during the workflow. Once a build has passed your build verification tests, and is ready to be sent to a test team, you might want to send that build to the test team so they can run additional tests that aren’t part of your workflow. This scenario is common when running manual tests.
  • Build and Deploy – This scenario is similar to the “deploy only” scenario, except a new build is created during the workflow.

A build-deploy-test workflow is a Windows Workflow file that defines how a build definition will run a build, deploy an application, and run tests. A build-deploy-test workflow is created in a build definition by choosing a build process template called the lab default template (LabDefaultTemplate.11.xaml), and configuring the settings.

You can also create a customized build process template for your workflow depending on your requirements. You configure your build definition after you set up your build machine, test machines, and lab environments.

The deployment settings in a -deploy-test workflow define how an application is deployed by specifying the deployment scripts to run on in your lab environment. You can specify a lab management role to run each deployment script on, or you can specify a machine in your lab environment.

Creating deployment scripts is a major part of setting up -deploy-test workflows. Deployment scripts copy files from your build to your lab environment, and then run your installation packages.

The following diagram describes how a build is deployed by a build-deploy-test workflow:

Dataflow for deployment scripts.

The following steps are displayed in the diagram above.

  1. The build-deploy-test workflow starts a build, and then gets the deployment scripts.
  2. The build definition copies the build files to the drop location.
  3. The workflow runs each deployment script in the working directory of the specific machine or machine role that the script is assigned to.
  4. Each deployment script retrieves build files from the drop location.
  5. Each deployment script copies or installs the specified build files onto machines in the lab environment.

How To : Convert Word Documents to PDF using SharePoint Server 2010 and Word Services and Stop Wasting Money on MS Field Engineers

SharePoint’s Word Automation Services is extremely powerful when it comes to converting document types and keeping the formatting.
Combine this with the flexibility of the templates that OpenXML use and you have a very powerful combination capapble of ANYTHING.
This is part of a Document Management System I developed for Nedbank that a Microsoft Field Engineer said was Impossible in SharePoint and asked R300 000 just for a few hours of his time for “analysis

SharePoint 2010Word Automation Services available with SharePoint Server 2010 supports converting Word documents to other formats. This includes PDF. This article describes using a document library list item event receiver to call Word Automation Services to convert Word documents to PDF when they are added to the list. The event receiver checks whether the list item added is a Word document. If so, it creates a conversion job to create a PDF version of the Word document and pushes the conversion job to the Word Automation Services conversion job queue.

This article describes the following steps to show how to call the Word Automation Services to convert a document:

  1. Creating a SharePoint 2010 list definition application solution in Visual Studio 2010.
  2. Adding a reference to the Microsoft.Office.Word.Server assembly.
  3. Adding an event receiver.
  4. Adding the sample code to the solution.

Creating a SharePoint 2010 List Definition Application in Visual Studio 2010

This article uses a SharePoint 2010 list definition application for the sample code.

To create a SharePoint 2010 list definition application in Visual Studio 2010

  1. Start Microsoft Visual Studio 2010 as an administrator.
  2. From the File Menu, point to the Project menu and then click New.
  3. In the New Project dialog box select the Visual C# SharePoint 2010 template type in the Project Templates pane.
  4. Select List Definition in the Templates pane.
  5. Name the project and solution ConvertWordToPDF.
    Figure 1. Creating the Solution

    Creating the solution

  6. To create the solution, click OK.
  7. Select a site to use for debugging and deployment.
  8. Select the site to use for debugging and the trust level for the SharePoint solution.
    Note
    Make sure to select the trust level Deploy as a farm solution. If you deploy as a sandboxed solution, it does not work because the solution uses the Microsoft.Office.Word.Server assembly. This assembly does not allow for calls from partially trusted callers.
    Figure 2. Selecting the trust level

    Creating the solution

  9. To finish creating the solution, click Finish.

Adding a Reference to the Microsoft Office Word Server Assembly

To use Word Automation Services, you must add a reference to the Microsoft.Office.Word.Server to the solution.

To add a reference to the Microsoft Office Word Server Assembly

  1. In Visual Studio, from the Project menu, select Add Reference.
  2. Locate the assembly. By using the Browse tab, locate the assembly. The Microsoft.Office.Word.Server assembly is located in the SharePoint 2010 ISAPI folder. This is usually located at C:\Program Files\Common Files\Microsoft Shared\Web Server Extensions\14\ISAPI. After the assembly is located, click OK to add the reference.
    Figure 3. Adding the Reference

    Adding the reference

Adding an Event Receiver

This article uses an event receiver that uses the Microsoft.Office.Word.Server assembly to create document conversion jobs and add them to the Word Automation Services conversion job queue.

To add an event receiver

  1. In Visual Studio, on the Project menu, click Add New Item.
  2. In the Add New Item dialog box, in the Project Templates pane, click the Visual C# SharePoint 2010 template.
  3. In the Templates pane, click Event Receiver.
  4. Name the event receiver ConvertWordToPDFEventReceiver and then click Add.
    Figure 4. Adding an Event Receiver

    Adding an event receiver

  5. The event receiver converts Word Documents after they are added to the List. Select the An item was added item from the list of events that can be handled.
    Figure 5. Choosing Event Receiver Settings

    Choosing even receiver settings

  6. Click Finish to add the event receiver to the project.

Adding the Sample Code to the Solution

Replace the contents of the ConvertWordToPDFEventReceiver.cs source file with the following code.C

 
using System;
using System.Security.Permissions;
using Microsoft.SharePoint;
using Microsoft.SharePoint.Security;
using Microsoft.SharePoint.Utilities;
using Microsoft.SharePoint.Workflow;

using Microsoft.Office.Word.Server.Conversions;

namespace ConvertWordToPDF.ConvertWordToPDFEventReceiver
{
  /// <summary>
  /// List Item Events
  /// </summary>
  public class ConvertWordToPDFEventReceiver : SPItemEventReceiver
  {
    /// <summary>
    /// An item was added.
    /// </summary>
    public override void ItemAdded(SPItemEventProperties properties)
    {
      base.ItemAdded(properties);

      // Verify the document added is a Word document
      // before starting the conversion.
      if (properties.ListItem.Name.Contains(".docx") 
        || properties.ListItem.Name.Contains(".doc"))
      {
        //Variables used by the sample code.
        ConversionJobSettings jobSettings;
        ConversionJob pdfConversion;
        string wordFile;
        string pdfFile;

        // Initialize the conversion settings.
        jobSettings = new ConversionJobSettings();
        jobSettings.OutputFormat = SaveFormat.PDF;

        // Create the conversion job using the settings.
        pdfConversion = 
          new ConversionJob("Word Automation Services", jobSettings);

        // Set the credentials to use when running the conversion job.
        pdfConversion.UserToken = properties.Web.CurrentUser.UserToken;

        // Set the file names to use for the source Word document
        // and the destination PDF document.
        wordFile = properties.WebUrl + "/" + properties.ListItem.Url;
        if (properties.ListItem.Name.Contains(".docx"))
        {
          pdfFile = wordFile.Replace(".docx", ".pdf");
        }
        else
        {
          pdfFile = wordFile.Replace(".doc", ".pdf");
        }

        // Add the file conversion to the conversion job.
        pdfConversion.AddFile(wordFile, pdfFile);

        // Add the conversion job to the Word Automation Services 
        // conversion job queue. The conversion does not occur
        // immediately but is processed during the next run of
        // the document conversion job.
        pdfConversion.Start();

      }
    }
  }
}

Examples of the kinds of operations supported by Word Automation Services are as follows:

  • Converting between document formats (e.g. DOC to DOCX)
  • Converting to fixed formats (e.g. PDF or XPS)
  • Updating fields
  • Importing “alternate format chunks”

This article contains sample code that shows how to create a SharePoint list event handler that can create Word Automation Services conversion jobs in response to Word documents being added to the list. This section uses code examples taken from the complete, working sample code provided earlier in this article to describe the approach taken by this article.

The ItemAdded(SPItemEventProperties) event handler in the list event handler first verifies that the item added to the document library list is a Word document by checking the name of the document for the .doc or .docx file name extension.

// Verify the document added is a Word document
// before starting the conversion.
if (properties.ListItem.Name.Contains(".docx") 
    || properties.ListItem.Name.Contains(".doc"))
{

If the item is a Word document then the code creates and initializes ConversionJobSettings and ConversionJob objects to convert the document to the PDF format.

C#
 
//Variables used by the sample code.
ConversionJobSettings jobSettings;
ConversionJob pdfConversion;
string wordFile;
string pdfFile;

// Initialize the conversion settings.
jobSettings = new ConversionJobSettings();
jobSettings.OutputFormat = SaveFormat.PDF;

// Create the conversion job using the settings.
pdfConversion = 
  new ConversionJob("Word Automation Services", jobSettings);

// Set the credentials to use when running the conversion job.
pdfConversion.UserToken = properties.Web.CurrentUser.UserToken;

The Word document to be converted and the name of the PDF document to be created are added to the ConversionJob.

 
// Set the file names to use for the source Word document
// and the destination PDF document.
wordFile = properties.WebUrl + "/" + properties.ListItem.Url;
if (properties.ListItem.Name.Contains(".docx"))
{
  pdfFile = wordFile.Replace(".docx", ".pdf");
}
else
{
  pdfFile = wordFile.Replace(".doc", ".pdf");
}

// Add the file conversion to the Conversion Job.
pdfConversion.AddFile(wordFile, pdfFile);

Finally the ConversionJob is added to the Word Automation Services conversion job queue.

 
// Add the conversion job to the Word Automation Services 
// conversion job queue. The conversion does not occur
// immediately but is processed during the next run of
// the document conversion job.
pdfConversion.Start();

How To : SharePoint Cross-site Publishing and Free code for Web Part

Cross-site publishing is one of the powerful new capabilities in SharePoint 2013.  It enables the separation of data entry from display and breaks down the container barriers that have traditionally existed in SharePoint (ex: rolling up information across site collections). 

 cross-site-publishing

Cross-site publishing is delivered through search and a number of new features, including list/library catalogs, catalog connections, and the content search web part.  Unfortunately, SharePoint Online/Office 365 doesn’t currently support these features.  Until they are added to the service (possibly in a quarterly update), customers will be looking for alternatives to close the gap.  In this post, I will outline several alternatives for delivering cross-site and search-driven content in SharePoint Online and how to template these views for reuse

I’m a huge proponent of SharePoint Online.  After visiting several Microsoft data centers, I feel confident that Microsoft is better positioned to run SharePoint infrastructure than almost any organization in the world.  SharePoint Online has very close feature parity to SharePoint on-premise, with the primary gaps existing in cross-site publishing and advanced business intelligence.  Although these capabilities have acceptable alternatives in the cloud (as will be outlined in this post), organizations looking to maximize the cloud might consider SharePoint running in IaaS for immediate access to these features.


Apps for SharePoint

The new SharePoint app model is fully supported in SharePoint Online and can be used to deliver customizations to SharePoint using any web technology.  New SharePoint APIs can be used with the app model to deliver an experience similar to cross-site publishing.  In fact, the content search web part could be re-written for delivery through the app model as an “App Part” for SharePoint Online. 
Although the app model provides great flexibility and reuse, it does come with some drawbacks.  Because an app part is delivered through a glorified IFRAME, it would be challenging to navigate to a new page from within the app part.  A link within the app would only navigate within the IFRAME (not the parent of the IFRAME).  Secondly, there isn’t a great mechanism for templating a site to automatically leverage an app part on its page(s).  Apps do not work with site templates, so a site that contains an app cannot be saved as a template.  Apps can be “stapled” to sites, but the app installed event (which would be needed to add the app part to a page) only fires when the app is installed into the app catalog.

REST APIs and Script Editor

The script editor web part is a powerful new tool that can help deliver flexible customization into SharePoint Online.  The script editor web part allows a block of client-side script to be added to any wiki or web part page in a site.  Combined with the new SharePoint REST APIs, the script editor web part can deliver mash-ups very similar to cross-site publishing and the content search web part.  Unlike apps for SharePoint, the script editor isn’t constrained by IFRAME containers, app permissions, or templating limitations.  In fact, a well-configured script editor web part could be exported and re-imported into the web part gallery for reuse.

Cross-site publishing leverages “catalogs” for precise querying of specific content.  Any List/Library can be designated as a catalog.  By making this designation, SharePoint will automatically create managed properties for columns of the List/Library and ultimately generate a search result source in sites that consume the catalog.  Although SharePoint Online doesn’t support catalogs, it support the building blocks such as managed properties and result sources.  These can be manually configured to provide the same precise querying in SharePoint Online and exploited in the script editor web part for display.

Calling Search REST APIs

<div id=”divContentContainer”></div>
<script type=”text/javascript”>
    $(document).ready(function ($) {
        var basePath = “https://tenant.sharepoint.com/sites/somesite/_api/&#8221;;
        $.ajax({
            url: basePath + “search/query?Querytext=’ContentType:News'”,
            type: “GET”,
            headers: { “Accept”: “application/json;odata=verbose” },
            success: function (data) {
                //script to build UI HERE
            },
            error: function (data) {
                //output error HERE
            }
        });
    });
</script>


An easier approach might be to directly reference a list/library in the REST call of our client-side script.  This wouldn’t require manual search configuration and would provide real-time publishing (no waiting for new items to get indexed).  You could think of this approach similar to a content by query web part across site collections (possibly even farms) and the REST API makes it all possible!

List REST APIs

<div id=”divContentContainer”></div>
<script type=”text/javascript”>
    $(document).ready(function ($) {
        var basePath = “https://tenant.sharepoint.com/sites/somesite/_api/&#8221;;
        $.ajax({
            url: basePath + “web/lists/GetByTitle(‘News’)/items/?$select=Title&$filter=Feature eq 0”,
            type: “GET”,
            headers: { “Accept”: “application/json;odata=verbose” },
            success: function (data) {
                //script to build UI HERE
            },
            error: function (data) {
                //output error HERE
            }
        });
    });
</script>


The content search web part uses display templates to render search results in different arrangements (ex: list with images, image carousel, etc).  There are two types of display templates the content search web part leverages…the control template, which renders the container around the items, and the item template, which renders each individual item in the search results.  This is very similar to the way a Repeater control works in ASP.NET.  Display templates are authored using HTML, but are converted to client-side script automatically by SharePoint for rendering.  I mention this because our approach is very similar…we will leverage a container and then loop through and render items in script.  In fact, all the examples in this post were converted from display templates in a public site I’m working on. 

Item display template for content search web part

<!–#_
var encodedId = $htmlEncode(ctx.ClientControl.get_nextUniqueId() + “_ImageTitle_”);
var rem = index % 3;
var even = true;
if (rem == 1)
    even = false;

var pictureURL = $getItemValue(ctx, “Picture URL”);
var pictureId = encodedId + “picture”;
var pictureMarkup = Srch.ContentBySearch.getPictureMarkup(pictureURL, 140, 90, ctx.CurrentItem, “mtcImg140”, line1, pictureId);
var pictureLinkId = encodedId + “pictureLink”;
var pictureContainerId = encodedId + “pictureContainer”;
var dataContainerId = encodedId + “dataContainer”;
var dataContainerOverlayId = encodedId + “dataContainerOverlay”;
var line1LinkId = encodedId + “line1Link”;
var line1Id = encodedId + “line1”;
 _#–>
<div style=”width: 320px; float: left; display: table; margin-bottom: 10px; margin-top: 5px;”>
   <a href=”_#= linkURL =#_”>
      <div style=”float: left; width: 140px; padding-right: 10px;”>
         <img src=”_#= pictureURL =#_” class=”mtcImg140″ style=”width: 140px;” />
      </div>
      <div style=”float: left; width: 170px”>
         <div class=”mtcProfileHeader mtcProfileHeaderP”>_#= line1 =#_</div>
      </div>
   </a>
</div>


Script equivalent

<div id=”divUnfeaturedNews”></div>
<script type=”text/javascript”>
    $(document).ready(function ($) {
        var basePath = “https://richdizzcom.sharepoint.com/sites/dallasmtcauth/_api/&#8221;;
        $.ajax({
            url: basePath + “web/lists/GetByTitle(‘News’)/items/?$select=Title&$filter=Feature eq 0”,
            type: “GET”,
            headers: { “Accept”: “application/json;odata=verbose” },
            success: function (data) {
                //get the details for each item
                var listData = data.d.results;
                var itemCount = listData.length;
                var processedCount = 0;
                var ul = $(“<ul style=’list-style-type: none; padding-left: 0px;’ class=’cbs-List’>”);
                for (i = 0; i < listData.length; i++) {
                    $.ajax({
                        url: listData[i].__metadata[“uri”] + “/FieldValuesAsHtml”,
                        type: “GET”,
                        headers: { “Accept”: “application/json;odata=verbose” },
                        success: function (data) {
                            processedCount++;
                            var htmlStr = “<li style=’display: inline;’><div style=’width: 320px; float: left; display: table; margin-bottom: 10px; margin-top: 5px;’>”;
                            htmlStr += “<a href=’#’>”;
                            htmlStr += “<div style=’float: left; width: 140px; padding-right: 10px;’>”;
                            htmlStr += setImageWidth(data.d.PublishingRollupImage, ‘140’);
                            htmlStr += “</div>”;
                            htmlStr += “<div style=’float: left; width: 170px’>”;
                            htmlStr += “<div class=’mtcProfileHeader mtcProfileHeaderP’>” + data.d.Title + “</div>”;
                            htmlStr += “</div></a></div></li>”;
                            ul.append($(htmlStr))
                            if (processedCount == itemCount) {
                                $(“#divUnfeaturedNews”).append(ul);
                            }
                        },
                        error: function (data) {
                            alert(data.statusText);
                        }
                    });
                }
            },
            error: function (data) {
                alert(data.statusText);
            }
        });
    });

    function setImageWidth(imgString, width) {
        var img = $(imgString);
        img.css(‘width’, width);
        return img[0].outerHTML;
    }
</script>


Even one of the more complex carousel views from my site took less than 30min to convert to the script editor approach.

Advanced carousel script

<div id=”divFeaturedNews”>
    <div class=”mtc-Slideshow” id=”divSlideShow” style=”width: 610px;”>
        <div style=”width: 100%; float: left;”>
            <div id=”divSlideShowSection”>
                <div style=”width: 100%;”>
                    <div class=”mtc-SlideshowItems” id=”divSlideShowSectionContainer” style=”width: 610px; height: 275px; float: left; border-style: none; overflow: hidden; position: relative;”>
                        <div id=”divFeaturedNewsItemContainer”>
                        </div>
                    </div>
                </div>
            </div>
        </div>
    </div>
</div>
<script type=”text/javascript”>
    $(document).ready(function ($) {
        var basePath = “https://richdizzcom.sharepoint.com/sites/dallasmtcauth/_api/&#8221;;
        $.ajax({
            url: basePath + “web/lists/GetByTitle(‘News’)/items/?$select=Title&$filter=Feature eq 1&$top=4”,
            type: “GET”,
            headers: { “Accept”: “application/json;odata=verbose” },
            success: function (data) {
                var listData = data.d.results;
                for (i = 0; i < listData.length; i++) {
                    getItemDetails(listData, i, listData.length);
                }
            },
            error: function (data) {
                alert(data.statusText);
            }
        });
    });
    var processCount = 0;
    function getItemDetails(listData, i, count) {
        $.ajax({
            url: listData[i].__metadata[“uri”] + “/FieldValuesAsHtml”,
            type: “GET”,
            headers: { “Accept”: “application/json;odata=verbose” },
            success: function (data) {
                processCount++;
                var itemHtml = “<div class=’mtcItems’ id=’divPic_” + i + “‘ style=’width: 610px; height: 275px; float: left; position: absolute; border-bottom: 1px dotted #ababab; z-index: 1; left: 0px;’>”
                itemHtml += “<div id=’container_” + i + “‘ style=’width: 610px; height: 275px; float: left;’>”;
                itemHtml += “<a href=’#’ title='” + data.d.Caption_x005f_x0020_x005f_Title + “‘ style=’width: 610px; height: 275px;’>”;
                itemHtml += data.d.Feature_x005f_x0020_x005f_Image;
                itemHtml += “</a></div></div>”;
                itemHtml += “<div class=’titleContainerClass’ id=’divTitle_” + i + “‘ data-originalidx='” + i + “‘ data-currentidx='” + i + “‘ style=’height: 25px; z-index: 2; position: absolute; background-color: rgba(255, 255, 255, 0.8); cursor: pointer; padding-right: 10px; margin: 0px; padding-left: 10px; margin-top: 4px; color: #000; font-size: 18px;’ onclick=’changeSlide(this);’>”;
                itemHtml += data.d.Caption_x005f_x0020_x005f_Title;
                itemHtml += “<span id=’currentSpan_” + i + “‘ style=’display: none; font-size: 16px;’>” + data.d.Caption_x005f_x0020_x005f_Body + “</span></div>”;
                $(‘#divFeaturedNewsItemContainer’).append(itemHtml);

                if (processCount == count) {
                    allItemsLoaded();
                }
            },
            error: function (data) {
                alert(data.statusText);
            }
        });
    }
    window.mtc_init = function (controlDiv) {
        var slideItems = controlDiv.children;
        for (var i = 0; i < slideItems.length; i++) {
            if (i > 0) {
                slideItems[i].style.left = ‘610px’;
            }
        };
    };

    function allItemsLoaded() {
        var slideshows = document.querySelectorAll(“.mtc-SlideshowItems”);
        for (var i = 0; i < slideshows.length; i++) {
            mtc_init(slideshows[i].children[0]);
        }

        var div = $(‘#divTitle_0’);
        cssTitle(div, true);
        var top = 160;
        for (i = 1; i < 4; i++) {
            var divx = $(‘#divTitle_’ + i);
            cssTitle(divx, false);
            divx.css(‘top’, top);
            top += 35;
        }
    }


bottlenecks[1]


    function cssTitle(div, selected) {
        if (selected) {
            div.css(‘height’, ‘auto’);
            div.css(‘width’, ‘300px’);
            div.css(‘top’, ’10px’);
            div.css(‘left’, ‘0px’);
            div.css(‘font-size’, ’26px’);
            div.css(‘padding-top’, ‘5px’);
            div.css(‘padding-bottom’, ‘5px’);
            div.find(‘span’).css(‘display’, ‘block’);
        }
        else {
            div.css(‘height’, ’25px’);
            div.css(‘width’, ‘auto’);
            div.css(‘left’, ‘0px’);
            div.css(‘font-size’, ’18px’);
            div.css(‘padding-top’, ‘0px’);
            div.css(‘padding-bottom’, ‘0px’);
            div.find(‘span’).css(‘display’, ‘none’);
        }
    }

    window.changeSlide = function (item) {
        //get all title containers
        var listItems = document.querySelectorAll(‘.titleContainerClass’);
        var currentIndexVals = { 0: null, 1: null, 2: null, 3: null };
        var newIndexVals = { 0: null, 1: null, 2: null, 3: null };

        for (var i = 0; i < listItems.length; i++) {
            //current Index
            currentIndexVals[i] = parseInt(listItems[i].getAttribute(‘data-currentidx’));
        }

        var selectedIndex = 0; //selected Index will always be 0
        var leftOffset = ”;
        var originalSelectedIndex = ”;

        var nextSelected = ”;
        var originalNextIndex = ”;

        if (item == null) {
            var item0 = document.querySelector(‘[data-currentidx=”‘ + currentIndexVals[0] + ‘”]’);
            originalSelectedIndex = parseInt(item0.getAttribute(‘data-originalidx’));
            originalNextIndex = originalSelectedIndex + 1;
            nextSelected = currentIndexVals[0] + 1;
        }
        else {
            nextSelected = item.getAttribute(‘data-currentidx’);
            originalNextIndex = item.getAttribute(‘data-originalidx’);
        }

        if (nextSelected == 0) { return; }

        for (i = 0; i < listItems.length; i++) {
            if (currentIndexVals[i] == selectedIndex) {
                //this is the selected item, so move to bottom and animate
                var div = $(‘[data-currentidx=”0″]’);
                cssTitle(div, false);
                div.css(‘left’, ‘-400px’);
                div.css(‘top’, ‘230px’);

                newIndexVals[i] = 3;
                var item0 = document.querySelector(‘[data-currentidx=”0″]’);
                originalSelectedIndex = item0.getAttribute(‘data-originalidx’);

                //annimate
                div.delay(500).animate(
                    { left: ‘0px’ }, 500, function () {
                    });
            }
            else if (currentIndexVals[i] == nextSelected) {
                //this is the NEW selected item, so resize and slide in as selected
                var div = $(‘[data-currentidx=”‘ + nextSelected + ‘”]’);
                cssTitle(div, true);
                div.css(‘left’, ‘-610px’);

                newIndexVals[i] = 0;

                //annimate
                div.delay(500).animate(
                    { left: ‘0px’ }, 500, function () {
                    });
            }
            else {
                //move up in queue
                var curIdx = currentIndexVals[i];
                var div = $(‘[data-currentidx=”‘ + curIdx + ‘”]’);

                var topStr = div.css(‘top’);
                var topInt = parseInt(topStr.substring(0, topStr.length – 1));

                if (curIdx != 1 && nextSelected == 1 || curIdx > nextSelected) {
                    topInt = topInt – 35;
                    if (curIdx – 1 == 2) { newIndexVals[i] = 2 };
                    if (curIdx – 1 == 1) { newIndexVals[i] = 1 };
                }

                //move up
                div.animate(
                    { top: topInt }, 500, function () {
                    });
            }
        };

        if (originalNextIndex < 0)
            originalNextIndex = itemCount – 1;

        //adjust pictures
        $(‘#divPic_’ + originalNextIndex).css(‘left’, ‘610px’);
        leftOffset = ‘-610px’;

        $(‘#divPic_’ + originalSelectedIndex).animate(
            { left: leftOffset }, 500, function () {
            });

        $(‘#divPic_’ + originalNextIndex).animate(
            { left: ‘0px’ }, 500, function () {
            });

        var item0 = document.querySelector(‘[data-currentidx=”‘ + currentIndexVals[0] + ‘”]’);
        var item1 = document.querySelector(‘[data-currentidx=”‘ + currentIndexVals[1] + ‘”]’);
        var item2 = document.querySelector(‘[data-currentidx=”‘ + currentIndexVals[2] + ‘”]’);
        var item3 = document.querySelector(‘[data-currentidx=”‘ + currentIndexVals[3] + ‘”]’);
        if (newIndexVals[0] != null) { item0.setAttribute(‘data-currentidx’, newIndexVals[0]) };
        if (newIndexVals[1] != null) { item1.setAttribute(‘data-currentidx’, newIndexVals[1]) };
        if (newIndexVals[2] != null) { item2.setAttribute(‘data-currentidx’, newIndexVals[2]) };
        if (newIndexVals[3] != null) { item3.setAttribute(‘data-currentidx’, newIndexVals[3]) };
    };
</script>


End-result of script editors in SharePoint Online

Separate authoring site collection

Final Thoughts

How To : Develop a Single-page Application in SharePoint

sharepointKnockoutJS

A single-page application in SharePoint

This app will be a single-page app and heavily javascript based, taking advantage of ajax and web services. As mentioned earlier, we’re going to base this app on the TodoMVC project. More specifically, we’re going to use the Knockout version of the TodoMVC app. So download the knockout todomvc app from github here and incorporate it into your project as follows:

  • Copy the js and bower_components folders into the Scripts folder. To do this quickly:
    1. Copy the folders in Windows Explorer
    2. Visual Studio, enable Project -> Show All Files
    3. The folders will now appear in Solution Explorer. Right click bower_components, and select Include In Project. Do the same for the js folder.
  • Copy the contents of index.html into Views/Index.cshtml (discard whatever is there).
  • Open Views/Index.cshtml and edit the script and css references to point to the Scripts folder (eg. find any references to bower_components and change it to Scripts/bower_components, do the same for js)
  • Open the Shared/_Layout.cshtml file and replace its contents with a single call to @RenderBody():

Your solution should now look like the following:

Hit F5 and you should now have a running TodoMVC app!

Data Storage

In previous articles I have described how to use the Azure database for storage of your data. In a provider-hosted app, you can equally as easily store your data in your own database. However, performance issues aside, it’s really handy to store data in the customer’s SharePoint system itself where possible. This has a number of advantages:

  • Security – you don’t need to store customer data in your own data center
  • App interoperability – if you have multiple apps talking to SharePoint, the architecture will be greatly simplified by by using SharePoint as the central data store
  • Transparency – customers can see their data transparently in lists and understand better what data is stored and how it’s used
  • Tight SharePoint integration – this is often useful since you can later easily take advantage of features such as workflows and event receivers.

In this article therefore I’ll use SharePoint lists for data storage. Let’s create a list to use for storage of our Todo items. Firstly, right-click on the TodoApp project, and select Add -> New Item. Choose List, and call it TodoList.

Click Add. On the next dialog, leave the list template as Default and click Finish.

Now you’ll be presented with a list designer form. By default it already has a Title column, so just add another column called Completed which should be a Boolean:

In my case, Completed was available as a site column. However, it was hidden by default. To remedy this, open up Schema.xml and ensure the Completed field has Hidden=FALSE:

Open up the TodoListInstance designer again and click the Views tab, and add the Completed column to the default view:

Now we’re going to add the server-side code for retrieving the list items. Firstly add a class called TodoItemViewModel and give it the relevant properties<!–. Note that the properties are not capitalised to match what we’ve got on the client side already–>:

    public class TodoItemViewModel
    {
        public string Title { get; set; }
        public bool Completed { get; set; }
    }
    

Next, open up the HomeController class and change the Index method to load the contents of the TodoList:

    [SharePointContextFilter]
    public ActionResult Index()
    {
        List<TodoItemViewModel> result = new List<TodoItemViewModel>();
        var spContext = SharePointContextProvider.Current.GetSharePointContext(HttpContext);
        using (var clientContext = spContext.CreateAppOnlyClientContextForSPAppWeb())
        {
            if(clientContext != null)
            {
                //Load list items
                List list = clientContext.Web.Lists.GetByTitle("TodoList");
                ListItemCollection items = list.GetItems(CamlQuery.CreateAllItemsQuery());
                clientContext.Load(items);
                clientContext.ExecuteQuery();
                //Create the Todo item view models
                result = items.Select(li => new TodoItemViewModel()
                {
                    Title = (string)li["Title"],
                    Completed = (bool)li["Completed"]
                }).ToList();
            }
        }
        return View(result); //Pass the items into the view
    }
    

You may notice we’re using CreateAppOnlyClientContextForSPAppWeb. This means we are accessing the list under the App identity, not the user identity. This is so that we don’t need to require the user themselves to have any special permissions – this should an important consideration throughout your app, as different resources may be only available to certain users and this will form a crucial part of your security model.

Now, since we want to access the list under the app identity, we need to enable that by opening AppManifest.xml under TodoApp, click the Permissions tab and check the option:

Client Side Code with Knockout.js

Now we move to the client side. We’re going to do something a bit scary and rewrite the app.js file, which contains all of the Todo app JavaScript we imported. We’re going to rewrite it so that firstly, we understand it, and secondly, we can integrate it with our AJAX methods more easily. You can always go back to study the original later on as it’ll be more advanced and refined.

If you are new to the Knockout way of data-binding in JavaScript, it might be a good time to visit the knockout.js website to familiarise yourself with it. It’s very powerful and yet pretty easy to pick up. and it makes writing javascript applications incredibly fast and easy.

So open app.js, delete what’s already there, and let’s start by creating a simple ViewModel for each Todo item:

    window.TodoApp = window.TodoApp || {};
    
    window.TodoApp.Todo = function (id, title, completed) {
        var me = this;
        this.id = ko.observable(id);
        this.title = ko.observable(title);
        this.completed = ko.observable(completed || false);
        this.editing = ko.observable(false);

        // edit an item
        this.startEdit = function () {
            me.editing(true);
        };

        // stop editing an item
        this.stopEdit = function (data, event) {
            if (event.keyCode == 13) {
                me.editing(false);
            }
            return true;
        };
    };


Next up we add the main ViewModel:

    window.TodoApp.ViewModel = function (spHostUrl) {
        var me = this;
        this.todos = ko.observableArray(); //List of todos
        this.current = ko.observable(); // store the new todo value being entered
        this.showMode = ko.observable('all'); //Current display mode

        //List which is currently displayed
        this.filteredTodos = ko.computed(function () {
            switch (me.showMode()) {
            case 'active':
                return me.todos().filter(function (todo) {
                    return !todo.completed();
                });
            case 'completed':
                return me.todos().filter(function (todo) {
                    return todo.completed();
                });
            default:
                return me.todos();
            }
        });        

        this.addTodo = function (todo) {
            me.todos.push(todo);
        }

        // add a new todo, when enter key is pressed
        this.add = function (data, event) {
            if (event.keyCode == 13) {
                var current = me.current().trim();
                if (current) {        
                    var todo = new window.TodoApp.Todo(0, current);
                    me.addTodo(todo);
                    me.current('');
                }
            }
            return true;
        };

        // remove a single todo
        this.remove = function (todo) {
            me.todos.remove(todo);
        };

        // remove all completed todos
        this.removeCompleted = function () {
            var todos = me.todos().slice(0);
            for (var i = 0; i < todos.length; i++) {
                if (todos[i].completed()) {
                    me.remove(todos[i]);
                }
            }
        };

        // count of all completed todos
        this.completedCount = ko.computed(function () {
            return me.todos().filter(function (todo) {
                return todo.completed();
            }).length;
        });

        // count of todos that are not complete
        this.remainingCount = ko.computed(function () {
            return me.todos().length - me.completedCount();
        });

        // writeable computed observable to handle marking all complete/incomplete
        this.allCompleted = ko.computed({
            //always return true/false based on the done flag of all todos
            read: function () {
                return !me.remainingCount();
            },
            // set all todos to the written value (true/false)
            write: function (newValue) {
                me.todos().forEach(function (todo) {
                    // set even if value is the same, as subscribers are not notified in that case
                    todo.completed(newValue);
                });
            }
        });
    };

Take a read through the above JavaScript – I have tried to simplify it from the original TodoMVC Knockout code so it should be a little more understandable if you’re new to Knockout.

Next we’re going to change the HTML to match our updated JavaScript. Open index.cshtml and replace the entire contents of the <body> tag with the following:

    <section id="todoapp">
        <header id="header">
            <h1>todos</h1>
            <input id="new-todo" data-bind="value: current, valueUpdate: 'afterkeydown', event: { keypress: add }" placeholder="What needs to be done?" autofocus>
        </header>
        <section id="main" data-bind="visible: todos().length">
            <input id="toggle-all" data-bind="checked: allCompleted" type="checkbox">
            <label for="toggle-all">Mark all as complete</label>
            <ul id="todo-list" data-bind="foreach: filteredTodos">
                <li data-bind="css: { completed: completed, editing: editing }">
                    <div class="view">
                        <input class="toggle" data-bind="checked: completed" type="checkbox">
                        <label data-bind="text: title, event: { dblclick: startEdit }"></label>
                        <button class="destroy" data-bind="click: $root.remove"></button>
                    </div>
                    <input class="edit" data-bind="value: title, valueUpdate: 'afterkeydown', event: { keypress: stopEdit }">
                </li>
            </ul>
        </section>
        <footer id="footer" data-bind="visible: completedCount() || remainingCount()">
            <span id="todo-count">
                <strong data-bind="text: remainingCount">0</strong> item(s) left
            </span>
            <ul id="filters">
                <li>
                    <a data-bind="css: { selected: showMode() == 'all' }, click: function(){showMode('all');}">All</a>
                </li>
                <li>
                    <a data-bind="css: { selected: showMode() == 'active' }, click: function(){showMode('active');}">Active</a>
                </li>
                <li>
                    <a data-bind="css: { selected: showMode() == 'completed' }, click: function(){showMode('completed');}">Completed</a>
                </li>
            </ul>
            <button id="clear-completed" data-bind="visible: completedCount, click: removeCompleted">
                Clear completed (<span data-bind="text: completedCount"></span>)
            </button>
        </footer>
    </section>
    <footer id="info">
        <p>Double-click to edit a todo</p>
        <p>Written by <a href="https://github.com/ashish01/knockoutjs-todos">Ashish Sharma</a> and <a href="http://knockmeout.net">Ryan Niemeyer</a></p>
        <p>Part of <a href="http://todomvc.com">TodoMVC</a></p>
    </footer>
    <script src="Scripts/bower_components/todomvc-common/base.js"></script>
    <script src="Scripts/bower_components/knockout.js/knockout.debug.js"></script>
    <script src="Scripts/jquery-1.10.2.js"></script>
    <script src="Scripts/js/app.js"></script>
        
    <script>
        var viewModel = new window.TodoApp.ViewModel(spHostUrl);
        ko.applyBindings(viewModel);
    </script>

Again, this is slightly simplified from the original TodoMVC code.

You should now be able to run the app as before. In the next step we’ll add the client-side code required to load the data back from the server. Update the final script block in index.cshtml to the following:

        
    <script>
        var model = @(Html.Raw(Json.Encode(Model)));
        var viewModel = new window.TodoApp.ViewModel();

        for(var i=0; i<model.length; i++) {
            viewModel.addTodo(new window.TodoApp.Todo(model[i].Id, model[i].Title, model[i].Completed));
        }

        ko.applyBindings(viewModel);
    </script>


Now we’re ready to give the app a quick test. Hit F5 and wait for you app to open. Since we don’t yet have a way of saving data, we’re going to add some directly into the SharePoint list. Just browse to the list using the url /[YourSPsite]/TodoApp/Lists/TodoList/ and you should see the standard List UI:

Add a couple of test items and refresh your app:

Saving Data via AJAX

The final piece of the puzzle is to react to user input and save the data back to the server. When an item is deleted, we’ll need to know the Id of the SharePoint ListItem which should be deleted. Therefore, we’ll add an Id property to the TodoItemViewModel class:

    public class TodoItemViewModel
    {
        public int Id { get; set; } //New!
        public string Title { get; set; }
        public bool Completed { get; set; }
    }
    

Don’t forget to set the Id property when we’re loading the items in the HomeController Index method:

Now we’ll create web service methods for adding, deleting and updating an item. Add these methods to HomeController:

    [HttpPost]
    public JsonResult AddItem(string title)
    {
        int newItemId = 0;
        var spContext = SharePointContextProvider.Current.GetSharePointContext(HttpContext);
        using (var clientContext = spContext.CreateAppOnlyClientContextForSPAppWeb())
        {
            if (clientContext != null)
            {
                List list = clientContext.Web.Lists.GetByTitle("TodoList");
                ListItem listItem = list.AddItem(new ListItemCreationInformation());
                listItem["Title"] = title;
                listItem.Update();
                clientContext.Load(listItem, li => li.Id);
                clientContext.ExecuteQuery();
                newItemId = listItem.Id;
            }
        }
        return Json(newItemId, JsonRequestBehavior.AllowGet);
    }

    [HttpPost]
    public JsonResult RemoveItem(int id)
    {
        var spContext = SharePointContextProvider.Current.GetSharePointContext(HttpContext);
        using (var clientContext = spContext.CreateAppOnlyClientContextForSPAppWeb())
        {
            if (clientContext != null)
            {
                List list = clientContext.Web.Lists.GetByTitle("TodoList");
                ListItem item = list.GetItemById(id);
                item.DeleteObject();
                clientContext.ExecuteQuery();
            }
        }
        return new JsonResult();
    }

    [HttpPost]
    public JsonResult UpdateItem(int id, string title, bool completed)
    {
        var spContext = SharePointContextProvider.Current.GetSharePointContext(HttpContext);
        using (var clientContext = spContext.CreateAppOnlyClientContextForSPAppWeb())
        {
            if (clientContext != null)
            {
                List list = clientContext.Web.Lists.GetByTitle("TodoList");
                ListItem item = list.GetItemById(id);
                item["Title"] = title;
                item["Completed"] = completed;
                item.Update();
                clientContext.ExecuteQuery();
            }
        }
        return new JsonResult();
    }
    

The above methods use fairly simple CSOM code to add, remove and update a list item. You can accomplish the same goal by using the JavaScript version of the CSOM which would have the added benefit of calling SharePoint directly without going via the app server. However, I haven’t done this because I want to illustrate how to make AJAX calls between the app client and server. click here to read more about the javascript CSOM library.

Now we’ll add the JavaScript code to call these server methods when an add, update or delete occurs. Earlier you may have noticed that we included a reference to the jQuery script. This is because we’re going to use jQuery’s AJAX helper methods:

Now all we need to do is add code to react to the add, remove and update events, and call the server methods. The first step is to open HomeController.cs and add the SPHostUrl, which is a crucial value for authentication, to the ViewBag:

The purpose of this is so that we can access SPHostUrl on the client, and pass it back to the server during AJAX requests. The authentication cookie will also be passed, and together this forms everything required for authentication to take place.

Next, open up the Index.cshtml file and update the last script block to match the following:

    <script>
        var model = @(Html.Raw(Json.Encode(Model)));
        
        var spHostUrl = '@ViewBag.SPHostUrl'; //<-- Add this line
        var viewModel = new window.TodoApp.ViewModel(spHostUrl); <-- Pass SPHostUrl into the ViewModel

        for(var i=0; i<model.length; i++) {        
            viewModel.addTodo(new window.TodoApp.Todo(model[i].Id, model[i].Title, model[i].Completed));
        }
        ko.applyBindings(viewModel);
    </script>
    

Next we’ll update the app.js code to call the web services at appropriate times by adding HTTP requests using jQuery’s $.ajax helper. Firstly, update the add function:

    this.add = function (data, event) {
        if (event.keyCode == 13) {
            var current = me.current().trim();
            if (current) {
                var todo = new window.TodoApp.Todo(0, current);
                me.addTodo(todo);
                me.current('');

                $.ajax({
                    type: 'POST',
                    url: "/Home/AddItem?SPHostUrl=" + encodeURIComponent(spHostUrl),
                    contentType: "application/json; charset=utf-8",
                    data: JSON.stringify({
                        title: todo.title()
                    }),
                    dataType: "json",
                    success: function (id) {
                        todo.id(id);
                    }
                });
            }
        }
        return true;
    };
    

Next up is the remove function:

    this.remove = function (todo) {
        me.todos.remove(todo);
        $.ajax({
            type: 'POST',
            url: "/Home/RemoveItem?SPHostUrl=" + encodeURIComponent(spHostUrl),
            contentType: "application/json; charset=utf-8",
            data: JSON.stringify({
                id: todo.id()
            }),
            dataType: "json"
        });
    };
    

Now that additions and deletions are being handled, it only remains to handle updates. We will do this by adding code within the addTodo function that listens for changes to the title or completed properties, and submits a change to the server. The updated addTodo function should look like this:

    this.addTodo = function (todo) {
        me.todos.push(todo);
        var adding = true;
        ko.computed(function () {
            var title = todo.title(),
                completed = todo.completed();
            if (!adding) {
                $.ajax({
                    type: 'POST',
                    url: "/Home/UpdateItem?SPHostUrl=" + encodeURIComponent(spHostUrl),
                    contentType: "application/json; charset=utf-8",
                    data: JSON.stringify({
                        id: todo.id(),
                        title: title,
                        completed: completed
                    }),
                    dataType: "json"
                });
            }
        });
        adding = false;
    }
    

In the code above, we add a Knockout computed property which listens to the title and completed observable properties. If either value changes, we make a call to the UpdateItem web service. Note that we use a flag called adding to ensure we don’t call UpdateItems during the initial item addition.

Run the project again. If all has gone to plan, you should hopefully be able to insert, edit and delete items and have them immediately saved back to SharePoint.

Tidying Up

It’s time to do some tidy up to make sure we’re following MVC conventions correctly. Firstly, we should be using the script loader to ensure the JavaScript is loaded as efficiently as possible. Open up App_Start\BundleConfig.cs and replace its contents with the following:

    public static void RegisterBundles(BundleCollection bundles)
    {
        bundles.Add(new ScriptBundle("~/bundles/scripts").Include(
                    "~/Scripts/bower_components/todomvc-common/base.js",
                    "~/Scripts/bower_components/knockout.js/knockout.debug.js",
                    "~/Scripts/jquery-{version}.js",
                    "~/Scripts/js/app.js"));

        bundles.Add(new StyleBundle("~/Content/css").Include(
                    "~/Scripts/bower_components/todomvc-common/base.css"));
    }

This creates two bundles: a CSS bundle and a JavaScript bundle. The advantage of this is that in production, your scripts will be loaded in a single request, and can be easily minified. Update your Index.cshtml file by removing existing script and style references and replace them by referencing your bundles in the <head> tag:

    <head>
        <meta charset="utf-8">
        <title>Knockout.js TodoMVC</title>
        @Styles.Render("~/Content/css")
        @Scripts.Render("~/bundles/scripts")
    </head>
    

Since your app doesn’t use the About or Contact pages which were included in the default project template, you can remove those:

Also, remove the associated methods within the HomeController class.

Adding an App Part (WebPart)

Adding a web part is really easy! You can create an app part to point to any page in your app, and it simply displays in an iframe inside your SharePoint site. In practice you’ll probably want to create a new page. We’re going to create a page that differs slightly in style from the app.

Now, this view will be identical to the main Index view except for styling. We want to avoid copy-pasting the original view into this one, so we’ll created a Shared view that we can use for both.

Start by adding a new View by right-clicking the Views/Home folder and selecting Add -> View: and name it IndexCommon:

Now copy the entire contents of the body tag from Index to IndexCommon. Then you can reference your IndexCommon from Index using a call to @Html.Partial. Your Index.cshtml should look as follows:

    <!doctype html>
    <html lang="en" data-framework="knockoutjs">
    <head>
        <meta charset="utf-8">
        <title>Knockout.js TodoMVC</title>
        @Styles.Render("~/Content/css")
        @Scripts.Render("~/bundles/scripts")
    </head>
    <body>
        @Html.Partial("IndexCommon")
    </body>
    </html>
    

Add a new view called IndexTrimmed:

Again, use the same content for Index. This time however we’re going to make one change, which is to reference an alternative CSS file. So change the @Styles.Render tag as follows:

Now open App_Start/BundleConfig.cs and add a new bundle:

    
    bundles.Add(new StyleBundle("~/Content/css-trimmed").Include(
                "~/Scripts/bower_components/todomvc-common/base-trimmed.css"));
    

And add the css file by copying base.css to base-trimmed.css:

You can make modifications to this CSS file at this point. I deleted the following rules:

  • #todoapp { margin: 130px 0 40px 0; } (the large title at the top)
  • body { margin: 0 auto; } (this caused page centering)
  • background: #eaeaea url(‘bg.png’); (grey background image)

I added these rules:

  • #info { display:none; } (to hide the info footer)

The next step is to add a Controller method for our new View. Open HomeController and add a method called IndexTrimmed. It should hold the exact same content as Index, so I’ve extracted it to a common method:

    [SharePointContextFilter]
    public ActionResult IndexTrimmed()
    {
        return View(GetItems()); //Pass the items into the view
    }

    [SharePointContextFilter]
    public ActionResult Index()
    {
        return View(GetItems()); //Pass the items into the view
    }

    private List<TodoItemViewModel> GetItems()
    {
        List<TodoItemViewModel> result = new List<TodoItemViewModel>();
        var spContext = SharePointContextProvider.Current.GetSharePointContext(HttpContext);
        ViewBag.SPHostUrl = spContext.SPHostUrl;
        using (var clientContext = spContext.CreateAppOnlyClientContextForSPAppWeb())
        {
            if (clientContext != null)
            {
                //Load list items
                List list = clientContext.Web.Lists.GetByTitle("TodoList");
                ListItemCollection items = list.GetItems(CamlQuery.CreateAllItemsQuery());
                clientContext.Load(items);
                clientContext.ExecuteQuery();
                //Create the Todo item view models
                result = items.ToArray().Select(li => new TodoItemViewModel()
                {
                    Id = (int)li.Id,
                    Title = (string)li["Title"],
                    Completed = (bool)li["Completed"]
                }).ToList();
            }
        }
        return result;
    }

Now we’re ready to add the Web Part. Right click on TodoApp in solution explorer, and select Add -> New Item. Choose Client Web Part:

Give it a name and click Next:. We want to use our new page, so enter its url:

Open the TodoApp/TodoWebPart/Elements.xml file and change the default width from 300px to 600px:

Now run your app again. Make sure the entire app reinstalls, since the app part is installed to the SharePoint server itself. Add the app part by visiting your SharePoint site and clicking Page, then Edit:

Then select Insert -> App Part, and choose the TodoWebPart from the list. Click Add.

Click Save to save your changes to the page, and your web part should be shown:

Making Your Web Part Resize Dynamically

Now, you’ll notice that the Web Part isn’t resizing correctly when you add items to the list. This is because as the app itself gets larger, the App Part doesn’t get larger – it is after all an iframe with a fixed height. This isn’t a problem for apps that don’t resize, for example forms or fixed-length lists. However, we want our app to resize as though it were a normal part of the main website flow.

Luckily, there’s a workaround for this involving posting a message to the iframe and asking it to resize.

Add the following code to your HomeController, in the IndexTrimmed method:

    public ActionResult IndexTrimmed()
    {
        ViewBag.SenderId = HttpContext.Request.Params["SenderId"];
        return View(GetItems());
    }
    

The purpose of the above code is to retrieve the SenderId parameter from the URL, and make it available (via the ViewBag) to the client. This SenderId parameter represents the ID of the iframe which is hosting the app part.

Next, we’ll use the Sender ID in the client to request a resize of the iframe whenever the app resizes – more specifically, whenever an item is added to or removed from the list. This script should be added to the end of the body in IndexTrimmed.cshtml:

    //Retrieve the sender ID from the viewbag
    var senderId = '@ViewBag.SenderId';

    //Create a function that will change the height of the iframe
    function setHeight() {
        var width = $('#todoapp').outerWidth(true),
            height = $('#todoapp').outerHeight(true);

        //Notify SP that it should resize its iframe to the appropriate height.
        window.parent.postMessage('<message senderId=' + senderId + '>resize(' + width + ', ' + (height + 50) + ')</message>', "*");
    }

    //List for changes to the todo list, and call setHeight when that happens
    viewModel.todos.subscribe(setHeight);

    //Set the correct initial height when the app first loads.
    setHeight();
    

For the avoidance of doubt, here’s where this script should go:

The script is intentionally placed below the call to load the IndexCommon partial view, because then it will have access to the JavaScript viewModel object.

Packaging your app

With autohosted apps, the process is simpler: you just right-click on your app and select Publish. From there, you click Package and you are given a .app file. This app file contains everything involved: both the SharePoint app and also the remove app (your Web project). It’s super simple because the autohosting process takes care of creating a Client ID and Client Secret (for OAuth authentiction), and also takes care of physical hosting.

With Provider-hosted apps, things are more complex, and the steps you follow depend on how you want to host your web project. Your first step will be to visit this page and create a Client ID and Client Secret by registering your app. Once you’ve done that, you can right-click your app project and click Package. Then follow the publish wizard which will involve entering your Client ID and Client Secret.

Note that with your provider hosted app, you will deploy your Web project separately from your App project. This is obvious really: you’re going to be hosting your Web project yourself (you’re the provider, after all), and the small app project will be packaged up and listed on the Office Store or sent manually to a customer. Once they install it, it’ll just point to your web server where your web app is installed. To configure this properly, open AppManifest.xml in the App project, and enter the URL to where your app is installed:

How To : Using the Proxy Pattern to implement Code Access Security

There are many ways to secure different parts of your application. The security of running code in .NET revolves around the concept of Code Access Security (CAS).

CAS

CAS determines the trustworthiness of an assembly based upon its origin and the characteristics of the assembly itself, such as its hash value. For example, code installed locally on the machine is more trusted than code downloaded from the Internet. The runtime will also validate an assembly’s metadata and type safety before that code is allowed to run.


There are many ways to write secure code and protect data using the .NET Framework. In this chapter, we explore such things as controlling access to types, encryption and decryption, random numbers, securely storing data, and using programmatic and declarative security.


Controlling Access to Types in a Local Assembly


Problem

You have an existing class that contains sensitive data, and you do not want clients to have direct access to any objects of this class. Instead, you want an intermediary object to talk to the clients and to allow access to sensitive data based on the client’s credentials. What’s more, you would also like to have specific queries and modifications to the sensitive data tracked, so that if an attacker manages to access the object, you will have a log of what the attacker was attempting to do.

Solution

Use the proxy design pattern to allow clients to talk directly to a proxy object. This proxy object will act as gatekeeper to the class that contains the sensitive data. To keep malicious users from accessing the class itself, make it private, which will at least keep code without the ReflectionPermissionFlag. MemberAccess access (which is currently given only in fully trusted code scenarios such as executing code interactively on a local machine) from getting at it.

The namespaces we will be using are:


  using System;
    using System.IO;
    using System.Security;
    using System.Security.Permissions;
    using System.Security.Principal;

Let’s start this design by creating an interface, as shown in Example 17-1, “ICompanyData interface”, that will be common to both the proxy objects and the object that contains sensitive data.

Example 17-1. ICompanyData interface


internal interface ICompanyData
{
    string AdminUserName
    {
        get;
        set;
    }

    string AdminPwd
    {
        get;
        set;
    }
    string CEOPhoneNumExt
    {
        get;
        set;
    }
    void RefreshData();
    void SaveNewData();
}

The CompanyData class shown in Example 17-2, “CompanyData class” is the underlying object that is “expensive” to create.

Example 17-2. CompanyData class


internal class CompanyData : ICompanyData
{
    public CompanyData()
    {
        Console.WriteLine("[CONCRETE] CompanyData Created");
        // Perform expensive initialization here.
        this.AdminUserName ="admin";
        this.AdminPd ="password";

        this.CEOPhoneNumExt ="0000";
    }

    public str ing AdminUserName
    {
        get;
        set;
    }

    public string AdminPwd
    {
        get;
        set;
    }

    public string CEOPhoneNumExt
    {
        get;
        set;
    }

    public void RefreshData()
    {
        Console.WriteLine("[CONCRETE] Data Refreshed");
    }

    public void SaveNewData()
    {
        Console.WriteLine("[CONCRETE] Data Saved");
    }
}

The code shown in Example 17-3, “CompanyDataSecProxy security proxy class” for the security proxy class checks the caller’s permissions to determine whether the CompanyData object should be created and its methods or properties called.

Example 17-3. CompanyDataSecProxy security proxy class


public class CompanyDataSecProxy : ICompanyData
{
    public CompanyDataSecProxy()
    {
        Console.WriteLine("[SECPROXY] Created");

        // Must set principal policy first.
        appdomain.CurrentDomain.SetPrincipalPolicy(PrincipalPolicy.
           WindowsPrincipal);
    }

    private ICompanyData coData = null;
    private PrincipalPermission admPerm =
        new PrincipalPermission(null, @"BUILTIN\Administrators", true);
    private PrincipalPermission guestPerm =
        new Pr incipalPermission(null, @"BUILTIN\Guest", true);
    private PrincipalPermission powerPerm =
        new PrincipalPermission(null, @"BUILTIN\PowerUser", true);
    private PrincipalPermission userPerm =
        new PrincipalPermission(null, @"BUILTIN\User", true);

    public string AdminUserName
    {
        get
        {
            string userName = ";
            try
            {
                admPerm.Demand();
                Startup();
                userName =coData.AdminUserName;
            }
            catch(SecurityException e)
            {
                Console.WriteLine("AdminUserName_get failed! {0}",e.ToString());
            }
            return (userName);
        }
        set
            {
            try
            {
                admPerm.Demand();
                Startup();
                coData.AdminUserName = value;
            }
            catch(SecurityException e)
            {
                Console.WriteLine("AdminUserName_set failed! {0}",e.ToString());
            }
        }
    }

    public string AdminPwd
    {
        get
        {
            string pwd = ";
            try
            {
                admPerm.Demand();
                Startup();
                pwd = coData.AdminPwd;
            }
            catch(SecurityException e)
            {
                Console.WriteLine("AdminPwd_get Failed! {0}",e.ToString());
            }

            return (pwd);
        }
        set
        {
            try
            {
                admPerm.Demand();
                Startup();
                coData.AdminPwd = value;
            }
            catch(SecurityException e)
            {
                Console.WriteLine("AdminPwd_set Failed! {0}",e.ToString());
            }
        }
    }

    public string CEOPhoneNumExt
    {
        get
        {
            string ceoPhoneNum = ";
            try
            {
                admPerm.Union(powerPerm).Demand();
                Startup();
                ceoPhoneNum = coData.CEOPhoneNumExt;
            }
            catch(SecurityException e)
            {
                Console.WriteLine("CEOPhoneNum_set Failed! {0}",e.ToString());
            }
            return (ceoPhoneNum);
        }
        set
        {
            try
            {
                admPerm.Demand();
                Startup();
                coData.CEOPhoneNumExt = value;
            }
            catch(SecurityException e)
            {
                Console.WriteLine("CEOPhoneNum_set Failed! {0}",e.ToString());
            }
        }
    }
    public void RefreshData()
    {
        try
        {
            admPerm.Union(powerPerm.Union(userPerm)).Dem and();
            Startup();
            Console.WriteLine("[SECPROXY] Data Refreshed");
            coData.RefreshData();
        }
        catch(SecurityException e)
        {
            Console.WriteLine("RefreshData Failed! {0}",e.ToString());
        }
    }

    public void SaveNewData()
    {
        try
        {
            admPerm.Union(powerPerm).Demand();
            Startup();
            Console.WriteLine("[SECPROXY] Data Saved");
            coData.SaveNewData();
        }
        catch(SecurityException e)
        {
            Console.WriteLine("SaveNewData Failed! {0}",e.ToString());
        }
    }

    // DO NOT forget to use [#define DOTRACE] to control the tracing proxy.
    private void Startup()
    {
        if (coData == null)
        {
#if (DOTRACE)
            coData = new CompanyDataTraceProxy();
#else
            coData = new CompanyData();
#endif
            Console.WriteLine("[SECPROXY] Refresh Data");
            coData.RefreshData();
        }
    }
}

When creating thePrincipalPermissions as part of the object construction, you are using string representations of the built-in objects (“BUILTIN\Administrators”) to set up the principal role. However, the names of these objects may be different depending on the locale the code runs under. It would be appropriate to use the WindowsAccountType.Administrator enumeration value to ease localization because this value is defined to represent the administrator role as well. We used text here to clarify what was being done and also to access the PowerUsers role, which is not available through the WindowsAccountType enumeration.

If the call to the CompanyData object passes through the CompanyDataSecProxy, then the user has permissions to access the underlying data. Any access to this data may be logged, so the administrator can check for any attempt to hack the CompanyData object. The code shown in Example 17-4, “CompanyDataTraceProxy tracing proxy class” is the tracing proxy used to log access to the various method and property access points in the CompanyData object (note that the CompanyDataSecProxy contains the code to turn this proxy object on or off).

Example 17-4. CompanyDataTraceProxy tracing proxy class


public class CompanyDataTraceProxy : ICompanyData
{    
    public CompanyDataTraceProxy() 
    {
        Console.WriteLine("[TRACEPROXY] Created");
        string path = Path.GetTempPath() + @"\CompanyAccessTraceFile.txt";
        fileStream = new FileStream(path, FileMode.Append,
            FileAccess.Write, FileShare.None);
        traceWriter = new StreamWriter(fileStream);
        coData = new CompanyData();
    }

    private ICompanyData coData = null;
    private FileStream fileStream = null;
    private StreamWriter traceWriter = null;

    public string AdminPwd
    {
        get
        {
            traceWriter.WriteLine("AdminPwd read by user.");
            traceWriter.Flush();
            return (coData.AdminPwd);
        }
        set
        {
            traceWriter.WriteLine("AdminPwd written by user.");
            traceWriter.Flush();
            coData.AdminPwd = value;
        }
    }

    public string AdminUserName
    {
        get
        {
            traceWriter.WriteLine("AdminUserName read by user.");
            traceWriter.Flush();
            return (coData.AdminUserName);
        }
        set
        {
            traceWriter.WriteLine("AdminUserName written by user.");
            traceWriter.Flush(); 
            coData.AdminUserName = value;
        }
    }

    public string CEOPhoneNumExt
    {
        get
        {
            traceWriter.WriteLine("CEOPhoneNumExt read by user.");
            traceWriter.Flush();
            return (coData.CEOPhoneNumExt);
        }
        set
        {
            traceWriter.WriteLine("CEOPhoneNumExt written by user.");
            traceWriter.Flush();
            coData.CEOPhoneNumExt = value;
        }
    }

    public void RefreshData()
    {
        Console.WriteLine("[TRACEPROXY] Refresh Data");
        coData.RefreshData();
    }

    public void SaveNewData()
    {
        Console.WriteLine("[TRACEPROXY] Save Data");
        coData.SaveNewData();
    }
}

The proxy is used in the following manner:


   // Create the security proxy here.
    CompanyDataSecProxy companyDataSecProxy = new CompanyDataSecProxy( );

    // Read some data.
    Console.WriteLine("CEOPhoneNumExt: " + companyDataSecProxy.CEOPhoneNumExt);

    // Write some data.
    companyDataSecProxy.AdminPwd = "asdf";
    companyDataSecProxy.AdminUserName = "asdf";

    // Save and refresh this data.
    companyDataSecProxy.SaveNewData( );
    companyDataSecProxy.RefreshData( );

Note that as long as the CompanyData object was accessible, you could have also written this to access the object directly:


    // Instantiate the CompanyData object directly without a proxy.
    CompanyData companyData = new CompanyData( );

    // Read some data.
    Console.WriteLine("CEOPhoneNumExt: " + companyData.CEOPhoneNumExt);

    // Write some data.
    companyData.AdminPwd = "asdf";
    companyData.AdminUserName = "asdf";

    // Save and refresh this data.
    companyData.SaveNewData();
    companyData.RefreshData();

If these two blocks of code are run, the same fundamental actions occur: data is read, data is written, and data is updated/refreshed. This shows you that your proxy objects are set up correctly and function as they should.

Discussion

The proxy design pattern is useful for several tasks. The most notable-in COM, COM+, and .NET remoting-is for marshaling data across boundaries such as AppDomains or even across a network. To the client, a proxy looks and acts exactly the same as its underlying object; fundamentally, the proxy object is just a wrapper around the object.


A proxy can test the security and/or identity permissions of the caller before the underlying object is created or accessed. Proxy objects can also be chained together to form several layers around an underlying object. Each proxy can be added or removed depending on the circumstances.


For the proxy object to look and act the same as its underlying object, both should implement the same interface. The implementation in this recipe uses an ICompanyData interface on both the proxies (CompanyDataSecProxy and CompanyDataTraceProxy) and the underlying object (CompanyData). If more proxies are created, they, too, need to implement this interface.


The CompanyData class represents an expensive object to create. In addition, this class contains a mixture of sensitive and nonsensitive data that requires permission checks to be made before the data is accessed. For this recipe, the CompanyData class simply contains a group of properties to access company data and two methods for updating and refreshing this data. You can replace this class with one of your own and create a corresponding interface that both the class and its proxies implement.


The CompanyDataSecProxy object is the object that a client must interact with. This object is responsible for determining whether the client has the correct privileges to access the method or property that it is calling. The get accessor of the AdminUserName property shows the structure of the code throughout most of this class:


  public string AdminUserName
    {
        get
        {
            string userName = ";
            try
            {
                admPerm.Demand( );
                Startup( );
                userName = coData.AdminUserName;
            }
            catch(SecurityException e)
            {
               Console.WriteLine("AdminUserName_get ailed!: {0}",e.ToString( ));
            }
            return (userName);
        }
        set
        {
            try
            {
                admPerm.Demand( );
                Startup( );
                coData.AdminUserName = value;
            }
            catch(SecurityException e)
            {
               Console.WriteLine("AdminUserName_set Failed! {0}",e.ToString( ));
            }
        }
    }

Initially, a single permission (AdmPerm) is demanded. If this demand fails, a SecurityException, which is handled by the catch clause, is thrown. (Other exceptions will be handed back to the caller.) If the Demand succeeds, the Startup method is called. It is in charge of instantiating either the next proxy object in the chain (CompanyDataTraceProxy) or the underlying CompanyData object. The choice depends on whether the DOTRACE preprocessor symbol has been defined. You may use a different technique, such as a registry key to turn tracing on or off, if you wish.


This proxy class uses the private field coData to hold a reference to an ICompanyData type, which can be either a CompanyDataTraceProxy or the CompanyData object. This reference allows you to chain several proxies together.

In the marketSenior C# & SharePoint Developer in the market

10 years experience in various industries

BSC Degree in Computer Science (Cum Laude)

tomas.floyd@outlook.com

https://sharepointsamurai.wordpress.com


The CompanyDataTraceProxy simply logs any access to the CompanyData object’s information to a text file. Since this proxy will not attempt to prevent a client from accessing the CompanyData object, the CompanyData object is created and explicitly called in each property and method of this object.

How To : Use JavaScript: Error Handling to Build More Efficient Windows Store Apps

winjs_life_02[1]

Believe it or not, sometimes app developers write code that doesn’t work. Or the code works but is terribly inefficient and hogs memory. Worse yet, inefficient code results in a poor UX, driving users crazy and compelling them to uninstall the app and leave bad reviews.

I’m going to explore common performance and efficiency problems you might encounter while building Windows Store apps with JavaScript. In this article, I take a look at best practices for error handling using the Windows Library for JavaScript (WinJS). In a future article, I’ll discuss techniques for doing work without blocking the UI thread, specifically using Web Workers or the new WinJS.Utilities.Scheduler API in WinJS 2.0, as found in Windows 8.1. I’ll also present the new predictable-object lifecycle model in WinJS 2.0, focusing particularly on when and how to dispose of controls.

For each subject area, I focus on three things:

  • Errors or inefficiencies that might arise in a Windows Store app built using JavaScript.
  • Diagnostic tools for finding those errors and inefficiencies.
  • WinJS APIs, features and best practices that can ameliorate specific problems.

I provide some purposefully buggy code but, rest assured, I indicate in the code that something is or isn’t supposed to work.

I use Visual Studio 2013, Windows 8.1 and WinJS 2.0 for these demonstrations. Many of the diagnostic tools I use are provided in Visual Studio 2013. If you haven’t downloaded the most-recent versions of the tools, you can get them from the Windows Dev Center (bit.ly/K8nkk1). New diagnostic tools are released through Visual Studio updates, so be sure to check for updates periodically.

I assume significant familiarity with building Windows Store apps using JavaScript. If you’re relatively new to the platform, I suggest beginning with the basic “Hello World” example (bit.ly/vVbVHC) or, for more of a challenge, the Hilo sample for JavaScript (bit.ly/SgI0AA).

Setting up the Example

First, I create a new project in Visual Studio 2013 using the Navigation App template, which provides a good starting point for a basic multipage app. I also add a NavBar control (bit.ly/14vfvih) to the default.html page at the root of the solution, replacing the AppBar code the template provided. Because I want to demonstrate multiple concepts, diagnostic tools and programming techniques, I’ll add a new page to the app for each demonstration. This makes it much easier for me to navigate between all the test cases.

The complete HTML markup for the NavBar is shown in Figure 1. Copy and paste this code into your solution if you’re following along with the example.

Figure 1 The NavBar Control

<!-- The global navigation bar for the app. -->
<div id="navBar" data-win-control="WinJS.UI.NavBar">
  <div id="navContainer" 
       data-win-control="WinJS.UI.NavBarContainer">
    <div id="homeNav" 
      data-win-control="WinJS.UI.NavBarCommand"
      data-win-options="{
        location: '/pages/home/home.html',
        icon: 'home',
        label: 'Home page'
    }">
    </div>
    <div id="handlingErrors"
      data-win-control="WinJS.UI.NavBarCommand"
      data-win-options="{
        location: '/pages/handlingErrors/handlingErrors.html',
        icon: 'help',
        label: 'Handling errors'
    }">
    </div>
    <div id="chainedAsync"
      data-win-control="WinJS.UI.NavBarCommand"
      data-win-options="{
        location: '/pages/chainedAsync/chainedAsync.html',
        icon: 'link',
        label: 'Chained asynchronous calls'
    }">
    </div>
  </div>
</div>

For more information about building a navigation bar, check out some of the Modern Apps columns by Rachel Appel, such as the one at msdn.microsoft.com/magazine/dn342878.

You can run this project with just the navigation bar, except that clicking any of the navigation buttons will raise an exception in navigator.js. Later in this article, I’ll discuss how to handle errors that come up in navigator.js. For now, remember the app always starts on the home­page and you need to right-click the app to bring up the navigation bar.

Handling Errors

Obviously, the best way to avoid errors is to release apps that don’t raise errors. In a perfect world, every developer would write perfect code that never crashes and never raises an exception. That perfect world doesn’t exist.

As much as users prefer apps that are completely error-free, they are exceptionally good at finding new and creative ways to break apps—ways you never dreamed of. As a result, you need to incorporate robust error handling into your apps.

Errors in Windows Store apps built with JavaScript and HTML act just like errors in normal Web pages. When an error happens in a Document Object Model (DOM) object that allows for error handling (for example, the <script>, <style> or <img> elements), the onerror event for that element is raised. For errors in the JavaScript call stack, the error travels up the chain of calls until caught (in a try/catch block, for instance) or until it reaches the window object, raising the window.onerror event.

WinJS provides several layers of error-handling opportunities for your code in addition to what’s already provided to normal Web pages by the Microsoft Web Platform. At a fundamental level, any error not trapped in a try/catch block or the onError handler applied to a WinJS.Promise object (in a call to the then or done methods, for example) raises the WinJS.Application.onerror event. I’ll examine that shortly.

In practice, you can listen for errors at other levels in addition to Application.onerror. With WinJS and the templates provided by Visual Studio, you can also handle errors at the page-control level and at the navigation level. When an error is raised while the app is navigating to and loading a page, the error triggers the navigation-level error handling, then the page-level error handling, and finally the application-level error handling. You can cancel the error at the navigation level, but any event handlers applied to the page error handler will still be raised.

In this article, I’ll take a look at each layer of error handling, starting with the most important: the Application.onerror event.

Application-Level Error Handling

WinJS provides the WinJS.Application.onerror event (bit.ly/1cOctjC), your app’s most basic line of defense against errors. It picks up all errors caught by window.onerror.” It also catches promises that error out and any errors that occur in the process of managing app model events. Although you can apply an event handler to the window.onerror event in your app, you’re better off just using Application.onerror for a single queue of events to monitor.

Once the Application.onerror handler catches an error, you need to decide how to address it. There are several options:

  • For critical blocking errors, alert the user with a message dialog. A critical error is one that affects continued operation of the app and might require user input to proceed.
  • For informational and non-blocking errors (such as a failure to sync or obtain online data), alert the user with a flyout or an inline message.
  • For errors that don’t affect the UX, silently swallow the error.
  • In most cases, write the error to a tracelog (especially one that’s hooked up to an analytics engine) so you can acquire customer telemetry. For available analytics SDKs, visit the Windows services directory at services.windowsstore.com and click on Analytics (under “By service type”) in the list on the left.

For this example, I’ll stick with message dialogs. I open up default.js (/js/default.js) and add the code shown in Figure 2 inside the main anonymous function, below the handler for the app.oncheckpoint event.

Figure 2 Adding a Message Dialog

app.onerror = function (err) {
  var message = err.detail.errorMessage ||
    (err.detail.exception && err.detail.exception.message) ||
    "Indeterminate error";
  if (Windows.UI.Popups.MessageDialog) {
    var messageDialog =
      new Windows.UI.Popups.MessageDialog(
        message,
        "Something bad happened ...");
    messageDialog.showAsync();
    return true;
  }
}

In this example, the error event handler shows a message telling the user an error has occurred and what the error is. The event handler returns true to keep the message dialog open until the user dismisses it. (Returning true also informs the WWAHost.exe process that the error has been handled and it can continue.)

hero-for-hire_basic-layout_600Senior C# & SharePoint Developer with 10 year’s development experience

BSC degree in Computer Science and Information Systems

5 years experience in delivering SharePoint based solutions using OOB functionality and Custom Development

Extensive experience in
• Microsoft SharePoint platform, App Model (2010 & 2013)
• C# 2.0 – 4.5
• Advanced Workflow (Visual Studio, K2, Nintex)
• Development of Custom Web Parts
• Master Page Dev & Branding
• Integration of Back-end systems, including 3 SAP Projects, MS CRM, K2 BlackPearl,
Custom LOB Systems
• SQL Server (design,development, stored procedures, triggers)
• BCS, BDC – Implementing WCF, REST Services, Web Services
• SharePoint Excel Services, PowerPivot, Word Automation Services
• Custom Reports (MS SQL Reporting, Crystal Reports)
• Objected Oriented Programming and Patterns
• TFS 2010-2013
• Agile & SCRUM methodologies (ALM / SDLC)
• Microsoft Azure as database and hosting hybrid solutions
• Office 365 and SharePoint App Development


Now I’ll create some errors for this code to handle. I’ll create a custom error, throw the error and then catch it in the event handler. For this first example, I add a new folder named handling­Errors to the pages folder. In the folder, I add a new Page Control by right-clicking the project in Solution Explorer and selecting Add | New Item. When I add the handlingErrors Page Control to my project, Visual Studio provides three files in the handlingErrors folder (/pages/handlingErrors): handlingErrors.html, handling­Errors.js and handlingErrors.css.

I open up handlingErrors.html and add this simple markup inside the <section> tag of the body:

<!-- When clicked, this button raises a custom error. -->
<button id="throwError">Throw an error!</button>

Next, I open handlingErrors.js and add an event handler to the button in the ready method of the PageControl object, as shown in Figure 3. I’ve provided the entire PageControl definition in handlingErrors.js for context.

Figure 3 Definition of the handlingErrors PageControl

// For an introduction to the Page Control template, see the following documentation:
// http://go.microsoft.com/fwlink/?LinkId=232511
(function () {
  "use strict";
  WinJS.UI.Pages.define("/pages/handlingErrors/handlingErrors.html", {
    ready: function (element, options) {
      // ERROR: This code raises a custom error.
      throwError.addEventListener("click", function () {
        var newError = new WinJS.ErrorFromName("Custom error", 
          "I'm an error!");
        throw newError;
      });
    },
    unload: function () {
      // Respond to navigations away from this page.
      },
    updateLayout: function (element) {
      // Respond to changes in layout.
    }
  });
})();

Now I press F5 to run the sample, navigate to the handling­Errors page and click the “Throw an error!” button. (If you’re following along, you’ll see a dialog box from Visual Studio informing you an error has been raised. Click Continue to keep the sample running.) A message dialog then pops up with the error, as shown in Figure 4.

The Custom Error Displayed in a Message Dialog
Figure 4 The Custom Error Displayed in a Message Dialog

Custom Errors

The Application.onerror event has some expectations about the errors it handles. The best way to create a custom error is to use the WinJS.ErrorFromName object (bit.ly/1gDESJC). The object created exposes a standard interface for error handlers to parse.

To create your own custom error without using the ErrorFromName object, you need to implement a toString method that returns the message of the error.

Otherwise, when your custom error is raised, both the Visual Studio debugger and the message dialog show “[Object object].” They each call the toString method for the object, but because no such method is defined in the immediate object, it goes through the chain of prototype inheritance for a definition of toString. When it reaches the Object primitive type that does have a toString method, it calls that method (which just displays information about the object).

Page-Level Error Handling

The PageControl object in WinJS provides another layer of error handling for an app. WinJS will call the IPageControlMembers.error method when an error occurs while loading the page. After the page has loaded, however, the IPageControlMembers.error method errors are picked up by the Application.onerror event handler, ignoring the page’s error method.

I’ll add an error method to the PageControl that represents the handleErrors page. The error method writes to the JavaScript console in Visual Studio using WinJS.log. The logging functionality needs to be started up first, so I need to call WinJS.Utilities.startLog before I attempt to use that method. Also note that I check for the existence of the WinJS.log member before I actually call it.

The complete code for handleErrors.js (/pages/handleErrors/handleErrors.js) is shown in Figure 5.

Figure 5 The Complete handleErrors.js

(function () {
  "use strict";
  WinJS.UI.Pages.define("/pages/handlingErrors/handlingErrors.html", {
    ready: function (element, options) {
      // ERROR: This code raises a custom error.      
      throwError.addEventListener("click", function () {
        var newError = {
          message: "I'm an error!",
          toString: function () {
            return this.message;
          }
        };
        throw newError;
      })
    },
    error: function (err) {
      WinJS.Utilities.startLog({ type: "pageError", tags: "Page" });
      WinJS.log && WinJS.log(err.message, "Page", "pageError");
    },
    unload: function () {
      // TODO: Respond to navigations away from this page.
    },
    updateLayout: function (element) {
      // TODO: Respond to changes in layout.
    }
  });
})();

WinJS.log

The call to WinJS.Utilities.startLog shown in Figure 5 starts the WinJS.log helper function, which writes output to the JavaScript console by default. While this helps greatly during design time for debugging, it doesn’t allow you to capture error data after users have installed the app.

For apps that are ready to be published and deployed, you should consider creating your own implementation of WinJS.log that calls into an analytics engine. This allows you to collect telemetry data about your app’s performance so you can fix unforeseen bugs in future versions of your app. Just make sure customers are aware of the data collection and that you clearly list what data gets collected by the analytics engine in your app’s privacy statement.

Note that when you overwrite WinJS.log in this way, the WinJS.log function will catch all output that would otherwise go to the JavaScript console, including things like status updates from the Scheduler. This is why you need to pass a meaningful name and type value into the call to WinJS.Utilities.startLog so you can filter out any errors you don’t want.

Now I’ll try running the sample and clicking “Throw an error!” again. This results in the exact same behavior as before: Visual Studio picks up the error and then the Application.onerror event fires. The JavaScript console doesn’t show any messages related to the error because the error was raised after the page loaded. Thus, the error was picked up only by the Application.onerror event handler.

So why use the PageControl error handling? Well, it’s particularly helpful for catching and diagnosing errors in WinJS controls that are created declaratively in the HTML. For example, I’ll add the following HTML markup inside the <section> tags of handleErrors.html (/pages/handleErrors/handleErrors.html), below the button:

<!-- ERROR: AppBarCommands must be button elements by default
  unless specified otherwise by the 'type' property. -->
<div data-win-control="WinJS.UI.AppBarCommand"></div>

Now I press F5 to run the sample and navigate to the handleErrors page. Again, the message dialog appears until dismissed. However, the following message appears in the JavaScript console (you’ll need to switch back to the desktop to check this):

pageError: Page: Invalid argument: For a button, toggle, or flyout   command, the element must be null or a button element

Note that the app-level error handling appeared even though I handled the error in the PageControl (which logged the error). So how can I trap an error on a page without having it bubble up to the application?

The best way to trap a page-level error is to add error handling to the navigation code. I’ll demonstrate that next.

Navigation-Level Error Handling

When I ran the previous test where the app.on­error event handler handled the page-level error, the app seemed to stay on the homepage. Yet, for some reason, a Back button control appeared. When I clicked the Back button, it took me to a (disabled) handlingErrors.html page.

This is because the navigation code in navigator.js (/js/navigator.js), which is provided in the Navigation App project template, still attempts to navigate to the page even though the page has fizzled. Furthermore, it navigates back to the homepage and adds the error-prone page to the navigation history. That’s why I see the Back button on the homepage after I’ve attempted to navigate to handlingErrors.html.

To cancel the error in navigator.js, I replace the PageControl­Navigator._navigating function with the code in Figure 6. You see that the navigating function contains a call to WinJS.UI.Pages.render, which returns a Promise object. The render method attempts to create a new PageControl from the URI passed to it and insert it into a host element. Because the resulting PageControl contains an error, the returned promise errors out. To trap the error raised during navigation, I add an error handler to the onError parameter of the then method exposed by that Promise object. This effectively traps the error, preventing it from raising the Application.onerror event.

Figure 6 The PageControlNavigator._navigating Function in navigator.js

// Other PageControlNavigator code ...
// Responds to navigation by adding new pages to the DOM.
_navigating: function (args) {
  var newElement = this._createPageElement();
  this._element.appendChild(newElement);
  this._lastNavigationPromise.cancel();
  var that = this;
  this._lastNavigationPromise = WinJS.Promise.as().then(function () {
    return WinJS.UI.Pages.render(args.detail.location, newElement,
       args.detail.state);
  }).then(function parentElement(control) {
    var oldElement = that.pageElement;
    // Cleanup and remove previous element
    if (oldElement.winControl) {
      if (oldElement.winControl.unload) {
        oldElement.winControl.unload();
      }
      oldElement.winControl.dispose();
    }
    oldElement.parentNode.removeChild(oldElement);
    oldElement.innerText = "";
  },
  // Display any errors raised by a page control,
  // clear the backstack, and cancel the error.
  function (err) {
    var messageDialog =
      new Windows.UI.Popups.MessageDialog(
        err.message,
        "Sorry, can't navigate to that page.");
    messageDialog.showAsync()
    nav.history.backStack.pop();
    return true;
  });
  args.detail.setPromise(this._lastNavigationPromise);
},
// Other PageControlNavigator code ...

Promises in WinJS

Creating promises and chaining promises—and the best practices for doing so—have been covered in many other places, so I’ll skip that discussion in this article. If you need more information, check out the blog post by Kraig Brockschmidt at bit.ly/1cgMAnu or Appendix A in his free e-book, “Programming Windows Store Apps with HTML, CSS, and JavaScript, Second Edition” (bit.ly/1dZwW1k).

Note that it’s entirely proper to modify navigator.js. Although it’s provided by the Visual Studio project template, it’s part of your app’s code and can be modified however you need.

In the _navigating function, I’ve added an error handler to the final promise.then call. The error handler shows a message dialog—as with the application-level error handling—and then cancels the error by returning true. It also removes the page from the navigation history.

When I run the sample again and navigate to handlingErrors.html, I see the message dialog that informs me the navigation attempt has failed. The message dialog from the application-level error handling doesn’t appear.

Tracking Down Errors in Asynchronous Chains

When building apps in JavaScript, I frequently need to follow one asynchronous task with another, which I address by creating promise chains. Chained promises will continue moving along through the tasks, even if one of the promises in the chain returns an error. A best practice is to always end a chain of promises with a call to the done method. The done function throws any errors that would’ve been caught in the error handler for any previous then statements. This means I don’t need to define error functions for each promise in a chain.

Even so, tracking errors down can be difficult in very long chains once they’re trapped in the call to promise.done. Chained promises can include multiple tasks, and any one of them could fail. I could set a breakpoint in every task to see where the error pops up, but that would be terribly time-consuming.

Here’s where Visual Studio 2013 comes to the rescue. The Tasks window (introduced in Visual Studio 2010) has been upgraded to handle asynchronous JavaScript debugging as well. In the Tasks window you can view all active and completed tasks at any given point in your app code.

For this next example, I’ll add a new page to the solution to demonstrate this awesome tool. In the solution, I create a new folder called chainedAsync in the pages folder and then add a new Page Control named chainAsync.html (which creates /pages/­chainedAsync/chainedAsync.html and associated .js and .css files).

In chainedAsync.html, I insert the following markup within the <section> tags:

<!-- ERROR:Clicking this button starts a chain reaction with an error. -->
<p><button id="startChain">Start the error chain</button></p>
<p id="output"></p>

In chainedAsync.js, I add the event handler shown in Figure 7for the click event of the startChain button to the ready method for the page.

Figure 7 The Contents of the PageControl.ready Function in chainedAsync.js

startChain.addEventListener("click", function () {
  goodPromise().
    then(function () {
        return goodPromise();
    }).
    then(function () {
        return badPromise();
    }).
    then(function () {
        return goodPromise();
    }).
    done(function () {
        // This *shouldn't* get called
    },
      function (err) {
          document.getElementById('output').innerText = err.toString();
    });
});

Last, I define the functions goodPromise and badPromise, shown in Figure 8, within chainAsync.js so they’re available inside the PageControl’s methods.

Figure 8 The Definitions of the goodPromise and badPromise Functions in chainAsync.js

function goodPromise() {
  return new WinJS.Promise(function (comp, err, prog) {
    try {
      comp();
    } catch (ex) {
      err(ex)
    }
  });
}
// ERROR: This returns an errored-out promise.
function badPromise() {
  return WinJS.Promise.wrapError("I broke my promise :(");
}

I run the sample again, navigate to the “Chained asynchronous” page, and then click “Start the error chain.” After a short wait, the message “I broke my promise :(” appears below the button.

Now I need to track down where that error occurred and figure out how to fix it. (Obviously, in a contrived situation like this, I know exactly where the error occurred. For learning purposes, I’ll forget that badPromise injected the error into my chained promises.)

To figure out where the chained promises go awry, I’m going to place a breakpoint on the error handler defined in the call to done in the click handler for the startChain button, as shown in Figure 9.

The Position of the Breakpoint in chainedAsync.html
Figure 9 The Position of the Breakpoint in chainedAsync.html

I run the same test again, and when I return to Visual Studio, the program execution has stopped on the breakpoint. Next, I open the Tasks window (Debug | Windows | Tasks) to see what tasks are currently active. The results are shown in Figure 10.

The Tasks Window in Visual Studio 2013 Showing the Error
Figure 10 The Tasks Window in Visual Studio 2013 Showing the Error

At first, nothing in this window really stands out as having caused the error. The window lists five tasks, all of which are marked as active. As I take a closer look, however, I see that one of the active tasks is the Scheduler queuing up promise errors—and that looks promising (please excuse the bad pun).

(If you’re wondering about the Scheduler, I encourage you to read the next article in this series, where I’ll discuss the new Scheduler API in WinJS.)

When I hover my mouse over that row (ID 120 in Figure 10) in the Tasks window, I get a targeted view of the call stack for that task. I see several error handlers and, lo and behold, badPromise is near the beginning of that call stack. When I double-click that row, Visual Studio takes me right to the line of code in badPromise that raised the error. In a real-world scenario, I’d now diagnose why badPromise was raising an error.

WinJS provides several levels of error handling in an app, above and beyond the reliable try-catch-finally block. A well-performing app should use an appropriate degree of error handling to provide a smooth experience for users. In this article, I demonstrated how to incorporate app-level, page-level and navigation-level error handling into an app. I also demonstrated how to use some of the new tools in Visual Studio 2013 to track down errors in chained promises.

How to: Modify a Project System So That Projects Load in Multiple Versions of Visual Studio

avatar[2]

In Visual Studio 2013, you can prevent a project that was created in your custom project system from loading in an earlier version of Visual Studio.

You can also enable that project to identify itself to a later version in case the project requires repair, conversion, or deprecation.

You can mark a project as incompatible with earlier versions of Visual Studio. For example, suppose you create in Visual Studio 2013 a project that uses a .NET Framework 4.5 feature.
Because this project can’t be built in Visual Studio 2010 with SP1, you can mark it as incompatible with Visual Studio 2010 with SP1 to prevent that version from trying to load it.


The component that adds the incompatible feature is responsible for marking the project as incompatible. The component must have access to the IVsHierarchy interface that represents the projects of interest.

Marking a Project as Incompatible


You can mark a project as incompatible with earlier versions of Visual Studio. For example, suppose you create in Visual Studio 2013 a project that uses a .NET Framework 4.5 feature. Because this project can’t be built in Visual Studio 2010 with SP1, you can mark it as incompatible with Visual Studio 2010 with SP1 to prevent that version from trying to load it.


The component that adds the incompatible feature is responsible for marking the project as incompatible. The component must have access to the IVsHierarchy interface that represents the projects of interest.

To mark a project as incompatible

  1. In the component, get an IVsAppCompat interface from the global service SVsSolution.

    For more information, see SVsSolution.

  2. In the component, call IVsAppCompat.AskForUserConsentToBreakAssetCompat, and pass it an array of IVsHierarchy interfaces that represent the projects of interest.

    This method has the following signature:

    HRESULT AskForUserConsentToBreakAssetCompat([in] SAFEARRAY(IVsHierarchy*) sarrProjectHierarchies) 
    

    If you implement this code, a project compatibility dialog box will appear. The dialog box will asks the user for permission to mark all specified projects as incompatible. If the user agrees, AskForUserConsentToBreakAssetCompat returns S_OK; otherwise, AskForUserConsentToBreakAssetCompat returns OLE_E_PROMPTSAVECANCELLED.

    Caution noteaution
    In most common scenarios, the IVsHierarchy array will contain only one item.


  3. If AskForUserConsentToBreakAssetCompat returns S_OK, the component makes or accepts the changes that break compatibility.
  4. In your component, call the IVsAppCompat.BreakAssetCompatibility method for each project that you want to mark as incompatible. The component can set the value of the parameter lpszMinimumVersion to a specific minimum version instead of having Visual Studio look up the current version string in the registry.

    This approach minimizes the risk of the component inadvertently setting a higher value in the future, based on what is in the registry at that time. If that higher value were set, Visual Studio 2013 couldn’t open such a project.

    This method has the following signature:

    HRESULT BreakAssetCompatibility([in] IVsHierarchy * pProjHier), [in] LPCOLESTR lpszMinimumVersion); 
    

    If the component sets lpszMinimumVersion to NULL, the BreakAssetCompatibility method calls the IVsAppCompat.GetCurrentDesignTimeCompatVersion method to obtain a string that represents the current version of Visual Studio.


  5. This method has the following signature:
    RESULT GetCurrentDesignTimeCompatVersion([out] BSTR * pbstrCurrentDesignTimeCompatVersion)


  6. The BreakAssetCompatibility method then calls the IVsHierarchy.SetProperty method to set the root VSHPROPID_MinimumDesignTimeCompatVersion property to the value of the version string that you obtained in the previous step.


 Important
You must implement the VSHPROPID_MinimumDesignTimeCompatVersion property to mark a project as compatible or incompatible. For example, if the project system uses an MSBuild project file, add to the project file a <MinimumVisualStudioVersion> build property that has a value equal to the corresponding VSHPROPID_MinimumDesignTimeCompatVersion property value.
A project that is incompatible with the current version of Visual Studio must be kept from loading. Furthermore, a project that is incompatible can’t be upgraded or repaired. Therefore, a project must be checked for compatibility twice: first, when it is being considered for upgrade or repair, and second, before it is loaded.

To enable the detection of project incompatibility, you must implement the UpgradeProject_CheckOnly and CreateProject methods. If a project is incompatible, UpgradeProject_CheckOnly must return the success code VS_S_INCOMPATIBLEPROJECT, and CreateProject must return the error code VS_E_INCOMPATIBLEPROJECT. For flavored projects, you must implement IVsProjectFlavorUpgradeViaFactory2.UpgradeProjectFlavor_CheckOnly instead of IVsProjectUpgradeViaFactory4.UpgradeProject_CheckOnly.

A project system is referred to as flavored if it has a web, Office (VSTO), Silverlight, or other project type built on top of it. Older project systems that already implement IVsProjectUpgradeViaFactory.UpgradeProject_CheckOnly and flavored project systems that already implement IVsProjectFlavorUpgradeViaFactory.UpgradeProjectFlavor_CheckOnly continue to be supported. The older version of IVsProjectUpgradeViaFactory.UpgradeProject_CheckOnly has the following implementation signature:

Copy
IVsProjectUpgradeViaFactory::UpgradeProject_CheckOnly(

/* [in] */ BSTR bstrFileName,
/* [in] */ IVsUpgradeLogger *pLogger,
/* [out] */ BOOL *pUpgradeRequired,
/* [out] */ GUID *pguidNewProjectFactory,
/* [out] */ VSPUVF_FLAGS *pUpgradeProjectCapabilityFlags
)

If this method sets pUpgradeRequired to TRUE and returns S_OK, the result is treated as “Upgrade” and as though the method set an upgrade flag to the value VSPUVF_PROJECT_ONEWAYUPGRADE, which is described later in this topic. The following return values are supported by using this older method but only when pUpgradeRequired is set to TRUE:

  1. VS_S_PROJECT_SAFEREPAIRREQUIRED. This return value translates the pUpgradeRequired value to TRUE as equivalent to VSPUVF_PROJECT_SAFEREPAIR, which is described later in this topic.
  2. VS_S_PROJECT_UNSAFEREPAIRREQUIRED. This return value translates the pUpgradeRequired value to TRUE as equivalent to VSPUVF_PROJECT_UNSAFEREPAIR, which is described later in this topic
  3. VS_S_PROJECT_ONEWAYUPGRADEREQUIRED. This return value translates the pUpgradeRequired value to TRUE as equivalent to VSPUVF_PROJECT_ONEWAYUPGRADE, which is described later in this topic.

The new implementations in IVsProjectUpgradeViaFactory4 and IVsProjectFlavorUpgradeViaFactory2 enable specifying the migration type more precisely.

NoteNote
You can cache the result of the compatibility check by the UpgradeProject_CheckOnly method so that it can also be used by the subsequent call to CreateProject.

For example, if the UpgradeProject_CheckOnly and CreateProject methods that are written for a Visual Studio 2010 with SP1 project system examine a project file and find that the <MinimumVisualStudioVersion> build property is “11.0”, Visual Studio 2010 with SP1 won’t load the project. In addition, Solution Navigator would indicate that the project is “incompatible” and won’t load it.

By using Visual Studio 2013, you can modify most projects that were created in Visual Studio 2010 with SP1 to work in both that version and Visual Studio 2013.

Before a project is loaded, Visual Studio calls the UpgradeProject_CheckOnly method to determine whether the project can be upgraded. If the project can be upgraded, the UpgradeProject_CheckOnly method sets a flag that causes a later call to the UpgradeProject method to upgrade the project. Because incompatible projects can’t be upgraded, UpgradeProject_CheckOnly must first check for project compatibility, as described in the earlier section.

You, as the author of a project system, implement UpgradeProject_CheckOnly (from the IVsProjectUpgradeViaFactory4 interface) to provide users of your project system with an upgrade check.

Visual-Studio-2010-Add-New-Project[1] visual-studio-11-output-directory[1]

When users open a project, this method is called to determine whether a project must be repaired before it is loaded. The possible upgrade requirements are enumerated in VSPUVF_REPAIRFLAGS, and they include the following possibilities:

  1. SPUVF_PROJECT_NOREPAIR: Requires no repair.
  2. VSPUVF_PROJECT_SAFEREPAIR: Makes the project compatible with Visual Studio 2010 with SP1 without the issues that you might have encounter with the previous versions of the product.
  3. VSPUVF_PROJECT_UNSAFEREPAIR: Makes the project compatible with Visual Studio 2010 with SP1 but with some risk of the issues that you might have encountered with previous versions of the product. For example, the project won’t be compatible if it depended on different SDK versions between Visual Studio 2013 and Visual Studio 2010 with SP1.
  4. VSPUVF_PROJECT_ONEWAYUPGRADE: Makes the project incompatible with Visual Studio 2010 with SP1.
  5. VSPUVF_PROJECT_INCOMPATIBLE: Indicates that Visual Studio 2013 doesn’t support this project.
  6. VSPUVF_PROJECT_DEPRECATED: Indicates that this project is no longer supported.
Note Note
To avoid confusion, don’t combine upgrade flags when you set them. For example, don’t create an ambiguous upgrade status such as VSPUVF_PROJECT_SAFEREPAIR | VSPUVF_PROJECT_DEPRECATED.


Project flavors may implement the function UpgradeProjectFlavor_CheckOnly from the IVsProjectFlavorUpgradeViaFactory2 interface.

To make this function work, the IVsProjectUpgradeViaFactory4.UpgradeProject_CheckOnly implementation mentioned earlier must call it.


This call is already implemented in the Visual Basic or C# base project system. The effect of this function enables project flavors to also determine the upgrade requirements of a project, in addition to what the base project system has determined. The compatibility dialog box shows the most severe of the two requirements.

When Visual Studio performs an upgrade check, it provides a logger instead of a NULL value as in previous versions of Visual Studio. The logger enables project systems and flavors to provide additional information that can help you understand the nature of the changes that are needed to make your older projects load properly.

For Managed implementations, the project upgrade interfaces are available in the Microsoft.VisualStudio.Shell.Interop.11.0.dll interop assembly.

The UpgradeProject method can determine whether the changes it makes would prevent the project from loading in an previous version of Visual Studio. If so, the method marks the project as incompatible.

To understand how a project is marked as incompatible, see Marking a Project as Incompatible earlier in this topic. We recommend that, after this dialog box appears, you mark the project as incompatible by calling the method IVsAppCompat.BreakAssetCompatibility directly, instead of first calling the IVsAppCompat.AskForUserConsentToBreakAssetCompat method because the dialog box doesn’t need to appear twice.

Here is an example to help summarize the compatibility user experience. If a project was created in Visual Studio 2010 with SP1, that project is opened in Visual Studio 2012, and Visual Studio 2012 determines that an upgrade is required, Visual Studio displays a dialog box to ask the user for permission to make the changes.

If the user agrees, the project is modified and then loaded. If the project was created by using Visual Studio 2005 or Visual Studio 2008, the solution file will also be upgraded. If the solution is then closed and reopened in Visual Studio 2010 with SP1, the one-way-upgraded project will be incompatible and not loaded (but will load in Visual Studio 2012).


If the project had only required a repair (instead of an upgrade), the repaired project will still open in Visual Studio 2010 with SP1, Visual Studio 2012, and Visual Studio 2013.

The call to IVsProjectUpgradeViaFactory::UpgradeProject contains an IVsUpgradeLogger logger, which project systems and flavors should use to provide detailed upgrade tracing for troubleshooting. If a warning or an error is logged, Visual Studio shows the upgrade report.When you write to the upgrade logger, consider the following guidelines:

  • Visual Studio will call Flush after all projects have finished upgrading. Don’t call it in your project system.
  • The LogMessage function has the following ErrorLevels:
    • 0 is for any information that you’d like to trace.
    • 1 is for a warning.
    • 2 is for an error
    • 3 is for the Report formatter. When your project is upgraded, log the word “Converted” once, and don’t localize the word.
  • If a project doesn’t require any repair or upgrade, Visual Studio will generate the log file only if the project system had logged a warning or an error during UpgradeProject_CheckOnly or UpgradeProjectFlavor_CheckOnly methods.

Microsoft Site Templates Upgraded and are now available


One of the main goals of the application templates is to provide a demonstration of the application building power in SharePoint and as a potential starting point for larger, more robust applications. While these templates are fully functional and usable out-of-the-box, I’ll be happy to reply on your comments and supporting you as needed.


note: those templates were collected from several resources and no source code for them.

All templates are compatible with SharePoint Server 2010 and Foundation Server 2010.

Case Management

The Case Management application template helps case managers track the status and tasks required to complete their work. When a case is created, standard tasks and documents are created which are modified based on the work each case manager has completed.

Clinical Trial Initiation and Management

For those who work in Academic Medical Centers, the Clinical Trial Initiation and Management application template helps teams manage the process of tracking clinical trial protocols, objective setting, subject selection and budget activities.

Employee Activities Site
employee activities
The Employee Activities Site application template helps departments, such as HR and Marketing, manage the creation and attendance of events for employees.

Employee Training Scheduling and Materials

The Employee Training Scheduling and Materials application template helps Instructors add new courses and organize course materials. Employees use the site to schedule attendance at a course, track courses they’ve attended and to provide feedback.

Employee Training 01

Employee Training

Employee Training 03

Absence Request and Vacation Schedule Management

The Absence Request and Vacation Schedule Management application template helps provider departments manage requests for out of office days and provides dashboards showing which users are signed up for a set of responsibilities

Event Planning

The Event Planning application template helps teams organize events efficiently through the use online registration, schedules, communication and feedback.

Discussion Database

The Discussion Database application template provides a location where team members can create and reply to discussion topics.

Team Work Site

The Team Work Site application template provides a place where clinical and business teams, can upload background documents, track scheduled calendar events and submit action items that result from team meetings.

Document Library and Review

The Document Library and Review application template helps people to manage the review cycle common to processes like publication, knowledge management and project plan development.

Knowledgebase

The Knowledgebase application template helps teams manage the information that is resident within their organization. The template enables team members to upload/create documents using Web-based tools and tag them with relevant identifying information.

Policies and Procedures Solution Accelerator

The Policies and Procedures Solution Accelerator assists healthcare organizations create, maintain, publish and easily access policy and procedure information. It also provides the ability to upload documents, maintain a version history and manage tasks.

Board of Directors

The Board of Directors application template provides a single location for an external group of members to store and locate common documents such as quarterly reviews, shareholder meeting notes and annual strategy documents.

Business Performance Reporting

The Business Performance Reporting application template helps health organization managers track the satisfaction of internal customers/patients through a combination of surveys and discussions.

Request for Proposal

The Request for Proposal application template helps manage the process of creating and releasing an initial RFP, collecting submissions of proposals and formally accepting the selected proposal from amongst those submitted.

Compliance Process Support Site

The Compliance Process Support Site application template helps both teams and executive sponsors to manage compliance implementation endeavors, such as HIPAA.

Expense Reimbursement and Approval

The Expense Reimbursement and Approval application template helps manage elements of the expense approval process, including creation and approval. Users can monitor the status of their reimbursement request through a filtered view listing.

Scorecards Solution Accelerator

The Scorecards solution accelerator acts as a template for configuring a management dashboard to track organizational metrics. It contains four example dashboards ranging from a primary care practice to a healthcare organization’s CEO dashboard.

Call Center
call center
The Call Center application template helps departments manage the process of handling customer service requests. The application template helps teams manage service requests from issue identification to cause analysis and resolution.

Help Desk
help desk
The Help Desk application template helps departments manage the process of handling service requests. Team members use the application template to identify a service request, manage identification of the root cause and track solution status.

Physical Asset Tracking and Management

The Physical Asset Tracking and Management application template helps departments, such as Facilities, BioMedical, Surgery, etc. manage requests and the tracking of physical assets.

Inventory Tracking
inventory
The Inventory Tracking application template helps organizations track elements associated with inventory, including creation of inventory. Users are notified when each part reaches the reorder quantity and helps manage customer and supplier information.

Cafeteria Menu Management

The Cafeteria Menu Management application template helps hospital Food & Nutrition staff easily communicate daily menu choices to hospital staff and visitors. It allows staff to develop/schedule menus and provide related nutritional information.

Budgeting and Tracking Multiple Projects

The Budgeting and Tracking Multiple Projects application template helps project teams track and budget multiple, interrelated sets of activities. Management tools such as assignment of new tasks, Gantt Charts and common status designators.

Change Request Management
change request management
The Change Request Management application template helps users track risks associated with a design change. Team members can submit a change request, notifying stakeholders of the risks involved with the change.

IT Team Workspace

The IT Team Workspace application template helps teams manage the development, deployment and support of software projects. It also includes help desk functionality, allowing team members to guide service requests from initiation to resolution.

Project Tracking Workspace

The Project Tracking Workspace application template helps small team projects manage project information in a single location. The application template provides a place where a team can list and view project issues and tasks.


How To : Use the Microsoft Monitoring Agent to Monitor apps in deployment

You can locally monitor IIS-hosted ASP.NET web apps and SharePoint 2010 or 2013 applications for errors, performance issues, or other problems by using Microsoft Monitoring Agent. You can save diagnostic events from the agent to an IntelliTrace log (.iTrace) file. You can then open the log in Visual Studio Ultimate 2013 to debug problems with all the Visual Studio diagnostic tools.

If you use System Center 2012, use Microsoft Monitoring Agent with Operations Manager to get alerts about problems and create Team Foundation Server work items with links to the saved IntelliTrace logs. You can then assign these work items to others for further debugging.

See Integrating Operations Manager with Development Processes and Monitoring with Microsoft Monitoring Agent.

Before you start, check that you have the matching source and symbols for the built and deployed code. This helps you go directly to the application code when you start debugging and browsing diagnostic events in the IntelliTrace log. Set up your builds so that Visual Studio can automatically find and open the matching source for your deployed code.

  1. Set up Microsoft Monitoring Agent.
  2. Start monitoring your app.
  3. Save the recorded events.
Set up the standalone agent on your web server to perform local monitoring without changing your application. If you use System Center 2012, see Installing Microsoft Monitoring Agent.

Set up the standalone agent

  1. Make sure that:
  2. Download the free Microsoft Monitoring Agent, either the 32-bit version MMASetup-i386.exe or 64-bit version MMASetup-AMD64.exe, from the Microsoft Download Center to your web server.
  3. Run the downloaded executable to start the installation wizard.
  4. Create a secure directory on your web server to store the IntelliTrace logs, for example, C:\IntelliTraceLogs.

    Make sure that you create this directory before you start monitoring. To avoid slowing down your app, choose a location on a local high-speed disk that’s not very active.


    Security note Security Note
    IntelliTrace logs might contain personal and sensitive data. Restrict this directory to only those identities that must work with the files. Check your company’s privacy policies.
  5. To run detailed, function-level monitoring or to monitor SharePoint applications, give the application pool that hosts your web app or SharePoint application read and write permissions to the IntelliTrace log directory. How do I set up permissions for the application pool?
  1. On your web server, open a Windows PowerShell or Windows PowerShell ISE command prompt window as an administrator.


    Open Windows PowerShell as administrator 

  2. Run the Start-WebApplicationMonitoring command to start monitoring your app. This will restart all the web apps on your web server.


    Here’s the short syntax:


    Start-WebApplicationMonitoring “<appName>” <monitoringMode> “<outputPath>” <UInt32> “<collectionPlanPathAndFileName>”


    Here’s an example that uses just the web app name and lightweight Monitor mode:


    PS C:\>Start-WebApplicationMonitoring “Fabrikam\FabrikamFiber.Web” Monitor “C:\IntelliTraceLogs”


    Here’s an example that uses the IIS path and lightweight Monitor mode:


    PS C:\>Start-WebApplicationMonitoring “IIS:\sites\Fabrikam\FabrikamFiber.Web” Monitor “C:\IntelliTraceLogs”


    After you start monitoring, you might see the Microsoft Monitoring Agent pause while your apps restart.


    Start monitoring with MMA confirmation 

    “<appName>” Specify the path to the web site and web app name in IIS. You can also include the IIS path, if you prefer.


    “<IISWebsiteName>\<IISWebAppName>”

    -or-

    “IIS:\sites \<IISWebsiteName>\<IISWebAppName>”


    You can find this path in IIS Manager. For example:


    Path to IIS web site and web app 

    You can also use the Get-WebSite and Get WebApplication commands.

    <monitoringMode> Specify the monitoring mode:


    • Monitor: Record minimal details about exception events and performance events. This mode uses the default collection plan.
    • Trace: Record function-level details or monitor SharePoint 2010 and SharePoint 2013 applications by using the specified collection plan. This mode might make your app run more slowly.


      This example records events for a SharePoint app hosted on a SharePoint site:


      Start-WebApplicationMonitoring “FabrikamSharePointSite\FabrikamSharePointApp” Trace “C:\Program Files\Microsoft Monitoring Agent\Agent\IntelliTraceCollector\collection_plan.ASP.NET.default.xml” “C:\IntelliTraceLogs”


    • Custom: Record custom details by using specified custom collection plan. You’ll have to restart monitoring if you edit the collection plan after monitoring has already started.
    “<outputPath>” Specify the full directory path to store the IntelliTrace logs. Make sure that you create this directory before you start monitoring.
    <UInt32> Specify the maximum size for the IntelliTrace log. The default maximum size of the IntelliTrace log is 250 MB.

    When the log reaches this limit, the agent overwrites the earliest entries to make space for more entries. To change this limit, use the -MaximumFileSizeInMegabytes option or edit the MaximumLogFileSize attribute in the collection plan.

    “<collectionPlanPathAndFileName>” Specify the full path or relative path and the file name of the collection plan. This plan is an .xml file that configures settings for the agent.

    These plans are included with the agent and work with web apps and SharePoint applications:

    • collection_plan.ASP.NET.default.xml

      Collects only events, such as exceptions, performance events, database calls, and Web server requests.

    • collection_plan.ASP.NET.trace.xml

      Collects function-level calls plus all the data in default collection plan. This plan is good for detailed analysis but might slow down your app.


    You can find localized versions of these plans in the agent’s subfolders. You can also customize these plans or create your own plans to avoid slowing down your app. Put any custom plans in the same secure location as the agent.


    How else can I get the most data without slowing down my app?


    For the more information about the full syntax and other examples, run the get-help Start-WebApplicationMonitoring –detailed command or the get-help Start-WebApplicationMonitoring –examples command.

  3. To check the status of all monitored web apps, run the Get-WebApplicationMonitoringStatus command.

How To : Use the Modelling SDK to create UML Diagrams

Use Case Diagrams

A use case diagram is a summary of who uses your application and what they can do with it. It
describes the relationships among requirements, users, and the major components of the system, and
provides an overall view of how the system is used.

uml+activity+diagram+library+mgmt+book+return[1]
Activity Diagrams
Use case diagrams can be broken down into activity diagrams. An activity diagram shows the software
process as the fl ow of work through a series of actions. It can be a useful exercise to draw an
activity diagram showing the major tasks that a user will perform with the software application.


Sequence Diagrams


Sequence diagrams display interactions between different objects. This interaction usually takes
place as a series of messages between the different objects. Sequence diagrams can be considered an
alternate view to the activity diagram. A sequence diagram can show a clear view of the steps in a
use case. Figure 14-3 shows an example of a sequence diagram.
Component Diagrams


Component diagrams help visualize the high-level structure of the software system. They show the
major parts of a system and how those parts interact and depend on each other. One nice feature of
component diagrams is that they show how the different parts of the design interact with each other,
regardless of how those individual parts are actually implemented. Figure 14-4 shows an example of
a component diagram.


Class Diagrams


Class diagrams describe the objects in the application system. They do this without referencing any
particular implementation of the system itself. This type of UML modeling diagram is also referred
to as a conceptual class diagram. Figure 14-5 shows an example of a class diagram.

How to: Export UML Diagrams to Image Files

You can export a UML document from Visual Studio to an image that is under program control. For example, you might want to do this as part of automatic document generation.

If you want to export a document to an image manually, you can copy and paste the shapes from a diagram into other programs such as Word. You can also print documents to XPS format. For more information, see Export Images of Diagrams.

The following code defines a shortcut menu command, also known as a context menu command, that saves an image to a file.

Note Note

To make this code work as a menu command, you must incorporate it into a MEF component. For more information, seeHow to: Define a Menu Command on a Modeling Diagram.

The code first uses GetObject<T> to get the Diagram of the underlying implementation. This type has a methodCreateBitmap.

namespace SaveToImage
{
  using System.ComponentModel.Composition; // for [Import], [Export]
  using System.Drawing; // for Bitmap
  using System.Drawing.Imaging; // for ImageFormat
  using System.Linq; // for collection extensions
  using System.Windows.Forms; // for SaveFileDialog
  using Microsoft.VisualStudio.Modeling.Diagrams;
    // for Diagram
  using Microsoft.VisualStudio.Modeling.ExtensionEnablement;
    // for IGestureExtension, ICommandExtension, ILinkedUndoContext
  using Microsoft.VisualStudio.ArchitectureTools.Extensibility.Presentation;
    // for IDiagramContext
  using Microsoft.VisualStudio.ArchitectureTools.Extensibility.Uml;
    // for designer extension attributes


  /// 
  /// Called when the user clicks the menu item.
  /// 
  // Context menu command applicable to any UML diagram 
  [Export(typeof(ICommandExtension))]
  [ClassDesignerExtension]
  [UseCaseDesignerExtension]
  [SequenceDesignerExtension]
  [ComponentDesignerExtension]
  [ActivityDesignerExtension]
  class CommandExtension : ICommandExtension
  {
    [Import]
    IDiagramContext Context { get; set; }

    public void Execute(IMenuCommand command)
    {
      // Get the diagram of the underlying implementation.
      Diagram dslDiagram = Context.CurrentDiagram.GetObject();
      if (dslDiagram != null)
      {
        string imageFileName = FileNameFromUser();
        if (!string.IsNullOrEmpty(imageFileName))
        {
          Bitmap bitmap = dslDiagram.CreateBitmap(
           dslDiagram.NestedChildShapes,
           Diagram.CreateBitmapPreference.FavorClarityOverSmallSize);
          bitmap.Save(imageFileName, GetImageType(imageFileName));
        }
      }
    }

    /// 
    /// Called when the user right-clicks the diagram.
    /// Set Enabled and Visible to specify the menu item status.
    /// 
    ///
    public void QueryStatus(IMenuCommand command)
    {
      command.Enabled = Context.CurrentDiagram != null 
        && Context.CurrentDiagram.ChildShapes.Count() > 0;
    }

    /// 
    /// Menu text.
    /// 
    public string Text
    {
      get { return "Save To Image..."; }
    }


    /// 
    /// Ask the user for the path of an image file.
    /// 
    /// image file path, or null
    private string FileNameFromUser()
    {
      SaveFileDialog dialog = new SaveFileDialog();
      dialog.AddExtension = true;
      dialog.DefaultExt = "image.bmp";
      dialog.Filter = "Bitmap ( *.bmp )|*.bmp|JPEG File ( *.jpg )|*.jpg|Enhanced Metafile (*.emf )|*.emf|Portable Network Graphic ( *.png )|*.png";
      dialog.FilterIndex = 1;
      dialog.Title = "Save Diagram to Image";
      return dialog.ShowDialog() == DialogResult.OK ? dialog.FileName : null;
    }

    /// 
    /// Return the appropriate image type for a file extension.
    /// 
    ///
    /// 
    private ImageFormat GetImageType(string fileName)
    {
      string extension = System.IO.Path.GetExtension(fileName).ToLowerInvariant();
      ImageFormat result = ImageFormat.Bmp;
      switch (extension)
      {
        case ".jpg":
          result = ImageFormat.Jpeg;
          break;
        case ".emf":
          result = ImageFormat.Emf;
          break;
        case ".png":
          result = ImageFormat.Png;
          break;
      }
      return result;
    }
  }
}

How To : Design the Physical Architecture to Support Collaborative Development and ALM of SharePoint Foundation 2010 Application

Introduction

This article explains the physical architecture which fits best in collaborative development and ALM of SharePoint Foundation 2010 application and what are the servers and tools needed and how they play key roles in ALM of SharePoint Foundation 2010. The purpose of this article is to provide overall understanding of various servers and farms connected to each other in SharePoint Foundation.

Background

Basic understanding of different server OS & SharePoint Foundation 2010 is required.

Solution

Application Life-cycle Management (ALM) is the co-ordination of development life-cycle activities—including requirements, modeling, development, build, and testing. Recently, ALM has expanded beyond the application and the software development life cycle to also include business solution governance, infrastructure management, operations, and support.

You can use ALM to help align your organization in the context of a software solution in business, development, and operations. With an application development platform that supports ALM, you can provide integration between the various tools used and activities performed within each of these capabilities.

There are main four types of staging servers with standalone developer’s environment which plays a key role in ALM of SharePoint 2010 application:

  1. Development SharePoint Farm
  2. Team foundation server
  3. Integration/Testing Farm
  4. Production Farm
    +
    Developer’s Workstation

The below figure is a physical architecture which depicts how each sever is interconnected to support collaborative development and ALM for SharePoint Foundation 2010 application:

Click to enlarge image

Development SharePoint Farm

A SharePoint farm is fundamentally a collection of SharePoint role servers that provide for the base infrastructure required to house SharePoint sites. The farm level is the highest level of SharePoint architecture, providing a distinct operational boundary for a SharePoint environment. Each farm in an environment is a self-encompassing unit made up of one or more servers, such as web servers, service application servers, and SharePoint database servers.

SharePoint development farm needed for the developers in an organization that makes heavy use of SharePoint often need environments to test new applications, web parts, solutions, and other SharePoint customization. These developers often need a sandbox area where these farm level features and solutions can be tested.

I have considered two-tier topology for SharePoint Foundation 2010 farm. However it will be entirely based on the need of your application. If your application is a relatively small intranet application, then you can choose single tier topology or if you are going to integrate other search server with foundation, then you can choose three-tier topology with application server as a middle tier (Remember that SharePoint Foundation 2010 doesn’t include enterprise search). It may make sense to deploy one or more development farms so that developers have the opportunity to run their tests and develop software for SharePoint independent of the existing production environment.

There are basically two types of servers included in two-tier development farm of SharePoint Foundation 2010:

  1. Web server
  2. Content database server

In the above figure, there are three front-end web servers and one SharePoint content database server. However you can choose a single front-end web server connected to content database server based on your application need and architecture of production environment. All web servers share the same content database. This is called two-tier deployment farm where SharePoint server component and content database are installed on separate server. As I mentioned before, you can choose one-tier, two-tier or three-tier deployment topology based on your application architecture and topology of production architecture.

Each web server has SharePoint Foundation 2010 and SharePoint extension for TFS 2010 install on it. It needs SharePoint extension for TFS 2010 to connect with Team Foundation Server for source control, build management & project management.

Advantage of Development SharePoint Farm:

  1. Single place where SharePoint Admin can integrate all the final artifacts from multiple developers.
  2. Developer can sync with latest SharePoint site on its standalone developer workstation.
  3. Admin can easily approve artifacts and migrate to integration server.
  4. It is a unit testing environment for developers where they can test dependent functionality or farm level features.

Team Foundation Server

Team Foundation Server plays a key role in ALM which provides source control, build management and work item. You can have TFS installed on the same server which has content database server but if you are going to use build management of TFS, then it is advisable to have separate Team Foundation Server because it utilizes CPU intensively when it processes the builds.

As per the above figure, there are separate Team foundation servers which are connected to SharePoint Farm as well as standalone development workstation so that it can provide source control for customized content as well as developer’s artifacts and resources.

Advantages of TFS
  1. Source control for SharePoint artifacts and customization
  2. Build management for SharePoint
  3. Work item and bug tracking tool for SharePoint
  4. Admin console for all management activity
  5. Easy integration with SharePoint foundation server and VS 2010
  6. Easy check-in & check-out
  7. Web based console to manage ALM activity

Developer’s Workstation

As per the above figure, developers’ environment includes two developers workstation. In practice, you can take as many workstations as your development team size.

Developer workstation should have Windows 7 or Windows vista operating system with standalone SharePoint foundation server with local content database. So that one developer’s work doesn’t affect another developer and he can debug artifacts locally.

Developer workstation will include the following stuff installed:

  1. Windows 7 or Windows vista 64 bit OS
  2. Stand alone SharePoint Foundation server 2010
  3. SharePoint designer 2010
  4. Visual Studio 2010 (connected to TFS)

Developer workstation should be connected to Team Foundation Server 2010 so that when developer finally completes his artifact, then he can check-in his artifact in TFS so that other developers can take the latest code from TFS if needed. This way, parallel development can happen without affecting other developer’s work.

Integration/Testing Farm

Any production SharePoint environment should have a test environment in which new SharePoint web parts, solutions, service packs, patches, and add-ons can be tested. It is critical to deploy test farms, because many SharePoint add-ons could potentially disrupt or corrupt the formatting or structure of a production environment, and trying to test these new solutions on site collections or different web applications is not enough because the solutions often install directly on the SharePoint servers themselves. If there is an issue, the issue will be reflected in the entire farm.

Integration or testing server farm should be similar to the existing environments, with the same add-ons and solutions installed and should ideally include restores of production site collections to make it as similar as possible to the existing production environment. All changes and new products or solutions installed into an environment should subsequently be tested first in this environment.

Integration/testing servers will have final SharePoint sites and site collection as per the business requirements. QA will test all the business functionality here. Customer can also do their ‘User acceptance test’ before going live to the production server.

After user acceptance test passed, all the sites & site collection will be deployed on production server.

Advantage of Integration testing server:

  1. Clean environments and same physical architecture as production
  2. QA can test all dependent business functionality at one place
  3. Customer can participate in UAT
  4. Easy deployment/migration from integration testing server to production server

Production Farm

The final stage is rolling your farm into a production environment. At this stage, you will have incorporated the necessary solution and infrastructure adjustments that were identified during the user acceptance test stage. These servers are generally in the customer’s premises. Development team and testing team do not have control over it.

There are various 3rd party tools available in the market for SharePoint data protection, administration, migration, compliance and integration.

ImageGen[1]

Summary

So this way, you can design physical architecture where Development SharePoint Farm and developer’s workstation are integrated with TFS 2010. TFS and Content database are connected to testing server or testing farm where all the artifacts and content will be integrated in testing server for QA and UAT. Finally after UAT, it will be deployed on production farm.

You can use VM (Virtual Machine) for all the servers and workstation for effective infrastructure because if server crashes due to some reason, then you can quickly create a new VM for the needed OS from images.

Note: In the above figure, integration/Testing farm and production farm is a single server just for clear understanding but it will be as large as development farm with number of front-end web server and content database server in reality. All the server OS is Windows Server 2008 R2 SP2 64 bit. Please visit here for more information on hardware & software requirements for SharePoint Foundation 2010.

How to: Customize the SharePoint HTML Editor Field Control using ECM

You can use the HTML Editor field control to insert HTML content into a publishing page. Page templates that include a Publishing HTML column type also include the HTML Editor field control.

This editor has special capabilities, such as customized styles, editing constraints, reusable content support, a spelling checker, and use of asset pickers to select documents and images to insert into a page’s content. This topic describes how to modify some features and attributes of the HTML Editor field control.

Image

If the content type of a page layout supports the Page Content column, you can add a Rich HTML field control to your page layout by using markup such as the following.

<PublishingWebControls:RichHtmlField id="ArticleAbstract" FieldName="ArticleAbstract" 
          AllowExternalUrls="false" 
          AllowFonts="true" 
          AllowReusableContent="false" 
          AllowHeadings="false"
          AllowHyperlinks="false"
          AllowImages="false"
          AllowLists="false"
          AllowTables="false"
          AllowTextMarkup="false" 
          AllowHTMLSourceEditing="false"
          DisalbeBasicFormattingButtons="false"
          runat="server"/>

In the example above, RichHTMLField is the name of the field control that provides the richer HTML editing experience. Attributes such as AllowFonts and AllowTables specify restrictions on the field.

The HTML field control allows font tags, but the control does not allow URLs that are external to the current site collection, reusable content stored in a centralized list, standard HTML heading tags, hyperlinks, images, numbered or bulleted lists, tables, or text markup.

Table 1. HTML editor field control properties
Attribute Description
AllowExternalUrls Only URLs internal to the current site collection are allowed to be referenced in a link or an image.
AllowFonts Content may contain Font tags.
AllowHtmlSourceEditing HTML Editor can be switched into a mode that allows the HTML to be edited directly.
AllowReusableContent Content may contain reusable content fragments stored in a centralized list.
AllowHeadings Content may contain HTML heading tags (H1, H2, and so on).
AllowTextMarkup Content may contain bold, italic, and underlined text.
AllowImages Content may contain images.
AllowLists Content may contain numbered or bulleted lists.
AllowTables Content may contain table-related tags such as <table>, <tr>, and <td>.
AllowHyperlinks Content may contain links to other URLs.
AllowHtmlSourceEditing When set to false, the HTML editor is disabled from switching to HTML source editing mode.
AllowHyperlinks Gets or sets the constraint that allows hyperlinks to be added to the HTML. If this flag is set to false, <A>, <AREA>, and <MAP> tags are removed from the HTML. Default is true. This property also determines whether the editing user interface (UI) enables these operations.
AllowImageFormatting Gets or sets image formatting items. This restriction disables only menus and does not force the content to adhere to this restriction
AllowImagePositioning Gets or sets the position of the image. This restriction disables only menus and does not force the content to adhere to this restriction.
AllowImageStyles Gets or sets whether the Table Styles menu is enabled. This restriction disables only the menu and does not force the content to adhere to this restriction.
AllowInsert Gets or sets whether Insert options are shown. This restriction disables only the menu and does not force the content to adhere to this restriction.
AllowLists Gets or sets the constraint that allows list tags to be added to the HTML. If this flag is set to false, <LI>, <OL>, <UL>, <DD>, <DL>, <DT>, and <MENU> tags are removed from the HTML. Default is true. This also determines whether the editing UI enables these operations.
AllowParagraphFormatting Gets or sets whether paragraph formatting items are enabled. This restriction disables only menus and does not force the content to adhere to this restriction.
AllowStandardFonts Gets or sets whether standard fonts are enabled. This restriction disables only menus and does not force the content to adhere to this restriction.
AllowStyles Gets or sets whether the Style menu is enabled. This restriction disables only the menu and does not force the content to adhere to this restriction.
AllowTables Gets or sets the constraint to allow tables to be added when editing this field.
AllowTableStyles Gets or sets whether the Table Styles menu is enabled. This restriction disables only the menu and does not force the content to adhere to this restriction.
AllowTextMarkup Get or set the constraint to allow text markup to be added when editing this field.
AllowThemeFonts Gets or sets whether theme fonts are enabled. This restriction disables only menus and does not force the content to adhere to this restriction.
Predefined Table Formats

The HTML editor includes a set of predefined table formats, but it can be customized to fit the styling of an individual page. Each table format is a collection of cascading style sheet (CSS) classes for each table tag. You can define styling for the first and last row, odd and even rows, first and last column, and so on.

The HTML Editor dynamically applies certain styles from the referenced style sheets on the page and makes them available to users when formatting a table. For a custom style to be available when formatting a table, the relevant class names must follow the PREFIXTableXXX-NNN format, where:

  • PREFIX is ms-rte by default, but you can override the default by using the control PrefixStyleSheet() property of the RichHTML field control.
  • XXX is the specific table section, such as EvenRow or OddRow.
  • NNN is the name to identify the table styling.

The following example presents a complete set of classes for a table styling format.

.ms-rteTable-1 {border-collapse:collapse;border-top:gray 1.5pt;
    border-left:gray 1.5pt;border-bottom:gray 1.5pt;
    border-right:gray 1.5pt;border-style:solid;}
.ms-rteTableHeaderRow-1 {color:Green;background:yellow;text-align:left}
.ms-rteTableHeaderFirstCol-1 {padding:0in 5.4pt 0in 5.4pt;}
.ms-rteTableHeaderLastCol-1 {padding:0in 5.4pt 0in 5.4pt;}
.ms-rteTableHeaderOddCol-1 {padding:0in 5.4pt 0in 5.4pt;}
.ms-rteTableHeaderEvenCol-1 {padding:0in 5.4pt 0in 5.4pt;}
.ms-rteTableOddRow-1 {color:black;background:#FFFFDD;}
.ms-rteTableEvenRow-1 {color:black;background:#FFB4B4;}
.ms-rteTableFirstCol-1 {padding:0in 5.4pt 0in 5.4pt;}
.ms-rteTableLastCol-1 {padding:0in 5.4pt 0in 5.4pt;}
.ms-rteTableOddCol-1 {padding:0in 5.4pt 0in 5.4pt;}
.ms-rteTableEvenCol-1 {padding:0in 5.4pt 0in 5.4pt;}
.ms-rteTableFooterRow-1 {color:blue;font-style:bold;
    font-weight:bold;background:white;border-top:solid gray 1.0pt;
    border-bottom:solid gray 1.0pt;border-right:solid silver 1.0pt; 
    border-style:solid;}
.ms-rteTableFooterFirstCol-1 {padding:0in 5.4pt 0in 5.4pt;
    border-top:solid gray 1.0pt;text-align:left}
.ms-rteTableFooterLastCol-1 {padding:0in 5.4pt 0in 5.4pt;
    border-top:solid gray 1.0pt;text-align:left}
.ms-rteTableFooterOddCol-1 {padding:0in 5.4pt 0in 5.4pt;
    text-align:left;border-top:solid gray 1.0pt;}
.ms-rteTableFooterEvenCol-1 {padding:0in 5.4pt 0in 5.4pt;
    text-align:left;border-top:solid gray 1.0pt;}

Microsoft SharePoint Server 2010 includes a set of default table styles. However, if the system detects new styles that did not originate in the default .css file, it removes the default set and presents only those newly defined styles in the HTML editor dialog box.

Spelling Checker

In SharePoint Server 2010, the HTML editor includes a spelling checker, which can be customized by developers by using the SpellCheckV4Action Web control and the SpellCheckToolbarButton Web control. The spelling checker action registers client files and data during a spelling check.

It also includes a method to get the console tab and calls the user rights to verify that the current user has rights to perform a spelling check operation on the selected item. The spelling checker action calls the appropriate ECMAScript (JavaScript, JScript) code, and sends information to the client about available spellings and the default language to use for the request.

A Look At : Visual Studio 2013 Update 3 CTP2

avatar[2]

New technology improvements in Visual Studio 2013 Update 3 CTP 2


Technology improvements

The following technology improvements were made in this release.

CodeLens

  • CodeLens jobs that are running on the Team Foundation Server job agent have been optimized for performance specifically while processing branching and merging changesets.

Debugger

  • If you have more than one monitor, Visual Studio will remember which monitor a Windows Store application was last run on.
  • You can debug x86 applications that are built by .NET native.
  • When you analyze managed memory dump files, you can go to Definition and Find All References of the selected type.
  • You can debug the dump files from .NET Native applications by using Visual Studio debugger.

General

  • The Application Insights Tools for Visual Studio are now included in Visual Studio 2013 Update 3 CTP2. This initial integration as part of CTP2 includes some software updates and performance improvements.

IntelliTrace

  • You can skip straight to the details of performance events that are exported from Application Insights to IntelliTrace.

Profiler

  • The Performance and Diagnostics hub can open profiling sessions (.diagsession files) that were exported from the F12 tools in the latest developer preview of Internet Explorer 11.
  • Windows Presentation Foundation (WPF) and Win32 applications are supported by the new Memory Usage Tool in the Performance and Diagnostics Hub. For more information about how to use the tool to troubleshoot issues in native and managed memory, go to the following blog post:
    Diagnosing memory issues with the new Memory Usage Tool in Visual Studio

Release Management

  • You can useWindowsPowerShell or theWindowsPowerShell Desired State Configuration (DSC) feature to deploy and manage configuration data. Additionally, you can deploy to the following environments without having to set up Microsoft Deployment Agent:
    • Microsoft Azure environments
    • On-premise environments (Standard environments)

Testing Tools

  • You can add custom fields and custom work flows for test plans and test suites.
  • You can use Manage Test Suites permission for granting access to test suites.
  • You can track changes to test plans and test suites by using work item history.

For more information about these features, see the following Visual Studio Developer Tools blog article:

Test Plan and Test Suite Customization with TFS2013 Update3

Visual Studio IDE

  • CodeLens authors and changes indicators are now available for Git repositories.
  • In Code Map, links are styled by using colors, and they display in the improved Legend.
  • Debugger Map automatically zooms to the call stack entry of interest and preserves user’s zoom preferences.
  • You can drag binaries from the Windows file explorer to a code map, and then start exploring binaries by using Code Map.

Known issues

Testing Tools

  • When you try to upgrade an existing TFS server that has Test management data to Visual Studio 2013 Team Foundation Server Update 3 CTP2 in JPN or CHS, the upgrade of Test Case Management service does not work.

Visual Studio IDE

  • In Visual Studio 2013 Ultimate Update 3 CTP2 localized (non en-us) drops, when trying to request a Code Map, or a Dependency Graph for the solution, the directed graph is not produced.


For more information on Visual Studio 2013 and other upgrades, visit http://support.microsoft.com/kb/2933779/en-us

How To : Peel back the layers of data and information and reveal meaningful BI with SharePoint

Business Intelligence (BI) often takes on the mantel of exotic, rare, and almost unattainable technology. But at its core, business intelligence is simply a method of reporting on what happened.

Image


Granted it is a type of reporting that reaches beyond an ordinary peek into the rearview mirror of past business events; business intelligence helps to spot future trends, make informed go/no-go decisions, or identify potential threats. BI technology is strongest when it rests on a large supply of valid, diverse and current data, and can leverage the proper tools to help users understand and visualize queries about that data.

This blog post is about how SharePoint 2013 can help users solve practical business information problems, even though they don’t have the time or the budget to custom build an enterprise-scale BI system. The underlying premise of this blog is – show how SharePoint 2013 can provide a reasonable cost-benefit ratio and justify investing in BI technology.


Before we jump into SharePoint 2013 and its capabilities, let’s take a high-level look at Business Intelligence.

What Problems Can BI Solve?


If the only tool you have in your toolbox is a hammer, then every problem might look like a nail. The fact is, most businesses are able to solve most problems without spending a dime on more technology. In other words, the ‘hammer’ most businesses have been using works just fine, because most of their problems look like nails. The challenge they face only comes into focus when their competition is able to solve the same type of problems, but they do it faster, cheaper, and with less effort. Obviously, this can be a doomsday scenario for the company falling behind, technologically speaking.

That said; Business Intelligence is a great tool…but what problems will it solve? Perhaps a better question would be…how do I figure out if BI can help my company? You are not alone in asking these questions. Just because we have the tools to do something amazing like BI, doesn’t mean you need it or can afford it. But it certainly would be beneficial for you to find out if and how a Business Intelligence capability would help your business.

The starting-line to find out if BI makes sense for your organization runs right through your own conference room. You need to sit down with your senior executives and managers and talk to them about the information they rely on to run their part of the business. What information do they need, when do they need it, what do they do with it, what information are they missing, and so on? Initiate this type of conversation and you will, undoubtedly, open up a window of opportunity to discuss the merits of Business Intelligence.

SharePoint 2013 and Business Intelligence

Assuming that you see value in establishing BI capabilities in your organization, a very good first step would be to evaluate Microsoft’s SharePoint 2013. Because Microsoft products are generally used throughout both the back-office and front-office of most businesses, SharePoint 2013 is a very powerful tool to integrate the data with the technical systems required to build BI capabilities.

The main theme for BI is aggregation of data from multiple sources and then making that data available when, where, and how it is needed. BI must also be in complete alignment with all corporate goals while it supports the needs of individual managers who are responsible for achieving those goals. SharePoint 2013 is designed to access information and put it in the hands of employees when and where they need it. Because of SharePoint 2013’s capabilities to enable collaboration and teamwork, its very nature aligns the goals of the business with the goals of the employees.

Data Warehousing Measures and Dimensions

Perhaps the most fundamental requirement of BI is the need for information or data. Often this data is distributed throughout multiple databases and must be aggregated in some form.

In data warehousing, which is the term used to describe the functions necessary to aggregate, store and access data for the purpose of Business Intelligence and analytics, the data is often loaded into Online Analytical Processing (OLAP) cubes. The data stored in a cube can be sorted and filtered based on measures and dimensions. This technique lets users query the cube based on practical business categories which enable calculations to be made such as sum, count, average, min/max, etc. This is called a measure.

The other characteristic used in a cube is called a dimension. Dimensions are a collection of information or references about a measureable event. Each dimension can be measured.
For example, let’s say you wanted to run a report that gives you an up-to-the-minute total on sales volume and the number of units sold for each region of your company. In this example, the regions would be the dimensions and the sales volume and number of units are the measures.

SharePoint is designed to access cubes and work with the data stored in the cube, based on the available measures and dimensions.

Key Performance Indicators Business Intelligence enables visualization of raw data in the form of charts, graphs, pictures, etc. Typically Key Performance Indicators (KPIs), Score Cards, and Dashboards use the raw data and turn it into something that can be easily consumed by a viewer. For example, a project status KPI is commonly displayed as green, yellow or red lights to indicate that the project is on target/no issues, there are minor issues, or the project is in trouble. This BI technique is an easy way to visualize the data and cut through all the non-essential information and get to the point. This also allows the viewer to quickly gauge if the corporate goals are being met or are in jeopardy.

SharePoint 2013 Business Intelligence Solutions

SharePoint 2013 has several products that may be used as part of a BI system. The following is a list of commonly used MS components, all or just some of them can be used to create a practical and powerful BI system:

  • BI Data Services – MS SQL Server Data Services and Integration services (both used to extract, transform and load data from disparate sources)
  • BI Engine MS SQL Server Analysis Services (supports OLAP cubes by letting you design, create, and manage multidimensional structures that contain data aggregated from other data sources, such as relational databases.)
  • PowerShell (a Microsoft task automation framework, consists of a command-line shell and associated scripting language built on .NET technology)
  • PowerPivot for SharePoint (Analysis Servicess server running in SharePoint mode and provides server hosting of PowerPivot data)
  • Microsoft Excel (commonly used spreadsheet with Pivot Tables and Pivot Charts and can be used with SharePoint)
  • Microsoft Performance Point Designer (is integrated with SharePoint to create dashboards, score cards, and analytics.

Setting Up SharePoint 2013


When SharePoint 2013 is installed and configured, Central Administration (CA) is provisioned. Central Administration is where you control all the settings and features of SharePoint Product sites for Web applications, like Excel or Performance Point. CA is a convenient tool that helps in linking the applications and tools required by SharePoint to set up a BI system. You will also use Microsoft’s PowerShell to set up the infrastructure for SharePoint sites so they can run in a multi-tenant environment on a single physical server or virtual server.

Excel Services or Performance Point

You can use either or both of these tools to create dashboards. Either one will help you establish trusted locations (e.g. http:// links), data providers, libraries, and databases.
Excel is often the easiest and most familiar tool to display and analyze BI data. Since Excel has been around a long time and so many people are experienced when it comes to using Excel, it is a good choice as the front-end tool to put on your BI environment.

With Excel you can add measures and dimensions from a source data cube (created by Analysis Services) and then use the Pivot Chart capabilities in Excel to select the fields you want to display, such as sales amount, product categories, sales by geography, etc. You can also create Pivot Tables is you want to display a spreadsheet with multiple columns and rows, also using the fields from the cube.

SharePoint’s Practical Solution


Microsoft and SharePoint have all the tools you need to create a very robust and practical BI solution. It is probable that you currently own licenses to many of the components, if not all, that are required to build a solution. If you are interested in Business Intelligence and you would consider a Microsoft-based solution, you might find that you can be up and running in a matter of days with a minimal investment.

Creating Your Own Document Management System With SharePoint and Dynamix

Image

With the R2 release of Dynamics AX 2012, a new feature was quietly snuck into the product that allows you to store document attachments from Dynamics AX within SharePoint rather than within an archive location, or within the database. This opens up a whole slew of possibilities when it comes to document management within SharePoint.

In this example we will show how you can create a document management structure within SharePoint that you can use in conjunction with the Dynamics AX attachments feature, and also we will show a few tweaks that you can make that may make managing your documents within SharePoint just a little easier.

Creating a new Document Management Site

The first step that we are going to work through is the creation of a new Document Management site where we will put all of our Dynamics AX document attachments. We are just creating a site to separate out the documents from other items that you may already have stored within SharePoint.

How to do it…

To create a new Document Management Site in SharePoint, follow these steps:

  1. Open up the SharePoint Workspace that you want to use to house your Document Management site and from the Site Actions menu, select the New Site option.
  2. When the Site Templates are displayed, select the Blank Site template. Give your site a name, and also a sub site name (probably the same as your site name). When you are done, click on the Create button for start the site creation process.

How it works…

When the site is created, you should be taken to a new blank site which you will be able to use as a document repository.

Creating Document Libraries for the Business Areas

The next step in the process is to create document libraries to store all of your documents away in. You could create one big library, or a number of smaller ones, broken out into groups based on business area or function. In this example we will do the latter because it will give us more flexibility with the indexing of the documents, and also make it easier to find particular documents.

How to do it…

To create document libraries for the business areas, follow these steps:

  1. From within your new Document Management site, select the New Document Library option from the Site Actions menu.
  2. When the Document Library Creation dialog box appears, give your library a Name, Description, and also set the Document Template to None. In this example we are creating a library for all of the AP Documents.
    When you are done, click on the Create button to start the document library creation process.

How it works…

After it finishes you should have a new library for you to use. You can repeat the process for all of the other business areas that you want to manage documents for – in our example we just used the standard business areas from the Dynamics AX navigation menu.

Creating Dynamics AX Document Types that Link to the Document Libraries

Once you have created your document libraries, you can connect them to Dynamics AX with the new SharePoint option so that the users are able to attach documents from the client and then store them within SharePoint for everyone to access.

How to do it…

To create a file attachment type that links to SharePoint, follow these steps:

  1. From the Organization administration area page, select the Document types menu item from the Document management folder of the Setup group.
  2. When the Document types maintenance form is displayed, click on the New button in the menu bar to create a new entry.
  3. We will start by creating a link for all of our generic Accounts Payable documents by giving our new Document type a Name and Description. In the Group select File from the dropdown options and select SharePoint for the Location option.
  4. Now return back to your document libraries within SharePoint and copy the URL for the document library.
  5. Paste the URL into the Archive
    directory field.

    Note: Remove all of the extra parameters though so that you are just referencing the base folder location.
    Also, if you click on the folder browser to the right of the Archive directory field you can test the link to SharePoint.

How it works…

Now, if you attach a document, then you will see the option for your new document type.

It will allow you to attach any file that you have on your desktop.

And rather than showing you the thumbnail image, it will show you a reference link to your SharePoint document library.

After attaching the document, if you look within SharePoint, you will see your document is saved away for you.

You can repeat this process for all of your other document libraries that were created in the previous step.

Adding Columns to your Document Libraries for Better Indexing

One of the reasons why you want to start using SharePoint is so that you can take advantage of the indexing functionality to code and classify your documents. Now that you have people storing the documents away, it’s time to add some indexes to you document libraries.

How to do it…

To create new indexes for your document libraries, follow these steps:

  1. Open up your document libraries within SharePoint and select the Library ribbon bar. Then click on the Create Column button within the Manage Views group.
  2. When the Create Column form opens, set the Column Name to be the field that you want to index, select the type of the column, and also set the columns Description.
  3. Note: Sometimes it’s a good idea not to have spaces in the column name, later on when we add filters, it becomes a litter easier to manage this way.
  4. After you have finished defining the column, click on the OK button to add the column to your library.
  5. When you return back to your document library, there will be a new column on the form.
  6. Repeat the process for all of the columns that you want to use as index fields for the library.

    Note: All of the columns do not have to be used during the indexing process, so it’s OK to have variations of columns, like InvoiceNum, CreditNoteNum, etc.

How it works…

To edit the columns, select the options menu for the document, and choose the Edit Properties option.

This will allow you to update the fields that Dynamics AX did not populate initially.

Now when you look at the document within SharePoint, you will see the additional metadata that is associated with the document.

Embedding Document Libraries into Dynamics AX Forms

Now that we are able to index documents a little more effectively within SharePoint, we can go the extra step, and link SharePoint to our forms within Dynamics AX so that we are able to access them without even leaving the application. Doing this just requires a little bit of coding, but is well worth the effort.

Getting Started…

You can manipulate the information that is displayed by SharePoint, and also how it is displayed through the URL that you use.

If you filter any of the views, then you will notice that it uses two qualifiers – FilterFieldX
and FilterValueX to restrict the viewed records.

Also, if you add a IsDlg=1 qualifier, then all of the navigation areas are hidden giving you a clean list of filtered documents.

This is the perfect type of view to embed within Dynamics AX.

The other half of this step is to choose a form to add your document libraries to. In this case we will update the Vendors form.

How to do it…

To embed your SharePoint document libraries within Dynamics AX forms, follow these steps:

  1. Start the process by opening up AOT, and create a new project for this tweak.
  2. From the Forms area in the AOT, drag over the form that you want to add the documents to – in this case it’s the VendTable form.
  3. Expand out the form within the project, and navigate to the group that you want to add your document library view into.
  4. Right-mouse-click on the parent tab, and select the TabPane option from the New Control sub-menu.
  5. Reorder your tabs (ALT+UpArrow/DownArrow) so that they are in the sequence that you want and then give your new Tab Control a Name and Caption in the Properties section.
  6. Right-mouse-click on the new tab that you added for the document library and select the ActiveX control from the New Control sub menu.
  7. When the list of ActiveX controls are displayed, select the Microsoft Web Browser control, and click the OK button to add it.
  8. Rename your ActiveX control, and set the Width to Column width
    and Height to Column height.
  9. Now we need to have Dynamics AX update the URL that is navigated to when the form is opened. To do this, right-mouse-click on the parent Methods group for the form, and select the activate method from the Override methods submenu.
  10. Update the activate method by building the URL that will define the specific document index that you are wanting to show. You are able to now add conditional filters that pick up the record values, and filter based on the current record – in this case the vendor number.
  11. Once you have finished the update, save the project.

How it works…

Now when you open up the Vendor form, there will be a Documents tab that shows all of the documents that are associated with the current record.

If you select a record that does not have attached documents, then you will not see anything there.

How cool is that.

Creating Custom Views for the Document Libraries

Now that all of the heavy lifting has been done, you can now start tweaking the SharePoint libraries and the way that the information is displayed. Based on the form that you are in you may want to show only particular information. You can do that by creating new custom views.

How to do it…

To create a custom view for your document libraries, follow these steps:

  1. Open up your document libraries within SharePoint and select the Library ribbon bar. Then click on the Library Settings button within the Settings group.
  2. When the document library settings maintenance form is displayed, scroll down to the bottom of the page, and there will be a section for Views that will show you all of the different ways that the form could be displayed. In this case there is only one, but we can fix that by clicking on the Create View link.
  3. Select the Standard View option from the format templates that are displayed.
  4. Assign your new view a Name and select the fields that you want to be displayed in the view.
  5. Once you have made the changes, click on the OK button to save your new view.

How it works…

When you return to the document library you will be able to see the new format of the view.

You can then change the view within the URL of your project to make it the default view for the form.

Now when you see all of the documents within your Dynamics AX form you will see just the information that you need.

Using the SharePoint Designer to Edit Document Libraries

Although you can do everything that we have shown so far within SharePoint, you can also take advantage of the SharePoint Designer application to update your SharePoint document libraries. You don’t even have to search for the install kit, because it is embedded within your SharePoint site, just waiting to be downloaded and installed.

How to do it…

To access the SharePoint Designer to manipulate your SharePoint site, follow these steps:

  1. To use the SharePoint Designer to update your SharePoint site, just select the Edit in SharePoint Designer option from the Site Actions menu.

    Note: If you don’t have SharePoint Designer installed then it will ask you to install it, and download the kit directly from your SharePoint installation.

How it works…

When SharePoint Designer opens up, it will be connected to your current SharePoint site, showing you all of the libraries, etc. that you have been creating.

If you select the Lists and Libraries option from the navigation pad, you will be able to see all of the document libraries that you created in the previous steps.

Drilling into the libraries you will be able to also see all of the views etc. that you configured within SharePoint.

Creating New Content Types to Manage Document Types

When we set up our document libraries we deliberately created them so that all of the documents for a particular area are within the same library. This allows us to save multiple types of documents away within the library like Invoices, Credit Notes, Vendor Certificates etc. The way that we can identify the type of document is through the creation of Content Types.

How to do it…

To create custom Content Types to help make classification easier, follow these steps:

  1. Open up SharePoint Designer (although you can also do this within SharePoint itself) and select the Content Types from the navigation menu and click on the Content type menu button within the New group
    of the Content Types ribbon bar.
  2. When the Content Type creation form is displayed, give your Content Type a Name, and Description, select a parent content type, and also a group that you want to show the Content Type in.

    Note: For the first content type that you create, you may want to create a new Content Type Group so that it isn’t intermingled with all of the other content types.

  3. When you have finished creating your Content Type click on the OK button to add it to SharePoint.
  4. When you return to your SharePoint Designer workspace you will be able to see your new Content Type.
  5. Repeat the process for all of the other types of documents that you want to file away within SharePoint.
  6. Now we need to enable Content Types within our document libraries, and then assign them. To do this, open up your Document Library within SharePoint Designer, and within the Settings group, check the Allow management of content types check box.
  7. Then click on the Add button to the right of the Content Types group to open up the Content Type Picker. Find the new Content Types that you just created, and click on the OK button to assign them to your Document Library.
  8. Now the Content Type will show up as a valid option for the document library.
  9. Repeat the process for all of the other content types that you created.

How it works…

Now when you edit the properties for your documents, there will be a new indexing option for your documents that allows you to define the type of document that you are looking at.

Specifying Document Columns by Content Types to Simplify Indexing

There is an additional benefit that you get from using Content Types within SharePoint, which is the ability to specify what columns are applicable to different Content Types at the time of indexing. For example, you probably don’t want to specify a Invoice Number when indexing a Vendor Insurance Certificate, but would definitely would want to when indexing an Invoice and even a Credit Note.

How to do it…

To modify your Content Types within your Document Libraries to only require certain columns to be indexed, follow these steps:

  1. From within your SharePoint Document Library (or from within SharePoint Designer) click on the Library Settings button within the Settings group of the Library ribbon bar.
  2. Within the Library Settings you will be able to see all of your Content Types that have been assigned. Select any of them to edit their options.
  3. When you first create the Content Types then they will have no columns assigned to them. Click on the Add from existing site or list columns link to assign the valid columns to your Content Type.
  4. When the Add columns to Content Type form is displayed, you will be able to see all of the available columns within the Document Library.
  5. Just select the ones that you want to use for the indexing, and then click the Add button. Once you have selected all the ones that you want to use, click on the OK button to save your changes.

How it works…

Now you will have indexing by Content Type.

Showing the Content Type in the Document View

Now that we are classifying documents by Content Type we might as well show it in the views so that we are able to differentiate different document types.

How to do it…

To add the Content Type field to our Document View, follow these steps:

  1. From within your SharePoint Document Library (or from within SharePoint Designer) click on the Modify View button within the Manage Views group of the Library ribbon bar.
  2. Now that the Content Type is enabled on our Document Library, it will show up on the list of valid columns. To add it to our view, just check the Display checkbox, and possibly change the order of the field so that it is first in the table.
  3. When you’re done, click on the OK button to update the view.

How it works…

Now the Content Type is shown in the document library view.

And also will show up when we browse to the documents within Dynamics AX.

How neat is that.

Grouping Records in the Document View by Key Columns

One final tweak that we will show within SharePoint is the ability to group columns within our document library views so that common information is shown together. These groupings can be different by view, and just make it a little easier to find information if we don’t’ initially filter the data.

How to do it…

To group records within your document library view, follow these steps:

  1. From within your SharePoint Document Library (or from within SharePoint Designer) click on the Modify View button within the Manage Views group of the Library ribbon bar.
  2. Scroll down your view definition until you see the Group By configuration options. Here you will be able to change the Group By fields.

How it works…

Now when you look at your documents, they will be classified by key fields.

Summary

In this walkthrough we have shown how you can:

  • Create a simple document management repository within SharePoint
  • Link the document attachments function within Dynamics AX to SharePoint to make the acquisition of the documents easier
  • Index your documents more effectively by defining custom columns
  • Embed SharePoint back into Dynamics AX and also
  • Tweak your views within SharePoint to make it easier to find and view documents

This is really just a starting point, and once you have mastered the basics, you can start investigating:

  • Assigning workflows to documents for approvals and updates
  • Enabling version control for your documents
  • Acquire documents into SharePoint through scanning technologies
  • Link the index column fields to Dynamics AX for validation of key information
  • And much more.

SharePoint is a great document management tool, and can usually handle all of your document indexing needs. Especially now that it is connected with Dynamics AX natively.

How To : Run SAP Applications on the Microsoft Platform

SAP on SQL General Update for Customers & Partners April 2014

SAP and Microsoft are continuously adding new features and functionalities to the SAP on SQL Server platform. The key objective of the SAP on Windows SQL port is to deliver the best performance and availability at the lowest TCO. This blog includes updates, fixes, enhancements and best practice recommendations collated over recent months.

sap2[1]SQL+Server+2014+Evolution[1]

Key topics in this blog: SQL Server 2014 First Customer Shipment program now available, Intel release new powerful E7 v2 processors, Windows 2012 R2 is now GA and customers are recommended to upgrade SQL Server 2012 CU to avoid a bug that can impact performance.

1.        SQL Server 2014 Release & Integration with SAP NetWeaver

SQL Server 2014 is now released and publically available. SAP are proceeding with the certification and integration of SQL Server 2014 with NetWeaver applications and other applications such as Business Objects.

Customers planning to implement SQL Server 2014 are advised to target upgrading to the following support pack stacks. Customers who wish to start projects on SQL Server 2014 or if early production support on SQL Server 2014 is required please follow the instructions in Note 1966681 – Release planning for Microsoft SQL Server 2014

Required SAP ABAP NetWeaver Support Package Stacks for SQL Server 2014

SAP SOFTWARE SUPPORT PACKAGE STACK (SPS)
SAP NETWEAVER 7.0 SPS 29, for SAP BW: SPS 30 (7.0 SPS 30 contains SAP_BASIS SP 30 and SAP_BW SP 32)
SAP EHP1 FOR SAP NETWEAVER 7.0 SPS 15, for SAP BW: SPS 15
SAP EHP2 FOR SAP NETWEAVER 7.0 SPS 14, for SAP BW: SPS 15
SAP EHP3 FOR SAP NETWEAVER 7.0 SPS 9
SAP NETWEAVER 7.1 SPS17
SAP EHP1 FOR SAP NETWEAVER 7.1 SPS 12, for SAP BW: SPS13
SAP NETWEAVER 7.3 SPS 10, for SAP BW: SPS11
SAP EHP1 FOR SAP NETWEAVER 7.3 SPS 9, for SAP BW: SPS11
SAP NETWEAVER 7.4 SPS 4, for SAP BW: SPS06

Java only systems do in general not require a dedicated support package stack for SQL Server 2014.

Note 1966701 – Setting up Microsoft SQL Server 2014

Note 1966681 – Release planning for Microsoft SQL Server 2014

New features in SQL Server 2014 are documented in a five part blog series here

Also see key new SQL Server Engine Features and SQL Server Managed Backups to Azure. Free trial Azure accounts can be created for backup testing. To test latency to the nearest Azure Region use this tool http://azurespeedtest.azurewebsites.net/

2.        New Enhancements for Performance and Functionality for SAP BW Systems

SAP BW customers can reduce database size, improve query performance and improve load/process chain performance by implementing SAP Support Packs, Notes and SQL Server Column Store.

All SAP on BW customers are strongly recommended to review these blogs:

SQL Server Column-Store: Updated SAP BW code

Optimizing BW Query Performance

Increasing BW cube compression performance

SQL Server Column-Store with SAP BW Aggregates

Performance of index creation

It is recommended to upgrade SAP BW systems to SQL Server 2012 or SQL Server 2014 and implement Column Store. Customer experiences so far have shown dramatic space savings of 20-45% and very good performance improvements.

BW customers with poor cube compression performance are highly encouraged to implement the fixes in Increasing BW cube compression performance

3.        SAP Note 1612283 Updated – IvyBridge EX E7 v2 Processor Released

Intel has released a new processor for 4 socket and 8 socket servers. The Intel E7 v2 IvyBridge EX processors almost doubles the performance compared to the previous Westmere EX E7 processor.

Even the largest SAP systems in the world are able to run on standard low cost Intel based hardware. Intel based systems are in fact considerably more powerful than high cost proprietary UNIX systems such as IBM pSeries. In addition to performance enhancements many reliability features have been added onto modern servers and built into the Windows operating system to allow Windows customers to meet the same service levels on Wintel servers that previously required high cost proprietary hardware.

  1. 4 socket HP DL580 Intel E7 v2 = 133,570 SAPSor 24,450 users
  2. 4 socket IBM pSeries Power7+ = 68,380 SAPS or 12,528 users

  3. 8 socket Fujitsu Intel E7 v2 = 259,680 SAPS or 47,500 users

Source: SAP SD 2 Tier Benchmarks http://global.sap.com/solutions/benchmark/sd2tier.epx   See end of blog for full disclosure

SAP Note 1612283 – Hardware Configuration Standards and Guidance has been updated to include recommendations for new Intel E5 v2, E7 v2 and AMD equivalent based systems. Customers are advised to ensure that new hardware is purchased with sufficient RAM as per the guidance in this SAP Note.

Most SAP Systems exhibit a ratio of Database SAPS to SAP application server SAPS of about 20% for DB and 80% for SAP application server. An 8 socket Intel server can deliver more than 200,000 SAPS, meaning one SAP on SQL Server system can deliver more than 1,000,000 SAPS. There are few if any single SAP systems in the world that are more than 1,000,000 SAPS, therefore these powerful platforms are recommended as consolidation platforms. This is explained in attachment to SAP Note 1612283. Many SQL databases and SAP systems can be consolidated onto a single powerful Windows & SQL Server infrastructure.

4.        SQL Server 2012 Cumulative Update Recommended

SQL Server 2012 Service Pack 1 CU3, CU4, CU5 & CU6 contains a bug that can impact performance on SAP systems.

It is strongly recommended to update to SQL Server 2012 Service Pack 1 CU 9 (the bug is fixed in CU7 & CU8 as well).

Microsoft will release a Service Pack 2 for SQL Server 2012 in the future

SQL Service Packs and Cumulative Updates can be found here: http://blogs.msdn.com/b/sqlreleaseservices/

Bug is documented here http://support.microsoft.com/kb/2895494

5.        Windows Server 2012 R2 – Shared Virtual Hard Disk for SAP ASCS Cluster

Windows Server 2012 R2 is now Generally Available for most NetWeaver applications and includes new features for Hyper-V Virtualization.

Feedback from customers has indicated that the vHBA feature offered in Windows 2012 requires that the OEM device drivers and firmware on the HBA card be up to date.

If the device drivers and firmware are not up to date, the vHBA can hang.

The SAP Central Services Highly Available cluster requires a shared disk to hold the /SAPMNT share. Therefore a shared disk is required inside a Hyper-V Virtual Machine.

There are now three options:

  1. iSCSI – generally only for small customers
  • vHBA – suitable for customers of any size, but driver/firmware must be up to date

  • Shared Virtual Hard Disk – available now in Windows 2012 R2. Simple to setup and configure RECOMMENDED

  • Windows 2012 R2 offers this feature and it is generally recommended for customers wanting to create guest clusters on Hyper-V to protect the SAP Central Services.

    SQL Server can also utilize Shared Virtual Hard Disk, however we generally recommend using SQL Server 2012 AlwaysOn for providing high availability

    Aidan Finn provides a useful blog on configuring Shared Virtual Hard Disk

    For more information about SAP on Hyper-V see this blog series How to Deploy SAP on Microsoft Private Cloud with Hyper-V 3.0 and SAP Note 1409608 – Virtualization on Windows

    6.        Important Notes for SAP BW Migration Customers

    Customers migrating SAP BW systems using R3load must pay particular attention to the SAP System Copy Notes and the supplementary SAP Note 888210 – NW 7.**: System copy (supplementary note)

    SAP BW and some other SAP components have special properties on some tables. These special properties are defined in DBMS specific definition files generated by SMIGR_CREATE_DDL.

    Prior to exporting a SAP BW system SMIGR_CREATE_DDL must be run. There are some important updates for the program SMIGR_CREATE_DDL that must be applied in the source system before the export. SAP Note 888210 will list all required notes. BW Systems running very old support packs must be checked very carefully and possibly other notes should be applied. The following notes should be implemented:

    1901705 – Long import runtime with certain tables on MSSQL

    1747330 – Missing data base indexes after system copy to MSSQL

    1993315 – SMIGR_CREATE_DDL: double columns in create index statements

    1771177 – SQL Server 2012 column-store support for SAP BW

    Customers migrating to SQL Server should review this blog: SAP OS/DB Migration to SQL Server–FAQ v5.2 April 2014

    7.        SQL Server AlwaysOn – Parameter AlwaysOn HealthCheckTimeout & LeaseTimeout. What are these values?

    SQL Server AlwaysOn leverages Windows Server Failover Cluster (WSFC) technology to determine resource health, quorum and control the status of a SQL Server Availability Group. The WSFC resource DLL of the availability group performs a health check of the primary replica by calling the sp_server_diagnostics stored procedure on the instance of SQL Server that hosts the primary replica. sp_server_diagnostics returns results at an interval that equals 1/3 of the health-check timeout threshold for the availability group. The default health-check timeout threshold is 30 seconds, which causes sp_server_diagnostics to return at a 10-second interval. If sp_server_diagnostics is slow or is not returning information, the resource DLL will wait for the full interval of the health-check timeout threshold before determining that the primary replica is unresponsive. If the primary replica is unresponsive or if the sp_server_diagnostics returns a failure level equal to or in excess of the configured failure level, an automatic failover is initiated.

    In addition to the above there is a further layer of logic to prevent another scenario:

    1. SQL Server Primary replica becomes extremely busy, so busy the operating system or SQL Server is saturated and cannot reply to the WSFC resource DLL within the configured period of time (default 30 seconds)
  • Windows Failover Cluster tries to stop SQL Server on the busy node, but is unable to communicate as the server is so busy. WSFC will assume the node has become isolated from the network and will start the failover process to and start SQL Server on another node. SQL Server is now running on another host

  • Eventually the condition causing the original host to be extremely busy finishes and client connections might continue to process on the first node (a very bad thing because we now have two “Primaries”)

  • To prevent this the Primary Node must connect to the WSFC resource DLL and obtain a lease periodically. This is controlled by the parameter LeaseTimeout. The Primary AlwaysOn Node must renew this lease otherwise the Primary will offline the database.

    Therefore there are two important parameters – HealthCheckTimeout and LeaseTimeout.

    Some customers have encountered problems with unexplained AlwaysOn failovers during activities such as initializing new Log Shipping or AlwaysOn Nodes via network or network backup while SQL Server is very busy. It is strongly recommended to use good quality 10G network cards, run Windows 2012 or Windows 2012 R2 and avoid using 3rd party network teaming utilities like HP Network Configuration Utility (NCU). In rare cases increasing both of these parameters may be needed.

    Additional Blog: SQL Server 2012 AlwaysOn – Part 7 – Details behind an AlwaysOn Availability Group


    8.        FusionIO Format Settings

    FusionIO or other in server SSD devices are now very common and are strongly recommended for customers that require high performance SQL Server infrastructure. The use of FusionIO and SSD is further recommended and detailed in Note 1612283 – Hardware Configuration Standards and Guidance and Infrastructure Recommendations for SAP on SQL Server: “in-memory” Performance.

    FusionIO devices are usually used for holding SQL Server transaction logs and tempdb. If the transaction log and tempdb datafiles and log files are placed on FusionIO we recommend:

    1. FusionIO card is formatted for maximum WRITE. This will reduce the usable space significantly
  • FusionIO physical level format should be 4k (not 8k – it is a proprietary format size)

  • Make sure server BIOS is set for MAX Fan blow out – FusionIO will slow down if it becomes hot (FusionIO device will throttle IO if temperature increases)

  • Update FusionIO and Server BIOS to latest

  • Format Windows disks NTFS Allocation Unit Size 64k

  • 9.        VHDX/VHD Format Settings

    Windows NTFS File System Allocation Unit Size default size is 4096 bytes. Smaller Allocation Unit Sizes (AUS) is more efficient for storing many small files. Larger AUS sizes such as 64k are more efficient for larger files.

    The file system holding the VHDX files for SQL Server virtual machines running on Hyper-V may benefit from a 64 kilobyte NTFS AUS size.

    The NTFS AUS of the file system inside the VHDX file must be 64 kilobytes

    The AUS size can be checked with the command below:

    fsutil fsinfo ntfsinfo <Drive letter>:

    10.        Do Not Install SAPGUI on SAP Servers

    Windows Servers have the ability to run many desktop PC applications such as SAPGUI and Internet Explorer however it is strongly recommended not to install this software on SAP servers, particularly production servers.

    1. To improve reliability of an operating system it is recommended to install as few software packages as possible. This will not only improve reliability and performance, but will also make debugging any issues considerably simpler
  • SAPGUI is in practice almost impossible to remove completely. SAPGUI installation installs DLLs into Windows directory

  • “A server is a server, a PC is a PC”. Customers are encouraged to restrict access to production servers by implementing Server Hardening Procedure. SAP Servers should not be used as administration consoles and there should be no need to directly connect to a server. Almost all administration can be done remotely

  •  


    Links

    How It Works: SQL Server AlwaysOn Lease Timeout

    http://blogs.msdn.com/b/psssql/archive/2012/09/07/how-it-works-sql-server-alwayson-lease-timeout.aspx

    Flexible Failover Policy for Automatic Failover of an Availability Group (SQL Server)

    http://technet.microsoft.com/en-us/library/hh710061.aspx

    Configure HealthCheckTimeout Property Settings

    http://technet.microsoft.com/en-us/library/ff878665.aspx

    How To : Make use of Application Insights (with a great VS extension available freely)

    You can now add Application Insights telemetry right from Visual Studio to new or existing projects in 2 clicks or less.

    This release of Application Insights Tools for Visual Studio is in PREVIEW; see Known Issues below.

    Get Started

    To get started with a new project, simply create a Web, Windows Store 8.1, or Windows Phone 8.0 project. In the New Project dialog, make sure that Add Application Insights to Project is checked.

    To get started with an existing project, right-click on a Web, Windows Store 8.1, or Windows Phone 8.0 project in Solution Explorer and choose Add Application Insights Telemetry to Project.

    That’s it! Then run your Web application locally (or deploy your application), and after 10-15 minutes, telemetry data will automatically start appearing in the Application Insights Portal in the Usage tab.

    Additional project types are supported with partial automation (see Known Issues below)

    Q & A

    Q: I don’t see the Add Application Insights Telemetry to Project command.

    A: The type of app you’re creating is not supported yet. Instead, add your application at the Application Insights portal.

    Q: Oops. I closed the Application Insights browser. How do I get it back?

    A: In Solution Explorer, in the context menu of the project, choose Open Application Insights Portal…

    Q: What other telemetry can I log from my app?

    A: You can log events and metrics. Take a look at Improve your application from live usage data

    Known Issues

    This release of Application Insights Tools for Visual Studio is in PREVIEW. There are a number of known issues, including:

    • If you are upgrading from version 0.6.56.3 of the Application Insights Telemetry SDK for Services using the Application Insights Tools for Visual Studio, you will need to manually copy any custom settings from Monitoring.CollectionPlan.config to ApplicationInsights.config file.
    • For Windows Store 8.1 C++ projects instrumented with Application Insights, updates for the “Application Insights Telemetry SDK for Windows Store Apps” from nuget.org do not show up in the “Manage NuGet Packages” dialog. You can install an updated nuget package from the “Online” section of the “Manage NuGet Packages” dialog. Or, you can execute this command in the Package Manager Console: update-package Microsoft.ApplicationInsights.Telemetry.WindowsStore

    Introduction to Cloud Automation


    Provision Azure Environment Resources


    This is where we can see proof of evolution.

    As you saw in the bulleted list of chronological blog posts (above), my first venture into Automating the Public Cloud leveraged Orchestrator + The Integration Pack for Windows Azure. My second releaseleveraged PowerShell and PowerShell Workflow + Windows Azure Cmdlets.

    Let’s get down to the goods. And actually, for the first time in a long time, my published example came out a couple days before the blog post / teaser!


    Script Center Contribution and Download

    The download is the example: New-AzureEnvironmentResources.ps1

    Here is a brief description:

    This runbook creates a number of Azure Environment Resources (in sequence): Azure Affinity Group, Azure Cloud Service, Azure Storage Account, Azure Storage Container, Azure VM Image, and Azure VM. It also requires the Upload of a VHD to a specified storage container mid-process.

    A detained Description, full set of Requirements, and the actual Runbook Contents are available within the Script Center Contribution (not to mention, the actual download).

    Download the Provision Azure Environment Resources Example Runbook from Script Center here:

    BC-DLButtonDark


    A bit more about the Requirements…

    Runbook Parameters

    • Azure Connection Name

      REQUIRED. Name of the Azure connection setting that was created in the Automation service.
          This connection setting contains the subscription id and the name of the certificate setting that
          holds the management certificate. It will be passed to the required and nested Connect-Azure runbook.

    • Project Name

      REQUIRED. Name of the Project for the deployment of Azure Environment Resources. This name is leveraged
          throughout the runbook to derive the names of the Azure Environment Resources created.

    • VM Name

      REQUIRED. Name of the Virtual Machine to be created as part of the Project.

    • VM Instance Size

      REQUIRED. Specifies the size of the instance. Supported values are as below with their (cores, memory)
          “ExtraSmall” (shared core, 768 MB),
          “Small”      (1 core, 1.75 GB),
          “Medium”     (2 cores, 3.5 GB),
          “Large”      (4 cores, 7 GB),
          “ExtraLarge” (8 cores, 14GB),
          “A5”         (2 cores, 14GB)
          “A6”         (4 cores, 28GB)
          “A7”         (8 cores, 56 GB)

    • Storage Account Name

      OPTIONAL. This parameter should only be set if the runbook is being re-executed after an existing
      and unique Storage Account Name has already been created, or if a new and unique Storage Account Name
      is desired. If left blank, a new and unique Storage Account Name will be created for the Project. The
      format of the derived Storage Account Names is:
          $ProjectName (lowercase) + [Random lowercase letters and numbers] up to a total Length of 23


    Other Requirements

    • An existing connection to an Azure subscription

    • The Upload of a VHD to a specified storage container mid-process. At this point in the process, the runbook will intentionally suspend and notify the user; after the upload, the user simply resumes the runbook and the rest of the creation process continues.

    • Six (6) Automation Assets (to be configured in the Assets tab). These are suggested, but not necessarily required. Replacing the “Get-AutomationVariable” calls within this runbook with static or parameter variables is an alternative method. For this example though, the following dependencies exist:
          VARIABLES SET WITH AUTOMATION ASSETS:
               $AGLocation = Get-AutomationVariable -Name ‘AGLocation’
               $GenericStorageContainerName = Get-AutomationVariable -Name ‘GenericStorageContainer’
               $SourceDiskFileExt = Get-AutomationVariable -Name ‘SourceDiskFileExt’
               $VMImageOS = Get-AutomationVariable -Name ‘VMImageOS’
               $AdminUsername = Get-AutomationVariable -Name ‘AdminUsername’
               $Password = Get-AutomationVariable -Name ‘Password’

    Note     The entire runbook is heavily checkpointed and can be run multiple times without resource recreation.


    Upload of a VHD

    Waaaaait a minute! That seems like a pretty big step, how am I going to accomplish that?

    I am so glad you asked.

    To make this easier (for all of us), I created a separate PowerShell Workflow Script to take care of this step. In fact, it is the same one I used during the creation and testing of New-AzureEnvironmentResources.ps1.

    Here it is (the contents of a file I called Upload-LocalVHDtoAzure.ps1):

    001
    002
    003
    004
    005
    006
    007
    008
    009
    010
    011
    012
    013
    014
    015
    016
    017
    018
    019
    020
    021
    022
    023
    024
    025
    026
    027
    028
    029
    030
    031
    032
    033
    034
    035
    036
    037
    038
    039
    040
    041
    042
    043
    044
    045
    046
    047
    048
    049
    050
    051
    052
    053
    param
    (
        [Parameter(Mandatory=$true)]
        [string]$AzureSubscriptionName,
        [Parameter(Mandatory=$true)]
        [string]$ProjectName,
        [Parameter(Mandatory=$true)]
        [string]$StorageAccountName
    )

    workflow Upload-LocalVHDtoAzure { 

        param 
        ( 
            [string]$StorageContainerName, 
            [string]$VHDName, 
            [string]$SourceVHDPath, 
            [string]$DestinationBlobURI, 
            [bool]$OverWrite 
        ) 
        
        $AzureSubscriptionForWorkflow = Get-AzureSubscription 

        $AzureBlob = Get-AzureStorageBlob -Container $StorageContainerName -Blob $VHDName -ErrorAction SilentlyContinue 
        
        if(!$AzureBlob -or $OverWrite) { 

            $AzureBlob = Add-AzureVhd -LocalFilePath $SourceVHDPath -Destination $DestinationBlobURI -OverWrite:$OverWrite 
        } 

        Return $AzureBlob 

    }

    $GenericStorageContainerName = “vhds”

    $SourceDiskName = “toWindowsAzure” 
    $SourceDiskFileExt = “vhd” 
    $SourceDiskPath = “D:\Drop\Azure\toAzure” 
    $SourceVHDName = “{0}.{1}” -f $SourceDiskName,$SourceDiskFileExt 
    $SourceVHDPath = “{0}\{1}” -f $SourceDiskPath,$SourceVHDName 

    $DesitnationVHDName = “{0}.{1}” -f $ProjectName,$SourceDiskFileExt 
    $DestinationVHDPath = https://{0}.blob.core.windows.net/{1}” -f $StorageAccountName,$GenericStorageContainerName 
    $DestinationBlobURI = “{0}/{1}” -f $DestinationVHDPath,$DesitnationVHDName 
    $OverWrite = $false 

    Select-AzureSubscription -SubscriptionName $AzureSubscriptionName
    Set-AzureSubscription -SubscriptionName $AzureSubscriptionName -CurrentStorageAccount $StorageAccountName

    $AzureBlobUploadJob = Upload-LocalVHDtoAzure -StorageContainerName $GenericStorageContainerName -VHDName $DesitnationVHDName `
        -SourceVHDPath $SourceVHDPath -DestinationBlobURI $DestinationBlobURI -OverWrite $OverWrite -AsJob 
    Receive-Job -Job $AzureBlobUploadJob -AutoRemoveJob -Wait -WriteEvents -WriteJobInResults

    Note     This is just one method of uploading a VHD to Azure for a specified Storage Account. I have parameterized the entire script so it could be run from the command line as a PS1 file. Obviously you can do with this as you please.


    Testing and Proof of Execution

    I figured you might want to see the results of my testing during my development of the Provision Azure Environment Resources example…so here are some screen captures from the Azure Automation interface:

    Dashboard

    image

    Runbooks

    image

    Assets

    image

    Azure All Items View

    You know, to prove that I created something with these scripts…

    image

    How To : Use Powershell and TFS together

    The absolute basics

    Where does a newbie to Windows PowerShell start—particularly in regards to TFS? There are a few obvious places. I’m hardly the first person to trip across the natural peanut-butter-and-chocolate nature of TFS and Windows PowerShell together. In fact, the TFS Power Tools contain a set of cmdlets for version control and a few other functions.

    Image

    There is one issue when downloading them, however. The “typical” installation of the Power Tools leaves out the Windows PowerShell cmdlets! So make sure you choose “custom” and select those Windows PowerShell cmdlets manually.

    After they’re installed, you also might need to manually add them to Windows PowerShell before you can start using them. If you try Get-Help for one of the cmdlets and see nothing but an error message, you know you’ll need to do so (and not simply use Update-Help, as the error message implies).

    Fortunately, that’s simple. Using the following command will fix the issue:

    add-pssnapin Microsoft.TeamFoundation.PowerShell

    See the before and after:

    Image of command output

    A better way to review what’s in the Power Tools and to get the full list of cmdlets installed by the TFS Power Tools is to use:

    Get-Command -module Microsoft.TeamFoundation.PowerShell

    This method doesn’t depend on the developers including “TFS” in all the cmdlet names. But as it happens, they did follow the Cmdlet Development Guidelines, so both commands return the same results.

    Something else I realized when working with the TFS PowerShell cmdlets: for administrative tasks, like those I’m most interested in, you’ll want to launch Windows PowerShell as an administrator. And as long-time Windows PowerShell users already know, if you want to enable the execution of remote scripts, make sure that you set your script execution policy to RemoteSigned. For more information, see How Can I Write and Run a Windows PowerShell Script?.

    Of all the cmdlets provided with the TFS Power Tools, one of my personal favorites is Get-TfsServer, which lets me get the instance ID of my server, among other useful things.  My least favorite thing about the cmdlets in the Power Tools? There is little to no useful information for TFS cmdlets in Get-Help. Awkward! (There’s a community bug about this if you want to add your comments or vote on it.)

    A different favorite: Get-TFSItemHistory. His following example not only demonstrates the power of the cmdlets, but also some of their limitations:

    Get-TfsItemHistory -HistoryItem . -Recurse -Stopafter 5 |

        ForEach-Object { Get-TfsChangeset -ChangesetNumber $_.ChangesetId } |

        Select-Object -ExpandProperty Changes |

        Select-Object -ExpandProperty Item

    This snippet gets the last five changesets in or under the current directory, and then it gets the list of files that were changed in those changesets. Sadly, this example also highlights one of the shortcomings of the Power Tools cmdlets: Get-TfsItemHistory cannot be directly piped to Get-TfsChangeset because the former outputs objects with ChangesetId properties, and the latter expects a ChangesetNumber parameter.

    One of the nice things is that raw TFS API objects are being returned, and the snap-ins define custom Windows PowerShell formatting rules for these objects. In the previous example, the objects are instances of VersionControl.Client.Item, but the formatting approximates that seen with Get-ChildItem.

    So the cmdlets included in the TFS Power Tools are a good place to start if you’re just getting started with TFS and Windows PowerShell, but they’re somewhat limited in scope. Most of them are simply piping results of the tf.exe commands that are already available in TFS. You’ll probably find yourself wanting to do more than just work with these.


    How to : Use JQuery and JSON in MVC 5 for Autocomplete

    Image

    Imagine that you want to create edit view for Company entity which has two properties: Name (type string) and Boss (type Person). You want both properties to be editable. For Company.Name simple text input is enough but for Company.Boss you want to use jQuery UI Autocomplete widget. This widget has to meet following requirements:

    • suggestions should appear when user starts typing person’s last name or presses down arrow key;
    • identifier of person selected as boss should be sent to the server;
    • items in the list should provide additional information (first name and date of birth);
    • user has to select one of the suggested items (arbitrary text is not acceptable);
    • the boss property should be validated (with validation message and style set for appropriate input field).

    Above requirements appear quite often in web applications. I’ve seen many over-complicated ways in which they were implemented. I want to show you how to do it quickly and cleanly… The assumption is that you have basic knowledge about jQuery UI Autocomplete and ASP.NET MVC. In this post I will show only the code which is related to autocomplete functionality but you can download full demo project here. It’s ASP.NET MVC 5/Entity Framework 6/jQuery UI 1.10.4 project created in Visual Studio 2013 Express for Web and tested in Chrome 34, FF 28 and IE 11 (in 11 and 8 mode).

    So here are our domain classes:

    public class Company
    {
        public int Id { get; set; } 
    
        [Required]
        public string Name { get; set; }
    
        [Required]
        public Person Boss { get; set; }
    }
    public class Person
    {
        public int Id { get; set; }
    
        [Required]
        [DisplayName("First Name")]
        public string FirstName { get; set; }
        
        [Required]
        [DisplayName("Last Name")]
        public string LastName { get; set; }
    
        [Required]
        [DisplayName("Date of Birth")]
        public DateTime DateOfBirth { get; set; }
    
        public override string ToString()
        {
            return string.Format("{0}, {1} ({2})", LastName, FirstName, DateOfBirth.ToShortDateString());
        }
    }

    Nothing fancy there, few properties with standard attributes for validation and good looking display. Person class has ToString override – the text from this method will be used in autocomplete suggestions list.

    Edit view for Company is based on this view model:

    public class CompanyEditViewModel
    {    
        public int Id { get; set; }
    
        [Required]
        public string Name { get; set; }
    
        [Required]
        public int BossId { get; set; }
    
        [Required(ErrorMessage="Please select the boss")]
        [DisplayName("Boss")]
        public string BossLastName { get; set; }
    }

    Notice that there are two properties for Boss related data.

    Below is the part of edit view that is responsible for displaying input field with jQuery UI Autocomplete widget for Boss property:

    <div class="form-group">
        @Html.LabelFor(model => model.BossLastName, new { @class = "control-label col-md-2" })
        <div class="col-md-10">
            @Html.TextBoxFor(Model => Model.BossLastName, new { @class = "autocomplete-with-hidden", data_url = Url.Action("GetListForAutocomplete", "Person") })
            @Html.HiddenFor(Model => Model.BossId)
            @Html.ValidationMessageFor(model => model.BossLastName)
        </div>
    </div>

    form-group and col-md-10 classes belong to Bootstrap framework which is used in MVC 5 web project template – don’t bother with them. BossLastName property is used for label, visible input field and validation message. There’s a hidden input field which stores the identifier of selected boss (Person entity). @Html.TextBoxFor helper which is responsible for rendering visible input field defines a class and a data attribute. autocomplete-with-hidden class marks inputs that should obtain the widget. data-url attribute value is used to inform about the address of action method that provides data for autocomplete. Using Url.Action is better than hardcoding such address in JavaScript file because helper takes into account routing rules which might change.

    This is HTML markup that is produced by above Razor code:

    <div class="form-group">
        <label class="control-label col-md-2" for="BossLastName">Boss</label>
        <div class="col-md-10">
            <span class="ui-helper-hidden-accessible" role="status" aria-live="polite"></span>
            <input name="BossLastName" class="autocomplete-with-hidden ui-autocomplete-input" id="BossLastName" type="text" value="Kowalski" 
             data-val-required="Please select the boss" data-val="true" data-url="/Person/GetListForAutocomplete" autocomplete="off">
            <input name="BossId" id="BossId" type="hidden" value="4" data-val-required="The BossId field is required." data-val-number="The field BossId must be a number." data-val="true">
            <span class="field-validation-valid" data-valmsg-replace="true" data-valmsg-for="BossLastName"></span>
        </div>
    </div>

    This is JavaScript code responsible for installing jQuery UI Autocomplete widget:

    $(function () {
        $('.autocomplete-with-hidden').autocomplete({
            minLength: 0,
            source: function (request, response) {
                var url = $(this.element).data('url');
       
                $.getJSON(url, { term: request.term }, function (data) {
                    response(data);
                })
            },
            select: function (event, ui) {
                $(event.target).next('input[type=hidden]').val(ui.item.id);
            },
            change: function(event, ui) {
                if (!ui.item) {
                    $(event.target).val('').next('input[type=hidden]').val('');
                }
            }
        });
    })

    Widget’s source option is set to a function. This function pulls data from the server by $.getJSON call. URL is extracted from data-url attribute. If you want to control caching or provide error handling you may want to switch to $.ajax function. The purpose of change event handler is to ensure that values for BossId and BossLastName are set only if user selected an item from suggestions list.

    This is the action method that provides data for autocomplete:

    public JsonResult GetListForAutocomplete(string term)
    {               
        Person[] matching = string.IsNullOrWhiteSpace(term) ?
            db.Persons.ToArray() :
            db.Persons.Where(p => p.LastName.ToUpper().StartsWith(term.ToUpper())).ToArray();
    
        return Json(matching.Select(m => new { id = m.Id, value = m.LastName, label = m.ToString() }), JsonRequestBehavior.AllowGet);
    }

    value and label are standard properties expected by the widget. label determines the text which is shown in suggestion list, value designate what data is presented in the input filed on which the widget is installed. id is custom property for indicating which Person entity was selected. It is used in select event handler (notice the reference to ui.item.id): Selected ui.item.id is set as a value of hidden input field – this way it will be sent in HTTP request when user decides to save Company data.

    Finally this is the controller method responsible for saving Company data:

    public ActionResult Edit([Bind(Include="Id,Name,BossId,BossLastName")] CompanyEditViewModel companyEdit)
    {
        if (ModelState.IsValid)
        {
            Company company = db.Companies.Find(companyEdit.Id);
            if (company == null)
            {
                return HttpNotFound();
            }
    
            company.Name = companyEdit.Name;
    
            Person boss = db.Persons.Find(companyEdit.BossId);
            company.Boss = boss;
            
            db.Entry(company).State = EntityState.Modified;
            db.SaveChanges();
            return RedirectToAction("Index");
        }
        return View(companyEdit);
    }

    Pretty standard stuff. If you’ve ever used Entity Framework above method should be clear to you. If it’s not, don’t worry. For the purpose of this post the important thing to notice is that we can use companyEdit.BossId because it was properly filled by model binder thanks to our hidden input field.

    That’s it, all requirements are met! Easy, huh?

    You may be wondering why I want to use jQuery UI widget in Visual Studio 2013 project which by default uses Twitter Bootstrap. It’s true that Bootstrap has some widgets and plugins but after a bit of experimentation I’ve found that for some more complicated scenarios jQ UI does a better job. The set of controls is simply more mature…

    PressurePoint – great tool to Stress, Load and Performance test your SharPoint Site

    SharePoint2013


    Awesome tool developed by

     MargrietBruggeman

    This version of PressurePoint only works with SharePoint 2013.

    There’s a generic version of PressurePoint that works for all versions of SharePoint and even normal web sites at: http://gallery.technet.microsoft.com/PressurePoint-Dragon-for-58648ae4

    Requires: The presence of the .NET 4.5 framework, because it makes extensive use of Parallel Programming techniques. Supports anonymous and Windows (NTLM) authentication.

    About PressurePoint

    When you apply enough pressure, every application you or somebody else builds has a point where it breaks. I call this point the pressure point.

    I’d say it’s a strong advisory positive to undertake some activities to find out where the pressure point of the application that you’re responsible for lies. Several kinds of tests are commonly used to find out about these:

    • Performance testing, the umbrella term for testing applications responsiveness and stability. Following, I’ll list some more specific relevant types of performance testing.
    • Load testing, makes requests of an application to simulate normal or anticipated load conditions. This kind of test helps greatly when you want to determine what your end users should expect.
    • Endurance testing, tests if an application is able to hold up under continuous prolonged, but normal or expected, load. Typically looks for memory consumption and gradually decreasing performance.
    • Stress testing, here, you try to find the breaking point by applying maximum application capacity and observe in what ways the application breaks. It finds bottlenecks and root causes for performance degradation.
    • Spike testing, applies a sudden and dramatic increase in load and sees how the application responds to that.
    • Isolation testing, tests a specific part of the application. Usually, this involves an area that has proved to be troublesome.

    It helps a lot if such tests are repeated throughout development/test/staging/production environments. This allows you to get a feel for your application.

    During these tests, you’ll typically look at server response time (instead of rendering time), the time it takes the client to make the request and get the final response back. Because of this, I can advise to execute performance tests as close to the server or server farm as possible to eliminate network latency issues.

    Most of the times, as an application developer or admin you don’t have much or any control over the network and you’ll be more interested how the specific application holds up.

    Also, but this is quite obvious, if you can avoid it don’t place test clients on the server or server farm itself, or on the host hosting the virtual machines containing server or server farms. This can have quite the effect on the test outcome, although I have to say that in my experience the effect is limited enough to be able to undertake meaningful performance tests launched from the server or server farm. Other quick tips: it typically works better if you execute performance tests using multiple client computers and you should preferably execute performance tests using multiple user accounts.

    Whatever types of tests you’re planning to do, please remember that forgetting to do any type of performance testing will result in an interesting product release experience. Lately, I can’t keep track anymore of the number of times companies contact me wishing they would have spent some time doing performance testing.

    Lots of Tools

    There are lots of tools out there that can help you do performance testing, but in my experience (and I have looked at 100+ of these tools) there are two types of tools: tools that are just a preview of a commercial version and too limited to do anything useful without buying the license and then there are tools that are insanely complex to use. See my blog post at http://sharepointdragons.com/2012/12/26/the-great-free-performance-load-and-stress-testing-tools-that-can-be-used-with-sharepoint-verdict/ for more information. The following overview at http://en.wikipedia.org/wiki/Test_tool is also nice and more objective (well, it would be more accurate to say that it refrains from giving any opinion).

    So, it depends on your situation how to proceed. If you have budget, you can buy a great performance test tool and use that. I found myself in situations where I had to do performance testing in companies that didn’t have a budget to invest in performance tooling. There was also another issue…

    About SharePoint

    As I mainly work in SharePoint environments, I prefer to use a tool that is able to do performance testing specifically targeted towards SharePoint. I found none. During my SharePoint testing, uhm, dare I say, adventures, I found that SharePoint page requests are typically handled just fine and it’s hard to get a SharePoint environment to its knees just doing that. Request times tend to increase linearly, which is a good sign for an application. On top, SharePoint handles excessive page requests gracefully, without falling back in throwing all kinds of errors. Things get a lot more interesting and dangerous when you do one of the following things:

    • Execute custom code
    • Upload and retrieve documents of various sizes and batch sizes
    • Work with custom SharePoint Services, such as Search, Forms Services or SQL Server Reporting Services (let’s just say I picked out these as examples for no particular reason)

    When using a testing tool that doesn’t have knowledge about SharePoint, it will be quite hard to test these aspects.

    My conclusion

    It may come as no surprise that eventually I decided that it was easier to build my own tool that has specific knowledge about SharePoint, can be extended by me at will, and is easy to use. Making extensive use of the .NET parallel programming capabilities, I found it was quite easy to do. When I was done, I decided that I wanted to share the basic version of it (basic, since I build custom extensions in it dedicated to the projects I’m doing) with the community. Later, I’m planning to add a specific version dedicated to SharePoint 2013, but I’m not quite there yet.

    What to look for?

    Doing performance testing in SharePoint environments without knowing what to look for is not the most useful thing one can do with one’s time. There are specific performance counters you should look out for on SharePoint WFE’s and different ones to check out on the back-end databases server. Depending on your needs, you might also need to spend some time coming up with the right set of performance counters you need for monitoring dedicated application servers. If you want to learn more about this topic, I can definitely recommend my gallery contribution at: http://gallery.technet.microsoft.com/PowerShell-script-for-59cf3f70 I’d also recommend the use of my SharePoint Flavored Weblog Reader (SFWR) tool at http://gallery.technet.microsoft.com/The-SharePoint-Flavored-5b03f323 which helps to analyze IIS log files.

    Whether you use these tools or not: bear in mind that running a performance test tool without analyzing what happens on the server is absolutely useless!

    How to use the PressurePoint Dragon for SharePoint

    PressurePoint is a command line tool that reads an XML file that describes the test you want to execute. Currently, it only supports Windows (NTLM) or anonymous authentication. When you download the PressurePoint ZIP file it contains three things:

    • PressurePoint.exe, the actual performance test tool that can be executed by calling it from the command line. It requires the presence of the .NET 4 framework since it makes extensive use of parallel programming techniques.
    • PressurePoint.exe.config, the configuration file that is mandatory for the PressurePoint tool. Check out the TestLocation app setting and point it to the location of the XML file describing your test:

      Copy Code

      XML
      Edit|Remove
        <appSettings> 
          <add key="TestLocation" value="C:\Clients\XYZ\PressurePoint\test.xml"/> 
      </appSettings> 
      
    • Test.xml, an example XML Test Description file describing an example test.

    Explanation of the structure of a Test Description file

    The test description file can do a couple of simple things. It contains a test body that is repeated x times, determined by the repeat attribute of the <Test> element.

    Copy Code

    XML
    Edit|Remove
    <!--?xml version="1.0" encoding="utf-8" ?> 
    <Test repeat="10"> 
    [body omitted for clarity] 
    </Test>

    The <Test> element is the root element and only occurs once. It contains 1 or more <Session> elements. In a Session, you can specify important configuration info, such as the user name (user attribute), password (password attribute), domain name (domain attribute), the number of concurrent users that start a session (e.g. 20 instances of user A start executing the actions as described in a session) via the concurrentUsers attribute, a friendly name that is outputted to the console window to make it easier to identify which session is executed at a given time (friendlySessionName attribute).

    Please note: If you’re using anonymous authentication, the values for user, password, and domain can just be left blank.

    The following example shows the Session section:

    Copy Code

    XML
    Edit|Remove
    <Session user="administrator" password="verySecret" domain="lc" concurrentUsers="1" friendlySessionName="SessionA"> 
    [body omitted for clarity] 
    </Session>

    Then there are various actions that can be used within a Session. These are:

    • Comment, outputs a text to the console window. Example:

      Copy Code

      XML
      Edit|Remove
      <Comment>Start Moon session A for administrator</Comment> 
      
    • Request, makes a request to a page. Please note: specify a page here, instead of a generic site url such as http://moon. Because right now, PressurePoint doesn’t support redirects. Example:

      Copy Code

      XML
      Edit|Remove
      <Request>http://moon/pages/default.aspx</Request>
    • DelaySeconds, waits for a given amount of time to simulate think time. Example:

      Copy Code

      XML
      Edit|Remove
      <DelaySeconds value="3" />
    • RandomDelaySeconds, waits for a random amount of time within a given range to provide a more realistic simulation of think time (which might not be what you want, since the action keeps the test more predictable. Example:

      Copy Code

      XML
      Edit|Remove
      <RandomDelaySeconds min="1" max="3" />
    • RandomRequest, makes a random request to a page from a given list. Example:

      Copy Code

      XML
      Edit|Remove
      <RandomRequest> 
        <URL>http://moon/pages/default.aspx</URL> 
        <URL>http://moon:28827/sitepages/home.aspx</URL> 
      <!--RandomRequest>  
      

      The next example is a full blown example of a single session by a single user repeated 10 times:

    Copy Code

    XML
    Edit|Remove
    <?xml version="1.0" encoding="utf-8" ?> 
    <Test repeat="10"> 
      <Session user="administrator" password="superSecret" domain="lc" concurrentUsers="1" friendlySessionName="SessionA"> 
        <Comment>Start Moon session A for administrator</Comment>    <Request>http://moon/pages/default.aspx</Request> 
        <RandomRequest> 
          <URL>http://moon/pages/default.aspx</URL> 
          <RandomDelaySeconds min="1" max="3" />  <URL>http://moon:28827/sitepages/home.aspx</URL> 
        </RandomRequest> 
      </Session> 
    </Test>

    The next example shows how to simulate 1000 concurrent users, using 2 different user accounts in a test that is repated 100 times:

    Copy Code

    XML
    Edit|Remove
    <?xml version="1.0" encoding="utf-8" ?> 
    <Test repeat="100"> 
      <Session user="administrator" password="secretPwd" domain="test" concurrentUsers="500" friendlySessionName="SessionA"> 
        <Comment>Start session "Home page" for administrator</Comment>    <Request>http://mysrv/sitepages/home.aspx</Request> 
      </Session>  
     
      <Session user="jBlack" password="superSecret" domain="test" concurrentUsers="500" friendlySessionName="SessionA"> 
        <Comment>Start session A for Jack Black</Comment>    <Request>http://mysrv/sitepages/home.aspx</Request> 
      </Session> 
    </Test>

    The following section contains SharePoint 2013 specific actions.

    • ClientSite, fetches the URL of a SharePoint site collection. Looks like this:

      Copy code

      XML
      Edit|Remove
      <ClientSite  <Url>http://moon</Url> 
      </ClientSite> 


    Quick tips for constructing performance test cases

    The following link contains interesting information about the typical type of use of a SharePoint environment: http://office.microsoft.com/en-us/windows-sharepoint-services-it/capacity-planning-for-windows-sharepoint-services-HA001160774.aspx . The quick take away is this:

    • Light usage: the end user makes 20 requests per hour.
    • Typical usage: the end user makes 36 requests per hour.
    • Heavy usage: the end user makes 60 requests per hour.
    • Extreme usage: the end user makes 120 requests per hour.

    This will help you build test cases that are more realistic; especially in situations where the customer isn’t really sure how much the application will be used. Concerning this topic, I’ve also found the following topic to be quite interesting: http://blogs.technet.com/b/wbaer/archive/2007/07/06/requests-per-second-required-for-sharepoint-products-and-technologies.aspx

    As a final guideline, I’ve also worked with the following rule of thumb that may help you: in a typical enterprise application, 1% of the users makes a request per second during peak time, in an enterprise application that is used extremely, 3% of the users makes a request per second during peak time.

    Support Tools

    It can be frustrating to try a new community tool that doesn’t seem to work. It makes you wonder whether you made a mistake in constructing the XML for the test case, or whether the tool simply doesn’t work. I’ve built two tools that support PressurePoint: Ping Dragon for SharePoint 2010 (http://gallery.technet.microsoft.com/Ping-Dragon-for-SharePoint-70fb299e ) and WinPing Dragon for SharePoint 2010 (http://gallery.technet.microsoft.com/WinPing-Dragon-for-eefb6dd3 ). The tools fulfill a single purpose: ping SharePoint using the same method leveraged by PressurePoint. In other words, if these tools work, PressurePoint will work too. The difference between both support tools is that the WinPing Dragon tool hides the password from view, while the Ping Dragon doesn’t.

    What’s going on under the covers?

    Usethe Resource Monitor tool (resmon.exe) to “check the heartbeat” of PressurePoint, since the tool is a bit of a black box to you and watching it doing its work can be a boring experience. Resource Monitor clearly shows how PressurePoint is building up to the point where it can simulate the load you require to simulate the number of different users and sessions you need. PressurePoint executes each session in a separate thread and Resource Monitor will show an increase of the PressurePoint thread counter until it approximates the intended load.

    The System image normally, as you’d expect, has the highest number of active threads (a couple of 100s), but once you’re simulating loads of 100s or even 1000s of end users,

    PressurePoint surpasses this. One of the things that I found interesting was that it can take quite a long time until you get to the point where you can actually run 100s or even 1000s of separate threads in a single application (on the environments I’ve tested it on, it can take 1 hour or more to reach those kinds of numbers). It makes sense, since those are a lot of threads, other threads finish their work, and your system has other tasks to take care of. But still, before building the tool, I didn’t anticipate this.

    FREE Microsoft Dynamics CRM 2011 List Component for Microsoft SharePoint Server 2010


    CRM2011 – SharePoint 2010 Integration? Glue CRM 2011 & Share Point 2010 together? Make CRM 2011 and Share Point 2010 converse? I wasn’t sure what to call this exactly. “Hooking together” works for me!

    Now that we have a CRM 2011 instance and a Share Point site working, let’s get them connected up! Go to this website and download Microsoft Dynamics CRM 2011 List Component for Microsoft SharePoint Server 2010:

    Accept the License Terms.

    Extract the files to a folder (I chose C:\CRM List).

    You will get a prompt “The Installation is complete.” Click OK.

    Let’s go over to the Share Point Central Administration Server to install the list component we just extracted. Connect to http://localhost:48835/ (your port might be different, be aware of this). Click Manage web applications.

    Click the new Share Point site, and then “General Settings” (the blue cogs).

    Scroll down to Browser File Handling and choose Permissive, Click OK.

    Let’s head back over to our new Share Point Site. Click Site Actions up top left, and then “Site Settings”.

    Under Galleries click “Solutions”.


    Click the Word “Solutions” up top (you have to click the word “Solutions”, even though it looks selected), and then click “Upload Solution”.

    Select the .wsp component that we extracted wayyy back at the top of this. I used C:CRM List as my extract folder. Click OK.

    You’ll get prompted at this point, I couldn’t active the control on this screen (but it still needs to be done). We need to make sure some services are running to activate the solution. Click Close.

    Head back to the Share Point Central Administration. http://localhost:48835. Found at

    Click System Settings –> Manage Services on this server

    Click Start beside “Share Point Foundation Sandboxed Code Service”. I also started “Microsoft SharePoint Foundation Subscription Settings Service (by accident)” so that’s why that ones started.

    Now to head back to our Share Point site http://localhost:39083/

    Under Galleries click “Solutions”.

    Click Solutions again, select crmlistcomponent, and the click “Activate” up top. Activate is now un-greyed out! Click Activate!

    The solution has now been activated! Hurray!

    There seems to be some confusion whether or not you need to run a power shell script to enable Activation of Share Point 2010 solutions (AllowHtcExtn). According to what I’ve read, you would need to run this if Share Point 2010 is running on a domain controller. I didn’t have to do this (and we’re on a domain controller), and I’ve yet to run into a problem with .htc stuff. Even in the Microsoft Dynamics CRM 2011 Readme it says:
    “If you are using Microsoft SharePoint Server 2010 (On-Premises), you must add .htc extensions to the list of allowed file types:
    a. Copy the AllowHtcExtn.ps1 script file to the server that is running Microsoft SharePoint Server 2010.
    b. In the Windows PowerShell window or in the SharePoint Management Console, run the command: AllowHtcExtn.ps1 .
    Example: AllowHtcExtn.ps1 http://servername%E2%80%9D

    Some people say the script works for them , and some say that using just the blog method (what we did) works
    The sharepoint configuration is complete at this point. You probably want to take a snapshot, name it “After Sharepoint Configuration”. Let’s head over to our CRM server (localhost:85).

    In CRM Click Settings –> Document Management –> Document Management Settings

    Select the entities that you want to have documents enabled on. This will create a “Documents” area when you open an instance of the entity. I’ll just leave the defaults for now. At the bottom punch in your Share Point site that you’ve created and click Next. This is the Share Point server we installed the list component on. You’re not allowed to use localhost:port, just use the computer name:port like below.

    Don’t select the box, otherwise it will relate the files to those entities. Without checking the box you will end up with something like Site/EntityName/Record Name (which is what I want, especially if you’re using custom entities). Click Next.

    If “Libraries are being created in the path”, click Next.

    Everything should “Succeed”, Click Finish.

    Let’s test this bad boy out now.

    Create a new account called “Test”.

    Click Save! Click “Documents” on the left side. You’ll get a prompt saying that the folder (Test) is being created under “Account”. Click OK.

    Click Add.

    Now you’ll probably get these errors! /crmgrid/scripts/DialogContainer.js and 403 FORBIDDEN! Depressing. The only real information on this error was here: . It wasn’t very clear, but I stumbled through it. It seems that CRM 2011 doesn’t enjoy being called localhost. Let’s fix these up.

    The fix for this was to run inetmgr –> Click Microsoft Dynamics CRM –> click Stop

    Click “Bindings…” on the right side. Click “Edit” on the items that show “localhost” and change it to my machine name: “win-b80icqrvluf”. This is so it has a a “real” name to connect to.

    Before:

    After:

    Now click “Start” on the right side.

    Head back over to the CRM (http://win-b80icqrvluf:85/CRMTest/main.aspx) make sure to use the host name, as it might give you the error if you use localhost. Open your Test Account again.

    Click Documents –> Add, you should now see this popup (it can take a while to load for the first time on the VM). If you continue to get the error, stop both CRM 2011 and Share Point 2010 servers and restart them. If that doesn’t work, try restarting the whole server.

    Pick a file, and click OK.

    The file should be uploaded to Share Point now.

    Head over to Share Point at http://win-b80icqrvluf:39083 and click “All Site Content” or “Libraries”.

    Click Account.

    You can see that CRM has created a folder “Test” (for our record). It creates 1 folder per record. Click it to see the files associated to that record!!

    The files associated to the record “Test” in Accounts.

    Share Point and CRM have combined into a super awesome force of doom. But we’re still missing 1 core piece of functionality (due to not picking a port when we installed CRM).


    Building Distributed Node.js Apps with Azure Service Bus Queue

    Azure Service Bus Queues provides, a queue based, brokered messaging communication between apps, which lets developers build distributed apps on the Cloud and also for hybrid Cloud environments. Azure Service Bus Queue provides First In, First Out (FIFO) messaging infrastructure. Service Bus Queues can be leveraged for communicating between apps, whether the apps are hosted on the cloud or on-premises servers.

    windows-azure-c3634

    Service Bus Queues are primarily used for distributing application logic into multiple apps. For an example, let’s say, we are building an order processing app where we are building a frontend web app for receiving orders from customers and want to move order processing logic into a backend service where we can implement the order processing logic in an asynchronous manner. In this sample scenario, we can use Azure Service Bus Queue, where we can create an order processing message into Service Bus Queue from frontend app for processing the request. From the backend order processing app, we can receives the message from Queue and can process the request in an efficient manner. This approach also enables better scalability as we can separately scale-up frontend app and backend app.

    For this sample scenario, we can deploy the frontend app onto Azure Web Role and backend app onto Azure Worker Role and can separately  scale-up both Web Role and Worker Role apps. We can also use Service Bus Queues for hybrid Cloud scenarios where we can communicate between apps hosted on Cloud and On-premises servers.    

    Using Azure Service Bus Queues in Node.js Apps

    In order to working with Azure Service Bus, we need to create a Service Bus namespace from Azure portal.

    image

    We can take the connection information of Service Bus namespace from the Connection Information tab in the bottom section, after choosing the Service Bus namespace.

    image

    Creating the Service Bus Client

    Firstly, we need to install npm module azure to working with Azure services from Node.js app.

    npm install azure

    The code block below creates a Service Bus client object using the Node.js module azure.

    var azure = require('azure');
    var config=require('./config');
    
    
    var serviceBusClient = azure.createServiceBusService(config.sbConnection);

    We create the Service Bus client object by using createServiceBusService method of azure. In the above code block, we pass the Service Bus connection info from a config file. The azure module can also read the environment variables AZURE_SERVICEBUS_NAMESPACE and AZURE_SERVICEBUS_ACCESS_KEY for information required to connect with Azure Service Bus where we can call  createServiceBusService method without specifying the connection information.

    Creating a Services Bus Queue

    The createQueueIfNotExists method of Service Bus client object, returns the queue if it is already exists, or create a new Queue if it is not exists.

    var azure = require('azure');
    var config=require('./config');
    var queue = 'ordersqueue';
    
    
    var serviceBusClient = azure.createServiceBusService(config.sbConnection);
    
    
    function createQueue() {
     serviceBusClient.createQueueIfNotExists(queue,
     function(error){
        if(error){
            console.log(error);
        }
        else
        {
            console.log('Queue ' + queue+ ' exists');
        }
    });
    }

    Sending Messages to Services Bus Queue

    The below function sendMessage sends a given message to Service Bus Queue

    function sendMessage(message) {
        serviceBusClient.sendQueueMessage(queue,message,
     function(error) {
            if (error) {
                console.log(error);
            }
            else
            {
                console.log('Message sent to queue');
            }
        });
    }

    The following code create the queue and sending a message to Queue by calling the methods createQueue and sendMessage which we have created in the previous steps.

    createQueue();
    var orderMessage={
     "OrderId":101,
     "OrderDate": new Date().toDateString()
    };
    sendMessage(JSON.stringify(orderMessage));

    We create a JSON object with properties OrderId and OrderDate and send this to the Service Bus Queue. We can send these messages to Queue for communicating with other apps where the receiver apps can read the messages from Queue and perform the application logic based on the messages we have provided.

    Receiving Messages from Services Bus Queue

    Typically, we will be receive the Service Bus Queue messages from a backend app. The code block below receives the messages from Service Bus Queue and extracting information from the JSON data.

    var azure = require('azure');
    var config=require('./config');
    var queue = 'ordersqueue';
    
    
    var serviceBusClient = azure.createServiceBusService(config.sbConnection);
    function receiveMessages() {
        serviceBusClient.receiveQueueMessage(queue,
          function (error, message) {
            if (error) {
                console.log(error);
            } else {
                var message = JSON.parse(message.body);
                console.log('Processing Order# ' + message.OrderId
                    + ' placed on ' + message.OrderDate);
            }
        });
    }

    By default, the messages will be deleted from Service Bus Queue after reading the messages. This behaviour can be changed by specifying the optional parameter isPeekLock as true as sown in the below code block.

    function receiveMessages() {
        serviceBusClient.receiveQueueMessage(queue,{ isPeekLock: true },
          function (error, message) {
            if (error) {
                console.log(error);
            } else {
                var message = JSON.parse(message.body);
              console.log('Processing Order# ' + message.OrderId
                    + ' placed on ' + message.OrderDate);
              serviceBusService.deleteMessage(message,
            function (deleteError){
                if(!deleteError){
                    console.delete('Message deleted from Queue');
                 }
               }
              });
            }
        });
    }

    Here the message will not be automatically deleted from Queue and we can explicitly delete the messages from Queue after reading and successfully implementing the application logic.

    Select Master Page App for SharePoint 2013 now available!! (Get the SharePoint 2010 Select Master Page Web Part Free)

    In Publishing sites, there will be a layouts or application page through which we can set a custom
    or another master page as a default master page. Unfortunately, this is missing in Team Sites.

    This is what this solution is all about. It is targeted mainly for Team sites, since publishing sites already have a provision.

    It adds a custom ribbon button in the Share and Track group of the Files group of Master Page Gallery. This is a SharePoint 2013 Hosted App. Refer the documentation for the technical details.


    The following screen shots depict the functionality.


    The custom ribbon button will not be enabled if a folder is selected or more than 1 item is selected.
    But if a file is selected, the button will be enabled, irrespective of the file extension. Upon selecting a file and clicking on the ribbon button, a pop up dialog will appear with the text “Working on it..”.

    Then a confirmation alert will appear, asking “Are you sure?”. Once confirmed by the user, a progress message will be displayed in the pop up dialog. If the file selected is not of .master extension, then the user will be displayed an alert “This will work only for master pages.”.

    If a master page, which is already set as default, is selected and the ribbon button is clicked, the user will be displayed an alert “The file at <url> is the current default master page. So please select another master page.”. If another master page is selected, then the user will be displayed an alert “Master Page Changed Successfully.

    Please press CTRL + F5 for changes to reflect.”. Once the user clicks OK on the alert, the pop up dialog also closes and pressing CTRL + F5 will reflect the updated master page. Any time, the user clicks OK or cancel on the alert screens, the parent screen will be refreshed and the current selection will be cleared.

    The app requires a Full Control on the host web, since this is required for setting the master page and thats precisely the reason why, I couldn’t publish this in the Office store.

    The app has been tested on IE9 and the latest version of Chrome and Firefox. It may not work on IE8 or lower version of other browsers also, in case they don’t support HTML5. Also, the app currently supports only English. Also, the app will set the default master only on the host web (where the app is installed) and not on the sub webs.

    The app uses jQuery AJAX and REST APIs of SharePoint 2013.

    To use the app, just upload the app (.app file) to the App Catalog and add/install it to the host team site and trust it and navigate to the Master Page Gallery and you are good to go.


    With this App, you will also receive the FREE SharePoint 2010 Select Master Page Web Part!!

    It adds a custom ribbon button in the Share and Track group of the Documents group of Master Page Gallery.

    It is a Sandbox solution and it is implemented to set the master of only the root site of a site collection, though it can be customized / extended for sub sites. It requires a user to be at least a Site owner to avoid unnecessary manipulation of master page by contributors or other users. Refer the documentation for the technical details.

    The following screen shots depict the functionality.


    How To : Setup MyTask List in SharePoint 2013

    Overview

    You are using SharePoint 2013, you have deployed My Sites. You or your users have tasks assigned. But when you or your users visit their MySite, they see below screen. Despite the users having assigned tasks elsewhere in the system, MySite still shows no tasks which is incorrect.

    123


    What is My Task List in SharePoint 2013?

    By architecture of the Newsfeed site on SharePoint 2013, My Tasks list puts together and shows all the SharePoint and Project Server (if installed) task assignment right into the users My Site page. The tasks can be either private tasks or public tasks.

    Pre-requisites for proper sync of My Task?

    • Search Service Application – very important to have this service enabled and running. Aggregator checks every 3 hours for any new “Tasks Lists”. Though the aggregator would look for SharePoint events / hints, they are known to have not activated an aggregation and hence the importance given to the indexer. Very important to have an Incremental / Continuous Crawl running.
    • Work Management Service Application (WMA) and the service running on the server.
    • User Profile Synchronization Service

    Refreshing the My Tasks Page

    The code behind aggregator is triggered by simply visiting the page within Newsfeed Site as long as the last trigger was older than 5 minutes. This delay is to preserve the performance of the SharePoint farm. This can be changed using PowerShell but highly recommend against the same for large farm deployments.

    Possible problems causing sync not work?

    1. Work Management Service wasn’t running
    2. Search wasn’t indexing anything yet. No indexer meant aggregator could potentially be not performing any aggregation as well.

    1234

    Solution

    1. Work management Service should run on App Server. If required create one from Central Admin
    2. Work management service application should be created with an app pool which must run with profile app pool account
    3. Create/ensure Incremental Crawls to happen across all the content sources, setup people search, my sites search.
    4. Ensure that continuous crawl is running
    5. Wait till the crawl completes
    6. Review the permission of profile app pool and portal app pool account on the specific databases with dbowner permissions
    • social db
    • sync db
    • profile db
    • state service db
    • manage metadata db
    • my site db
    • portal content db
    • projects content db
    • teams content db
    • communities content db
    • Search db.
    1. User profile synchronization service should be running.
    2. Run IIS reset on all app and WFE servers at the same time.

    12345

    Using Word Automation Services and OpenXML to Change Document Formats

     
    There are some tasks that are difficult when using the Welcome to the Open XML SDK 2.0 for Microsoft Office, such as repagination, conversion to other document formats such as PDF, or updating of the table of contents, fields, and other dynamic content in documents. Word Automation Services is a new feature of SharePoint 2010 that can help in these scenarios. It is a shared service that provides unattended, server-side conversion of documents into other formats, and some other important pieces of functionality. It was designed from the outset to work on servers and can process many documents in a reliable and predictable manner.Image


    Using Word Automation Services, you can convert from Open XML WordprocessingML to other document formats. For example, you may want to convert many documents to the PDF format and spool them to a printer or send them by e-mail to your customers. Or, you can convert from other document formats (such as HTML or Word 97-2003 binary documents) to Open XML word-processing documents.

    In addition to the document conversion facilities, there are other important areas of functionality that Word Automation Services provides, such as updating field codes in documents, and converting altChunk content to paragraphs with the normal style applied. These tasks can be difficult to perform using the Open XML SDK 2.0. However, it is easy to use Word Automation Services to do them. In the past, you used Word Automation Services to perform tasks like these for client applications. However, this approach is problematic. The Word client is an application that is best suited for authoring documents interactively, and was not designed for high-volume processing on a server. When performing these tasks, perhaps Word will display a dialog box reporting an error, and if the Word client is being automated on a server, there is no user to respond to the dialog box, and the process can come to an untimely stop. The issues associated with automation of Word are documented in the Knowledge Base article Considerations for Server-side Automation of Office.

    This scenario describes how you can use Word Automation Services to automate processing documents on a server.

    • An expert creates some Word template documents that follow specific conventions. She might use content controls to give structure to the template documents. This provides a good user experience and a reliable programmatic approach for determining the locations in the template document where data should be replaced in the document generation process. These template documents are typically stored in a SharePoint document library.

    • A program runs on the server to merge the template documents together with data, generating a set of Open XML WordprocessingML (DOCX) documents. This program is best written by using the Welcome to the Open XML SDK 2.0 for Microsoft Office, which is designed specifically for generating documents on a server. These documents are placed in a SharePoint document library.

    • After generating the set of documents, they might be automatically printed. Or, they might be sent by e-mail to a set of users, either as WordprocessingML documents, or perhaps as PDF, XPS, or MHTML documents after converting them from WordprocessingML to the desired format.

    • As part of the conversion, you can instruct Word Automation Services to update fields, such as the table of contents.

    Using the Welcome to the Open XML SDK 2.0 for Microsoft Office together with Word Automation Services enables you to create rich, end-to-end solutions that perform well and do not require automation of the Word client application.

    One of the key advantages of Word Automation Services is that it can scale out to your needs. Unlike the Word client application, you can configure it to use multiple processors. Further, you can configure it to load balance across multiple servers if your needs require that.

    Another key advantage is that Word Automation Services has perfect fidelity with the Word client applications. Document layout, including pagination, is identical regardless of whether the document is processed on the server or client.

    Supported Source Document Formats

    The supported source document formats for documents are as follows.

    1. Open XML File Format documents (.docx, .docm, .dotx, .dotm)

    2. Word 97-2003 documents (.doc, .dot)

    3. Rich Text Format files (.rtf)

    4. Single File Web Pages (.mht, .mhtml)

    5. Word 2003 XML Documents (.xml)

    6. Word XML Document (.xml)

    Supported Destination Document Formats

    The supported destination document formats includes all of the supported source document formats, and the following.

    1. Portable Document Format (.pdf)

    2. Open XML Paper Specification (.xps)

    Other Capabilities of Word Automation Services

    In addition to the ability to load and save documents in various formats, Word Automation Services includes other capabilities.

    You can cause Word Automation Services to update the table of contents, the table of authorities, and index fields. This is important when generating documents. After generating a document, if the document has a table of contents, it is an especially difficult task to determine document pagination so that the table of contents is updated correctly. Word Automation Services handles this for you easily.

    Open XML word-processing documents can contain various field types, which enables you to add dynamic content into a document. You can use Word Automation Services to cause all fields to be recalculated. For example, you can include a field type that inserts the current date into a document. When fields are updated, the associated content is also updated, so that the document displays the current date at the location of the field.

    One of the powerful ways that you can use content controls is to bind them to XML elements in a custom XML part. See the article, Building Document Generation Systems from Templates with Word 2010 and Word 2007 for an explanation of bound content controls, and links to several resources to help you get started. You can replace the contents of bound content controls by replacing the XML in the custom XML part. You do not have to alter the main document part. The main document part contains cached values for all bound content controls, and if you replace the XML in the custom XML part, the cached values in the main document part are not updated. This is not a problem if you expect users to view these generated documents only by using the Word client. However, if you want to process the WordprocessingML markup more, you must update the cached values in the main document part. Word Automation Services can do this.

    Alternate format content (as represented by the altChunk element) is a great way to import HTML content into a WordprocessingML document. The article, Building Document Generation Systems from Templates with Word 2010 and Word 2007 discusses alternate format content, its uses, and provides links to help you get started. However, until you open and save a document that contains altChunk elements, the document contains HTML, and not ordinary WordprocessingML markup such as paragraphs, runs, and text elements. You can use Word Automation Services to import the HTML (or other forms of alternative content) and convert them to WordprocessingML markup that contains familiar WordprocessingML paragraphs that have styles.

    You can also convert to and from formats that were used by previous versions of Word. If you are building an enterprise-class application that is used by thousands of users, you may have some users who are using Word 2007 or Word 2003 to edit Open XML documents. You can convert Open XML documents so that they contain only the markup and features that are used by either Word 2007 or Word 2003.

    Limitations of Word Automation Services

    Word Automation Services does not include capabilities for printing documents. However, it is straightforward to convert WordprocessingML documents to PDF or XPS and spool them to a printer.

    A question that sometimes occurs is whether you can use Word Automation Services without purchasing and installing SharePoint Server 2010. Word Automation Services takes advantage of facilities of SharePoint 2010, and is a feature of it. You must purchase and install SharePoint Server 2010 to use it. Word Automation Services is in the standard edition and enterprise edition.

    By default, Word Automation Services is a service that installs and runs with a stand-alone SharePoint Server 2010 installation. If you are using SharePoint 2010 in a server farm, you must explicitly enable Word Automation Services.

    To use it, you use its programming interface to start a conversion job. For each conversion job, you specify which files, folders, or document libraries you want the conversion job to process. Based on your configuration, when you start a conversion job, it begins a specified number of conversion processes on each server. You can specify the frequency with which it starts conversion jobs, and you can specify the number of conversions to start for each conversion process. In addition, you can specify the maximum percentage of memory that Word Automation Services can use.

    The configuration settings enable you to configure Word Automation Services so that it does not consume too many resources on SharePoint servers that are part of your important infrastructure. The settings that you must use are dictated by how you want to use the SharePoint Server. If it is only used for document conversions, you want to configure the settings so that the conversion service can consume most of your processor time. If you are using the conversion service for low priority background conversions, you want to configure accordingly.


    In addition to writing code that starts conversion processes, you can also write code to monitor the progress of conversions. This lets you inform users or post alert results when very large conversion jobs are completed.

    Word Automation Services lets you configure four additional aspects of conversions.

    1. You can limit the number of file formats that it supports.

    2. You can specify the number of documents converted by a conversion process before it is restarted. This is valuable because invalid documents can cause Word Automation Services to consume too much memory. All memory is reclaimed when the process is restarted.

    3. You can specify the number of times that Word Automation Services attempts to convert a document. By default, this is set to two so that if Word Automation Services fails in its attempts to convert a document, it attempts to convert it only one more time (in that conversion job).

    4. You can specify the length of elapsed time before conversion processes are monitored. This is valuable because Word Automation Services monitors conversions to make sure that conversions have not stalled.

    Unless you have installed a server farm, by default, Word Automation Services is installed and started in SharePoint Server 2010. However, as a developer, you want to alter its configuration so that you have a better development experience. By default, it starts conversion processes at 15 minute intervals. If you are testing code that uses it, you can benefit from setting the interval to one minute. In addition, there are scenarios where you may want Word Automation Services to use as much resources as possible. Those scenarios may also benefit from setting the interval to one minute.

    To adjust the conversion process interval to one minute

    1. Start SharePoint 2010 Central Administration.

    2. On the home page of SharePoint 2010 Central Administration, Click Manage Service Applications.

    3. In the Service Applications administration page, service applications are sorted alphabetically. Scroll to the bottom of the page, and then click Word Automation Services . If you are installing a server farm and have installed Word Automation Services manually, whatever you entered for the name of the service is what you see on this page.

    4. In the Word Automation Services administration page, configure the conversion throughput field to the desired frequency for starting conversion jobs.

    5. As a developer, you may also want to set the number of conversion processes, and to adjust the number of conversions per worker process. If you adjust the frequency with which conversion processes start without adjusting the other two values, and you attempt to convert many documents, you make the conversion process much less efficient. The best value for these numbers should take into consideration the power of your computer that is running SharePoint Server 2010.

    6. Scroll to the bottom of the page and then click OK.

    Because Word Automation Services is a service of SharePoint Server 2010, you can only use it in an application that runs directly on a SharePoint Server. You must build the application as a farm solution. You cannot use Word Automation Services from a sandboxed solution.

    A convenient way to use Word Automation Services is to write a web service that you can use from client applications.

    However, the easiest way to show how to write code that uses Word Automation Services is to build a console application. You must build and run the console application on the SharePoint Server, not on a client computer. The code to start and monitor conversion jobs is identical to the code that you would write for a Web Part, a workflow, or an event handler. Showing how to use Word Automation Services from a console application enables us to discuss the API without adding the complexities of a Web Part, an event handler, or a workflow.

    Important note Important

    Note that the following sample applications call Sleep(Int32) so that the examples query for status every five seconds. This would not be the best approach when you write code that you intend to deploy on production servers. Instead, you want to write a workflow with delay activity.

    To build the application

    1. Start Microsoft Visual Studio 2010.

    2. On the File menu, point to New, and then click Project.

    3. In the New Project dialog box, in the Recent Template pane, expand Visual C#, and then click Windows.

    4. To the right side of the Recent Template pane, click Console Application.

    5. By default, Visual Studio creates a project that targets .NET Framework 4. However, you must target .NET Framework 3.5. From the list at the upper part of the File Open dialog box, select .NET Framework 3.5.

    6. In the Name box, type the name that you want to use for your project, such as FirstWordAutomationServicesApplication.

    7. In the Location box, type the location where you want to place the project.

      Figure 1. Creating a solution in the New Project dialog box

      Creating solution in the New Project box

    8. Click OK to create the solution.

    9. By default, Visual Studio 2010 creates projects that target x86 CPUs, but to build SharePoint Server applications, you must target any CPU.

    10. If you are building a Microsoft Visual C# application, in Solution Explorer window, right-click the project, and then click Properties.

    11. In the project properties window, click Build.

    12. Point to the Platform Target list, and select Any CPU.

      Figure 2. Target Any CPU when building a C# console application

      Changing target to any CPU

    13. If you are building a Microsoft Visual Basic .NET Framework application, in the project properties window, click Compile.

      Figure 3. Compile options for a Visual Basic application

      Compile options for Visual Basic applications

    14. Click Advanced Compile Options.

      Figure 4. Advanced Compiler Settings dialog box

      Advanced Compiler Settings dialog box

    15. Point to the Platform Target list, and then click Any CPU.

    16. To add a reference to the Microsoft.Office.Word.Server assembly, on the Project menu, click Add Reference to open the Add Reference dialog box.

    17. Select the .NET tab, and add the component named Microsoft Office 2010 component.

      Figure 5. Adding a reference to Microsoft Office 2010 component

      Add reference to Microsoft Office 2010 component

    18. Next, add a reference to the Microsoft.SharePoint assembly.

      Figure 6. Adding a reference to Microsoft SharePoint

      Adding reference to Microsoft SharePoint

    The following examples provide the complete C# and Visual Basic listings for the simplest Word Automation Services application.

     
    using System;
    using System.Collections.Generic;
    using System.Linq;
    using System.Text;
    using Microsoft.SharePoint;
    using Microsoft.Office.Word.Server.Conversions;
    
    class Program
    {
        static void Main(string[] args)
        {
            string siteUrl = "http://localhost";
            // If you manually installed Word automation services, then replace the name
            // in the following line with the name that you assigned to the service when
            // you installed it.
            string wordAutomationServiceName = "Word Automation Services";
            using (SPSite spSite = new SPSite(siteUrl))
            {
                ConversionJob job = new ConversionJob(wordAutomationServiceName);
                job.UserToken = spSite.UserToken;
                job.Settings.UpdateFields = true;
                job.Settings.OutputFormat = SaveFormat.PDF;
                job.AddFile(siteUrl + "/Shared%20Documents/Test.docx",
                    siteUrl + "/Shared%20Documents/Test.pdf");
                job.Start();
            }
        }
    }
    
    NoteNote

    Replace the URL assigned to siteUrl with the URL to the SharePoint site.

    To build and run the example

    1. Add a Word document named Test.docx to the Shared Documents folder in the SharePoint site.

    2. Build and run the example.

    3. After waiting one minute for the conversion process to run, navigate to the Shared Documents folder in the SharePoint site, and refresh the page. The document library now contains a new PDF document, Test.pdf.

    In many scenarios, you want to monitor the status of conversions, to inform the user when the conversion process is complete, or to process the converted documents in additional ways. You can use the ConversionJobStatus class to query Word Automation Services about the status of a conversion job. You pass the name of the WordServiceApplicationProxy class as a string (by default, “Word Automation Services”), and the conversion job identifier, which you can get from the ConversionJob object. You can also pass a GUID that specifies a tenant partition. However, if the SharePoint Server farm is not configured for multiple tenants, you can pass null (Nothing in Visual Basic) as the argument for this parameter.

    After you instantiate a ConversionJobStatus object, you can access several properties that indicate the status of the conversion job. The following are the three most interesting properties.

    ConversionJobStatus Properties

    Property

    Return Value

    Count

    Number of documents currently in the conversion job.

    Succeeded

    Number of documents successfully converted.

    Failed

    The number of documents that failed conversion.

    Whereas the first example specified a single document to convert, the following example converts all documents in a specified document library. You have the option of creating all converted documents in a different document library than the source library, but for simplicity, the following example specifies the same document library for both the input and output document libraries. In addition, the following example specifies that the conversion job should overwrite the output document if it already exists.


    Console.WriteLine("Starting conversion job");
    ConversionJob job = new ConversionJob(wordAutomationServiceName);
    job.UserToken = spSite.UserToken;
    job.Settings.UpdateFields = true;
    job.Settings.OutputFormat = SaveFormat.PDF;
    job.Settings.OutputSaveBehavior = SaveBehavior.AlwaysOverwrite;
    SPList listToConvert = spSite.RootWeb.Lists["Shared Documents"];
    job.AddLibrary(listToConvert, listToConvert);
    job.Start();
    Console.WriteLine("Conversion job started");
    ConversionJobStatus status = new ConversionJobStatus(wordAutomationServiceName,
        job.JobId, null);
    Console.WriteLine("Number of documents in conversion job: {0}", status.Count);
    while (true)
    {
        Thread.Sleep(5000);
        status = new ConversionJobStatus(wordAutomationServiceName, job.JobId,
            null);
        if (status.Count == status.Succeeded + status.Failed)
        {
            Console.WriteLine("Completed, Successful: {0}, Failed: {1}",
                status.Succeeded, status.Failed);
            break;
        }
        Console.WriteLine("In progress, Successful: {0}, Failed: {1}",
            status.Succeeded, status.Failed);
    }
    

    To run this example, add some WordprocessingML documents in the Shared Documents library. When you run this example, you see output similar to this code snippet,

     
    Starting conversion job
    Conversion job started
    Number of documents in conversion job: 4
    In progress, Successful: 0, Failed: 0
    In progress, Successful: 0, Failed: 0
    Completed, Successful: 4, Failed: 0
    

    You may want to determine which documents failed conversion, perhaps to inform the user, or take remedial action such as removing the invalid document from the input document library. You can call the GetItems() method, which returns a collection of ConversionItemInfo() objects. When you call the GetItems() method, you pass a parameter that specifies whether you want to retrieve a collection of failed conversions or successful conversions. The following example shows how to do this.


    Console.WriteLine("Starting conversion job");
    ConversionJob job = new ConversionJob(wordAutomationServiceName);
    job.UserToken = spSite.UserToken;
    job.Settings.UpdateFields = true;
    job.Settings.OutputFormat = SaveFormat.PDF;
    job.Settings.OutputSaveBehavior = SaveBehavior.AlwaysOverwrite;
    SPList listToConvert = spSite.RootWeb.Lists["Shared Documents"];
    job.AddLibrary(listToConvert, listToConvert);
    job.Start();
    Console.WriteLine("Conversion job started");
    ConversionJobStatus status = new ConversionJobStatus(wordAutomationServiceName,
        job.JobId, null);
    Console.WriteLine("Number of documents in conversion job: {0}", status.Count);
    while (true)
    {
        Thread.Sleep(5000);
        status = new ConversionJobStatus(wordAutomationServiceName, job.JobId, null);
        if (status.Count == status.Succeeded + status.Failed)
        {
            Console.WriteLine("Completed, Successful: {0}, Failed: {1}",
                status.Succeeded, status.Failed);
            ReadOnlyCollection<ConversionItemInfo> failedItems =
                status.GetItems(ItemTypes.Failed);
            foreach (var failedItem in failedItems)
                Console.WriteLine("Failed item: Name:{0}", failedItem.InputFile);
            break;
        }
        Console.WriteLine("In progress, Successful: {0}, Failed: {1}", status.Succeeded,
            status.Failed);
    }
    

    To run this example, create an invalid document and upload it to the document library. An easy way to create an invalid document is to rename the WordprocessingML document, appending .zip to the file name. Then delete the main document part (known as document.xml), which is in the Word folder of the package. Rename the document, removing the .zip extension so that it contains the normal .docx extension.

    When you run this example, it produces output similar to the following.


    Starting conversion job
    Conversion job started
    Number of documents in conversion job: 5
    In progress, Successful: 0, Failed: 0
    In progress, Successful: 0, Failed: 0
    In progress, Successful: 4, Failed: 0
    In progress, Successful: 4, Failed: 0
    In progress, Successful: 4, Failed: 0
    Completed, Successful: 4, Failed: 1
    Failed item: Name:http://intranet.contoso.com/Shared%20Documents/IntentionallyInvalidDocument.docx
    

    Another approach to monitoring a conversion process is to use event handlers on a SharePoint list to determine when a converted document is added to the output document library.

    In some situations, you may want to delete the source documents after conversion. The following example shows how to do this. 

    Console.WriteLine("Starting conversion job");
    ConversionJob job = new ConversionJob(wordAutomationServiceName);
    job.UserToken = spSite.UserToken;
    job.Settings.UpdateFields = true;
    job.Settings.OutputFormat = SaveFormat.PDF;
    job.Settings.OutputSaveBehavior = SaveBehavior.AlwaysOverwrite;
    SPFolder folderToConvert = spSite.RootWeb.GetFolder("Shared Documents");
    job.AddFolder(folderToConvert, folderToConvert, false);
    job.Start();
    Console.WriteLine("Conversion job started");
    ConversionJobStatus status = new ConversionJobStatus(wordAutomationServiceName,
        job.JobId, null);
    Console.WriteLine("Number of documents in conversion job: {0}", status.Count);
    while (true)
    {
        Thread.Sleep(5000);
        status = new ConversionJobStatus(wordAutomationServiceName, job.JobId, null);
        if (status.Count == status.Succeeded + status.Failed)
        {
            Console.WriteLine("Completed, Successful: {0}, Failed: {1}",
                status.Succeeded, status.Failed);
            Console.WriteLine("Deleting only items that successfully converted");
            ReadOnlyCollection<ConversionItemInfo> convertedItems =
                status.GetItems(ItemTypes.Succeeded);
            foreach (var convertedItem in convertedItems)
            {
                Console.WriteLine("Deleting item: Name:{0}", convertedItem.InputFile);
                folderToConvert.Files.Delete(convertedItem.InputFile);
            }
            break;
        }
        Console.WriteLine("In progress, Successful: {0}, Failed: {1}",
            status.Succeeded, status.Failed);
    }


    Console.WriteLine("Starting conversion job")
    Dim job As ConversionJob = New ConversionJob(wordAutomationServiceName)
    job.UserToken = spSite.UserToken
    job.Settings.UpdateFields = True
    job.Settings.OutputFormat = SaveFormat.PDF
    job.Settings.OutputSaveBehavior = SaveBehavior.AlwaysOverwrite
    Dim folderToConvert As SPFolder = spSite.RootWeb.GetFolder("Shared Documents")
    job.AddFolder(folderToConvert, folderToConvert, False)
    job.Start()
    Console.WriteLine("Conversion job started")
    Dim status As ConversionJobStatus = _
        New ConversionJobStatus(wordAutomationServiceName, job.JobId, Nothing)
    Console.WriteLine("Number of documents in conversion job: {0}", status.Count)
    While True
        Thread.Sleep(5000)
        status = New ConversionJobStatus(wordAutomationServiceName, job.JobId, _
                                         Nothing)
        If status.Count = status.Succeeded + status.Failed Then
            Console.WriteLine("Completed, Successful: {0}, Failed: {1}", _
                              status.Succeeded, status.Failed)
            Console.WriteLine("Deleting only items that successfully converted")
            Dim convertedItems As ReadOnlyCollection(Of ConversionItemInfo) = _
                status.GetItems(ItemTypes.Succeeded)
            For Each convertedItem In convertedItems
                Console.WriteLine("Deleting item: Name:{0}", convertedItem.InputFile)
                folderToConvert.Files.Delete(convertedItem.InputFile)
            Next
            Exit While
        End If
        Console.WriteLine("In progress, Successful: {0}, Failed: {1}",
                          status.Succeeded, status.Failed)
    End While
    

    The power of using Word Automation Services becomes clear when you use it in combination with the Welcome to the Open XML SDK 2.0 for Microsoft Office. You can programmatically modify a document in a document library by using the Welcome to the Open XML SDK 2.0 for Microsoft Office, and then use Word Automation Services to perform one of the difficult tasks by using the Open XML SDK. A common need is to programmatically generate a document, and then generate or update the table of contents of the document. Consider the following document, which contains a table of contents.

    Figure 7. Document with a table of contents

    Document with table of contents

    Let’s assume you want to modify this document, adding content that should be included in the table of contents. This next example takes the following steps.

    1. Opens the site and retrieves the Test.docx document by using a Collaborative Application Markup Language (CAML) query.

    2. Opens the document by using the Open XML SDK 2.0, and adds a new paragraph styled as Heading 1 at the beginning of the document.

    3. Starts a conversion job, converting Test.docx to TestWithNewToc.docx. It waits for the conversion to complete, and reports whether it was converted successfully.

     
    Console.WriteLine("Querying for Test.docx");
    SPList list = spSite.RootWeb.Lists["Shared Documents"];
    SPQuery query = new SPQuery();
    query.ViewFields = @"<FieldRef Name='FileLeafRef' />";
    query.Query =
      @"<Where>
          <Eq>
            <FieldRef Name='FileLeafRef' />
            <Value Type='Text'>Test.docx</Value>
          </Eq>
        </Where>";
    SPListItemCollection collection = list.GetItems(query);
    if (collection.Count != 1)
    {
        Console.WriteLine("Test.docx not found");
        Environment.Exit(0);
    }
    Console.WriteLine("Opening");
    SPFile file = collection[0].File;
    byte[] byteArray = file.OpenBinary();
    using (MemoryStream memStr = new MemoryStream())
    {
        memStr.Write(byteArray, 0, byteArray.Length);
        using (WordprocessingDocument wordDoc =
            WordprocessingDocument.Open(memStr, true))
        {
            Document document = wordDoc.MainDocumentPart.Document;
            Paragraph firstParagraph = document.Body.Elements<Paragraph>()
                .FirstOrDefault();
            if (firstParagraph != null)
            {
                Paragraph newParagraph = new Paragraph(
                    new ParagraphProperties(
                        new ParagraphStyleId() { Val = "Heading1" }),
                    new Run(
                        new Text("About the Author")));
                Paragraph aboutAuthorParagraph = new Paragraph(
                    new Run(
                        new Text("Eric White")));
                firstParagraph.Parent.InsertBefore(newParagraph, firstParagraph);
                firstParagraph.Parent.InsertBefore(aboutAuthorParagraph,
                    firstParagraph);
            }
        }
        Console.WriteLine("Saving");
        string linkFileName = file.Item["LinkFilename"] as string;
        file.ParentFolder.Files.Add(linkFileName, memStr, true);
    }
    Console.WriteLine("Starting conversion job");
    ConversionJob job = new ConversionJob(wordAutomationServiceName);
    job.UserToken = spSite.UserToken;
    job.Settings.UpdateFields = true;
    job.Settings.OutputFormat = SaveFormat.Document;
    job.AddFile(siteUrl + "/Shared%20Documents/Test.docx",
        siteUrl + "/Shared%20Documents/TestWithNewToc.docx");
    job.Start();
    Console.WriteLine("After starting conversion job");
    while (true)
    {
        Thread.Sleep(5000);
        Console.WriteLine("Polling...");
        ConversionJobStatus status = new ConversionJobStatus(
            wordAutomationServiceName, job.JobId, null);
        if (status.Count == status.Succeeded + status.Failed)
        {
            Console.WriteLine("Completed, Successful: {0}, Failed: {1}",
                status.Succeeded, status.Failed);
            break;
        }
    }
    

    After running this example with a document similar to the one used earlier in this section, a new document is produced, as shown in Figure 8.

    Figure 8. Document with updated table of contents

    Document with updated table of contents

    The Open XML SDK 2.0 is a powerful tool for building server-side document generation and document processing systems. However, there are aspects of document manipulation that are difficult, such a document conversions, and updating of fields, table of contents, and more. Word Automation Services fills this gap with a high-performance solution that can scale out to your requirements. Using the Open XML SDK 2.0 in combination with Word Automation Services enables many scenarios that are difficult when using only the Open XML SDK 2.0.

    NEW “Filter My Lists” Web Part now available + FREE Metro UI Master Page when ordering

    “Filter My Lists” Web Part

    Saves you time with optimal performance

    Find what you are looking for with a few clicks, even in cluttered sites and lists with masses of items and documents.

    Find exactly what you need and stop wasting your time browsing SharePoint.
    Filter the content of multiple lists and libraries in a single   step.

    Combine search and metadata filters

    In a single panel combine item, document and attachment searches with metadata keyword searches and managed metadata filters.

    Select multiple filter values from drop-down lists or alternatively use the keyword search of metadata fields with the help of wildcard characters and logical operators.

    Export filtered views to Excel

    Export filtered views and data to Excel. A print view enables you to print your results in a clear printable format with a single  click.

    Keep views clear and concise

    Provides a complete set of filters without cluttering list views and keeps your list views clear, concise and speedy. Enables you to filter SharePoint using columns which aren’t visible in list views.

    Refine filters and save them for future use, whether private, to share with others or to use as default filters.

    FREE Metro Style UI Master Page


    Screen Capture Medium

    Modern UI Master Page and Styles for SharePoint 2010.

    This will give the Metro/Modern UI styling of SharePoint 2013 to your SharePoint 2010 team sites.

    Features include:
    – Quick launch styling
    – Global navigation and drop-down styling
    – Search box styling and layout change
    – Web part header styling
    – Segoe UI font

    How To : Implement a WCF 4 Routing Manager

    Contents


    Features

    • Manageable Routing Service
    • Mapping physical to logical endpoints
    • Managing routing messages from Repository
    • No Service interruptions
    • Adding more outbound endpoints on the fly
    • Changing routing rules on the fly
    • .Net 4 Technologies

     Introduction

    Recently released Microsoft .Net 4 Technology represents a foundation technology for metadata driven model applications. This article focuses on one of the unique components from the WCF 4 model for logical connectivity such as a Routing Service. I will demonstrate how we can extend its usage for enterprise application driven by metadata stored in the Runtime Repository. For more details about the concept, strategy and implementation of the metadata driven applications, please visit my previous articles such as Contract Model and Manageable Services.   

    I will highlight the main features of the Routing Service, more details can be found in the following links [1], [2], [3].

    From the architectural style, the Router represents a logical connection between the inbound and outbound endpoints. This is a “short wire” virtual connection in the same appDomain space described by metadata stored in the router table. Based on these rules, the messages are exchanged via the router in the specific built-in router pattern. For instance, the WCF Routing Service allows the following Message Exchange Pattern (MEP) with contract options:

    • OneWay (SessionMode.Required, SessionMode.Allowed, TrasactionFlowOption.Allowed)
    • Duplex (OneWay, SessionMode.Required, CallbackContract, TrasactionFlowOption.Allowed)
    • RequestResponse (SessionMode.Allowed, TrasactionFlowOption.Allowed)

    In addition to the standard MEPs, the Routing Service has a built-in pattern for Multicast messaging and Error handling.


    The router process is very straightforward, where the untyped message received by inbound endpoint is forwarding to the outbound endpoint or multiple endpoints based on the prioritized rules represented by message filter types. The evaluation rules are started by highest priority. The router complexity is depended by number of inbound and outbound endpoints, type of message filters, MEPs and priorities.

    Note, that the MEP pattern between the routed inbound and outbound endpoints must be the same, for example: the OneWay message can be routed only to the OneWay endpoint, therefore for routing Request/Response message to the OneWay endpoint, the service mediator must be invoked to change the MEP and then back to the router.

    A routing service enables an application to physically decouple a process into the business oriented services and then logical connected (tight) in the centralized repository using a declaratively programming. From the architecture point of view, we can consider a routing service as a central integration point (hub) for private and public communication.

    The following picture shows this architecture:


    As we can see in the above picture, a centralized place of the connectivity represented by Routing Table. The Routing Table is the key component of the Routing service, where all connectivity is declaratively described. These metadata are projected on runtime for message flowing between the inbound to outbound points. Messages are routing between the endpoints in the full transparent manner. The above picture shows the service integration with the MSMQ Technology via routing. The queues can be plugged-in to the Routing Table integration part like another service.

    From the metadata driven model point of view, the Routing Table metadata are part of the logical business model, centralized in the Repository. The following picture shows an abstraction of the Routing Service to the Composite Application:


    The virtualization of the connectivity allows encapsulating a composite application from the physical connectivity. This is a great advantage for model driven architecture, where internally, all connectivity can be used well know contracts. Note, that the private channels (see the above picture – logical connectivity) are between the well know endpoints such as Routing Service and Composite Application. 

    Decoupling sources (consumers) from the target endpoints and their logical connection driven by metadata will enable our application integration process for additional features such as:   

    • Mapping physical to logical endpoints
    • Virtualization connectivity
    • Centralized entry point
    • Error handling with alternative endpoints
    • Service versioning
    • Message versioning
    • Service aggregation
    • Business encapsulation
    • Message filtering based on priority routing
    • Metadata driven model
    • Protocol bridging
    • Transacted message routing

    As I mentioned earlier, in the model driven architecture, the Routing Table is a part of the metadata stored in the Repository as a Logical Centralized Model. The model is created by design time and then physical decentralized to the target. Note, deploying model for its runtime projecting will require recycling the host process. To minimize this interruption, the Routing Service can help to isolate this glitch by managing the Routing Table dynamically.

    The WCF Routing Service has built-in a feature for updating a Routing Table at the runtime. The default bootstrap of the routing service is loading the table from the config file (routing section). We need to plug-in a custom service for updating the routing table in the runtime. That’s the job for Routing Manager component, see the following picture:


    Routing Manager is a custom WCF Service responsible for refreshing the Table located in the Routing Service from the config file or Repository. The first inbound message (after the host process is opened) will boot the Table from the Repository automatically. During the runtime time, when the routing service is active, the Routing Manager must receive an inquiry message to load a routing metadata from the Repository and then update the Table.

    Basically, the Routing Manager enables our virtualized composite application to manage this integration process without recycling a host process. There is one conceptual architectural change in this model. As we know, the Repository pushed (deployed) metadata for its runtime projecting to the host environment (for instance: IIS, WAS, etc.). This runtime metadata is stored in the local, private repository such as file system and it is used for booting our application, services.

    That’s a standard Push phase such as Model->Repository->Deploy. The Routing Service is a good candidate for introducing a concept of the Pull phase such as Runtime->Repository, where the model created during the design time can be changed during its processing in the transparent manner. Therefore, we can decide about the runtime metadata used by Pull model during the design time as well.

    Isolating metadata for boot projector and runtime update enables our Repository to administrate application without interruptions, for instance, we can change physical endpoint, binding, plug-in a new service version, new contract, etc. Of course, we can build more sophisticated tuning system, where runtime metadata can be created and/or modified by analyzer, etc. In this case, we have a full control loop between the Repository and Runtime.

    Finally, the following picture is an example of the manageable routing service:


    As the above picture shows, the manageable Routing Service represents central virtualizations of the connectivity between workflow services, services, queues and web services. The Runtime Repository represents a routing metadata for booting process and also runtime changes. The routing behavior can be changed on the fly in the common shareable database (Repository) and then it can be synchronized with runtime model by Routing Manager.

    One more “hidden” feature of the Routing Service can be seen in the above picture, such as scalability. Decomposition of the application into the small business oriented services and composition via a routing service; we can control scalability of the application. We can assign localhost or cluster address of the logical endpoints based on the routing rules.

    From the virtualization point of the view, the following picture shows a manageable composite application:


    As you can see, the Composite Application is driven by logical endpoints, therefore can be declared within the logical model without the physical knowledge where they are located. Only the Runtime Repository knows these locations and can be easily managed based on requirements, for example: dev, staging, QA, production, etc.

    This article is focusing on the Routing Manager hosted on IIS/WAS. I am assuming you have some working experience or understand features of the WCF4 Routing Service.

    OK, let’s get started with Concept and Design of the Manageable Routing Service.


    Concept and Design

    The concept and design of the Routing Manager hosted on IIS/WAS is based on the extension of the WCF4 Routing Service for additional features such as downloading metadata from Repository in the loosely coupled manner. The plumbing part is implemented as a common extension to services (RoutingService and RoutingManager) named as routingManager. Adding the routingManager behavior to the routing behavior (see the following code snippet), we can boot a routing service from the repositoryEndpointName.

    The routingManager behavior has the same attributes like routing one with additional attribute for declaration of the repository endpoint. As you can see, it is very straightforward configuration for startup routing service. Note, that the routingManager behavior is a pair to the routing behavior.

    Now, in the case of updating routing behavior on the runtime, we need to plug-in a Routing Manager service and its service behavior routingManager. The following code snippet shows an example of activations without the .svc file within the same application:

    and its service behavior:

    Note, that the repositoryEndpointName can be addressed to different Repository than we have at the process startup.


    Routing Manager Contract

    Routing Manager Contract allows to communicate with Routing Manager service out of the appDomain. The Contract Operations are designed for broadcasting and point to point patterns. Operation can be specified for specific target or for unknown target (*) based on the machine and application names. The following code snippet shows the IRoutingManager contract:

    [ServiceContract(Namespace = "urn:rkiss/2010/09/ms/core/routing", 
      SessionMode = SessionMode.Allowed)]
    public interface IRoutingManager
    {
      [OperationContract(IsOneWay = true)]
      void Refresh(string machineName, string applicationName);
    
      [OperationContract]
      void Set(string machineName, string applicationName, RoutingMetadata metadata);
    
      [OperationContract]
      void Reset(string machineName, string applicationName);
    
      [OperationContract]
      string GetStatus(string machineName, string applicationName);
    }


    The Refresh operation represents an inquiry event for refreshing a routing table from the Repository. Based on this event, the Routing Manager is going to pick-up a “fresh” routing metadata from the Repository (addressed by repositoryEndpointName) and update the routing table.

    Routing Metadata Contract

    This is a Data contract between the Routing Manager and Repository. I decided to use it for the contract routing configuration section as xml formatted text. This selection gives me an integration and implementation simplicity and easy future migration. The following code snippet is an example of the routing section:

    and the following is Data Contract for repository:

    [DataContract(Namespace = "urn:rkiss/2010/09/ms/core/routing")]
    public class RoutingMetadata
    {
      [DataMember]
      public string Config { get; set; }
    
      [DataMember]
      public bool RouteOnHeadersOnly { get; set; }
    
      [DataMember]
      public bool SoapProcessingEnabled { get; set; }
    
      [DataMember]
      public string TableName { get; set; }
    
      [DataMember]
      public string Version { get; set; }
    }
    

    OK, that should be all from the concept and design point on the view, except one thing what was necessary to figure out, especially for hosting services on the IIS/WAS. As we know [1], there is a RoutingExtension class in the System.ServiceModel.Routing namespace with a “horse” method ApplyConfiguration for updating routing service internal tables. 

    I used the following “small trick” to access this RoutingExtension from another service such as RoutingManager hosted by its own factory.

    The first routing message will stored the reference of the RoutingExtension into the AppDomain Data Slot under the well-known name, such as value of the CurrentVirtualPath.

    serviceHostBase.Opened += delegate(object sender, EventArgs e)
    {
        ServiceHostBase host = sender as ServiceHostBase;
        RoutingExtension re = host.Extensions.Find<RoutingExtension>();
        if (configuration != null && re != null)
        {
            re.ApplyConfiguration(configuration);
    
            lock (AppDomain.CurrentDomain.FriendlyName)
            {
                AppDomain.CurrentDomain.SetData(this.RouterKey, re);
            }
        }
    };

    Note, that both services such as RoutingService and RoutingManager are hosted under the same virtual path, therefore the RoutingManager can get this Data Slot value and cast it to the RoutingExtension. The following code snippet shows this fragment:

    private RoutingExtension GetRouter(RoutingManagerBehavior manager)
    {
      // ...
          
      lock (AppDomain.CurrentDomain.FriendlyName)
      {
        return AppDomain.CurrentDomain.GetData(manager.RouterKey) as RoutingExtension;
      }         
    }
    

    Ok, now it is the time to show the usage of the Routing Manager.


    Usage and Test

    The Manageable Router (RoutingService + RoutingManager) features and usage, hosted on the IIS/WAS, can be demonstrated via the following test solution. The solution consists of the Router and simulators for Client, Services and LocalRepository. 

    The primary focus is on the Router, as shown in the above picture. As you can see, there are no .svc files, etc., just configuration file only. That’s right. All tasks to setup and configure manageable Router are based on the metadata stored in the web.config and Repository (see later discussion).

    The Router project has been created as an empty web project under http://localhost/Router/ virtualpath, adding an assembly reference from RoutingManager project and declaring the following sections in the web.config.

    Let’s describe these sections in more details.

    Part 1. – Activations

    These sections are mandatory for any Router such as activation of the RoutingService and RoutingManager service, behavior extension for routingManager and declaring client endpoint for Repository connectivity. The following picture shows these sections:

    Note, this part also declares relative address for our Router. In the above example, the entry point for routing message is ~/Pilot.svc and access to RoutingManager has address ~/PilotManager.svc.

    Part 2. – Service Endpoints

    In these sections, we have to declare endpoints for two services such as RoutingService and RoutingManager. The RoutingService endpoints have untyped contracts defined in the System.ServiceModel.Routing namespace. In this test solution, we are using two contracts, one for notification (OneWay) and the other one is for RequestReply message exchange. The binding is used by basicHttpBinding, but it can be any standard or custom binding based on the requirements.

    The RoutingManager service is configured with simple basicHttpBinding endpoint, but in the production version, it should use a custom udp channel for broadcasting message to trigger the pull metadata process from the Repository across the cluster.


    Part 3. – Plumbing RoutingService and Manager together

    This section will attach a RoutingService to the RoutingManager for accessing its RoutingExtension in the runtime.

    The first extBehavior section is a configuration of the routing boot process. The second one is a section for downloading routing metadata during the runtime.

     OK, that’s all for creating a manageable Router.

    The following picture shows a full picture of the solution:


    As you can see, there is the Manageable Router (hosted in the IIS/WAS) for integration of the composite application. On the left hand side is the Client simulator to generate two operations (Notify and Echo) to the Service1 and/or Service2 based on the routing rules. The Client and Services are regular WCF self-hosted applications, the client can talk directly to the Services or via the Router.

    Local Repository

    Local Repository represents a metadata storage of the metadata such as logical centralized application model, deployment model, runtime model, etc. Models are created during the design time and based on the deployment model are pushed (physical decentralized) to the targets where they are projecting on the runtime. For example: The RouterManager assembly and web.config are metadata for deploying model from the Repository to the IIS/WAS Target.

    During the runtime, some components have capability to update behavior based on the new metadata pulled from the Repository. For example, this component is a manageable Router (RouterService + RouterManager). Building Enterprise Repository and Tools is not a simple task, see more details about Microsoft strategy here [6] and interesting example here [7], [8].

    In this article, I included very simple Local Repository for Routing metadata with self-hosting service to demonstrate a capability of the RoutingManager Service. The Routing metadata is described by system.serviceModel section. The following picture shows a configuration root section for remote routing metadata:


    As you can see, the content of the system.ServiceModel section is similar to the target web.config. Note, that the Repository is holding these sections only. They are related to the Routing metadata. By selecting RoutingTable tab, the routing rules will be displayed in the table form:

    Any changes in the Routing Table will update a local routing metadata by pressing the button Finnish, but runtime Router must be notified about this change by pressing button Refresh. In this scenario, the LocalRepository will send an inquiry message to the RoutingManager for pulling a new routing metadata. You can see this action in the Status tab.

    Routing Rules

    The above picture shows a Routing Table as a representation of the Routing Rules mapped to the routing section in the configuration metadata. This test solution has a pre-build routing ruleset with four rules. Let’s describes these rules. Note, we are using an XPath filter for message body, therefore the option RouteOnHeadersOnly must be unchecked. Otherwise the Router will throw an exception.

    The Router is deployed with two inbound endpoints such as SimplexDatagram and RequestReply, therefore the received message will be routed based on the following rules:

    Request/Reply rules

    First, as the highest priority (level 3) the message is buffered for xpath body expression

    starts-with(/s11:Envelope/s11:Body/rk:Echo/rk:topic, 2)

    if the xpath expression is true, then the copied message is routing to the outbound endpoint TE_Service1, else the copied message is forwarded to the TE_Service2 (see the filter aa)

    SimplexDatagram rules

    This is a multicast routing (same priority 2) to the two outbound endpoints such as TE_Service1 and TE_Service2. If the message cannot be delivered to the TE_Service2, the alternative endpoint from the backup list is used, such as Test1 (queue). Note, that the message is not buffered, it is passed directly (filterType = EndpointName) from endpointNotify endpoint.


    Test

    Testing Router is a very simple process. Launch the Client, Service1, Service2 and Local Repository programs, create VirtualDirectory in IIS/WAS for http://localhost/Router project and the solution is ready for testing. The following are instruction steps:

    1. On the Client form, press button Echo. You should see a message routed to the Service2
    2. Press button Echo again, the message is routed to the Service1
    3. Press button Echo again, the message is routed to the Service2
    4. Change Router combo box to: http://localhost/Router/Pilot.svc/Notify
    5. Press button Event, see notification messages in both services

    You can play with Local Repository to change the routing rules to see how the Router will handle the delivery messages.

    For testing a backup rule, create a transactional queue Test1 and close the Service2 console program and follow the Step 2. and 3. You should see messages in the Service1 and queue.


    Troubleshooting

    There are two kinds of troubleshooting in the manageable Router. The first one is a built-in standard WCF tracing log and its viewing by Microsoft Service Trace Viewer program. The Router web.config file has already specified this section for diagnostics, but it is commented.

    The second way to troubleshoot router with focus on the message flowing is built-in custom message trace inspector. This inspector is injected automatically by RoutingManager and its service behavior. We can use DebugView utility program from Windows Sysinternals to view the trace outputs from the Router.


    Some Router Tips

    1. Centralizing physical outbound connections into one Router enables the usage of logical connections (alias addresses) for multiple applications. The following picture shows this schema:

    Instead of using physical outbound endpoints for each application router, we can create one master Router for virtualization of all public outbound endpoints. In this scenario, we need to manage only the master router for each physical outbound connection. The same strategy can be used for physical inbound endpoints. Another advantage of this router hierarchy is centralizing pre-processing and post-processing services.

    2. As I mentioned earlier, the Router enables decomposition of the business workflow into small business oriented services, for instance: managers, workers, etc. The composition of the business workflow is declared by Routing Table which represents some kind of dispatcher of the messages to the correct service. We should use ws binding with a custom headers to simplify dispatching messages via a router based on the headers only.


    Implementation

    Based on the concept and design, there are two pieces for implementation, such as RoutingManager service and its extension behavior. Both modules are using the same custom config library, where useful static methods are located for getting clr types from the metadata stored in the xml formatted resource. I used this library in my previous articles (.Net 3) and I extended it for the new routing section. 

    In the following code snippet I will show you how straightforward implementation is done.

    The following code snippet is a demonstration of the Refresh implementation for RoutingManager Service. We need to get some configurable properties from the routingManager behavior and access to the RouterExtension. Once we have them, the RepositoryProxy.GetRouting method is invoked to obtain routing metadata from the Repository.

    We get the configuration section in the xml formatted text like from the application config file. Now, using the “horse” config library, we can deserialize a text resource into the clr object, such as  MessageFilterTable<IEnumerable<ServiceEndpoint>>.

    Then the RoutingConfiguration instance is created and passed to the router.ApplyConfiguration process. The rest of the magic is done in the RoutingService.

    public void Refresh(string machineName, string applicationName)
    {
      RoutingConfiguration rc = null;
      
      RoutingManagerBehavior manager = 
        OperationContext.Current.Host.Description.Behaviors.Find<RoutingManagerBehavior>();
      
      RoutingExtension router = this.GetRouter(machineName, applicationName, manager);
    
      try
      {
        if (router != null)
        {
          RoutingMetadata metadata = 
            RepositoryProxy.GetRouting(manager.RepositoryEndpointName, 
             Environment.MachineName, manager.RouterKey, manager.FilterTableName);
             
          string tn = metadata.TableName == null ? 
                      manager.FilterTableName : metadata.TableName;
            
          var ft = ServiceModelConfigHelper.CreateFilterTable(metadata.Config, tn);
    
          rc = new RoutingConfiguration(ft, metadata.RouteOnHeadersOnly);
          rc.SoapProcessingEnabled = metadata.SoapProcessingEnabled;
             
          router.ApplyConfiguration(rc);
    
          // insert a routing message inspector
          foreach (var filter in rc.FilterTable)
          {
            foreach (var se in filter.Value as IEnumerable<ServiceEndpoint>)
            {
              if (se.Behaviors.Find<TraceMessageEndpointBehavior>() == null)
                se.Behaviors.Add(new TraceMessageEndpointBehavior());
            }
          }
        }
      }
      catch (Exception ex)
      {
         RepositoryProxy.Event( ...);
      }
    }
    

    The last action in the above Refresh method is injecting the TraceMessageEndpointBehavior for troubleshooting messages within the RoutingService on the Trace output device.

    The next code snippets show some details from the ConfigHelper library:

    public static MessageFilterTable<IEnumerable<ServiceEndpoint>>CreateFilterTable(string config, string tableName)
    {
      var model = ConfigHelper.DeserializeSection<ServiceModelSection>(config);
      
      if (model == null || model.Routing == null || model.Client == null)
        throw new Exception("Failed for validation ...");
    
      return CreateFilterTable(model, tableName);
    }


    The following code snippet shows a generic method for deserializing a specific type section from the config xml formatted text:

    public static T DeserializeSection<T>(string config) where T : class
    {
      T cfgSection = Activator.CreateInstance<T>();
      byte[] buffer = 
        new ASCIIEncoding().GetBytes(config.TrimStart(new char[]{'\r','\n',' '}));
      XmlReaderSettings xmlReaderSettings = new XmlReaderSettings();
      xmlReaderSettings.ConformanceLevel = ConformanceLevel.Fragment;
    
      using (MemoryStream ms = new MemoryStream(buffer))
      {
        using (XmlReader reader = XmlReader.Create(ms, xmlReaderSettings))
        {
          try
          {
            Type cfgType = typeof(ConfigurationSection);
            
            MethodInfo mi = cfgType.GetMethod("DeserializeSection", 
                    BindingFlags.Instance | BindingFlags.NonPublic);
                    
            mi.Invoke(cfgSection, new object[] { reader });
          }
          catch (Exception ex)
          {
            throw new Exception("....");
          }
        }
      }
      return cfgSection;
    }
    

    Note, the above static method is a very powerful and useful method for getting any type of config section from the xml formatted text resource, which allows us using the metadata stored in the database instead of the file system – application config file. 


    Conclusion

    In conclusion, this article described a manageable Router based on the WCF4 Routing Service. Manageable Router is allowing dynamically change routing rules from the centralized logical model stored in the Repository. The Router represents a virtualization component for mapping logical endpoints to the physical ones and it is a fundamental component in the model driven distributed architecture.


    References:

    [1] http://msdn.microsoft.com/en-us/library/ee517421(v=VS.100).aspx

    [2] http://blogs.msdn.com/routingrules/archive/2010/02/09/routing-service-features-dynamic-reconfiguration.aspx

    [3] http://weblogs.thinktecture.com/cweyer/2009/05/whats-new-in-wcf4-routing-service—or-look-ma-just-one-service-to-talk-to.html

    [4] http://dannycohen.info/2010/03/02/wcf-4-routing-service-multicast-sample/

    [5] http://blogs.profitbase.com/tsenn/?p=23

    [6] SQL Server Modeling CTP and Model-Driven Applications

    [7] Model Driven Content Based Routing using SQL Server Modeling CTP – Part I

    [8] Model Driven Content Based Routing using SQL Server Modeling CTP – Part II

    [9] Intermediate Routing


    How to Create Custom SharePoint 2010 Page Layouts using SharePoint Designer 2010

    Scenario:

    You’re working with the Enterprise Wiki Site Template and you don’t really like where the “Last modified…” information is located (above the content). You want to move that information to the bottom of the page.

    Option 1: Modify the “EnterpriseWiki.aspx” Page Layout directly.

    Option 2: Create a new Page Layout based on the original one and then modify that one.

    We’ll go ahead and go with Option 2 since we don’t want to modify the out of the box template just in case we need it later on.

    How To:

    Step 1

    Navigate to the top level site of the Site Collection > Site Actions > Site Settings > Master pages (Under the Galleries section). Then switch over to the Documents tab in the Ribbon and then click New > Page Layout.

    Step 2

    Select the Enterprise Wiki Page Content Type to associate with, give it a URL and Title. Note that there’s also a link on this page to create a new Content Type. You might be interested in doing this if you wanted to say, add more editing fields or metadata properties to the layout. For example if you wanted to add another Managed Metadata column to capture folksonomy aside from the already included “Wiki Categories” Managed Metadata column.

    Step 3

    SharePoint Designer time! Hover over your newly created Page Layout and “Edit in Microsoft SharePoint Designer.”

    Step 4

    Now you can choose to build your page manually by dragging your SharePoint Controls onto the page and laying them out as you’d like…

    … Or you can copy and paste the OOB Enterprise Wiki Page Layout. I think I’ll do that. 🙂

    Step 5

    Alright, so you’ve copied the contents of the EnterpriseWiki.aspx Page Layout and now it’s time for some customizing. I found the control I want to move, so I’ll simply do a copy or cut/paste to the new spot.

    Step 6

    Check-in, publish, and approve the new Page Layout. Side note: I like to add the Check-In/Check-Out/Discard or Undo-Checkout buttons to all of my Office Applications’ Quick Access Toolbars for convenience.

    Step 7

    Almost there! Navigate to your publishing site, in this case the Enterprise Wiki Site, then go to Site Actions > Site Settings > Page layouts and site templates (Under Look and Feel). Here you’ll be able to make the new Page Layout available for use within the site.

    Step 8

    Go back to your site and edit the page that you’d like to change the layout for. On the Page tab of the Ribbon, click on Page Layout and select your custom Page Layout.

    Et voila! You just created a custom Page Layout using SharePoint Designer 2010, re-arranged a SharePoint control and managed to plan for the future by not modifying the out of the box template. That was a really simple example but I hope it helped to give you some ideas on how else you can customize Page Layouts within SharePoint 2010!

    2132

    Visio for Developers in Office 365

    In this post, I’ll introduce some of the new features of interest to developers in Visio 2013. Among these features are:

    • New file format
    • Robust updates to themes
    • The change shape feature (that allows you to replace one shape with another while Maintaining shape text)
    • New shape effects
    • Improvements to commenting
    • Coauthoring on SharePoint Server 2013
    • Customizable image clipping
    • Relative geometry
    • Support for Business Connectivity Services (BCS) data
    • Updates to Visio Services in Microsoft SharePoint Server 2013
    • Duplicate page feature

    At the end of the post, I provide you with some additional resources for both Visio and general Office development.


    New file format

    Visio 2013 introduces a new file format, based on the Open Packaging Conventions (OPC) standard (ISO 29500, Part 2) and the XML elements from the previous Visio XML file format (.vdx). It is a zipped, XML-based file format similar to the file formats used in other applications.

    Because the new file format is supported by both Visio 2013 and Visio Services in Microsoft SharePoint Server 2013, you can save a Visio drawing directly to a SharePoint Server library without having to first publish the file as a Visio Web Drawing (.vdw). Even so, Visio Services can still read and display Visio Web Drawing files.

    The new file format includes the following file types (by extension):

    • .vsdx (Visio drawing)
    • .vsdm (Visio macro-enabled drawing)
    • .vssx (Visio stencil)
    • .vssm (Visio macro-enabled stencil)
    • .vstx (Visio template)
    • .vstm (Visio macro-enabled template)

    By using existing support for reading and writing to the file format package (such as System.IO.Packaging) and for parsing XML (System.Xml.Linq), you can work with the new file formats programmatically.

    Visio 2013 retains the ability to read the old file formats (.vsd, .vss, .vst, .vdx, .vsx, .vtx, .vdw, .vwi). Visio 2013 does not save to the previous Visio XML file format (.vdx). Solutions or tools that consume the previous Visio XML file format (.vdx) files may need to be refactored in order to read the new file format and its schemas.

    Visio Services retains the ability to display the Visio Web Drawing (.vdw) format in the browser. It now also renders the new Visio drawing (.vsdx) and Visio macro-enabled drawing (.vsdm) formats.

    For more information about the new file format, see the article How to: Manipulate the Visio 2013 file format programmatically.

    Themes

    Themes have been redesigned in Visio 2013, making use of a greater variety of effects and styles including the integration of Shape Art effects. Users can now decide on an overarching style by applying a theme, personalize the diagram with theme variants, and highlight individual shapes with Quick Styles. ShapeSheet developers can take advantage of these features with new functions and cells in the ShapeSheet.

    The user interface for applying theme variants is shown in the following figure.


    You can also manipulate themes at the Page, Shape, and Selection object level. New APIs for working with themes include Page.SetTheme method, Page.SetThemeVariant method, Shape.SetQuickStyle method, and the Selection.SetQuickStyle method.

    For more information about new VBA objects and members in Visio 2013, see the Visio Automation reference. For more information about the new ShapeSheet cells in Visio 2013, see the article What’s new for ShapeSheet developers in Visio 2013.

    Change Shape

    Visio 2013 includes a shape replacement API that enables you to swap one or more shapes for another shape contained in a stencil, while retaining some of the local values from the original shape, like the shape text shape, shape data, or shape formatting. Shape developers can update the ShapeSheet settings of their custom shapes to specify the Change Shape behavior for their shapes. Among the new APIs for Change Shape are the Shape.ReplaceShape and Selection.ReplaceShape methods and the ReplaceShapesEvent object.

    The Change Shape feature lets you easily change a shape (in this case, the green rectangle)…


    …to another shape, the green diamond.

    For more information about the Change Shape feature, see Eric Schmidt’s blog post, Change shapes in Visio 2013.

    For more information about new VBA objects and members in Visio 2013, see the Visio Automation reference. For more information about the new ShapeSheet cells in Visio 2013, see the article What’s new for ShapeSheet developers in Visio 2013.

    Shape effects

    New shape effects such as bevel, 3-D rotation, glow, reflection, and sketching have been added to Visio 2013. The ShapeSheet includes new cells for working with these effects. The following figure shows a shape to which effects have been applied.

    You can also use Office VBA objects such as TextFrame2, GlowFormat, and ReflectionFormat and their members to apply shape effects.

    For more information about the new ShapeSheet cells in Visio 2013, see the article What’s new for ShapeSheet developers in Visio 2013.

    Commenting

    Visio 2013 includes a new commenting framework. Comments can now be associated with a particular shape or page. Visio 2013 includes two new objects, Comments and Comment. New APIs for accessing comments programmatically include the Document.Comments, Page.Comments, Shape.Comments, and Page.ShapeComments properties.

    The following images show what comments looked like in Visio 2010 and what they look like in Visio 2013.


    Visio Services includes JavaScript APIs to read the comments from a page or shape in a diagram.

    Note: You can no longer access comments in the ShapeSheet.

    Coauthoring

    Visio 2013 includes the ability to co-author diagrams stored on SharePoint or OneDrive. Developers have access to the Document.AfterDocumentMerge event which provides information about diagram changes due to coauthoring. Solution developers also have the ability to disable coauthoring to suit their custom needs by using the NoCoauth cell on the Document ShapeSheet.

    Customizable image clipping

    Visio 2013 supports defining a Custom Image Clipping path to crop images to any shape. This extends the capacities of Visio 2010, which supported clipping images in a rectangular way. This functionality is available in the ShapeSheet by using the ClippingPath cell in the Foreign Image Info section.

    Relative geometries

    In previous versions of Visio, shape geometry was defined by formulas that depended on the height or width of the shape. For example, in Visio 2010 the vertices of many built-in Visio shapes were defined by multiplying the height or width of the shape by a constant. These shapes had Geometry sections that included MoveTo or LineTo rows (for example) with formulas like Width1 and Height0.

    Visio 2013 now supports relative geometry in the ShapeSheet. Shape developers can now use relative geometries to specify geometries as simple values or formulas, which multiply by the height or width automatically. You can now express Shape vertices by using constants, for instance—you no longer need to express vertices as multiples of the shape width or height. This makes it easier for you to create shapes that have better performance and smaller file sizes. New rows include the RelMoveTo and RelLineTo rows where the X and Y cell values are automatically multiplied by the width or height of the shape (respectively).

    Support for Business Connectivity Services (BCS) data

    Visio 2013 diagrams can now be connected to external lists on SharePoint Server 2013 servers. An external list is a content source external to SharePoint (for example, a SQL Server table) that has been connected to a SharePoint list by using Microsoft Business Connectivity Services (BCS). Visio Services supports the ability to refresh the Visio diagrams as the data updates.

    For more information about what’s new in Visio Services, see the article Visio Services in SharePoint 2013. For more information about Business Connectivity Services (BCS), see Business Connectivity Services in SharePoint 2013.

    Improvements in Visio Services

    Visio Services in Microsoft SharePoint Server 2013 includes many improvements. As mentioned previously, Visio Services supports the new Visio file format (.vsdx and .vsdm). Visio Services has expanded data refresh and recalculation, including the ability to recalculate formulas across an entire diagram.

    For more information about what’s new in Visio Services, see the article Visio Services in SharePoint 2013.

    Duplicate page

    You can now copy a page and all of its shapes within the same document in Visio 2013. Accordingly, the Page object has a new method, Duplicate, which duplicates the page and returns a new Page object.

    Additional resources

    How To : Update SharePoint Social Rating more than once per hour

    These two Timer Jobs are responsible for Social Rating Updates:

    (http://technet.microsoft.com/en-us/library/cc678870.aspx)

    • User Profile service application – social data maintenance
      • Aggregates social tags and ratings and cleans the social data change log.
    • User Profile service application proxy – social rating synchronization
      • Synchronizes rating values between the social database and content database.

    Per default these Jobs are running hourly. You can modify these jobs to run more than once an hour up to once per minute.

    SharePoint-2013-Service-Pack-1-225x93


    Performance Considerations when you let this timerjob run e.g.: once per minute:

    –> You have to monitor especially the performance of your social database, because this is the single point where every rating information is inserted.


     How to find out how long these TimerJobs are currently running:

    $social_timer = get-sptimerjob | ? {$_.Name -like “*social*”}


    foreach ($timer in $social_timer)

    {

    write-host “Duration of TimerJob:” $timer.name “(hh:mm:ss,ms)” -foregroundcolor yellow

    $historyentries = $timer.historyentries

    foreach ($hist in $historyentries)

    {

    $duration = $hist.EndTime – $hist.StartTime

    write-host $duration.hours”:”$duration.minutes”:”$duration.seconds”,”$duration.milliseconds -foregroundcolor green

    }

    }

    How authentication works in Duet Enterprise 2.0

    How authentication works in Duet Enterprise 2.0

    Duet Enterprise 2.0 stores all business processes and data in the SAP system while letting SharePoint users access the processes and data from SharePoint websites and Outlook 2013. Because SAP and SharePoint authenticate users differently, Duet provides a single sign-on authentication model that authenticates each user individually.

    It’s helpful to understand the following things before you look at the overall authentication process.

    • A user logs on to SharePoint by using their SharePoint user identity. This can be either forms-based authentication or credentials stored in Active Directory Domain Services (AD DS), but is typically associated with a user account stored in AD DS.
    • The SAP environment can’t authenticate a user’s SharePoint identity. Instead, a Duet Enterprise component installed on the SharePoint Server 2013 farm swaps the user’s Windows credentials for a user certificate that SAP NetWeaver uses to authenticate the user. When Duet Enterprise 2.0 is installed, the SAP administrator creates a trust relationship with the DuetRoot Certificate (an X.509 Root Authority certificate), which is stored in the SharePoint Secure Store Service. This certificate is used to create a certificate for each individual user on the fly.
    • Information in an SAP environment can’t be secured with Windows credentials or SharePoint credentials (which in this case would be the user’s SharePoint identity). Instead, information is secured in SAP using SAP user accounts. When deploying Duet Enterprise 2.0, an SAP administrator maps each SharePoint user account to a unique SAP user. This way, a user who logs into a SharePoint website can access data that’s stored in SAP without getting an extra login prompt.

    The following picture shows a high-level view of authentication flow in a Duet Enterprise 2.0 environment. It shows the steps that occur when a SharePoint user accesses SAP information from a SharePoint site.

    Tip Tip:
    To see this picture and the following list that describes the process without having to scroll, download the Authentication flow in Duet Enterprise 2.0 poster.


    Figure: Duet Enterprise 2.0 authentication

    Secure objects in SharePoint by using SAP rolesThe following list describes the steps shown in the preceding picture. This picture assumes that a SharePoint user has requested data that’s stored in the SAP environment.

    A.   A user logs on to a Duet Enterprise 2.0-enabled SharePoint website using his SharePoint user identity. Because the website contains an external list or Web Part that surfaces SAP data, the request is sent to the Business Connectivity Services runtime in the SharePoint farm.

    B.   The Business Connectivity Services runtime invokes the Duet Enterprise 2.0 OData Extension Provider.

    C.   The Duet Enterprise 2.0 OData Extension Provider gets the DuetRoot Certificate from the Secure Store.

    D.   The Duet Enterprise 2.0 OData Extension Provider uses the DuetRoot Certificate to create an X.509 user certificate and sends the certificate to the Business Connectivity Services runtime.

    E.   The Business Connectivity Services runtime sends the request with the user certificate to the SAP NetWeaver Gateway component of SAP NetWeaver in a request packet.

    Tip Tip:
    SAP NetWeaver with the SAP NetWeaver Gateway component installed is also known as SAP NetWeaver Gateway.


    F.   Because SAP NetWeaver trusts the DuetRoot Certificate that was used to create the user certificate, SAP NetWeaver can authenticate the user and look up the SAP user who is mapped to the SharePoint user who is identified by the certificate.

    G.   The SAP user account that’s mapped to the SharePoint user is returned to SAP NetWeaver.

    H.   SAP NetWeaver uses the SAP user account to request access to the requested information in the SAP system and, if the user is authorized to access the information, the requested information is sent to SAP NetWeaver Gateway.

    I.   SAP NetWeaver Gateway sends the reply as a response packet to the Business Connectivity Services runtime on the on-premises SharePoint farm.

    J.   The Business Connectivity Services runtime passes the information to the SharePoint user. In this case, to the website from which the user has requested the information.

    note Note:
    The two-way connection between the SharePoint Server farm and SAP NetWeaver is secured by using two Secure Sockets Layer (SSL) certificates. One certificate is bound to a SharePoint web application and trusted by the SAP administrator. The other certificate is bound to SAP NetWeaver and trusted by the SharePoint administrator.


    Using SAP roles to access SharePoint objects

    In the enterprise, the tasks that a user does are usually related to that user’s role. Because of this, it’s handy to grant permissions to resources, such as list items, websites, and documents, based on SAP roles. Conceptually, SAP roles are like SharePoint groups except that they’re created and managed in SAP.

    In SAP NetWeaver, users are assigned one or more roles, such as Sales Representative, Project Manager, Executive, and Human Resources Specialist. SAP roles can be broad, such as All Sales Managers, or narrow, such as Sales Managers Eastern Region.

    In Duet Enterprise 2.0, these SAP roles can be used to grant permissions in SharePoint Server. Anything you can set permissions on in SharePoint Server can be assigned permissions using SAP roles.

    This includes objects directly related to Duet Enterprise 2.0, such as SAP reports, external lists, actions on external content types, and any general and securable SharePoint Server objects, such as websites or document libraries.

    After a role is granted permissions to an object, any user who is assigned that role will then have permissions to use that object.

    If you remember nothing else about RoleSync, remember that SAP NetWeaver admins assign SAP users to roles and they also assign SharePoint users to SAP users. This effectively assigns one or more SAP roles to SharePoint users.

    Duet Enterprise 2.0 uses the Duet Enterprise Profile Synchronization Timer Job feature to bring the user role assignments from the SAP system into the SharePoint user profile store. Duet Enterprise 2.0 also uses the Duet Enterprise Claims Provider to help manage the role-based permissions to securable objects in SharePoint Server.

    note Note:
    Think of role synchronization as a one-way street. Users’ roles that are defined in the SAP system are brought into the SharePoint user profile store. No properties in the SharePoint user profiles are sent from SharePoint back to SAP.


    During role synchronization, the set of SAP users is imported into the SharePoint user profile store by using Business Connectivity Services. For each SAP user who has a related user profile in SharePoint, all of the SAP roles assigned to that user are listed in the user profile store.

    Role synchronization connects from SharePoint Server to an external system on the SAP side named “SAPUsersService.” This external system sends the user-to-roles mappings to the SharePoint user profile store.

    After role synchronization is completed, you’ll see a new field, called SAP Roles at the bottom of the User Profile page. The SAP roles assigned to the user are separated by semicolons.

    SAP Roles as seen on a User Profile page.

    SAP Roles as seen on a User Profile page in SharePoint.Role synchronization is typically scheduled to be run on a schedule by using the Duet Enterprise Profile Synchronization Timer Job. You decide how often to synchronize roles and how many users to import at a time.

    After roles are synchronized with the SharePoint user profile store, users and administrators can grant access to SharePoint securable objects using the SAP roles. Before this capability is available, a SharePoint farm administrator needs to activate the Duet Enterprise SAP Roles Claims Provider feature at the farm level which makes the claims provider available.

    note Note:
    When a user’s role is changed in the SAP system, the change can take some time (up to 10 hours) to be propagated to the SharePoint system. This might temporarily prevent users from being authorized if their roles have changed since the last sync job.

    How To : Customize the Duet Workflow Task form in InfoPath 2013

    Contents

    • Introduction
    • Displaying the SAP business properties
    • Adding and deleting controls on the form
    • Adding heading images to the form and applying a theme

    Duet

    Introduction

    After a task site is published through SharePoint Designer, the task form ApprovalProcess.xsn is generated. The form has a default layout. But we may also want to display the SAP business properties, add some more controls relevant to the use of the form, or delete some irrelevant controls. We may also want to give a nice look and feel to the form. We can do these customizations easily with the help of InfoPath 2013.

    Scenario

    We have published a task site of the task type TestTask using SharePoint Designer 2013. The task form has the default layout shown below. We want to customize the form to include a SAP business property, add a control, remove a control, add a heading image, and apply a theme.

    Figure 1. TestTask task form with default layout

    Figure 1. TestTask task form with default layout

    Displaying the SAP business properties

    Prerequisite: We can display the SAP business properties in the workflow task form provided that we have included the properties in the Extended Business Properties text box while creating the task site.

    Steps:

    1. In SharePoint Designer, click ApprovalProcess.xsn.

    Figure 2. ApprovalProcess.xsn in SharePoint Designer

    Figure 2. ApprovalProcess.xsn in SharePoint Designer

    InfoPath Designer opens with an auto-generated layout of the form.

    Figure 3. InfoPath Designer with auto-generated layout of the TestTask form

    Figure 3. InfoPath Designer with auto-generated layout of the TestTask form

    2. Insert a new row, wherever you want, for the business property LeaveDaysUsedTillToday that you want to display in the form.

    a. In the first column, enter the field name as you want to see it displayed in the form, for example,Leaves Used Till Today.

    Figure 4. Entering field name in the first column
    Figure 4. Entering field name in the first column

    b. In the second column, we need to get the value for the business property LeavesUsedTillTodayfrom the Workflow Business Document Library. Thus, we need to create a secondary data connection with the Workflow Business Document Library.

    3. Create a secondary data connection with the Workflow Business Document Library as follows: 

    a. Under Actions, click Manage Data Connections.

    Figure 5. Clicking Manage Data Connections in InfoPath
    Figure 5. Clicking Manage Data Connections in InfoPath

    The Data Connections dialog box appears.

    Figure 6. Data Connections dialog box

    Figure 6. Data Connections dialog box

    b. In the Data Connections dialog box, select Context  from the list of Data Connections for the form template, and click Add. The Data Connection Wizard starts.

    Figure 7. Data Connection Wizard

    Figure 7. Data Connection Wizard

    c. Click Next without changing any settings. The wizard now asks for the source of data. SelectSharePoint library or list as the source of data.

    Figure 8. Selecting SharePoint library or list in the Data Connection Wizard

    Figure 8. Selecting SharePoint library or list in the Data Connection Wizard

    d. Click Next. The wizard now prompts you to enter the location of the SharePoint site.

    e. Enter the URL of the task site, and click Next.

    Figure 9. Entering task site location in the Data Connection Wizard

    Figure 9. Entering task site location in the Data Connection Wizard

    f. Select the Workflow Business Data Document Library for the data connection, and click Next.

    Figure 10. Selecting Workflow Business Data Document Library for the data connection

    Figure 10. Selecting Workflow Business Data Document Library for the data connection

    g. Select the Title and LeavesUsedTillToday fields, and click Next. The Title field will help us filter the data corresponding to a task from the Workflow Business Data Document Library. The Title field is the concatenation of the Related Content field in the main data connection and the string “.xml“.

    Figure 11. Selecting the Title field and LeaveDaysUsedTillToday field

    Figure 11. Selecting the Title field and LeaveDaysUsedTillToday field

    h. Click Next.

    Figure 12. Data Connection Wizard

    Figure 12. Data Connection Wizard

    i. Click Finish.

    Figure 13. Finishing the Data Connection Wizard

    Figure 13. Finishing the Data Connection Wizard

    j. Close the Data Connections dialog box that now has the data connection to the Workflow Business Data Document Library.

    Figure 14. Data Connections dialog box with the new data connection

    Figure 14. Data Connections dialog box with the new data connection

    4. Click in the second column of the new row that we inserted in step 3. On the Home tab in the ribbon, click Calculated Value (fx) button in the Controls pane.

    Figure 15. Choosing Calculated Value in InfoPath

    Figure 15. Choosing Calculated Value in InfoPath

    The Insert Calculated Value dialog box appears.

    5. Click the fx button next to the XPath text box.

    Figure 16. Insert Calculated Value dialog box

    Figure 16. Insert Calculated Value dialog box

    The Insert Formula dialog box appears as shown in the following figure.

    6. Click Insert Field or Group.

    Figure 17. Insert Field or Group button

    Figure 17. Insert Field or Group button

    The Select a Field or Group dialog box appears, as shown in the following figure.

    7. Click Show advanced view.

    Figure 18. Show advanced view link

    Figure 18. Show advanced view link

    Now, we have the option to select the data connection also. 

    Figure 19. Select a Field or Group dialog box

    Figure 19. Select a Field or Group dialog box

    8. Select the secondary data connection to the Workflow Business Document Library from the drop-down list.

    Figure 20. Choosing a secondary data connection

    Figure 20. Choosing a secondary data connection

    9. Expand the dataFields tree structure until you see LeaveDaysUsedTillToday. SelectLeaveDaysUsedTillToday. Since we want to get only the business property for the corresponding task, we need to filter the data received from the data connection. Click Filter Data.

    Figure 21. Filter Data button

    Figure 21. Filter Data button

    10. The Filter Data dialog box appears. Click Add.

    Figure 22. Add button in the Filter Data dialog box

    Figure 22. Add button in the Filter Data dialog box

    The Specify Filter Conditions dialog box appears.

    Figure 23. Specify Filter Conditions dialog box

    Figure 23. Specify Filter Conditions dialog box

    11. Specify the filter conditions as follows:

    a. In the first drop-down list, choose Select a field or group.

    Figure 24. Choosing Select a field or group
    Figure 24. Choosing Select a field or group

    b. Choose Workflow Business Data Document Library as the data source.

    c. Expand the dataFields tree structure until you see Title. Select Title, and then click OK.

    Figure 25. Title in the Select a Field or Group dialog box

    Figure 25. Title in the Select a Field or Group dialog box

    d. In the second drop-down list in the Specify Filter Conditions dialog box, select is equal to.

    e. In the third drop-down list in the Specify Filter Conditions dialog box, select Use a formula.

    Figure 26. Selecting Use a formula in the list

    Figure 26. Selecting Use a formula in the list

    f. The Insert Formula dialog box opens. Click Insert Function.

    Figure 27. Insert Function button

    Figure 27. Insert Function button

    The Insert Function dialog box opens.

    Figure 28. Insert Function dialog box

    Figure 28. Insert Function dialog box

    g. Select Text in the Categories list, and then select concat in the Functions list. Click OK.

    Figure 29. Choosing category and function

    Figure 29. Choosing category and function

    The formula corresponding to the selection appears in the Insert Formula dialog box.

    Figure 30. Concat Formula prototype (skeleton) in the Insert Formula dialog box

    Figure 30. Concat Formula prototype (skeleton) in the Insert Formula dialog box

    h. Double-click the first argument in the concat function. The Select a Field or Group dialog box opens. Under the Main data connection, expand the dataFields tree structure till you see Related Content. Select the subfield :Description under Related Content. Click OK.

    Figure 31. :Description subfield under Related Content

    Figure 31. :Description subfield under Related Content

    i. Write the string “.xml” as the second argument in the concat function. Delete the comma following the second argument and the third argument.

    The updated formula is as shown in the following figure. Click OK.

    Figure 32. Updated concat formula (with provided arguments) in Insert Formula dialog box

    Figure 32. Updated concat formula (with provided arguments) in Insert Formula dialog box

    j. Click OK in the dialog boxes in the order: Specify Filter Conditions, Filter Data, Select a Field or Group.

    The final overall formula appears in the Insert Formula dialog box. (This dialog box was opened in step 5 and is still open)

    Figure 33. Final formula in the Insert Formula dialog box

    Figure 33. Final formula in the Insert Formula dialog box

    12. Click OK in the Insert Formula dialog box (shown above) to return to the Insert Calculated Valuedialog box where the XPath corresponding to our selections has been updated.

    Figure 34. Updated XPath in the Insert Calculated Value dialog box

    Figure 34. Updated XPath in the Insert Calculated Value dialog box

    Click OK.

    13. Click the File tab on the ribbon. Click Quick Publish.

    Figure 35. Publish your form

    Figure 35. Publish your form

    14. The Save As dialog box opens.

    Figure 36. Saving the form template

    Figure 36. Saving the form template

    15. Click Save. The Microsoft InfoPath dialog box stating the successful publishing of the form template appears. Click OK.

    Figure 37. Form template published successfully

    Figure 37. Form template published successfully

    16. Open the task site and look up any of the tasks. The task appears as shown in the following figure. The SAP business property LeavesUsedTillToday has the value 10 in this task.

    Figure 38. Task on the task site with LeavesUsedTillToday business property

    Figure 38. Task on the task site with LeavesUsedTillToday business property

    Adding and deleting controls on a form

    Suppose we want to add a control—for example, ID—from the main data connection to the workflow task form, and delete the control Consolidated Comments from the form.

    1. Insert a new row for the ID field.

    Figure 39. Inserting a new row for the ID field

    Figure 39. Inserting a new row for the ID field

    2.  Drag the ID field from the Fields task pane onto the canvas. The label for the control appears automatically in the left column when you drag the field into the right column of the table. However, this is true only if you highlight both columns when you release the mouse.

    Figure 40. ID field in right column

    Figure 40. ID field in right column

    3. Delete the row containing the control for Consolidated Comments.

    Figure 41. Consolidated Comments row deleted

    Figure 41. Consolidated Comments row deleted

    3. Click the File tab on the ribbon. Click Quick Publish. The Microsoft InfoPath dialog box stating the successful publishing of the form template appears.

    4. Click OK.

    5. Open the task site and look up any of the tasks. The task appears as shown in the following figure. The task has the ID field with value 1 and no Consolidated Comments control.

    Figure 42. Task on the task site with ID control and without Consolidated Comments control
    Figure 42. Task on the task site with ID control and without Consolidated Comments control

    Adding heading images to the form and applying a theme

    1. Place your cursor in the title area of the page layout. Add a title—for example, MyTask—in the required format and font.

    Figure 43. Title area of the page layout

    Figure 43. Title area of the page layout

    2. Add the heading image to the form by inserting a picture from the Insert tab on the ribbon.

    3. On the Page Design tab, apply the Professional – Standard theme. The easiest way to select the theme is to expand the Themes gallery by clicking the arrow at the lower-right corner. Professional – Standard is the first theme in the Professional section.

    Figure 44. Page Design tab

    Figure 44. Page Design tab

    The title, heading image, and page design should now resemble the following figure.

    Figure 45. New title, heading image, and page design

    Figure 45. New title, heading image, and page design

    4. Click the File tab on the ribbon. Click Quick Publish. The Microsoft InfoPath dialog box stating the successful publishing of the form template appears.

    5. Click OK.

    6. Open the task site and look up any of the tasks. The task appears as shown in the following figure. The task has the desired heading image and theme.

    Figure 46. Task on the task site with desired heading image and theme

    Figure 46. Task on the task site with desired heading image and theme

    How To : Enable RSS feed in SharePoint 2013

    SharePoint 2013 have out of the box support for publishing RSS feed for lists and libraries.  For publishing portals it is important to expose the site contents as RSS feeds. In this walkthrough I am going to explain how you can configure RSS feed for lists, libraries etc. in the SharePoint portal with your own display.


    For the purpose of this walkthrough, I have created a picture Library named “MyPictures” and added five pictures to this library. The thumbnail view of the picture library is as follows.

    clip_image002

    Now go to the library tab of your list page.

    clip_image003

    You can see the RSS feed icon is disabled, this is because I didn’t enable the RSS feed for my site. Now let us see how we can enable the RSS feed settings.

    Enable RSS feed for Sites/Site Collection

    Initially you need to enable the RSS feed for the site collection and the site where you need to expose your contents as RSS feeds.

    Go to your top level site settings page, if you are in a sub site, make sure you click on “Go to top level site settings”

    clip_image004

    Now In the Top level site settings page, you can find RSS link under site administration.

    clip_image005

    In the RSS settings page, you can enable the RSS for the site or entire site collection. Also you can define certain properties such as Copy right, managing editor, web master etc. Click OK once you are done.

    clip_image007

    If you want to disable the RSS feed for any site, go the site settings page and click RSS link and just uncheck the “Enable RSS” checkbox and click OK.

    Now let us see the effect of the changes we have made. Go to the “MyPictures” page and under library tab, see the RSS icon, you should see the icon is enabled now.

    clip_image009

    Click on the RSS feed icon, you will see the RSS feed in the browser.

    clip_image011

    Customize the RSS feed

    In SharePoint 2013, the RSS feed is exposed using listfeed.aspx, you can find the listfeed.aspx under the layouts folder.

    clip_image012

    By default the RSS feed is using RSSXslt.aspx file, which renders XSL to the browser.

    /_layouts/15/RssXslt.aspx

    You can find these files under layouts folder the 15 hive. The following is the path to layouts folder when SharePoint is installed in the C: drive.

    C:\Program Files\Common Files\microsoft shared\Web Server Extensions\15\TEMPLATE\LAYOUTS

    clip_image014

    Though it is possible to customize RssXslt.aspx to apply your own design, it is not recommended as this is a SharePoint system file and there is a chance that this file can be replaced by patches, service packs etc.

    Though RSS feeds meant for machines, you may need to present the RSS feed in your site and provide subscription instructions. So you need to perform two things here, first you need to select the data for the RSS feed to expose and secondly you need to display the RSS feed in your site in a formatted way. Let us see how we can achieve the same.

    Choose the data for RSS Feed

    Navigate to your list page, under the library tab, click on Library settings icon.

    clip_image016

    Once you enabled RSS for the site, you will see a column “Communications”, locate “RSS Settings” under Communications.

    clip_image018

    Click on the RSS settings, you will see the below settings page

    clip_image019

    First you can define whether you need to enable RSS for this list, in case if you don’t want a particular list to expose as RSS feed, you can say no for this.

    Under the RSS channel information; you can define a title, description and an Icon for the feed. Under document options, include file enclosures allows you to link the content of the file as encloses so that the feed reader can optionally download the file. Link RSS items directly to their files, since this is a picture library, I need the item to link directly to the image. You can select these options depending on your needs.

    clip_image020

    In the columns section, you can select the columns that you need to include in the RSS feed, also you can specify the order of the columns in the feed.

    clip_image021

    Under Item Limit, you can specify the maximum number of items and the maximum age for the item, by default items in the past 7 days will include, you can configure this based on your needs. Click OK once you are done.

    See the output XML generated by listfeed.aspx

    clip_image023

    Display RSS feed in your page

    Now you may need to include this RSS feed in your page. In order to do that you can use the XML viewer web part available in SharePoint 2013 and specify a XSLT for transforming the feed to formatted output.

    First create a page and insert a web part, under the web part selection menu, select Content rollup as the category and then select the XML Viewer web part and click on the Add button.

    clip_image025

    In the Web part settings you can define XML url and XSL url.

    clip_image026

    I just created a simple XSL file, you can download the text version of the file from here.

    The following is the output generated in the browser once I applied the attached xsl.

    clip_image028

    Summary

    SharePoint 2013 supports exposing and consuming RSS feeds without writing a single line of code. You have complete control over on what content can be exposed as RSS feeds.

    The Essential How To : Upgrade from Team Foundation Server 2012 to 2013.

    This blog gives you the step by step actions required for the upgrade from Team Foundation Server 2012 to 2013.

    > Prerequisites: (IMPORTANT)

    Make sure you have appropriate accounts with permissions for SQL, SharePoint, TFS and Machine level Admin privileges on both the servers.

    1. You must be an Administrator on the Server.
    2. Must be a part of the Farm Administrator’s group in SharePoint.

    A detailed information about this can be found here.

       Back up all the databases from TFS 2012.

    Make sure you stop all TFS services, using the TFSServiceControl.exe quiesce command. More info here.

    Databases to backup,

    1. The Configuration Database (For instance, Tfs_Configuration)
    2. The Collection Database(s) (For instance, Tfs_DefaultCollection)
    3. The Warehouse Database* (For instance, Tfs_Warehouse)
    4. The Analysis Database* (For instance, Tfs_Analysis)
    5. Report Server Databases* (For instance, ReportServer and ReportServerTempDB)
    6. SharePoint Content Databases** (For instance, WSS_Content)

    * If you have configured Reporting in TFS 2012

    ** If you have configured SharePoint in TFS 2012

    Also, you have to back up the Encryption keys of ReportServer database.

       In the new Server,

    1. Install a compatible version of SharePoint (Foundation/Standard/Enterprise)Note: Configuration fails with SQL Server 2012 RTM. You need SP1 update installed.

    > Step 1: Restoring Databases.

    On the new server, using the SQL Server Management Studio, Connect to the Database engine and restore all the databases (Configuration, Collection(s), SharePoint Content Warehouse and Reporting). Also, connect to the Analysis Engine and restore the Analysis Database.

    clip_image002

    If you have Reports configured and want to do the same in 2013, go to Step 2, else skip it.

    > Step 2: Configure Reporting.

    Open Reporting Services Configuration Manager,

    clip_image004

    Click on Database on the left pane and click on Change Database.

    Choose an existing report server database and click on .

    clip_image006

    Enter the credentials and click on .

    clip_image009

    Select ReportServer database and to next. Review and complete the wizard.

    clip_image011

    Now, you’ll have to restore the Encryption key. To do that Click on Encryption Keys on the left pane and click on Restore.

    Specify the file and enter the password you used to back up the encryption key and click on OK.

    clip_image013

    Go to Report Manager URL, and Click on the URLs to see if you are able to successfully browse through the reports.

    > Step 3: Install and Configure SharePoint.

    Install a compatible version of SharePoint and run the SharePoint Products Configuration Wizard.

    To check compatible versions, refer to the Team Foundation Server 2013 Installation Guide, available here.

    Click on Next.

    clip_image017

    Configuring a new farm would require reset of some services. Confirm by clicking on Yes.

    clip_image019

    Select Create a new server farm and click on Next.

    clip_image021

    Enter the Database Server and give a name for the configuration Database. Specify the service account that has the permissions to access that database server.

    clip_image023

    The recent versions of SharePoint would ask for a passphrase to secure the farm configuration data. Enter a passphrase.

    clip_image025

    Click on Specify Port Number and give “17012”. TFS usually uses this port for SharePoint. You can however give another unused port number too.
    Select NTLM for default security settings.

    clip_image027

    Review and complete the configuration wizard.

    clip_image029

    Now that we’ve configured SharePoint, go to SharePoint Central Admin page, give the admin credentials and create a new web application for TFS. It will automatically create a new content database for you.
    If you want to restore the content database from the previous version, say SharePoint 2010, you must first upgrade the content database and attach it to the web application.

    • First, Click on Application Management -> Manage Content Databases.
      Select the web application you created for TFS and remove that content database.
    • Upgrade and Attach the old content database by using the Mount-SPContentDatabase. Example,
      Mount-SPContentDatabase “MyDatabase” -DatabaseServer “MyServer” -WebApplication http://sitename
      (More information on that command, here.)

    > Step 4: Configure Team Foundation Server.

    Once we’ve restored all the databases and the encryption key and/or configured reporting, we are all set to upgrade TFS to the latest version.
    Start Team Foundation Administration Console and Click on Application tier.

    clip_image031

    Click on Configure Installed Features and choose Upgrade.

    clip_image032

    Enter the SQL Server/Instance name and Click on list available databases.

    clip_image033

    that you have taken backup and click on next (Yes, taking a backup is that important)

    Choose the Account and Authentication Method.

    clip_image034

    Select the Configure Reporting for use with Team Foundation Server and click on .

    clip_image035

    Note: If your earlier deployment was not using Reporting Service then you would not be able to add Reporting Service during the upgrade (this option would be disabled). You can configure Reporting Service with TFS later on after the upgrade is complete.

    Give the Reporting Services Instance name and Click on Populate URLs to populate the Report Server and Report Manager URLs. Click on .

    clip_image036

    Since we are configuring with Reports, we need to specify the Warehouse database. Enter the New SQL Instance that hosts the Warehouse database, do a Test and Click on List Available Databases. Select Tfs_Warehouse and click on Next.

    clip_image037

    In the next screen, Input the New Analysis Services Instance, do a Test and Click on Next.
    Note: If you’ve restored the Analysis Database (Tfs_Analysis) from the previous instance, TFS will automatically identify and use the same.

    clip_image038

    Enter the Report Reader account Credentials, do a Test and click on Next.

    clip_image039

    Check Configure SharePoint Products for Use with Team Foundation Server. Click on Next.
    Note: This is for Single Server Configuration, meaning SharePoint is installed on the same server as TFS.

    clip_image040

    Note: If your earlier deployment was not using SharePoint then you would not be able to add SharePoint during the upgrade (this option would be disabled). You can configure SharePoint with TFS later on after the upgrade is complete.

    In this screen, make sure you point to the correct SharePoint farm. Click on Test to test out the connection to the server. In our case, this is a Single-Server deployment. We’ve configured SharePoint manually, and created a web for TFS.

    clip_image041

    Make sure all the Readiness Checks are passed without any errors. Click on Configure.

    clip_image042

    Now, the basic TFS Configuration is completed successfully. Click on to initiate the Project Collection(s) upgrade.

    clip_image043

    That’s it. Project Collections are now upgraded and attached.

    clip_image044

    Click on next to review a summary and this wizard.

    clip_image045

    We are almost done. Notice that in the summary of TFS Administration Console, we still see the old server URL.

    This is very important.

    We need to change this to reflect the new server using the Change URLs.

    clip_image047

    clip_image049

    Do a test on both the URLs and Click on OK.

    Now, try browsing the Notification URL to see if you are able to view the web access without any errors.

    clip_image051

    Next, Click on the Team Project Collections in the left pane, Select your Collection(s) and click on Team Projects. See if you have the projects listed.

    clip_image053

    Under SharePoint site, check if the URL points to the correct location, if not, Click on Edit Default Site Location and edit it.

    clip_image055

    See if the URL under Reports Folder points to the correct location, if not, Click on Edit Default Folder Location and edit it.

    clip_image057

    Next, Click on Reporting in the left pane and see if the configurations are saved and are started.

    clip_image059

    > Step 5: Configuring Extensions for SharePoint (Only when SharePoint is on a different server)

    If you’ve configured SharePoint on a different server, you need to add Extensions for SharePoint products manually.
    First you need to Remote SharePoint Extensions on the server available as part of the TFS installation media. Run the configuration wizard for Extensions for SharePoint. For a detailed blog on how to do that click here.

    That’s it. With that TFS is configured correctly.
    As a final step, Team Explorer, Connect to the Team Foundation Server and create a new Team Project. See if it creates properly with Reports and a SharePoint site.

    Now, your new TFS 2013 is up and running, with upgraded collections.

    SharePoint Samurai