Tag Archives: Outlook

New SharePoint 2010 & 2013, Online Connector for Outlook available!!

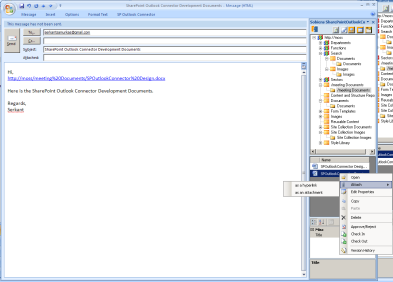
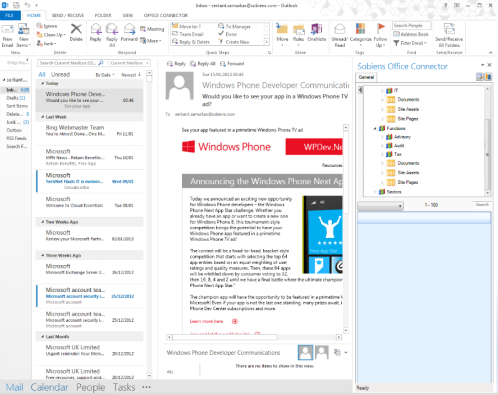
SharePoint Connector  For Outlook makes it easier for office users to upload emails to SharePoint and attach SharePoint documents to an email message .


Please contact me through my blog or at tomas.floyd@outlook.com for more information on pricing, licensing and trials.


   SharePointOutlookConnectorAttachingSharePointOutlookExplorer_2

FEATURES

  • Workflow integration
  • Attach items as attachments into email item functionality
  • Multiple site configuration
  • Check Out/Check In functionality
  • Drag & Drop files(attachments) into a folder
  • Copy, delete and open item/document functionalities
  • Version History for files
  • Saving email meta data to SharePoint document item (title, to, from etc) functionality
  • Works with all SharePoint versions
  • Saving email message as list item and attachments as attachment of the list item functionality
  • Template based search functionality
  • Windows explorer right click upload
  • Editing metadata on uploading document
  • Multiple site configuration
  • File System Integration has been added. (This allows you to integrate live mesh folders into outlook)
  • Attach items as attachments into email item functionality
  • Advanced Alert System
  • Library Content Viewer
  • Saving email message as list item and attachments as attachment of the list item functionality

How To : Use a Site mailbox to collaborate with your team

Share documents with others

Image

Every team has documents of some kind that need to be stored somewhere, and usually need to be shared with others. If you store your team’s documents on your SharePoint site, you can easily leverage the Site Mailbox app to share those documents with those who have site access.

 Important    When users view a site mailbox in Outlook, they will see a list of all the documents in that site’s document libraries. Site mailboxes present the same list of documents to all users, so some users may see documents they do not have access to open.

If you’re using Exchange, your documents will also appear in a folder in Outlook, making it even easier to forward documents to others.

Forwarding a document from the site mailbox

Organizations, and teams within organizations, often have several different email threads going in all directions at one time. It’s easy for lines to cross, information to get lost or overlooked, and for communication to break down. Site mailboxes enable you to store team or project-related email in one place, so that everyone on the team can see all communication.

On the Quick Launch, click Mailbox.

Mailbox on the Quick Launch

The site mailbox opens as a second, separate inbox and folder structure, next to your personal email account. Mail sent to and from the site mailbox account will be shared between all those who have Contributor permissions on the SharePoint site.

 Tip    Did you know you can also use a site mailbox to collaborate on documents?

Add a site mailbox as a mail recipient

By including the site mailbox on an important email thread, you ensure that a copy of the information in that thread is stored in a location that can be accessed by anyone on the team.

Simply add the site mailbox in the To, CC, or BCC line of an email message.

Email message with site mailbox included in CC field.

You could even consider adding the site mailbox email address to any team contact groups or distribution lists. That way, relevant email automatically gets stored in the team’s site mailbox.

Send email from the site mailbox

When you write and send email from the site mailbox, it will look as though it came from you.

Because everyone with Contributor permissions on a site can access the site mailbox, several people can work together to draft an email message.

To compose a message, simply click New Mail.

New mail button for site mailboxes.

This will open a new message in your site mailbox.

New mail message in a site mailbox.

New Office 365 API VS.Net Add-In exposes Javascript Client model

You can now access the Office 365 APIs using libraries available for .NET and JavaScript. These libraries make it easier to interact with the REST APIs from the device or platform of your choice.


Office365

The libraries are included in the latest update for Office 365 API Tools for Visual Studio Preview. Along with the libraries, this release also brings you some key updates to the tooling experience, making it easier to interact with Office 365 services.

Client libraries

Office 365 provides REST-based APIs that enable developers to access Office resources such as calendar, contacts, mail, files, and more.

The client libraries will let you:

  • Perform authentication and discovery
  • Use the Mail, Calendar and Contacts API
  • Use the My Files and Sites API (currently .NET only, with JavaScript coming soon)
  • Use the Users and Groups API


You can program directly against the REST APIs to interact with Office 365, but it requires you to write and maintain code around managing authentication tokens, constructing the right urls and queries for the API you wanted to access, and perform other tasks.

By using client libraries to access the Office 365 APIs, you can reduce the complexity of the code you need to write to access the APIs. We’re providing these libraries for .NET as well as JavaScript developers for use with the just-announced multi-device hybrid applications.

Here are some examples of how easy it is access the Office 365 APIs using these libraries.

.NET C# code to authenticate and get upcoming events from your Office 365 calendar:

// Shows UI to authenticate
Authenticator = newAuthenticator();
AuthenticationInfo result = await authenticator.AuthenticateAsync("https://outlook.office365.com");

The AuthenticateAsync method will prompt for a username and password and authenticate against the specified resource url, like outlook.office365.com in this case. Once you have the authentication information, you can create a client object that serves as the base for accessing all the APIs for Exchange:


// Create a client object
ExchangeClient client =
newExchangeClient(newUri("https://outlook.office365.com/ews/odata"),
result.GetAccessToken);

Because we’re using .NET here, we get to take advantage of the native language capabilities, like LINQ, so querying the Office 365 calendar is as simple as writing a LINQ query and executing it:

// Obtain calendar event data
var eventsResults = await (from i in client.Me.Events
where i.End >= DateTimeOffset.UtcNow
select i).Take(10).ExecuteAsync();

With just those four lines of code you can start making calls to the Office 365 APIs!

We wanted to make sure that you can reach multiple device and service platforms with a consistent API, so the client libraries are portable .NET libraries, which means they also work with Android and iOS devices through Xamarin. Because authentication needs to display a UI that is different on the various platforms, we also provide platform-specific authentication libraries, which can then be used with the portable ones to provide an end-to-end experience.

For developers creating multi-device hybrid applications that target multiple device platforms through JavaScript, we also have JavaScript versions of these libraries that provide a similar experience while adopting JavaScript’s patterns and practices, such as using the promises pattern instead of await.


Here is the same example to authenticate and get calendar events in JavaScript:

var authContext = new O365Auth.Context();
authContext.getIdToken('https://outlook.office365.com/')
.then((function (token) {
// authentication succeeded
var client = new Exchange.Client('https://outlook.office365.com/ews/odata',
token.getAccessTokenFn('https://outlook.office365.com'));
client.me.calendar.events.getEvents().fetch()
.then(function (events) {
// get currentPage of calendar events
var myevents = events.currentPage;
}, function (reason) {
// handle error
});
}).bind(this), function (reason) {
// authentication failed
});

The flow to authenticate and create a client object is similar across .NET and JavaScript, but you’re doing it in a way that should be natural to the language.

Along with the JavaScript files for these libraries, we are also including the TypeScript type definition (.d.ts)—in case you choose to develop your apps in TypeScript.

As you get started using these libraries, there are a few things to keep in mind. This is a very early preview release of the libraries that is meant to prove out the concept and get feedback on it. The libraries do not currently cover all the APIs provided by the services and some of the APIs in the library may not work. The APIs in the libraries themselves will definitely change in future updates.

Note that while we tend to call these “client” libraries, these also work with .NET server technologies like Asp.Net Web Forms and MVC, so you really get to target the breadth of the .NET platform.


Tooling updates

With today’s update of our Office 365 API Tools for Visual Studio 2013, the tool displays the available Office 365 services that you can add to your project. Once you’ve signed in with your Office 365 credentials, adding a service to your project is as easy as selecting the appropriate service and applying the required permissions.

dotnetvisualstudioupdate_01

Once you submit the changes, Visual Studio performs the following:

  1. Registers an application (if there isn’t an application registered yet) in Microsoft Azure Active Directory to consume Office 365 services.
  2. Adds the following to the project:
    1. Client libraries from Nuget for the configured services.
    2. Sample code files that use the Client Libraries.

Project types supported

With the broad reach of the client libraries, the Office 365 API tool is now available for a variety of project types (client, desktop, and web) in Visual Studio. Here’s are all the project types supported with the May update:

  • .NET Windows Store Apps
  • Windows Forms Application
  • WPF Application
  • ASP.NET MVC Web Application
  • ASP.NET Web Forms Application
  • Xamarin Android and iOS Applications
  • Multi-device hybrid apps

Installing the latest update

To install the latest update, you can either:

  • Check for updates within Visual Studio. To do so, follow these steps:
    1. In Visual Studio menu, click Tools->Extensions and Updates->Updates.
    2. You should see the update available for Office 365 API Tools.
    3. Click Update to update to the latest version.

–OR–

  • Download the extension and install it manually.

Once you’ve updated, you can invoke the Office 365 API tool as usual, that is, by going to your project node in the Solution Explorer and selecting Add->Connected Service from the context menu.

Looking forward to seeing your Apps out there when I visit the stores!!


MSDN references

Check also new SharePoint Online Solution Pack for branding and provisioning. This package contains also some examples, which originates from the AMS reference implementations. Here’s the direct links for the Solution Pack

You can find introduction to this SharePoint Online Solution Pack for branding and provisioning from following blog post – Introduction to SharePoint Online Solution Pack for branding and provisioning released.

How To : A library to create .mht files (available at request)

There are a number of ways to do this, including hosting Word or Excel on the Web Server and dealing with COM Interop issues, or purchasing third – party MIME encoding libraries, some of which sell for $250.00 or more. But, there is no native .NET solution. So, being the curious soul that I am, I decided to investigate a bit and see what I could come up with. Internet Explorer offers a File / Save As option to save a web page as “Web Archive, single file (*.mht)”.

Image

What this does is create an RFC – compliant Multipart MIME Message. Resources such as images are serialized to their Base64 inline encoding representations and each resource is demarcated with the standard multipart MIME header – breaks. Internet Explorer, Word, Excel and most newsreader programs all understand this format. The format, if saved with the file extension “.eml”, will come up as a web page inside Outlook Express; if saved with “.mht”, it will come up in Internet Explorer when the file is double-clicked out of Windows Explorer, and — what many do not know — if saved with a “*.doc” extension, it will load in MS Word, each with all the images intact, and in the case of the EML and MHT formats, with all of the hyperlinks fully-functioning. The primary advantage of the format is, of course, that all the resources can be consolidated into a single file,. making distribution and archiving much easier — including database storage in an NVarchar or NText type field.


System.Web.Mail, which .NET provides as a convenient wrapper around the CDO for Windows COM library, offers only a subset of the functionality exposed by the CDO library, and multipart MIME encoding is not a part of that functionality. However, through the wonders of COM Interop, we can create our own COM reference to CDO in the Visual Studio IDE, allowing it to generate a Runtime Callable Wrapper, and help ourselves to the entire rich set of functionality of CDO as we see fit.


One method in the CDO library that immediately came to my notice was the CreateMHTMLBody method. That’s MHTMLBody, meaning “Multipurpose Internet Mail Extension HTML (MHTML) Body”. Well!– when I saw that, my eyes lit up like the LED’s on a 32 – way Unisys box! This is a method on the CDO Message class; the method accepts a URI to the requested resource, along with some enumerations, and creates a MultiPart MIME – encoded email message out of the requested URI responses — including images, css and script — in one fell swoop.


“Ah”, you say, “How convenient”! Yes, and not only that, but we also get a free “multipart COM Interop Baggage” reference to the ADODB.Stream object – and by simply calling the GetStream method on the Message Class, and then using the Stream’s SaveToFile method, we can grab any resource including images, javascript, css and everything else (except video) and save it to a single MHT Web Archive file just as if we chose the “Save As” option out of Internet Explorer.


If we choose not to save the file, but instead want to get back the stream contents, no problem. We just call Stream.ReadText(Stream.Size) and it returns a string containing the entire MHT encoded content. At that point we can do whatever we want with it – set a content – header and Response .Write the content to the browser, for instance — or whatever.


For example, when we get back our “MHT” string, we can write the following code:

Response.ContentType=”application/msword”;
Response.AddHeader( “Content-Disposition”, “attachment;filename=NAME.doc”);
Response.Write(myDataString);


— and the browser will dutifully offer to save the file as a Word Document. It will still be Multipart MIME encoded, but the .doc extension on the filename allows Word to load it, and Word is smart enough to be able to parse and render the file very nicely. “Ah”, you are saying, “this is nice, and so is the price!”. Yup!

And, if you are serving this MIME-encoded file from out of your database, for example, and you would like it to be able to be displayed in the browser, just change the “NAME.doc” to “NAME.MHT”, and don’t set a content-type header. Internet Explorer will prompt the user to either save or open the file. If they choose “open”, it will be saved to the IE Temporary files and open up in the browser just as if they had loaded it from their local file system.


So, to answer a couple of questions that came up recently, yes — you can use this method to MHTML – encode any web page – even one that is dynamically generated as with a report — provided it has a URL, and save the MIME-encoded content as a string in either an NVarchar or NText column in your database. You can then bring this string back out and send it to the browser, images,css, javascript and all.

Now here is the code for a small, very basic “Converter” class I’ve written to take advantage of the two scenarios specified above. Bear in mind, there is much more available in CDO, but I leave this wondrous trail of ecstatic discovery to your whims of fancy:

using System;
using System.Web;
using CDO;
using ADODB;
using System.Text;
namespace PAB.Web.Utils
{
 public class MIMEConverter
 {
  //private ctor as our methods are all static here
  private MIMEConverter()
  {
   
  }   
  public static bool SaveWebPageToMHTFile( string url, string filePath)
  {
   bool result=false;
   CDO.Message  msg = new CDO.MessageClass(); 
   ADODB.Stream  stm=null ;
   try
   {
    msg.MimeFormatted =true;   
    msg.CreateMHTMLBody(url,CDO.CdoMHTMLFlags.cdoSuppressNone, "" ,"" );
stm = msg.GetStream(); stm.SaveToFile(filePath,ADODB.SaveOptionsEnum.adSaveCreateOverWrite); msg=null; stm.Close(); result=true; } catch {throw;} finally { //cleanup here } return result; } public static string ConvertWebPageToMHTString( string url ) { string data = String.Empty; CDO.Message msg = new CDO.MessageClass(); ADODB.Stream stm=null; try { msg.MimeFormatted =true; msg.CreateMHTMLBody(url,CDO.CdoMHTMLFlags.cdoSuppressNone,
"", "" );
stm = msg.GetStream(); data= stm.ReadText(stm.Size); } catch { throw; } finally { //cleanup here } return data; } } }


NOTE: When using this type of COM Interop from an ASP.NET web page, it is important to remember that you must set the AspCompat=”true” directive in the Page declaration or you will be very disappointed at the results! This forces the ASP.NET page to run in STA threading model which permits “classic ASP” style COM calls. There is, of course, a significant performance penalty incurred, but realistically, this type of operation would only be performed upon user request and not on every page request.

<

p align=”left”>The downloadable zip file below contains the entire class library and a web solution that will exercise both methods when you fill in a valid URI with protocol, and a valid file path and filename for saving on the server. Unzip this to a folder that you have named “ConvertToMHT” and then mark the folder as an IIS Application so that your request such as “http://localhost/ConvertToMHT/WebForm1.aspx&#8221; will function correctly. You can then load the Solution file and it should work “out of the box”. And, don’t forget – if you have an ASP.NET web application that wants to write a file to the file system on the server, it must be running under an identity that has been granted this permission.

Architecture and Practical Application – BizTalk Adapter for mySAP Business Suite

Architecture for BizTalk Adapter for mySAP Business Suite

f36f4-netvjava

The Microsoft BizTalk Adapter for mySAP Business Suite implements a Windows Communication Foundation (WCF) custom binding, which contains a single custom transport binding element that enables communication with an SAP system.

biztalk-accelerator

The SAP adapter is wrapped by the Microsoft Windows Communication Foundation (WCF) Line of Business (LOB) Adapter SDK runtime and is exposed to applications through the WCF channel architecture. The SAP adapter communicates with the SAP system through either the 64-bit or 32-bit version of the SAP Unicode RFC SDK (librfc32u.dll).

The following figure shows the end-to-end architecture for solutions that are developed by using the SAP adapter.
SAP End-to-End Architecture
Consuming the Adapter

The SAP adapter exposes the SAP system as a WCF service to client applications. Client applications exchange SOAP messages with the SAP adapter through WCF channels to perform operations and to access data on the SAP system. The preceding figure shows four ways in which the SAP adapter can be consumed.

image
• Through a WCF channel application that performs operations on the SAP system by using the WCF channel model to exchange SOAP messages directly with the SAP adapter. For more information about developing solutions for the SAP adapter by using WCF channel model programming, see Developing Applications by Using the WCF Channel Model.

• Through a WCF service model application that calls methods on a WCF client to perform operations on the SAP system. A WCF client models the operations exposed by the SAP adapter as .NET methods. You can use the Microsoft Windows Communication Foundation (WCF) Line of Business (LOB) Adapter SDK or the svcutil.exe tool to create a WCF client class from metadata exposed by the SAP adapter. For more information about WCF service model programming and the SAP adapter, see Developing Applications by Using the WCF Service Model.

• Through a BizTalk port that is configured to use the BizTalk WCF-Custom adapter with the SAP Binding configured as the binding for the WCF-Custom transport type in a BizTalk Server application. The BizTalk WCF-Custom adapter enables communication between a BizTalk Server application and a WCF service.

The BizTalk WCF-Custom adapter supports custom WCF bindings through its WCF-Custom transport type, which enables you to configure any WCF binding exposed to the configuration system as the binding used by the BizTalk WCF-Custom adapter. For more information about how to use the SAP adapter in BizTalk Server solutions, see Developing BizTalk Applications. BizTalk transactions are supported by the BizTalk Layered Channel binding element which can be loaded by setting a binding property on the SAP Binding.

• Through an IIS-hosted Web service. In this scenario, the SAP adapter is exposed through a WCF Service proxy, which is hosted in IIS by using one of the standard WCF HTTP bindings.

• Through the .NET Framework Data Provider for mySAP Business Suite. The Data Provider for SAP runs on top of the SAP adapter and provides an ADO.NET interface to an SAP system.

The SAP adapter and the SAP RFC library are always hosted in-process with the application or service that consumes the adapter.

The SAP Adapter and WCF

WCF presents a programming model based on the exchange of SOAP messages over channels between clients and services. These messages are sent between endpoints exposed by a communicating client and service.

An endpoint consists of an endpoint address which specifies the location at which messages are received, a binding which specifies the communication protocols used to exchange messages, and a contract which specifies the operations and data types exposed by the endpoint.

A binding consists of one or more binding elements that stack on top of each other to define how messages are exchanged with the endpoint.


At a minimum, a binding must specify the transport and encoding used to exchange messages with the endpoint. Message exchange between endpoints occurs over a channel stack that is composed of one or more channels. Each channel is a concrete implementation of one of the binding elements in the binding configured for the endpoint.

For more information about WCF and the WCF programming model, see “Windows Communication Foundation” at http://go.microsoft.com/fwlink/?LinkId=89726.

The Microsoft BizTalk Adapter for mySAP Business Suite exposes a WCF custom binding, the SAP Binding (Microsoft.Adapters.SAP.SAPBinding). By default, this binding contains a single custom transport binding element, the SAP Adapter Binding Element (Microsoft.Adapters.SAP.SAPAdapter), which enables operations on an SAP system. When using the SAP adapter with BizTalk Server, you can set the EnableBizTalkCompatibilityMode binding property to load a custom binding element, the BizTalk Layered Channel Binding Element, on top of the SAP Adapter Binding Element. The BizTalk Layered Channel Binding Element is implemented internally by the SAP adapter and is not exposed outside the SAP Binding.

Microsoft.Adapters.SAP.SAPBinding (the SAP Binding) and Microsoft.Adapters.SAP.SAPAdapter (the SAP Adapter Binding Element) are public classes and are also exposed to the configuration system. Because the SAP Adapter Binding Element is exposed publicly, you can build your own custom WCF bindings capable of extending the functionality of the SAP adapter. For example, you could implement a custom binding to support Enterprise Single Sign-On (SSO) in a WCF channel or a WCF service model programming solution, to aggregate database operations into a single multifunction operation, or to perform schema transformation between operations implemented by a custom application and operations on the SAP system.

The SAP adapter is built on top of the Microsoft Windows Communication Foundation (WCF) Line of Business (LOB) Adapter SDK and runs on top of the WCF LOB Adapter SDK runtime. The WCF LOB Adapter SDK provides a software framework and tooling infrastructure that the SAP adapter leverages to provide a rich set of features to users and adapter clients.

The Connection to the SAP System

The SAP adapter connects with the SAP system through the SAP Unicode RFC SDK Library (librfc32u.dll). The SAP adapter supports both the 32 bit and the 64 bit versions of the SAP RFC SDK. The SAP RFC SDK enables external programs to call ABAP functions on a SAP system.

You establish a connection to an SAP system by providing a connection URI to the SAP adapter. The SAP adapter supports the following kinds of connections to an SAP system:
• An application host–based connection (A), in which the SAP adapter connects directly to an SAP application server.

• A load balancing connection (B), in which the SAP adapter connects to an SAP messaging server.

• A destination-based connection (D), in which the connection to the SAP system is specified by a destination in the saprfc.ini configuration file. A, B, and R type connections are supported.

• A listener connection (R), in which the adapter receives RFCs, tRFC and IDOCs through an RFC Destination on the SAP system that is specified by a listener host, a listener gateway service, and a listener program ID, either directly in the connection URI or by an R-based destination in the saprfc.ini configuration file.

Architecture for BizTalk Adapter for mySAP Business Suite

This topic has not yet been rated – Rate this topic

The Microsoft BizTalk Adapter for mySAP Business Suite implements a Windows Communication Foundation (WCF) custom binding, which contains a single custom transport binding element that enables communication with an SAP system. The SAP adapter is wrapped by the Microsoft Windows Communication Foundation (WCF) Line of Business (LOB) Adapter SDK runtime and is exposed to applications through the WCF channel architecture. The SAP adapter communicates with the SAP system through either the 64-bit or 32-bit version of the SAP Unicode RFC SDK (librfc32u.dll). The following figure shows the end-to-end architecture for solutions that are developed by using the SAP adapter.
SAP End-to-End Architecture
Consuming the Adapter

The SAP adapter exposes the SAP system as a WCF service to client applications. Client applications exchange SOAP messages with the SAP adapter through WCF channels to perform operations and to access data on the SAP system. The preceding figure shows four ways in which the SAP adapter can be consumed.
• Through a WCF channel application that performs operations on the SAP system by using the WCF channel model to exchange SOAP messages directly with the SAP adapter. For more information about developing solutions for the SAP adapter by using WCF channel model programming, see Developing Applications by Using the WCF Channel Model.

• Through a WCF service model application that calls methods on a WCF client to perform operations on the SAP system. A WCF client models the operations exposed by the SAP adapter as .NET methods. You can use the Microsoft Windows Communication Foundation (WCF) Line of Business (LOB) Adapter SDK or the svcutil.exe tool to create a WCF client class from metadata exposed by the SAP adapter. For more information about WCF service model programming and the SAP adapter, see Developing Applications by Using the WCF Service Model.

• Through a BizTalk port that is configured to use the BizTalk WCF-Custom adapter with the SAP Binding configured as the binding for the WCF-Custom transport type in a BizTalk Server application. The BizTalk WCF-Custom adapter enables communication between a BizTalk Server application and a WCF service.

The BizTalk WCF-Custom adapter supports custom WCF bindings through its WCF-Custom transport type, which enables you to configure any WCF binding exposed to the configuration system as the binding used by the BizTalk WCF-Custom adapter. For more information about how to use the SAP adapter in BizTalk Server solutions, see Developing BizTalk Applications.

BizTalk transactions are supported by the BizTalk Layered Channel binding element which can be loaded by setting a binding property on the SAP Binding.

• Through an IIS-hosted Web service. In this scenario, the SAP adapter is exposed through a WCF Service proxy, which is hosted in IIS by using one of the standard WCF HTTP bindings.

• Through the .NET Framework Data Provider for mySAP Business Suite. The Data Provider for SAP runs on top of the SAP adapter and provides an ADO.NET interface to an SAP system.

The SAP adapter and the SAP RFC library are always hosted in-process with the application or service that consumes the adapter.

The SAP Adapter and WCF

WCF presents a programming model based on the exchange of SOAP messages over channels between clients and services. These messages are sent between endpoints exposed by a communicating client and service.

An endpoint consists of an endpoint address which specifies the location at which messages are received, a binding which specifies the communication protocols used to exchange messages, and a contract which specifies the operations and data types exposed by the endpoint. A binding consists of one or more binding elements that stack on top of each other to define how messages are exchanged with the endpoint.

At a minimum, a binding must specify the transport and encoding used to exchange messages with the endpoint. Message exchange between endpoints occurs over a channel stack that is composed of one or more channels. Each channel is a concrete implementation of one of the binding elements in the binding configured for the endpoint.

For more information about WCF and the WCF programming model, see “Windows Communication Foundation” at http://go.microsoft.com/fwlink/?LinkId=89726.

The Microsoft BizTalk Adapter for mySAP Business Suite exposes a WCF custom binding, the SAP Binding (Microsoft.Adapters.SAP.SAPBinding). By default, this binding contains a single custom transport binding element, the SAP Adapter Binding Element (Microsoft.Adapters.SAP.SAPAdapter), which enables operations on an SAP system. When using the SAP adapter with BizTalk Server, you can set the EnableBizTalkCompatibilityMode binding property to load a custom binding element, the BizTalk Layered Channel Binding Element, on top of the SAP Adapter Binding Element. The BizTalk Layered Channel Binding Element is implemented internally by the SAP adapter and is not exposed outside the SAP Binding.

Microsoft.Adapters.SAP.SAPBinding (the SAP Binding) and Microsoft.Adapters.SAP.SAPAdapter (the SAP Adapter Binding Element) are public classes and are also exposed to the configuration system. Because the SAP Adapter Binding Element is exposed publicly, you can build your own custom WCF bindings capable of extending the functionality of the SAP adapter. For example, you could implement a custom binding to support Enterprise Single Sign-On (SSO) in a WCF channel or a WCF service model programming solution, to aggregate database operations into a single multifunction operation, or to perform schema transformation between operations implemented by a custom application and operations on the SAP system.

The SAP adapter is built on top of the Microsoft Windows Communication Foundation (WCF) Line of Business (LOB) Adapter SDK and runs on top of the WCF LOB Adapter SDK runtime. The WCF LOB Adapter SDK provides a software framework and tooling infrastructure that the SAP adapter leverages to provide a rich set of features to users and adapter clients.

The Connection to the SAP System

The SAP adapter connects with the SAP system through the SAP Unicode RFC SDK Library (librfc32u.dll). The SAP adapter supports both the 32 bit and the 64 bit versions of the SAP RFC SDK. The SAP RFC SDK enables external programs to call ABAP functions on a SAP system.

You establish a connection to an SAP system by providing a connection URI to the SAP adapter. The SAP adapter supports the following kinds of connections to an SAP system:
• An application host–based connection (A), in which the SAP adapter connects directly to an SAP application server.

• A load balancing connection (B), in which the SAP adapter connects to an SAP messaging server.

• A destination-based connection (D), in which the connection to the SAP system is specified by a destination in the saprfc.ini configuration file. A, B, and R type connections are supported.

• A listener connection (R), in which the adapter receives RFCs, tRFC and IDOCs through an RFC Destination on the SAP system that is specified by a listener host, a listener gateway service, and a listener program ID, either directly in the connection URI or by an R-based destination in the saprfc.ini configuration file.

So – How Do I Use a Custom Web Part?

This topic has not yet been rated – Rate this topic

This section provides information about using a custom Web Part with Microsoft Office SharePoint Server. To use a custom Web Part, you must do the following:
1. Create a custom Web Part

  1. Deploy the custom Web Part to a SharePoint portal
  2. Configure the SharePoint portal to use the custom Web Part

Before You Begin

Before you create a custom Web Part:
• Publish the SAP artifacts as a WCF service. For more information, see Step 1: Publish the SAP Artifacts as a WCF Service in Tutorial 1: Presenting Data from an SAP System on a SharePoint Site.

• Create an application definition file for the SAP artifacts using the Business Data Catalog in Microsoft Office SharePoint Server. For more information, see Step 2: Create an Application Definition File for the SAP Artifacts in Tutorial 1: Presenting Data from an SAP System on a SharePoint Site.

Step 1: Create a custom Web Part

To create a custom Web Part using Visual Studio, do the following:
1. Start Visual Studio, and then create a project.

  1. In the New Project dialog box, from the Project types pane, select Visual C#. From the Templates pane, select Class Library.
  • Specify a name and location for the solution. For this topic, specify CustomWebPart in the Name and Solution Name boxes. Specify a location, and then click OK.

  • Add a reference to the System.Web component into the project. Right-click the project name in Solution Explorer, and then click Add Reference. In the Add Reference dialog box, select System.Web in the .NET tab, and then click OK. The System.Web component contains the required namespace of System.Web.UI.WebControls.WebParts.

  • Add the required code based on your issue in the project. For the code sample that is relevant to a certain issue, see “Issues Involving Custom Web Parts” in Considerations While Using the SAP Adapter with Microsoft Office SharePoint Server.

  • Build the project. On successful build of the project, a .dll file, CustomWebPart.dll, will be generated in the /bin/Debug folder.

  • Only for 64-bit computer: Sign the CustomWebPart.dll file with a strong name before performing the following steps. Otherwise, you will not be able to import, and hence use the CustomWebPart.dll in the SharePoint portal in “Step 3: Configure the SharePoint Portal to use the custom Web Part.” For information about how to sign an assembly with a strong name, see http://go.microsoft.com/fwlink/?LinkId=197171.

  • Step 2: Deploy the custom Web Part to a SharePoint Portal

    You must do the following to make the CustomWebPart.dll file (custom Web Part) that is created in “Step 1: Create a custom Web Part” of this topic usable on the SharePoint portal:
    • Copy the CustomWebPart.dll file to the bin folder of the SharePoint Portal: Microsoft Office SharePoint Server creates portals under the :\Inetpub\wwwroot\wss\VirtualDirectories folder. A folder is created for each portal, and can be identified with the port number. You must copy the CustomWebPart.dll file created in “Step 1: Create a custom Web Part” of this topic to the :\Inetpub\wwwroot\wss\VirtualDirectories\bin folder. For example, if the port number of your SharePoint portal is 13614, you must copy the CustomWebPart.dll file to the :\Inetpub\wwwroot\wss\VirtualDirectories\13614\bin folder.

    TipTip

    Another way to find the folder location of your SharePoint portal is by using the Internet Information Services (IIS) Manager window (Start > Run > inetmgr). Locate your SharePoint portal in the Internet Information Services (IIS) Manager window ([computer_name] > Web Sites > [Portal-Name]), right-click, and then click Properties in the shortcut menu. In the properties dialog box of the SharePoint portal, click the Home Directory tab, and then select the Local path box.

    • Add the Safe Control Entry in the web.config File: Because the CustomWebPart.dll file will be used on different computers and by multiple users, you must declare the file as “safe.” To do so, open the web.config file located in the SharePoint portal folder at :\Inetpub\wwwroot\wss\VirtualDirectories. Under the section of the web.config file, add the following safe control entry:

    ◦On 32-bit computer:

    Copy


    ◦On 64-bit computer:

    Copy


    Save the web.config file, and then close it.

    Step 3: Configure the SharePoint portal to use the custom Web Part

    You need to add the custom Web Part to the Microsoft Office SharePoint Server Web Part Gallery, so that you can use it on your SharePoint portal. To do so:

    1. Start SharePoint 3.0 Central Administration. Click Start, point to All Programs, point to Microsoft Office Server, and then click SharePoint 3.0 Central Administration.
  • In the left navigation pane, click the name of the Shared Service Provider (SSP) to which you want to add the custom Web Part.

  • On the Shared Services Administration page, in the upper-right corner, click Site Actions, and then click Create.

  • On the Site Settings page, click Web Parts under the Galleries column.

  • On the Web Part Gallery page, to add the custom Web Part to the gallery, click New. At this point the custom Web Part is not available in the Web Part Gallery page.

  • On the New Web Parts page, locate CustomWebPart (name of the custom Web Part) in the list, select the check box on the left, and then click Populate Gallery on the top of the page. This will add the CustomWebPart entry in the Web Part Gallery page.

  • Now you can use the custom Web Part (CustomWebPart) to create Web Parts in your SharePoint portal. The custom Web Part (CustomWebPart) will appear under the Miscellaneous section in the Add Web Parts page.


    Expand

    BizTalk Adapter for mySAP Business Suite and the WCF LOB Adapter SDK

    This topic has not yet been rated Rate this topic

    The Microsoft BizTalk Adapter for mySAP Business Suite implements a set of core components that leverage functionality provided by the Microsoft Windows Communication Foundation (WCF) Line of Business (LOB) Adapter SDK and provide connectivity to the SAP system through the SAP Unicode RFC SDK Library (librfc32u.dll).

    The WCF LOB Adapter SDK serves as the software layer through which the SAP adapter interfaces with Windows Communication Foundation (WCF), and the RFC SDK serves as the layer through which the SAP adapter interfaces with the SAP system.

    The following figure shows the relationships between the internal components of the SAP adapter and between these components and the RFC SDK.

    The relationship of internal adapter components

    See


    When should I choose to create a mail app versus an add-in for Outlook?

    When should I choose to create a mail app versus an add-in for Outlook?

    Rate This
    PoorPoorFairFairAverageAverageGoodGoodExcellentExcellent

    Some of you may or may not be aware that alongside with the legacy COM-based Office client object models, Office 2013 supports a new apps for Office developer platform. This blog post is intended to help new and existing Office developers understand the main differences between the COM-based object models and the apps for Office platform. In particular, this post focuses on Outlook, suggests why you should consider developing solutions as mail apps, and identifies those exceptional scenarios where add-ins may still be the more appropriate choice.

    Contents:

    An introduction to the apps for Office platform

    Architectural differences between add-in model and apps for Office platform

    Main features available to mail apps

    Major objects for mail apps

    Reasons to create mail apps instead of add-ins for Outlook

    Reasons to choose add-ins

    Conclusion

    Further references

    An introduction to the apps for Office platform

    The apps for Office platform includes a JavaScript API for Office and a schema for apps for Office manifests. You can use this platform to extend web services and content into the context of rich and web clients of Office. An app for Office is a webpage that is developed using common web technologies, hosted inside an Office client application (such as Outlook) on-premises or in the cloud. Of the three types of apps for Office, the type that Outlook supports is called mail apps. While you use the legacy APIs—the object model, PIA, and MAPI—to automate Outlook at an application level, you can use the JavaScript API for Office in a mail app to interact at an item level with the content and properties of an email message, meeting request, or appointment. You can publish mail apps in the Office Store or in an internal Exchange catalog. End users and administrators can install mail apps for an Exchange 2013 mailbox, and use mail apps in the Outlook rich client as well as Outlook Web App. As a developer, you can choose to make your mail app available for end users on only the desktop, or also on the tablet or smart phone. You can find more information about the apps for Office platform by starting here: Overview of apps for Office.

    Architectural differences between add-in model and apps for Office platform

    Add-in model

    The Office add-in model offers individual object models for most of the Office rich clients. Each object model is intended to automate the corresponding Office client, and allows an add-in to integrate closely with the behavior of that client. The same add-in can integrate with one or multiple Office applications, such as Outlook, Word, and Excel, by calling into each of the Outlook, Word, and Excel object models. Figure 1 describes a few examples of 1:1 relationships between an Office rich client and its object model.

    Figure 1. The legacy Office development architecture is composed of individual client object models.


    Apps for Office platform

    The apps for Office platform includes an apps for Office schema. Using this schema, each app specifies a manifest that describes the permissions it requests, its requirements for its host applications (for example, a mail app requires the host to support the mailbox capability), its support for the default and any extra locales, display details for one or more form factors, and activation rules for a mail app to be available in the app bar.

    In addition to the schema, the apps for Office platform includes the JavaScript API for Office. This API spans across all supporting Office clients and allows apps to move toward a single code base. Rather than automating or extending a particular Office client at the application level, the apps for Office platform allows apps to connect to services and extend them into the context of a document, message, or appointment item in a rich or web client. Figure 2 shows Office applications with their rich and web clients sharing a common app platform.

    Figure 2. The apps for Office development architecture is composed of a common platform and individual object models.


    One main difference of note is that the object models were designed to integrate tightly with the corresponding Office client applications. However, this tight integration has a side effect of requiring an add-in to run in the same process as the rich client. The reliability and performance of an add-in often affects the perceived performance of the rich client. Unlike client add-ins, an app for Office doesn’t integrate as tightly with the host application, does not share the same process as the rich client, and instead runs in its own isolated runtime environment. This environment offers a privacy and permission model that allows users and IT administrators to monitor their ecosystem of apps and enjoy enhanced security.

    Main features available to mail apps

    Contextual activation: Mail app activation is contextual, based on the app’s activation rules and current circumstances, including the item that is currently displayed in the Reading Pane or inspector. A mail app is activated and becomes available to end users when such circumstances satisfy the activation rules in the app manifest.

    Matching known entities or regular expression: A mail app can specify certain entities (such as a phone number or address) or regular expressions in its activation rules. If a match for entities or regular expressions occurs in the item’s subject or body, the mail app can access the match for further processing.

    Roaming settings: A mail app can save data that is specific to Outlook and the user’s Exchange mailbox for access in a subsequent Outlook session.

    Accessing item properties: A mail app can access built-in properties of the current item, such as the sender, recipients, and subject of a message, or the location, start, end, organizer, and attendees of a meeting request.

    Creating item-level custom properties: A mail app can save item-specific data in the user’s Exchange mailbox for access in a subsequent Outlook session.

    Accessing user profile: A mail app can access the display name, email address, and time zone in the user’s profile.

    Authentication by identity tokens: A mail app can authenticate a user by using a token that identifies the user’s email account on an Exchange Server.

    Using Exchange Web Services: A mail app can perform more complex operations or get further data about an item through Exchange Web Services.

    Permissions model and governance: Mail apps support a three-tier permissions model. This model provides the basis for privacy and security for end users of mail apps.

    Major objects for mail apps

    For mail apps, you can look at the JavaScript API for Office object model in three layers:

    1. In the first layer, there are a few objects shared by all three types of apps for Office: Office, Context, and AsyncResult.
    2. The second layer in the API that is applicable and specific to mail apps includes the Mailbox, Item, and UserProfile objects, which support accessing information about the user and the item currently selected in the user’s mailbox.
    3. The third layer describes the data-level support for mail apps:
      1. There are CustomProperties and RoamingSettings that support persisting properties set up by the mail app for the selected item and for the user’s mailbox, respectively.
      2. There are the supported item objects, Appointment and Message, that inherit from Item, and the MeetingRequest object that inherits from Message. These objects represent the types of Outlook items that support mail apps: calendar items of appointments and meetings, and message items such as email messages, meeting requests, responses, and cancellations.
      3. Then there are the item-level properties (such as Appointment.subject) as well as objects and properties that support certain known Entities objects (for example Contact, MeetingSuggestion, PhoneNumber, and TaskSuggestion).

    Figure 3 shows the major objects: Mailbox, Item, UserProfile, Appointment, Message, Entities, and their members.

    Figure 3. Major objects and their members used by mail apps in the JavaScript API for Office.

    Figure 4 shows all of the objects and enumerations in the JavaScript API for Office that pertain to mail apps.

    Figure 4. All objects for mail apps in the JavaScript API for Office.

    Figure 5 is a thumbnail of a diagram with all the objects and members that mail apps use. Zoom into the diagram at http://go.microsoft.com/fwlink/?LinkId=317271.

    Figure 5. All objects and members used by mail apps in the JavaScript API for Office.

    The following are common reasons why mail apps are a better choice for developers than add-ins:

    • You can use existing knowledge of and the benefits of web technologies such as HTML, JavaScript, and CSS. For power users and new developers, XML, HTML, and JavaScript require less significant ramp-up time than COM-based APIs such as the Outlook object      model.
    • You can use a simple web deployment model to update your mail app (including the web services that the app uses) on your web server without any complex installation on the Outlook client. In fact, any updates to the mail app, with the exception of the app manifest, do not require any updating on the Office client. You can update the code or user interface of the mail app conveniently just on the web server. This presents a significant advantage over the administrative overhead involved in updating add-ins.
    • You can use a common web development platform for mail apps that can roam across the Outlook rich client and Outlook Web App on the desktop, tablet, and smartphone. On the other hand, add-ins use the object model for the Outlook rich client and, hence, can run on only that rich client on a desktop form factor.
    • You can enjoy rapid turnaround of building and releasing apps via the Office Store.
    • Because of the three-tier permissions model, users and administrators can appreciate better security and privacy in mail apps than add-ins, which have full access to the content of each account in the user’s profile. This, in turn, encourages user consumption of apps.
    • Depending on your scenarios, there are features unique to mail apps that you can take advantage of and that are not supported by add-ins:
      • You can specify a mail app to activate only for certain contexts (for example, Outlook displays the app in the app bar only if the message class of the user-selected appointment is IPM.Appointment.Contoso, or if the body of an email contains a package       tracking number or a customer identifier).
      • You can activate a mail app if the selected message contains some known entities, such as an address, contact, email address, meeting suggestion, or task suggestion.
      • You can take advantage of authentication by identity tokens and of Exchange Web Services.

    Reasons to choose add-ins

    The following features are unique to add-ins and may make them a more appropriate choice than mail apps in some circumstances:

    • You can use add-ins to extend or automate Outlook at an application-level, because the object model and PIA have extensive integration with Outlook features (such as all Outlook item types, user interface, sessions, and rules). At the item-level, add-ins can interact with an item in read or compose mode. With mail apps, you cannot automate Outlook at the application level, and you can extend Outlook’s functionality in the context of only the read-mode of the supported items (messages and appointments) in the user’s mailbox.
    • You can specify custom business logic for a new item type.
    • You can modify and add custom commands in the ribbon and Backstage view.
    • You can display a custom form page or form region.
    • You can detect events such as sending an item or modifying properties of an item.
    • You can use add-ins on Outlook 2013 and Exchange Server 2013, as well as earlier versions of Outlook and Exchange. On the other hand, mail apps work with Outlook and Exchange starting in Outlook 2013 and Exchange Server 2013, but not earlier versions.

    Conclusion

    When you are considering creating a solution for Outlook, first verify whether the supported major features and objects of the apps for Office platform meet your needs. Develop your solution as a mail app, if possible, to take advantage of the platform’s support across Outlook clients over the desktop, tablet, and smartphone form factors. Note that there are still some circumstances where add-ins are more appropriate, and you should prioritize the goals of your solution before making a decision.

    Further references

    Apps for Office and mail apps

    How to : Configure a Customer or Product workspace for offline availability using Duet Enterprise and SAP

    In the Duet Enterprise Web site, an entity workspace contains one or more lists with data from an SAP backend. For example, the Products workspace has a list of products, or the Customers workspace has a list of customers, contacts, inquiries and quotations list.

    Working with an entity workspace offline gives you more flexibility to use the workspace data. For example, if you configure the Customer workspace for offline availability, you can consolidate your business contacts from SAP with your other Outlook contacts in Outlook 2010. You can then use Outlook 2010 more effectively for corresponding with business contacts and customers.

    To make a workspace available offline, first create a downloadable package (called a BCS solution) that contains several important elements, such as lists of workspace data, task panes, and actions.

    Lists In the Customers workspace, two lists are available for offline use—Customers and Contacts.

    Task pane A workspace task pane is a window that provides information about another workspace element, or about options to perform a task. For example, a task pane can show details of a contact or a product.

    Actions A task (such as Open Workspace) that you are able to perform related to a workspace.

    In Outlook 2010, task panes and actions enable an interactive experience of connecting and working with the information in a workspace. By default, Duet offers a few pre-defined task panes and actions. However, if the default ones do not meet your needs, you can add customized task panes and actions. Customized task panes and actions add functionality to the offline experience in Outlook 2010. For example, you can create a task pane that lists the quotations and inquiries related to a customer, or an action to open an email template or reports for a particular contact, and so on.

    Note The Connect to Outlook option in a SharePoint 2010 site only enables you to take the list data in a workspace offline, and not task panes and actions.
    Step 1: Enable libraries and upload building block files to the site collection

    Building block files are source files for the task panes, actions, and other core files that you need to package together to enable the workspace to function offline in Outlook 2010. First, you have to upload these source files to the site collection. Later in the process, you create a package of building block files to download to Outlook 2010.

    To configure a workspace for offline use, three types of building block files are important.

    A BCS Solution Task Pane file, which is an Extensible Markup Language (XML) file. You can use the task pane file that duet provides, or use a custom file.
    A Business Data Action file, which is also an XML file. You can use the default action file or use a custom file.
    The Dynamic Linked Library (DLL) file that implements the task pane and action.

    Note If you are unsure of the location or the name of the file, contact your server administrator.
    Enable libraries on the site collection

    First, you have to enable the libraries on the site collection that stores these building block files. The following steps describe how to enable libraries:

    From the Site Actions menu, click Site Settings.
    Under Site Collection Administration, click Site collection features.

    Note If the Site collection features option does not appear, then click Go to top level settings option under Site Collection Administration. The Site Collection Features option will now appear.

    On the Features page, against BCS Solution Galleries, click Activate.

    You are now ready to upload the source files to the site collection starting with the DLL file.
    Upload the building block files to the site collection

    Click Site Collection Administration on the breadcrumb navigation at the top of the page.
    On the Site Settings page, under BCS Solution Galleries, click Application Assemblies.
    On the All Documents page, click Add document. Then in the Upload Document window, click Browse to navigate to the DLL file, and then click OK.
    On the Site Actions menu, click Site Settings.
    On the Site Settings page, under BCS Solution Galleries, click Task panes.
    On the All Documents page, click Add document. Then in the Upload Document window, click Browse to navigate to the task pane file (for example, ContactDetails.xml), and then click OK.
    On the Site Actions menu, click Site Settings.
    On the Site Settings page, under BCS Solution Galleries, click Business data actions.
    On the All Documents page, click Add document. Then in the Upload Document window, click Browse to navigate to the action file (for example, CollabOnAction.xml), and then click OK.

    Step 2: Build the BCS solution

    A BCS solution is a package of downloadable files that enable specific functionality. In this case, the BCS solution contains a collection of files that together enable elements of a Duet workspace to function offline. It includes workspace lists, BCS Solution Task Panes, and BCS Data Actions. When you create a BCS Solution, the resulting objects are called BCS Solution Artifacts.

    To build a BCS solution, you have to follow these steps:

    Configure a setting that will make the workspace available offline in Outlook 2010.
    Add the BCS Solution Task Pane files for the workspace.
    Add the Business Data Action files for the workspace.
    Generate the BCS Solution Artifacts.

    Note If you are unsure of what files to use or where they are located, contact your server administrator.
    Configure a workspace for offline availability

    Open the Customers collaboration space.
    From the Site Actions menu, click Site Settings.
    On the Site Settings page, under Site Actions, click Manage site features.
    On the Features page, locate the BCS Solution Design Feature and click Activate.
    Click Site Settings on the breadcrumb navigation at the top of the page.
    On the Site Settings page, under Duet Enterprise Administration, click Outlook Application Designer.
    On the Outlook Application Designer page, under External Lists, click Contacts.
    On the Outlook settings page, under List Settings, click Outlook Client Settings.
    In the Edit Outlook settings for this external list dialog box, select the Offline this external list to Outlook and Auto generate Outlook forms check boxes and click OK.
    (Optional) Repeat steps 7 to 9 for configuring another workspace.

    You are ready to upload the task pane files for the workspace.
    Upload the Business Data Task Pane files for the workspace

    Note If you are unsure of what files to use or where they are located, contact your server administrator.

    On the Outlook settings page, under Task Panes, click Add from Business Data Task Panes Gallery.
    In the Add task pane page, do the following:

    In Select a task pane, select a task pane from the available task panes.
    In Display properties, enter a display name and a tool tip for the task pane. A tool tip is the text that appears when you hover over the task pane in Outlook 2010.
    In Default task pane, select Make this the default task pane if you want to make the selected task pane as the default task pane.
    Click OK.
    (Optional) Repeat the previous steps to upload additional task panes.

    Note If you do not see any task panes listed, it might mean that your site administrator has not uploaded the task pane files to the site collection. Contact your site administrator.

    You are now ready to upload the action files for the workspace.
    Upload the Business Data Action files for the workspace

    On the Outlook settings page, under Business Data actions, click Add from Business Data Actions Gallery.
    On the Add business data actions page, do the following:

    In Select a business data action, select an action from the available actions.

    Note If you do not see any actions listed, it might mean that your site administrator has not uploaded the action files to the site collection. Contact your site administrator.

    In Display properties, enter a display name Open Customer Workspace and a tool tip for the action. The tool tip text appears when you hover over the task pane in Outlook 2010.
    Click OK.
    In Map business data action parameters, select a field from the dropdown menu of entity fields.
    Click OK.
    (Optional) Repeat steps 25 and 26 for adding more action files.

    Generate the BCS Solution Artifacts

    The next step is to generate the BCS Solution Artifacts. A BCS Solution Artifact is a software object that collects elements of the solution into a logical unit that the system can process.

    On the Outlook settings page, click Back to the Outlook Application Designer page.
    Click Generate BCS Solution Artifacts.
    Click OK when you get a message that the operation is successfully completed.

    Step 3: Generate the BCS Solution and open in Outlook 2010

    Once you have generated the BCS Solution Artifact, you or other users with the necessary permissions can generate the BCS Solution and download the solution in Outlook 2010.

    On the Site Actions menu, click Generate BCS Solution.
    On the Generate BCS Solution page, in Certificate, select a certificate, and then click OK.

    Note If the OK button is not available, it means that the farm administrator has not uploaded the necessary certificates to the Trusted Publishers and Trusted Root Certification Authorities stores in the farm. Contact your server administrator for further assistance.

    Click OK in the Web page to confirm when the operation completes successfully.

    Duet Enterprise opens the All Documents page, where you can download the solution in Outlook 2010. In the All Documents page, you can even manage permissions for the solution. This means you can add users who can download the solution in Outlook 2010, or even remove users.
    Download the solution in Outlook 2010

    On the Site Actions menu, select Download BCS Solution. Click Allow.
    On the Microsoft Office Customization Installer dialog box, click Close.

    The Contacts list now opens automatically in Outlook 2010. In Outlook 2010, you can view and update contact details, email contacts, or open a customer workspace corresponding to a contact.

    Follow these steps to work with contacts:

    In Outlook 2010, double-click a contact in the contacts list.
    On the contact details window, click the Duet Enterprise tab, and click View SAP actions. The View SAP actions option displays the task pane and action that we added in the earlier steps.

    View SAP actions

    Do one of the following:

    Click Show Details Task Pane to view the contact details task pane. The task pane displays the contact’s full name and the title. By default, the task pane is docked to the contact details window, and this position might prevent you from viewing the full details. You can undock it by clicking the dropdown appearing next to Customers, and then clicking Move.

    Customers task pane in Outlook 2010

    Customers task pane in Outlook 2010

    Click Open Customer Workspace to open the customer workspace on the Duet Enterprise Web site for the selected contact.

    Each time you open Outlook 2010, a synchronization window opens automatically to show that Outlook 2010 is synchronizing with the workspace on the Duet Enterprise Web site.

    Developing for the future – How to write code in VS 2010 for Web Parts, that are compatible with the App model of SharePoint 2013

    The sample demonstrates how to develop code that works in SharePoint 2010 and also as a SharePoint 2013 App. The goal is to show you how to develop a SharePoint web part and event receiver that can be packaged as traditional solutions or as apps. Whether you’re ready for the new App model or not, it’s not too early to start developing in a new way that works on premises or online, today or tomorrow.

    This sample focuses on a Provider-hosted app that runs in an external ASP.NET site – and that can be packaged
    to run in SharePoint 2010 as a Visual Web Part and Event Receiver as well as in SharePoint 2013 as an app.
    •This posting is the SharePoint 2010 Solution
    •The posting you are viewing now is the SharePoint 2013 app

    Whether packaged as a SharePoint solution or app, the sample assists users in locating and creating SharePoint sites. It begins by displaying a list of child sites, and then can present a form that allows the user to create a new child site using a web template.

    Building the Sample

    There are two related samples. MSDN Code Gallery would not allow posting them together because it only allows one posting in each language, and thinks the samples are written in C# due to the Visual Studio project type. (In reality, it’s a blend of C# and Javascript!) The Location Mapping Solution requires a SharePoint 2010 development machine using Visual Studio 2012. The App requires a SharePoint 2013 development machine using Visual Studio 2012.

    Description

    A detailed artcile explaining this sample is available at http://blogs.msdn.com/b/bobgerman/archive/2013/10/08/future-proof-solutions-part-2-sharepoint-2010-solutions-that-become-provider-hosted-apps.aspx.

    BCS Solution Packaging Tool

    Resource Page Description

    735240_BCSSolutionPackagingTool48  http://archive.msdn.microsoft.com/odcsps14bcsgnrtrtool/Release/ProjectReleases.aspx?ReleaseId=4352
    The Business Connectivity Services (BCS) Solution Packaging Tool is intended for Power Users and Developers of Microsoft Business Connectivity Services solutions.

    With this tool you can create:
    – Intermediate Declarative Solutions (for Microsoft Outlook 2010)
    – Advanced Code-Based Solutions (utilizing a Solution Manifest, for Microsoft Outlook 2010)
    – Data Solutions (for use with Microsoft Office Professional Plus 2010 Add-Ins)

    This tool includes a help file.

    NEW
    A sample solution has been added to the Downloads page (click “Sample Solution” in the Releases navigation at the right side of the page).

    NEW
    The tool now has an option to validate the artifacts and their connections before packaging. This option is on by default, but can be turned off to speed up the packaging process.

    SharePoint Samurai